This step by step woodworking project is about farmhouse rolling cabinet plans. This article features detailed instructions for building a simple wooden rolling cabinet. We have designed the plans to keep the expenditures under control and to involve the least amount of work possible. These are the easiest farmhouse cabinet plans you will find on internet.
When buying the lumber, you should select the planks with great care, making sure they are straight and without any visible flaws (cracks, knots, twists, decay). Use a spirit level to plumb and align the components, before inserting the galvanized screws, otherwise the cabinet won’t have a symmetrical look. If you have all the materials and tools required for the project, you could get the job done in about a day. See all my Premium Plans HERE.
Projects made from these plans
It’s that simple to build a rolling cabinet!
Rolling Cabinet Plans
Building a rolling cart
Cut & Shopping Lists
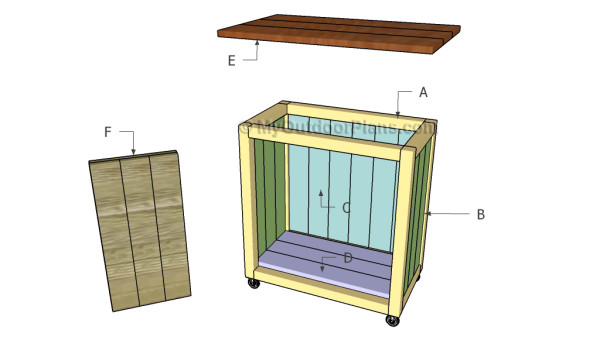
- A – 4 pieces of 2×2 lumber – 24 1/4″ long, 4 pieces – 10 1/2″ long FRAME
- B – 3 pieces of 1×4 lumber – 21 1/4″ long 2xSIDES
- C – 6 piece of 1×4 lumber – 21 1/4″ long FACE
- D – 3 piece of 1×4 lumber – 22″ long BOTTOM
- E – 3 piece of 1×6 lumber – 27″ long TOP
- F – 4 pieces of 1×4 lumber – 21″ long, 2 pieces of 1×2 lumber – 18″ long, 2 pieces – 10 1/2″ long 2xDOORS
- 2 pieces of 2×2 lumber – 8 ft
- 7 pieces of 1×4 lumber -8 ft
- 1 piece of 1×6 lumber – 8 ft
- 2 pieces of 1×2 lumber – 8 ft
- 2 1/2″ pocket screws
- filler, stain
- glue
Tools
![]() Hammer, Tape measure, Framing square, Level
Hammer, Tape measure, Framing square, Level
![]() Miter saw, Drill machinery, Screwdriver, Sander
Miter saw, Drill machinery, Screwdriver, Sander
Time
![]() One day
One day
How to build a rolling cabinet
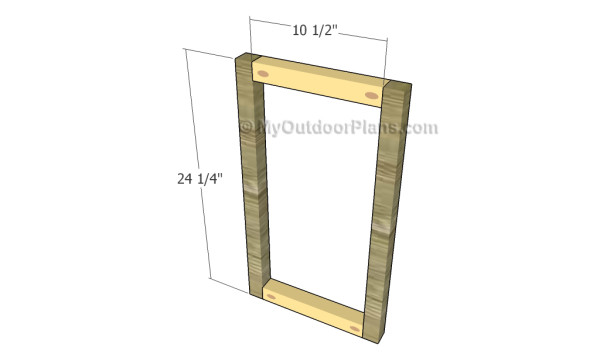
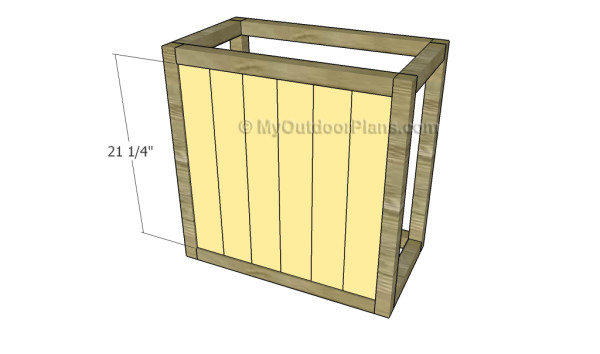
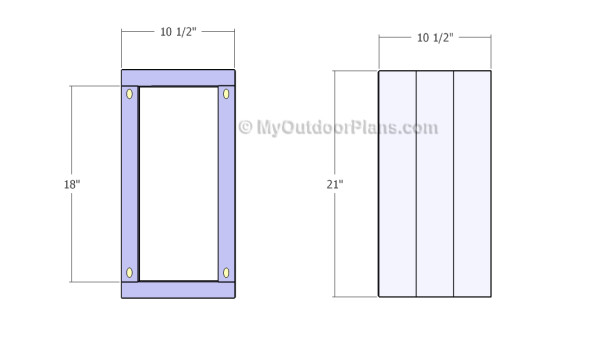
Building the side frames
The first step of the woodworking project is to build the side frames for the cabinet. Drill pocket holes at both ends of the short components and insert 2 1/2″ screws into the vertical supports. Add glue to the joints and make sure the corners are square.
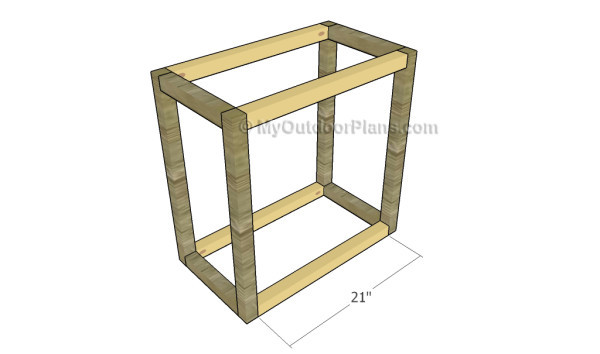
Assembling the frame
The next step of the project is to assemble the box frame for the cabinet. Drill pocket holes at both ends of the components and secure them to the sides using 2 1/2″ pocket screws.
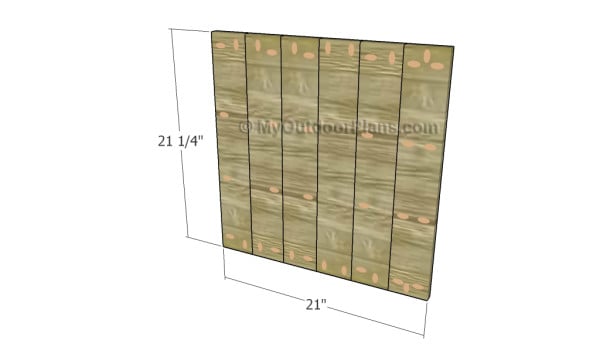
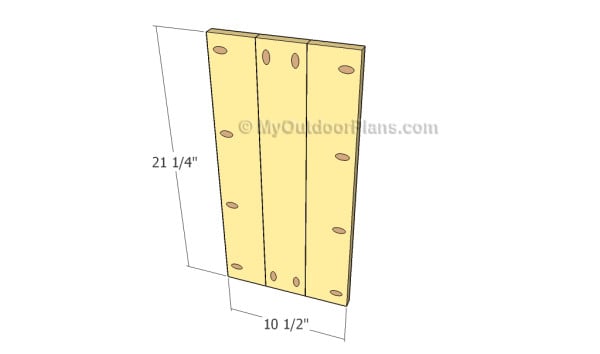
Building the front panel
Build the front panel for the cabinet using the information described in the diagram. Drill pocket holes and add glue to the joints before clamping the slats together tightly. Make sure the edges are aligned and leave no gaps between the components.
Fitting the front front panel
Fit the panel to the front of the cabinet. Recess the panel 1/4″ from the front face of the cabinet. Insert 1 1/4″ screws through the panel into the frame of the rolling cabinet.
Building the side panels
Build the side panels out of 1×4 slats. Drill pocket holes and glue the slats together tightly. You can secure the slats together only with glue or use pocket holes too. Align the edges with attention before inserting the 1 1/4″ screws.
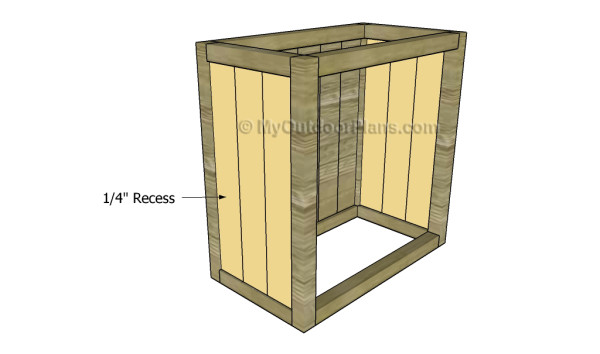
Fitting the side panels
Fit the panels to the frame and lock them into place using 1 1/4″ screws. Add glue to the joints and make sure the panels are 1/4″ recessed.
Attaching the bottom slats
Glue the three slats together and clamp them tightly. Fit the 1×4 slats to the bottom of the cabinet and secure them into place using brad nails. Make sure you leave no gaps between the components for a professional result. Smooth the surface with sandpaper.
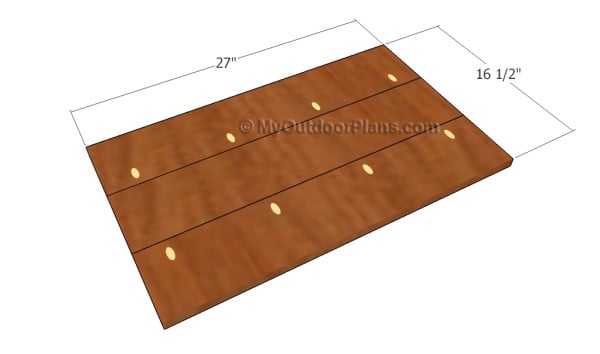
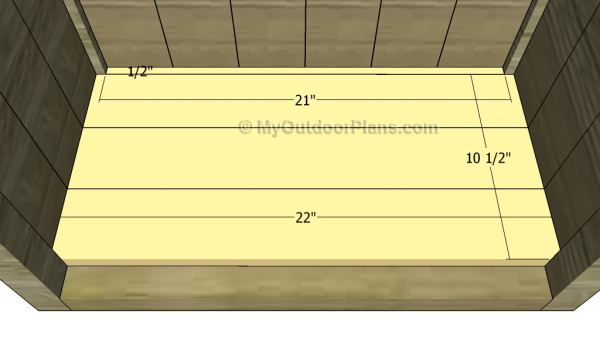
Building the tabletop
Build the top for the cabinet out of 1×6 lumber. Drill pocket holes though the slats, as described in the diagram. Add glue to the joints and clamp them together before inserting the 1 1/4″ screws. Smooth the edges with fine-grit sandpaper.

Attaching the tabletop
Center the frame of the cabinet to the tabletop and insert 2″ screw through the frame. Add glue to enhance the bond of the components.
Building the doors
Build the door panels out of 1×4 slats glued together. Build the frame for the doors out of 1×2 slats. Assemble the frame together with pocket screws and secure it to the panels using glue and finishing nails. Smooth the surface with sandpaper and leave no gaps between the components.
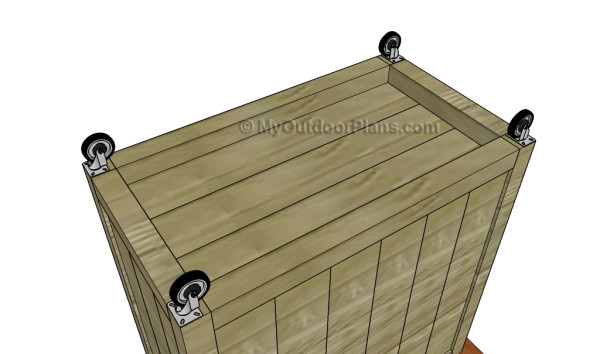
Attaching the caster wheels
Fit 2″ caster wheels to the bottom of the cabinet, as described in the diagram. Use screws to secure the wheels to the frame of the rolling cabinet.
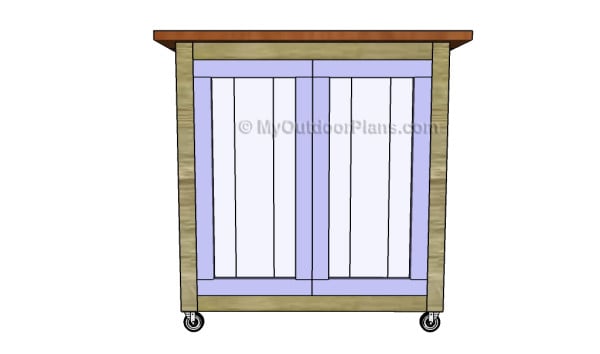
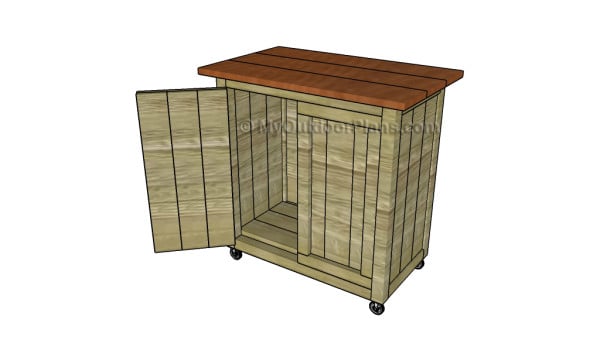
Fitting the doors
Fit the doors to the opening, as shown in the diagram. Use a planer to skim the width of the door, otherwise they won’t open easily. Secure the doors to the vertical supports using hinges.
Rolling cabinet plans
One of the last steps of the woodworking project is to take care of the finishing touches. Therefore, fill the pilot holes with wood putty and smooth the surface with 120-grit sandpaper.
Top Tip: If you want to enhance the look of the project and to protect the wooden nightstand from decay, we recommend you to cover the components with paint or stain.
This woodworking project was about farmhouse cabinet plans. If you want to see more outdoor plans, we recommend you to check out the rest of our step by step projects. LIKE us on Facebook and Google + to be the first that gets out latest projects and to hep us keep adding free woodworking plans for you.
EXPLORE MORE IDEAS FOR:
 |
 |
 |
 |