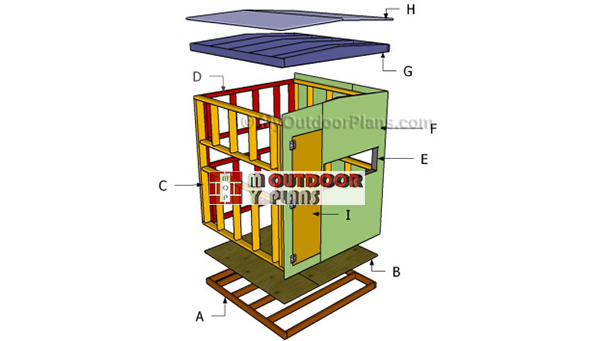
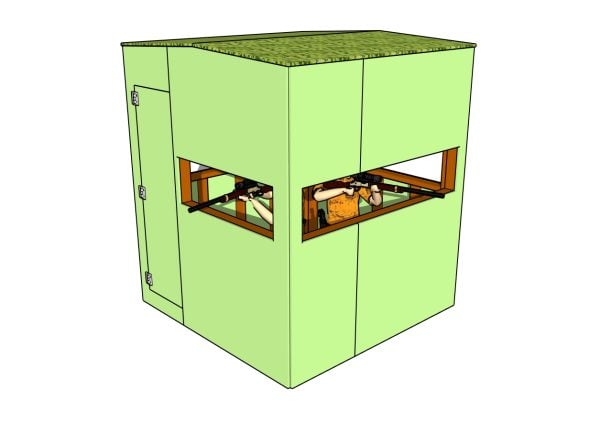
This step by step project is about a 6×6 deer blinds plans. This article features detailed plans for building a 6×6 deer blind using common materials and tools. The structure is sturdy enough to support several persons and have windows on all side. Make sure you study the related plans, as there are several options to choose from when starting the final assembly. Check out our plans for a 4×8 deer blind, as well.
Building a 6×6 deer blind offers some fantastic benefits for all you hunting enthusiasts. It provides a sturdy, comfortable, and concealed spot for observing wildlife, giving you the upper hand during hunting season. Plus, it’s a fun woodworking project that enhances your hunting experience and helps you blend seamlessly into the environment.
There are several aspects that any person should take into account before starting the woodworking project. First of all, you need to use weather-resistant lumber, such as cedar, pine or redwood. Drill pocket holes at both ends of the components, if you want to lock them together tightly. In addition, add wood glue to the joints and check if the corners are right-angled. Plan everything from the very beginning, if you want to get a professional result. See all my Premium Plans HERE.
Projects made from these plans
It’s that simple to build a 6×6 deer blind!
Deer Blind Plans
Building-a-deer-blind
Cut & Shopping Lists
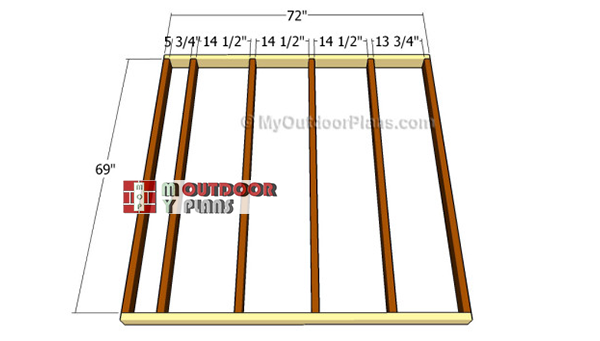
- A – 2 pieces of 2×4 lumber – 72″ long, 6 pieces – 69″ long JOISTS
- B – 1 piece of 3/4″ plywood – 48″ x 72″ long, 1 piece – 24″x72″ long FLOOR
- C – 2 pieces of 2×4 lumber – 72″ long, 2 pieces – 65″ long, 4 pieces – 72″ long, 4 pieces – 22 1/2″ long, 4 pieces – 32 1/2″ long 2xSIDES
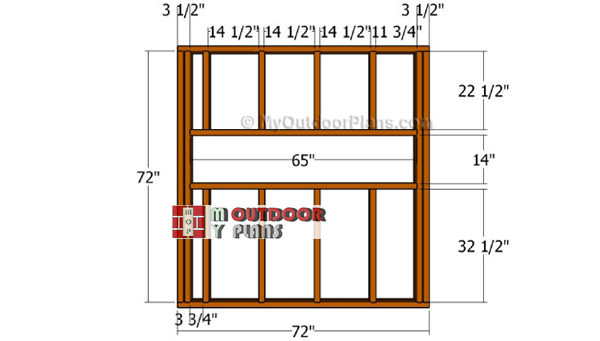
- D – 2 pieces of 2×4 lumber – 65″ long, 2 pieces – 72″ long, 2 pieces – 62″ long, 4 pieces – 22 1/2″ long, 4 pieces – 32 1/2″ long FRONT
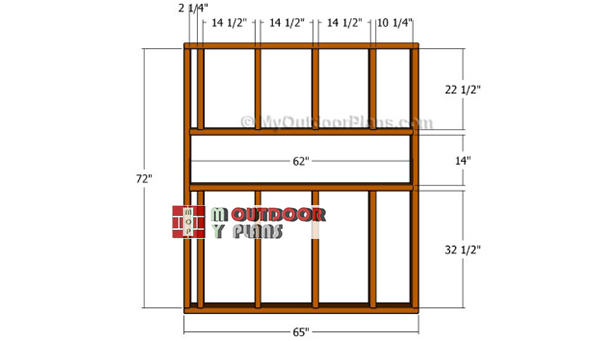
- E – 2 pieces of 2×4 lumber – 65″ long, 3 pieces – 72″ long, 2 pieces – 41 1/2″ long, 2 pieces – 22 1/2″ long, 2 pieces – 32 1/2″ long BACK
- F – 2 pieces of 3/4″ plywood – 48″x82 3/4″ long, 2 pieces – 24″x82 3/4″ long, 2 pieces – 48″x84 3/4″ long, 2 piece – ” 24″x83 3/4″ long WALLS
- 50 pieces of 2×4 lumber – 8′
- 8 pieces of 3/4″ plywood – 4’x8′
- 500 pieces of 1 5/8″ screws
- 500 pieces of 2 1/2″ screws
- brackets for stand
Tools
![]() Hammer, Tape measure, Framing square
Hammer, Tape measure, Framing square
![]() Miter saw, Drill machinery, Screwdriver, Sander
Miter saw, Drill machinery, Screwdriver, Sander
Time
![]() One day
One day
Related
- Part 1: Deer Blind Plans
- Part 2: Building a deer blind roof
Building a deer blind
Building-the-floor-frame-6×6
The first step of the woodworking project is to build the frame of the floor. In order to get the job done in a professional manner, we recommend you to cut the joists out of 2×4 lumber. Cut the components at the right size and smooth the edges with sandpaper.
Drill pilot holes through the perimeter joists and insert 2 1/2″ galvanized screws into the regular joists. Make sure the corners are square and place the joists equally-spaced.

Attaching the floor
The next step of the woodworking project is to attach the plywood sheets over the floor frame. Cut the 3/4″ plywood sheets at the right size and secure the edges with sandpaper.
Top Tip: Make sure the edges are flush and drill pilot holes before inserting the 1 1/4″ screws, to prevent the wood from splitting. Insert the screws along the joists every 8″ and leave no gaps between the sheets.
Building-the-side-wall-frames
Continue the project by building the side walls. In order to get a professional result, we recommend you to cut the component out of 2×4 lumber. Drill pilot holes through the plates and insert 2 1/2″ screws into the studs.
Makes sure the corners are square and leave no gaps between the components. Plumb the studs with a spirit level and make sure the plates are horizontal. Frame the windows as in the diagram.

Fitting the side walls
The next step of the outdoor project is to secure the side walls to the floor of the deer blind. Ask a friend to move the walls to the floor and secure them temporarily with braces, after plumbing them with a spirit level.
Top Tip: Drill pilot holes through the bottom plates and insert 3 1/2″ screws into the joists. Leave no gaps and make sure the walls frames are flush with the floor.
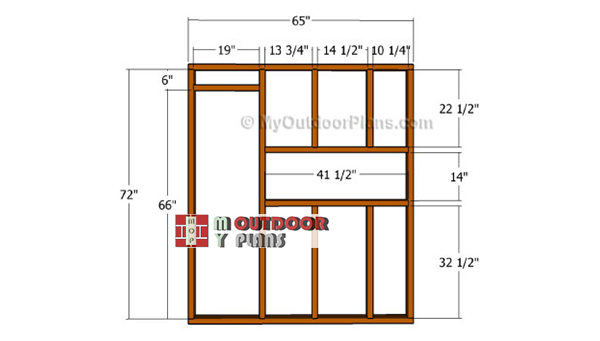
Building-the-front-wall-frame
The next step of the project is to build the front wall of the deer blind. As you can notice in the diagram, we recommend you to build the components out of 2×4 lumber. Drill pilot holes through the plates and insert 2 1/2″ screws into the studs.
Make sure the corners are right-angled and leave no gaps between the components. Frame the window for the deer blind and make adjustments if necessary.
Building-the-back-wall-frame
One of the last steps of the framing project is to build the back wall of the deer blind. In order to have access to the hunting blind, we recommend you to frame the door, as described in the diagram.
Work with attention and check if the corners are square. Drill pilot holes through the components before inserting the screws, to prevent the wood from splitting. Leave no gaps between the components.

Assembling the frame of the blind
The next step of the woodworking project is to attach the front and back walls to the floor of the deer stand. As you can easily notice in the diagram, we recommend you to make sure the corners are right-angled.
Drill pilot holes and secure the adjacent walls together, by inserting 2 1/2′ screws. Drill pilot holes through the plates and insert screws into the joints. Use braces to lock the walls together tightly.

Attaching the side walls
After assembling the frame of the 6×6 deer stand together, we recommend you to attach the exterior walls to the structure. Mark the cut lines over the 3/4″ plywood sheets and get the job done with a circular saw.
Smooth the cut edges with sandpaper and remove the residues with a vacuum. Drill pilot holes and secure the sheets to the frame using 1 1/4″ screws, along the studs and plates.

Fitting the front wall
Next, attach the plywood sheets to the face of the 6×6 deer stand. In order to get a professional result, we recommend you to leave no gaps between the components and to cut the top at an angle. Smooth the edges with sandpaper before locking them to the structure.

Fitting the back wall
Afterwards, attach the exterior walls to the back of the structure. Make the cuts to the 3/4″ plywood sheets and align them into place, as described in the diagram. Smooth the edges with sandpaper and secure it into place by using 1 1/4′ galvanized screws.

Deer blind plans
Last but not least, you should take care of the finishing touches. Therefore, fill the holes with wood putty and let the compound to dry out for several hours. Smooth the surface with medium-grit sandpaper along the wood grain.
After building your 6×6 deer blind, you can really customize it with some awesome add-ons. Consider adding insulated walls and windows for extra comfort during those chilly hunting trips, or even a small heater to keep you warm. You can also install shelves and hooks for gear storage, making your blind not only more functional but also more convenient for extended stays.
Deer blind plans
Let’s break down the cost for building a 6×6 deer blind. You’re looking at around $500 to $750 for the basic materials, depending on the quality of wood and insulation you choose. If you want to add extras like windows, a heater, and shelving, you might need to budget an additional $100 to $200. This estimate should give you a good ballpark to plan your project and make it as comfortable as possible!
Top Tip: Apply several coats of stain or paint to enhance the look of the deer stand and to protect the components from decay. Check out the rest of the projects to see how to build the roof and the door.
This project was about free deer blind plans. If you want to see more outdoor plans, we recommend you to check out the rest of the projects. Don’t forget to share our projects with your friends, by using the social media widgets. Submit your projects to inspire other readers.

EXPLORE MORE IDEAS FOR:
 |
 |
 |
 |
37 comments
Just wanted to point out that on part E of materials it says that you need 2 pcs @ 65″ and 3 pcs at 65″. After looking over the image of the layout for E it looks like it should be 2 pcs at 65″ and 3 pcs @ 72″. I believe this is right please correct me if I’m wrong.
Also looks like step E only needs 2-22.5″ and 2-33.5″ instead of the 3-22.5″ and 3-32.5″ as stated in materials. Thanks for the plans they’re great! Just trying to make sure that I get all the correct cuts.
Thank you for pointing that out. I made the adjustments to the cut list. I always recommend that the people using my plans should also take a look over the measurements in the diagrams before making the cuts, as these small typing errors are inherent. I am looking forward to seeing the end result of your work!
Pretty much finished. Just have to put the tarp on and it’s good to go! Thanks for the plans it came out great. Plan to put an actual roof on it before next season.
thanks for the plans. I’m in the process of building it right now.
That’s great! Good luck and I’m looking forward to seeing how it goes for you. Keep me updated with the progress.
Do you have a pdf for the 6X6. I am unable to print these from the site
You can print the plans or save them as a PDF file using the floating green widget on the left side of the screen (working only on desktop, not on mobile). The green widget has a printer icon.
How heavy is it
Unfortunately I have no answer to your question. Maybe someone who built this project is willing to help…
Where can I download these plans? I do not see a way to do it on here? I would like to have them and not have a computer in my garage to do it.
Thank you,
Kevin
Please read the FAQs: http://myoutdoorplans.com/faq/
Thank you!
How much will this cost to build, including the roof?
The cost of materials vary according to location. You have the materials list so you can easily add up the costs for each item.
Going to try this out. Just bought the wood at Lowes last night and got it all measured and cut. Laid the platform out and the spread of joists. Ready to screw together. Thank ya.
Good luck with the project and don’t forget to let me know how it comes out. It would be awesome if you take a few pics as well.
How much was the materials at Lowes Gary?
Hello
I love this plan. I am going to build it for next season.
Question Though! Is there a reason for the plywood siding not lining up on stud for support?
Let me know if I’m missing something
Where doesn’t it line up on the studs?
What about the roof is it flat or will it have some pitch to it for the water to run off? Thanks
It has a pitch. It’s not a flat roof.
Was reading through the material list, and was wondering what the metal connectors were? What are they used for?
To secure the rafters to the frame (rafter ties).
HOW DO WE GET THE PLAN FOR THE DEER STAND
Please read the FAQs: http://myoutdoorplans.com/faq/
These plans are amazing I am on Step C right now. Doing it for a School Shop project.
Thank you. Let me know how it comes out.
Just a very small comment. I want to build this on an elevated platform. This is easy enough using 4×4’s and 2×4’s for bracing. The door opening seems a little small for me. I only weigh 189 pounds but am 17 1/2″ shoulder to shoulder. So 19″ for a door opening on ladder does not leave much room. I will shorten the window on the door side by 4 inches. This will give me plenty of “wiggle room” and still ample room for the shooting window,
Thank for the feedback. Looking forward to seeing your project!
Has anyone tried to put in Plexiglas in teh window frames?
Thomas, great idea. Although a bit expensive. 1/8″x4’x8′ sheet is $150. If you go this route, use a router or table saw to cut a rabbit in the frame to lay the plexiglass in the rabbit. use window glazing push points for holding in place or a piece of wood trim for better security in winds. On the cheap, go with a heavy clear plastic.
The ADA recommends a minimum door width of 32 inches for wheelchair access. Increasing the door width (and maybe adding a window in the door so as not to close that area off from shooting) might make this plan more useful to those thinking about using this as a blind for persons with disabilities.
Thanks for the feedback.
No plans for the rafters for the dear blind.
There is a NEXT button at the end of the article.
I love the plans. I am building my first one now. I am cutting and marking everything at home and then transporting to the field. The walls will be framed at home as well. Final assembly with minimal tools in the field. I made a slight change to my version of the plan. I kept the 2×6 trusses at 96″ I am adding a 2nd truss on each end for a slight overhang. With the longer trusses, the roof will overhang the front and back by 9″ on each. This will give me a little cover from rain and protect the walls. I am going with a rolled roof meant for low sloped roofs. Quick and inexpensive. It’s about $45 at H.D. Use roofing nails and done. I will be adding removable or tilt up covers to the shooting windows as well. Happy hunting all.