This step by step woodworking project is about lean to greenhouse plans. Building a greenhouse attached to your house is a convenient way to store your plants during the winter, or to grow fresh vegetables all the time. After making sure your project complies with the local building codes, you should get all the tools required and buy the materials for the job (miter saw, drill machinery and screwdriver).
Check if the lumber is in a good condition and the slats are perfectly straight, before buying them from the local diy store. Make sure you pre-drill pilot holes in the lumber before inserting the wood screws, to prevent the wood from splitting. Align all the components at both ends, plumb them if necessary and insert the wood screws into place. Work with good judgement and attention, as to get a professional result. See all my Premium Plans HERE.
Projects made from these plans
Cut & Shopping Lists
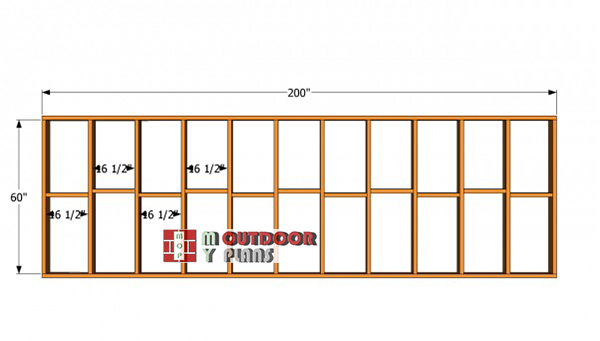
- A – 2 pieces of 2×4 lumber 200”, 12 pieces of 2×4 lumber 60” SMALL WALL
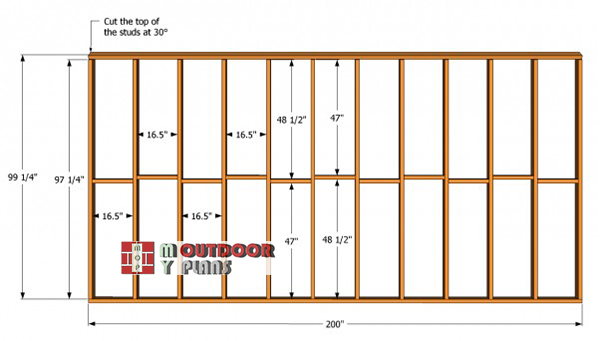
- B – 2 pieces of 2×4 lumber 200” – top end cut at 30º, 12 piece of 2×4 lumber 99 1/4” TALL WALL
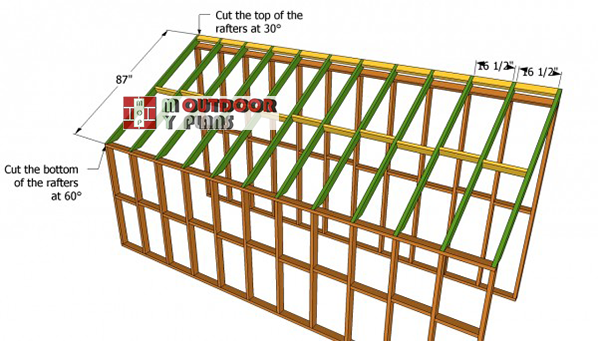
- C – 12 pieces of 2×4 lumber 87” long – one end cut at 30º, the other end cut at 60º RAFTERS
- D – 2 pieces of 2×4 93” – cut at 30º, 2 piece of 74 1/4” – cut at 30º, 2 pieces of 27 1/2” FRONT AND BACK
- D – 3 pieces of 2×4 lumber 24”, 2 pieces of 2×4 lumber 64 1/4, 4 pieces of 10 1/4” FRONT AND BACK
- E – 2 pieces of 2×4 – 69 1/2”, 2 pieces of 2×4 – 24 1/2”, 1 pieces of 2×4 – 17 1/2” DOOR
- F – 2 pieces of 2×2 lumber, 2 pieces of 2×2 lumber VENT
- 4 pieces of 2×4 lumber – 20′
- 32 pieces of 2×4 lumber – 8′
- 12 pieces of 2×4 lumber – 10′
- 1 piece of 2×2 lumber – 8′
- 2 hinges, 1 latch
- vent opener
- 500 pieces of 2 1/2″ screws
- greenhouse film
Tools
![]() Hammer, Tape measure, Framing square
Hammer, Tape measure, Framing square
![]() Miter saw, Drill machinery, Screwdriver, Sander
Miter saw, Drill machinery, Screwdriver, Sander
Time
![]() One weekend
One weekend
Attached greenhouse plans

Build-a-lean-to-greenhouse
Building a small greenhouse, attached to your house is a straight-forward job, if you plan everything from the very beginning. Nevertheless, even it is an appealing idea, we do not recommend you to attach the greenhouse to a timber-built house, as it might damage it over time.
Top Tip: Make sure you study the local building codes, before designing the greenhouse. Buy quality materials, checking if the lumber is perfectly straight and in a good condition.
Lean to greenhouse plans
small-wall-plans
First, you need to build the small wall of the greenhouse. In order to get the job done accurately, you need install the 2×4 studs between the bottom and the top plates. Drill pilot holes trough the plates before inserting the 3” screws.
Top Tip: Use a carpentry square to make sure the corners of the walls are right-angled. Fit the 2×4 filing blocks between the wooden studs, in order to enhance the rigidity of the structure.
Tall-wall-plans
The next step of the project is to build the tall side wall of the lean to greenhouse, using the same techniques described above. As you can see in the image, you should cut the top of the studs at 30º, in order to get a proper slope for the roof.
Make sure the suds are perfectly equal otherwise the greenhouse won’t have a symmetrical look. Fit the top plate on top of the studs and secure them into place with screws. Install 2×4 blockings between the studs, to increase the rigidity of the frame.
Installing-the-rafters-to-lean-to-greenhouse
Afterwards, you need to build the wooden rafters and to fit them into place, making sure they are equally spaced. As you should easily notice in the plans, you have to cut one end of the rafters at 30º and the other end at 60º.
Top Tip: In order to give support to the light construction, you need to cut several blockings and to secure them between the rafters with 3” screws, as in the image.

Front wall plans
Continue the project by building the front and the back faces of the greenhouse, using the free plans. Make sure you leave enough room for a door. In addition, you should reinforce the whole structure with a brace, as to get the job done as a professional.
Drill pilot holes trough the components and lock them into place with 3” galvanized screws. Using regular screws is a mistake, as they will rust quickly.

Installing the door
Building a door for the attached greenhouse is a straight forward job, if use the right plans and tools. Build the frame from 2×4 lumber and secure the components together with 3” screws. Use a carpentry square to make sure the corners are right-angled.
Top Tip: Place the door inside the opening and lock it into place with several hinges. Check if the door is plumb, using a spirit level.

Top window plans
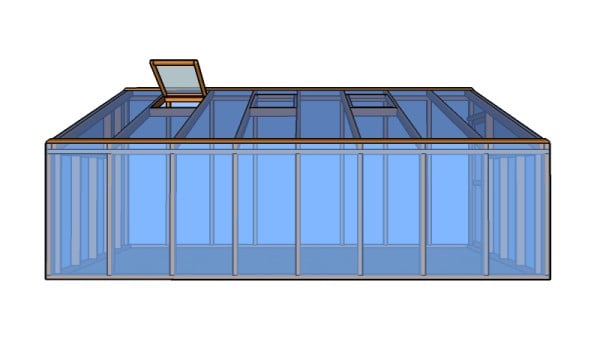
In order to ventilate the lean to greenhouse properly, you need to install several windows, placed between the rafters. In order to get the job done quickly, build the frame of the windows from 2×2 lumber and lock them into place with hinges.
Top Tip: Moreover, you can automate the process, by installing an opener, that will lift the vent if the temperature exceeds a certain level. Make sure the vent opens properly, before continuing the project.
Lean to greenhouse
Install the polyethylene foil on the studs and secure it into place fit fitting 1×2 wooden strips to the frame.

Lean to greenhouse plans
Last but not least, you should take care of the finishing touches. Therefore, fill the head of the screws with a good filler and let it dry out for at least several hours. Afterwards, sand the surface with 120-grit sandpaper, along the wood grain and vacuum the residues.
This article was about small greenhouse plans. If you want to see more plans for your garden, we recommend you to check out the rest of our step by step projects.
EXPLORE MORE IDEAS FOR:
 |
 |
 |
 |
16 comments
how much will the materials cost by them selfs, and then also what is the total price for the whole things at the end?
It all depends on the materials you use and their local cost. Total cost should be between 500 to 1000$.
Many greenhouse plans call for 2×3 instead of 2×4 since there is not a lot of weight being supported. I’m going to attempt to make this using 2×3 to cut down on cost. I’ll let you know how it turns out.
I personally live in an area with heavy winters, so I wanted the structure to be as sturdy as possible. I’m looking forward to seeing how your project comes out.
Thank you so much – you gave first real hope for my lean to greenhouse dream yours looks wonderful
That sounds awesome. Let me know how it goes.
You say; “FREE” Very deceptive. No “floating icon”. No, “PRINT”. No download. EXACTLY, How does one go about getting your, “FREE PLANS”???
I don’t know what is your problem and why you are so impolite and nervous. The print button works just fine. Try using Google Chrome and disable the ad blockers.
Mrs. Merlene, are you working on a desktop? You cannot print from a mobile device.
Nice plans. Thank you for your considerable work. I work in an area with frequent winds (sometimes heavy) and lots of snow in winter. Do you think this 2×4 material will hold that?
Also, I wanted to know if you have any plans for the foundation, and if a small wall is required to avoid water intrusion into the greenhouse from the bottom.
What do I need to build a detached 10×10 lean to greenhouse? Only see plans for 8×10 with comment to modify plan if you want bigger.
What needs to be done for adding 2 ft width without affecting integrity of greenhouse?
I’m curious why there needs to be a wall against the brick wall. My garage has a brick south facing wall that I would like to build a greenhouse against. I was thinking I could just bolt something like 2 by 12 board to the brick with big masonry bolts. Then use that as the stud to attach the rafters to. Wouldn’t this work?
I need architectural plans to build a 8’x 30′ wood/polycarbonate lean to greenhouse. I am attaching it to a concrete structure.
Just to avoid mistakes: the measures are in feet, inches etc., right?
(I’m visiting site from Italy)
Yes, imperial measurements
Hello. I need a lean-to greenhouse that measures 12×16. The attachment location is 8’10” from the finished surface.