This step by step diy project is about free raised garden bed plans. If you want to grow vegetables in your garden even in the cold season, you should pay attention to this article. Building a garden bed is not enough to ensure the plants are proper climate during the cold night, so you should also install light hoop frames and put polyethylene film. Work with attention, after reading all the instructions and tips.
First, you need to remove the weeds and lay out the garden bed, using string and batter boards. Next, you need to dig in the ground about 3-5”. You can improve the drainage of the soil by putting a 2” thick layer of gravel. Fill the bed with soil and cover the surface with weed-suppressing fabric, making sure the materials also extends to the walls of the wooden structure. We strongly recommend you to use weather-resistant lumber, such as pine, cedar or redwood. See all my Premium Plans HERE.
Projects made from these plans
Cut & Shopping Lists
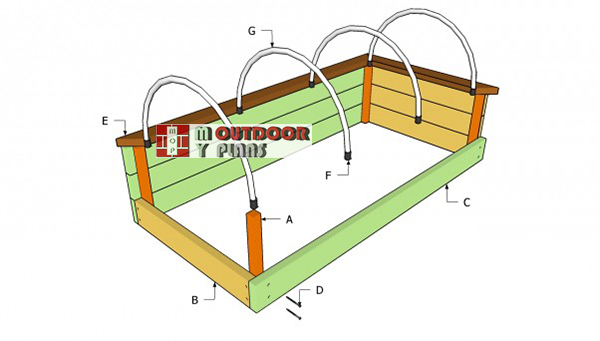
- A – 4 pieces of 2×2 lumber – 16 1/2” long CORNER POSTS
- B – 6 pieces of 2×6 lumber – 33” long FRONT AND BACK WALLS
- C – 6 pieces of 2×6 lumber – 72” long SIDE WALLS
- D – 50 pieces of 3” wood galvanized screws SCREWS
- E – 2 pieces of 2×4 lumber – 73” long, 2 pieces of 2×4 lumber – 37” long, both ends cut at 45º TRIMS
- F – 8 pieces of 1” PVC pipes – 8” long, 8 pieces of galvanized pipe straps SUPPORTS
- G – 4 pieces of 1/2” PVC tubing – 6” long HOOP FRAMES
- 100 pieces of 2 1/2″ screws
- 2″ brad nails
- wood glue, stain/paint
- wood filler
- landscape fabric
- drip irrigation
Tools
![]() Hammer, Tape measure, Framing square
Hammer, Tape measure, Framing square
![]() Miter saw, Drill machinery, Screwdriver, Sander
Miter saw, Drill machinery, Screwdriver, Sander
Time
![]() One weekend
One weekend
Related
Building a raised garden bed
Garden-raised-bed-plans
Building a simple raised garden bed will provide fresh vegetables even in wintertime. If you also install a light hoop frame on top of the raised bed, it will be easy to raise the temperature with several degrees.
Top Tip: Don’t forget to remove the cover on warm days, otherwise the sun will literally bake the plants. In addition, you should check the plants constantly, even if the cover ensures protections against insects.
Free Raised Garden Bed Plans
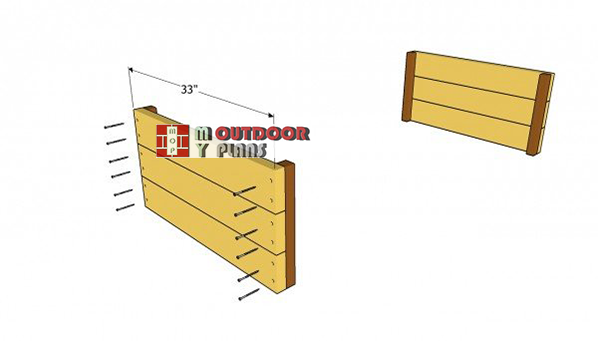
Building-the-front-and-back-panels
The first step of the project is to build the front and back walls of the raised bed. As you should notice in the image, you just have to lay the corner posts on a level surface, align them thoroughly and to attach the 2×6 slats.
It is essential to check the corners for squareness, using a carpentry square, otherwise the garden bed wouldn’t have a neat look. Remember that there shouldn’t be any gaps between the 2×6 slats.
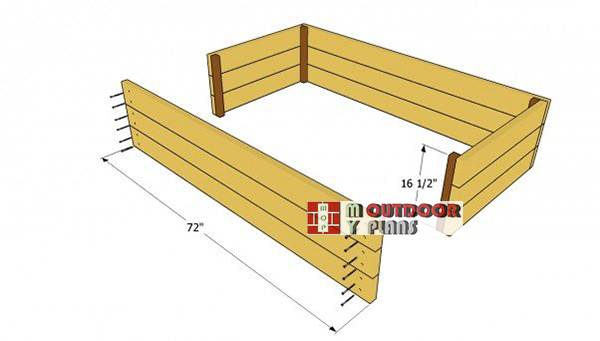
Fitting-the-side-walls
The next step is to attach the side slats. Attach the 6′ long slats to the corner posts, after plumbing the front and the back faces with a spirit level. In order to get the job done as a professional, you need to drill pilot holes trough the slats and to drive in 3” galvanized screws.
Top Tip: After attaching the side walls, you need to make sure the corners of the raised bed are right-angled. Use a carpentry square to get accurate results.

Attaching the trims
In order to enhance the look of the wooden garden bed and to hide the edges of the walls, you could attach 2×4 trims. As you can see in the image, you have to miter cut the ends of the trims at 45º. Protect the wood from decay, using appropriate products.
If you fit these cap railings, you will have a nice place to sit when harvesting or weeding. Use a level to check if the components are horizontal.

Installing the hoop frame supports
Adding a cover to the plants will allow you to grow the plans even in the wintertime. Nevertheless, the first step is to install 1” PVC pipes along the sides of the garden bed. After fitting the 8” long supports in the soil, you need to secure them to the cap railing with galvanized pipe straps. Make sure the frame is rigid, before filling the bed with soil.
Top Tip: Place the supports every 12-16” along both sides of the wooden bed.

Installing the hoop frames
Next, you need to make the hoop frames from 1/2” PVC tubing. The tubing is so flexible that you could easily bend the to curve. In order to build the arches, you should cut the pieces at about 6′.
Top Tip: Fit the ends of the hoop frames in the supports and plumb them with a spirit level. Afterwards, cover the structure with polyethylene film. When the weather is warm, make sure ventilated the plants.

Free raised garden bed plans
Last but not least, you should take care of the finishing touches. Therefore, make sure the hoop frames are plumb and equally spaced. You could cover the raised bed with polyethylene film, to raise the air and soil temperature.
Top Tip: If you want to save yourself from work, you should install a simple drip-irrigation system. The drip emitters will deliver water to the plants roots constantly, so you just have to wait until the first harvest.
This woodworking project was about free raised garden bed plans. If you want to see more outdoor plans, check out the rest of our step by step projects and follow the instructions to obtain a professional result.
EXPLORE MORE IDEAS FOR:
 |
 |
 |
 |