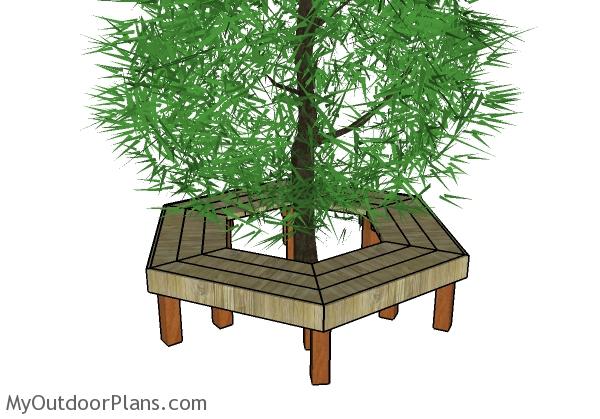
This step by step diy project is about tree bench plans. If you are trying to make an upgrade to your garden design, building a hexagonal bench around a tree might be the right choice. In this tutorial, I show you free plans on how to build the tree bench using common materials and super basic tools. You can even get the job done with hand tools! Take a look over the rest of my woodworking plans, if you want to get more building inspiration. Premium Plans available for this project in the Shop.
When buying the lumber, you should select the planks with great care, making sure they are straight and without any visible flaws (cracks, knots, twists, decay). Investing in cedar or other weather resistant lumber is a good idea, as it will pay off on the long run. Use a spirit level to plumb and align the components, before inserting the galvanized screws, otherwise the project won’t have a symmetrical look. If you have all the materials and tools required for the project, you could get the job done in about a day. See all my Premium Plans HERE.
Projects made from these plans
Tree Bench Plans
Building-a-tree-bench
Cut & Shopping Lists
- A – 12 pieces of 4×4 lumber – 18″ long LEGS
- B – 12 pieces of 2×4 lumber – 17″ long BRACES
- C – 6 pieces of 2×6 lumber – 41″ long, 6 pieces – 34 3/4″ long, 6 pieces – 28 1/4″ long SEAT SLATS
- D – 6 pieces of 1×6 lumber – 41 3/4″ long TRIMS
- 2 pieces of 4×4 lumber – 10′
- 2 pieces of 2×4 lumber – 10′
- 8 piece of 2×6 lumber – 10′
- 3 pieces of 1×6 lumber – 8′
- 2 1/2″ screws, 3 1/2″ screws, 1 5/8″ screws
- 4d nails, 16d nails
- wood filler , wood glue, stain/paint
Tool
![]() Hammer, Tape measure, Framing square, Level
Hammer, Tape measure, Framing square, Level
![]() Miter saw, Drill machinery, Screwdriver, Sander
Miter saw, Drill machinery, Screwdriver, Sander
Time
![]() One day
One day
Related
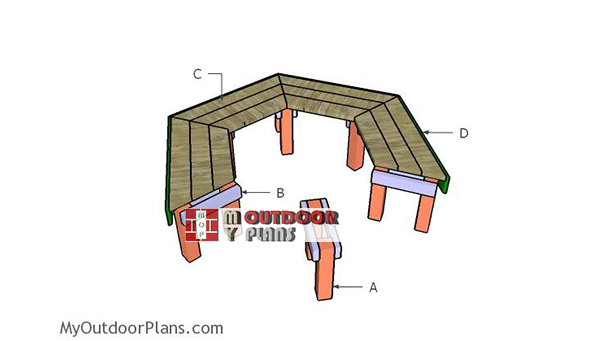
How to build a bench around a tree
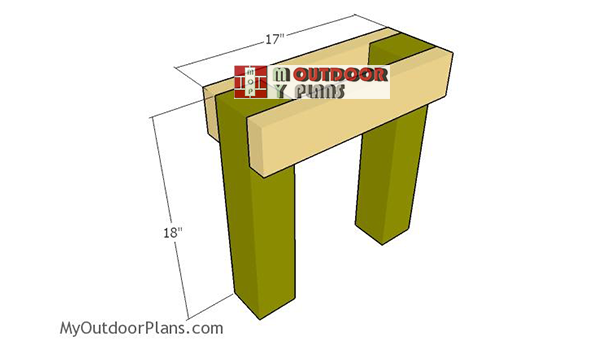
Building-the-legs
The first step of the project is to build the legs for the tree bench. Cut the legs from 4×4 lumber and then attach the 2×4 lumber supports. Align the edges flush, drill pilot holes and insert 3 1/2″ screws, so you can assemble the base parts.
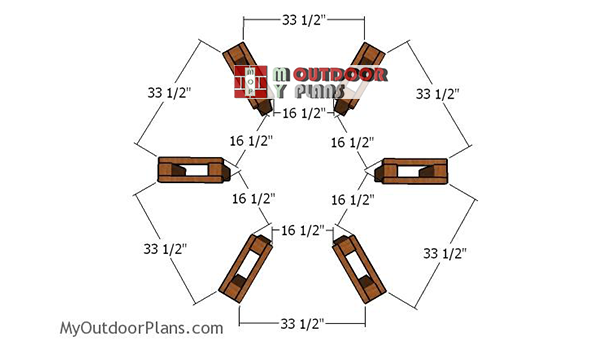
Laying-out-the-legs
After building the legs for the bench around a tree, you need to lay them around the trunk. Remember that the final alignment will be made when fitting the seat slats to the legs. This is a rough sketch, so you can understand where the legs will be located under the tree bench.
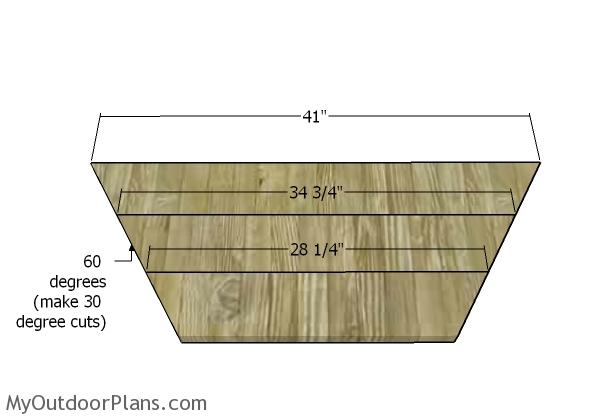
Building the seat slats
Use 2×6 lumber for the seat slats. Make 30 degree cuts to both ends of the slats and then smooth the edges with 120-220 grit sandpaper.
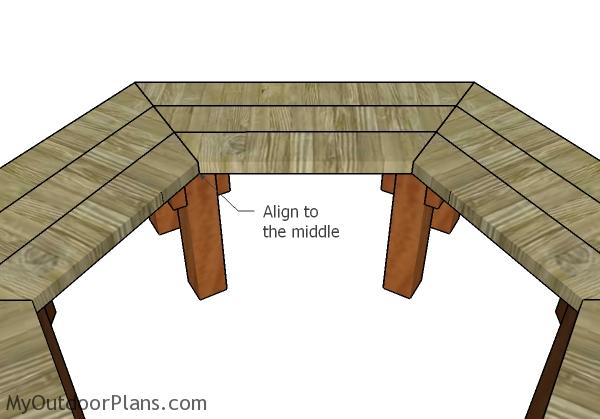
Fitting the seat slats
Fit the slats over the legs and then leave no gaps between them. As you can easily see in the diagram, you need to make sure the joints between the seat slats fall to the middle of the legs. Drill pilot holes and then insert 2 1/2″ screws into the 2×4 braces.

Fitting the bench trims
After installing all the seat slats, you need to attach the 1×6 trims to the front of the hexagonal tree bench. Make 30 degree bevel cuts to both ends of the trims and then lock them into place with 2″ brad nails or 1 5/8″ screws. Leave no gaps between the components.
DIY tree bench plans
Last but not least, you need to take care of the finishing touches. Fill the holes with wood putty and then smooth the surface with 120-220 grit sandpaper, after the fill gets dry. Apply a few coats of paint or stain over the components, so you can protect the components from decay and to enhance the look of the tree bench.
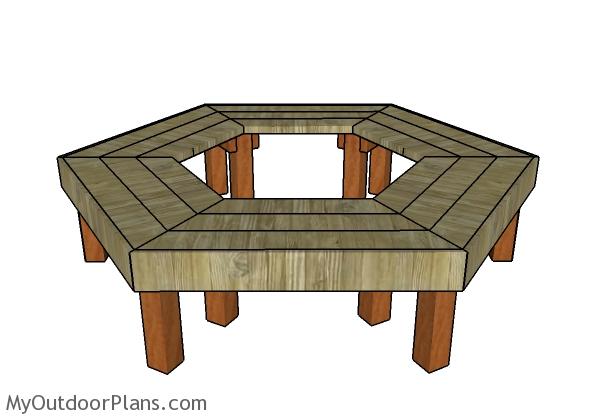
Tree bench plans
Remember that you can easily adjust the size of the bench according to the diameter of the tree trunk. With little adjustments you can use my free bench plans around any tree out there. Don’t forget to SHARE these plans with your friends, to keep the ball rolling. Letting others know about my work helps me add even more free plans. Premium Plans available for this project in the Shop.
If you want to get PREMIUM PLANS for this project (different design and re-engineered structure), in a PDF format, please press GET PDF PLANS button bellow. Thank you for the support.

This woodworking project was about tree bench plans free. If you want to see more outdoor plans, check out the rest of our step by step projects and follow the instructions to obtain a professional result.
EXPLORE MORE IDEAS FOR:
 |
 |
 |
 |
8 comments
how do I download tree bench plans
Please read the FAQs: http://myoutdoorplans.com/faq/
I’m interested in your tree bench plans, but every link I look at to download or print is wanting to install a app, chrome extension, or program to my computer.
Where can I get a direct download of a pdf file without installing “junk” on my tech equipment.
Thanks for offering these plans.
Dennis
You don’t have to install anything. Please read the FAQs: http://myoutdoorplans.com/faq/
What size of tree will the plans accommodate?
30″ in diameter
I am curious why your material list includes 2 1/2, 3 1/2, and 1 5/8″ screws as well as 4d and 16d nails, but nowhere in the directions does it call for them.
You can replace the screws with the nails, if you want to use a nail gun for example.