This step by step diy woodworking project is about lifeguard chair plans. This article features detailed instructions for building a lifeguard chair using just 2x4s. This is the ideal project for a beginner, as it requires common tools and basic carpentry skills. If you want to build an unique piece of outdoor furniture, this is a great project for summer.
When buying the lumber, you should select the planks with great care, making sure they are straight and without any visible flaws (cracks, knots, twists, decay). Investing in cedar or other weather resistant lumber is a good idea, as it will pay off on the long run. Use a spirit level to plumb and align the components, before inserting the galvanized screws, otherwise the project won’t have a symmetrical look. If you have all the materials and tools required for the project, you could get the job done in about a day.
Projects made from these plans
Lifeguard Chair Plans
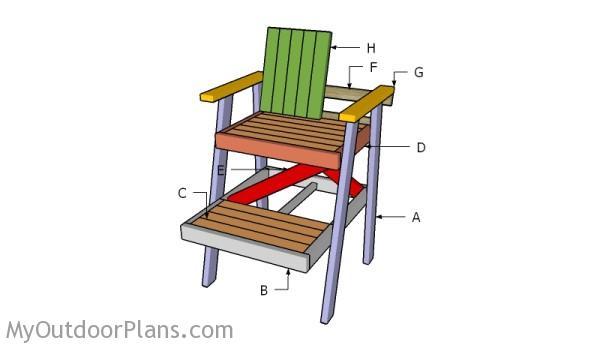
Building a lifeguard chair
Cut & Shopping Lists
- A – 2 pieces of 2×4 lumber – 49″ long, 2 pieces – 46 1/2″ long LEGS
- B – 2 pieces of 2×4 lumber – 31 1/2″ long, 2 pieces – 36 1/2″ long, 1 piece of 2×2 lumber – 36 1/2″ long BOTTOM FRAME
- C – 4 pieces of 2×4 lumber – 28 1/2″ long SLATS
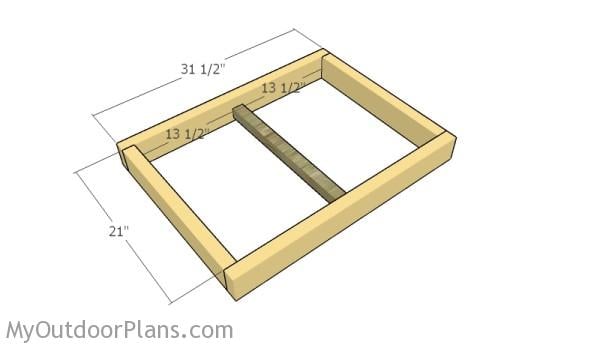
- D – 2 pieces of 2×4 lumber – 31 1/2″ long, 2 pieces – 21″ long, 1 piece of 2×2 lumber – 21″ long TOP FRAME
- D – 6 pieces of 2×4 lumber – 28 1/2″ long long SLATS
- E – 2 pieces of 2×4 lumber – 35 1/2″ long BRACES
- F – 1 piece of 2×2 lumber – 31 1/2″ long, 1 piece of 2×4 lumber – 38 1/2″ long CLEATS
- G – 2 pieces of 2×4 lumber – 26″ long ARMRESTS
- H – 9 pieces of 2×4 lumber – 22″ long BACKREST
- 12 piece of 2×4 lumber – 8′
- 1 pieces of 2×2 lumber – 8′
- 2 1/2″ screws
- 1 1/4″ screws
- wood putty, wood stain
Tools
![]() Hammer, Tape measure, Framing square, Level
Hammer, Tape measure, Framing square, Level
![]() Miter saw, Drill machinery, Screwdriver, Sander
Miter saw, Drill machinery, Screwdriver, Sander
Time
![]() One day
One day
Related
Wood Chair Plans

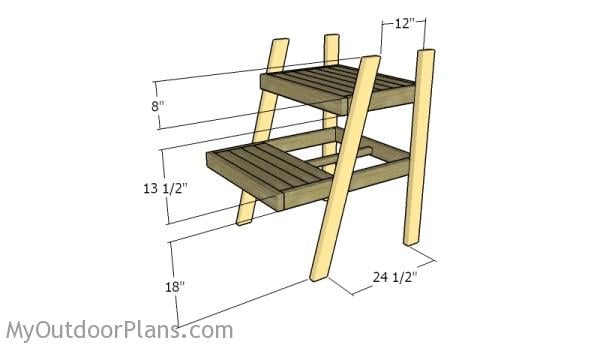
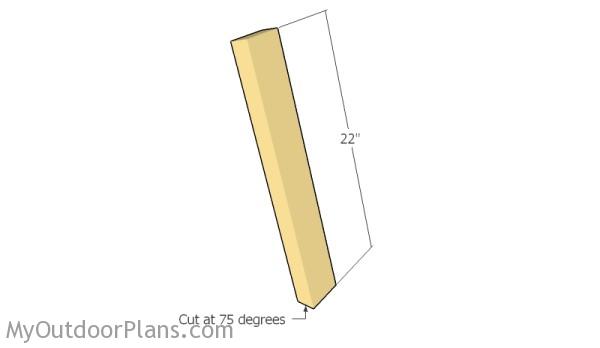
Building the legs
The first step of the project is to build the legs for the lifeguard chair. Cut both ends of the front legs at 75 degrees, as shown in the diagram. Smooth the edges with sandpaper and remove the residues with a damp cloth.

Building the lower frame
Next, you need to build the lower frame for the chair. Use 2×4 lumber for the frame and 2×2 lumber for the middle support. Align the edges with attention, drill pilot holes and insert 2 1/2″ screws to lock the components together tightly. Add glue to the joints for a professional result.
Make sure the middle support is fitted 1 1/2″ under the top of the frame.

Building the steps
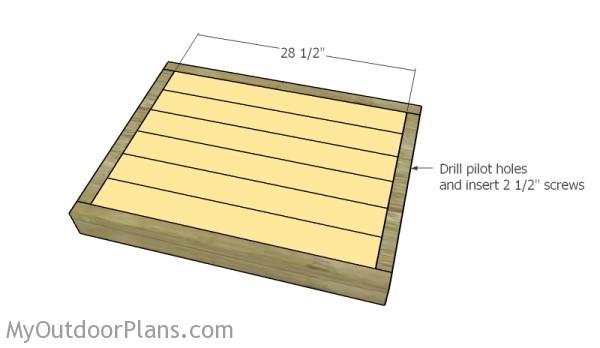
Next, fit the 2×4 slats to the frame, as shown in the plans. Drill pilot holes through the side components for the frame and insert 2 1/2″ screws into the slats. Leave no gaps between the slats.
Seat frame
Next, you need to build the seat frame, in the same manner described above. Make sure the 2×2 middle support is placed 1 1/2″ under the top surface.
Fitting the seat slats
Attach the 2×4 slats to the frame, as shown in the diagram. Drill pilot holes through the sides and insert 2 1/2″ screws into the slats. In addition, you can also insert a few screws into the middle support, if you want to enhance the rigidity of the structure.
Assembling the chair
The next step of the project is to attach the legs to the frames. As you can easily notice, the back legs should be aligned with the back of the frames. Drill pilot holes through the legs and insert 2 1/2″ screws into the frames. Make sure the corners are square and leave no gaps between the components.
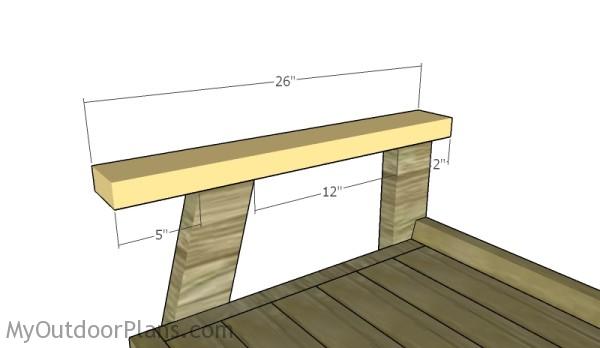
Fitting the armrests
Attach the armrests to the top of the legs. Use 2×4 lumber for the armrests. Drill pilot holes and lock the components to the legs using 2 1/2″ screws.
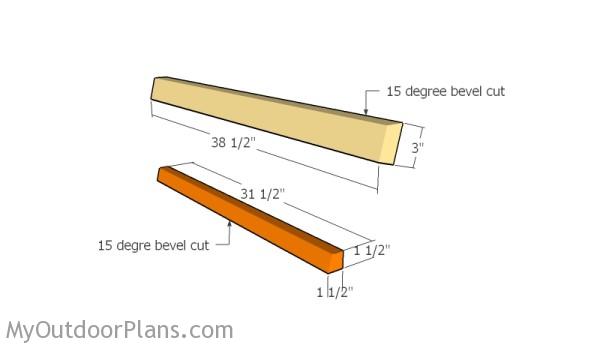
Building the backrest supports
Build the supports for the backrest. Make sure you make the 15 degree bevel cuts to the supports.
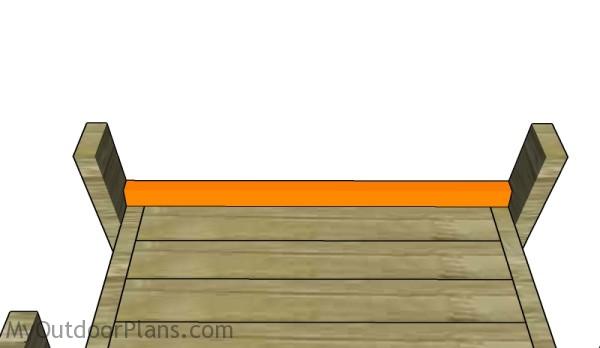
Bottom backrest support
Fit the lower support to the back of the seat using 2 1/2″ screws, after drilling pilot holes.
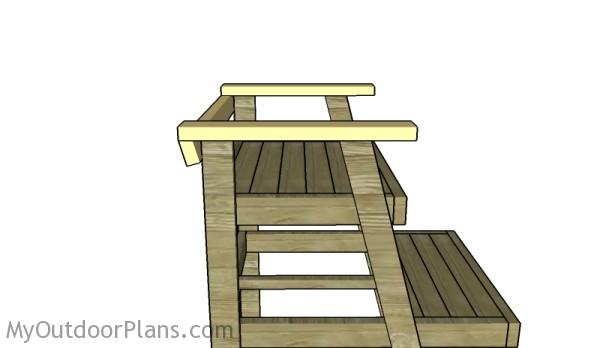
Backrest supports
Next, attach the top support for the backrest, Drill pilot holes through the support and insert 2 1/2″ screws into the back legs. In addition, drill pilot holes through the armrests and insert 2 1/2″ screws into the backrest.
Backrest slats
Build the backrest from 2×4 lumber. Cut the bottom of the slats at 75 degrees.
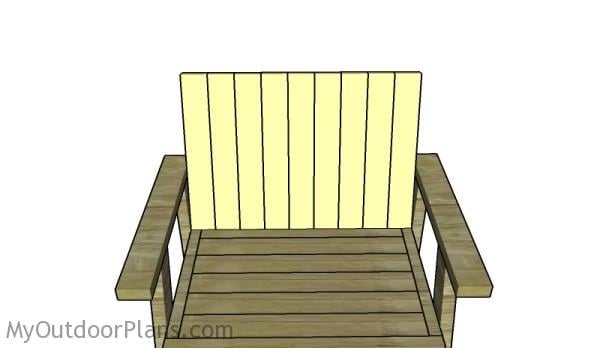
Fitting the backrest slats
Fit the slats to the back of the chair, drill pilot holes and insert 2 1/2″ screws into the bottom and top cleats. Leave no gaps between the slats for a professional result.
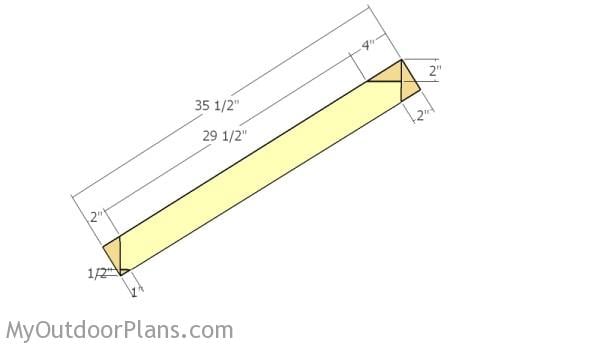
Building the braces
In order to enhance the rigidity of the lifeguard chair, you need to attach two braces to the frame. Mark the cut lines on the 2x4s and get the job done with a saw.
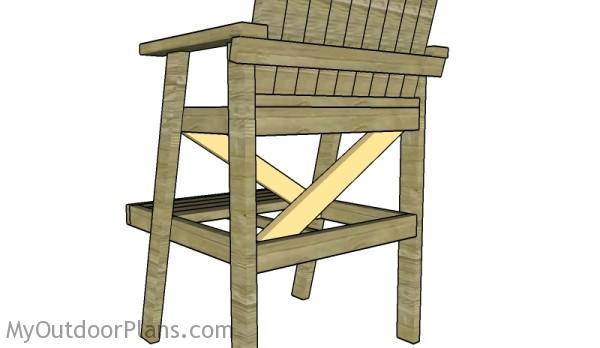
Fitting the braces
Fit the braces to the chair, after making sure the legs are plumb. Drill pilot holes at both ends and secure the braces to the frame using 2 1/2″ screws.
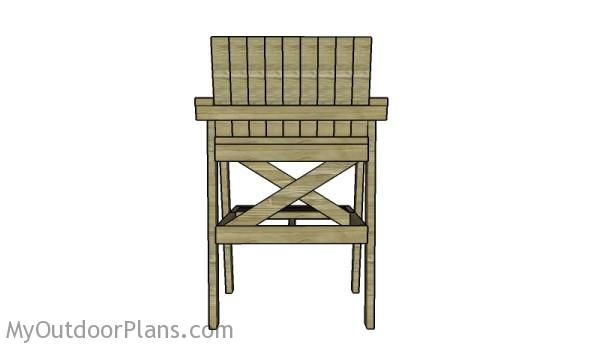
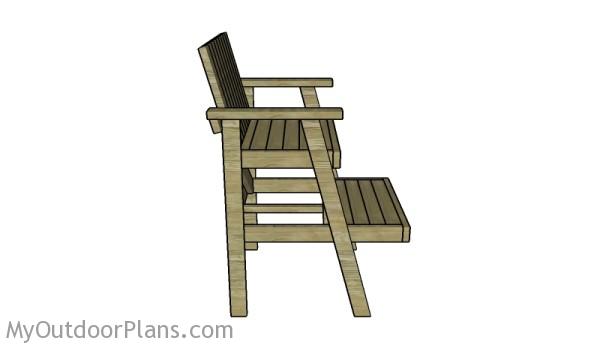
DIY Lifeguard Chair
The lifeguard chair seen from another angle.
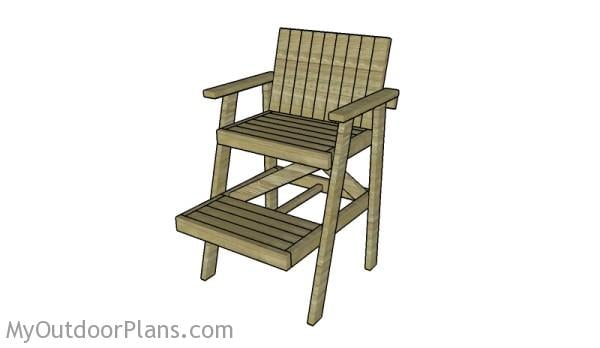
Lifeguard Chair Plans Free
I personally like the unique look of the chair and I think it would look great next to a pool or on a beach.
Lifeguard Chair Plans
Fill the holes with wood putty and let them dry out for a few hours. Smooth the surface with 100-220 grit sandpaper and remove the residues with a damp cloth.
Top Tip: Apply a few coats of paint or stain to the components, to enhance the look of the project.
This woodworking project was about lifeguard chair plans free. If you want to see more outdoor plans, check out the rest of our step by step projects and follow the instructions to obtain a professional result.
EXPLORE MORE IDEAS FOR:
 |
 |
 |
 |
28 comments
How do I cut the 15 degree bevel cuts for the back without a table saw ?
Thank you
That is hard without a table saw. You could try with a circular saw.
you could also use a compound miter saw
No you can’t. You cannot rip with a miter saw.
Can I make the legs longer for official lifeguard use without compromising the balance, strength and safety of the chair?
I cannot guarantee that. But you could make them longer and add more stability by fitting some horizontal 2x4s to the sides of the legs (longer than the base).
Thank You very much, Just what I needed.
You’re very welcome. Let me know how it comes out!
One of our Boy Scouts is building four stands for our local Medford Lakes Colony for his Eagle award. I showed him these plans & he thought they would work for his project.
Awesome! Thank you for sharing my plans. Looking forward to seeing your projects!
Just built this project for our 22′ above ground pool. I added 6″ to the legs to make it sit higher and there were no problems other than it made the lower platform more difficult to step up to. Solved that by purchasing a couple two step stringers and lumber to build small steps that sit adjacent to the chair. Worked out well. It looks great and got official approval from my daughter this morning. Nice plans.
Thank you for the nice words and congrats for the project. I would love to see your chair. You can send a few pics here: http://myoutdoorplans.com/contact/
These look great! I want to build 4 of these for my deck. Would the balance and/ or integrity be compromised if I made them a little narrower?
I think it should work. In worst case scenario, you can make a base for the chairs.
If I wanted to double the height of the seat, ~70-80 inches. And also make the seat wide enough for 3+ ppl. How would you go about doing so? Think the design looks great and would love your opinion. thanks!
I would build the legs A shaped for better support. Other than this just scale it up and add supports to the seat frame.
Thanks! about how much does it weigh? following the plan you provided
Congratulations! A great design. Can I use your pictures and use them on my blog so that rescuers in Poland can make such chairs for themselves?
No, all my designs are copyrighted. You can refer them to my site.
Built two chairs. One to spec and then one by adding 12 inches all around to make it higher. Need to modify the leg spread for more stability but you need to play with it. So fun to build. I wanted a life guard chair but at up to $800, I like my $50 chair very much.
I wanted build and sell to friends. Is that cool given plans are copywriter?
Yes, you can build projects using my plans and sell them. However, I would appreciate if you send a few pics to feature them on the blog: http://myoutdoorplans.com/contact/
Going to try this project this week. What are the 1 1/4″ screws used for? Thanks
I’m doing this this weekend with my 9 year old, super excited!
I do have to ask what the 1 1/4″ screws are for? Not seeing them mentioned in the actual plans anywhere, just 2 1/2″ screws.
Awesome plans. Finishing up. Only thing is I should have used pocket holes for a cleaner look. If you have the equipment I would give it a shot.
Thanks again. Can’t wait to open the pool and use it.
I just completed this project! Thank you so much for the plans. This was a fun build. Kids love it!
Great looking chair? Do you happen to plans in CAD or Sketchup? Looking to make the chair 7ft in height.
I don’t share the model file. Sorry