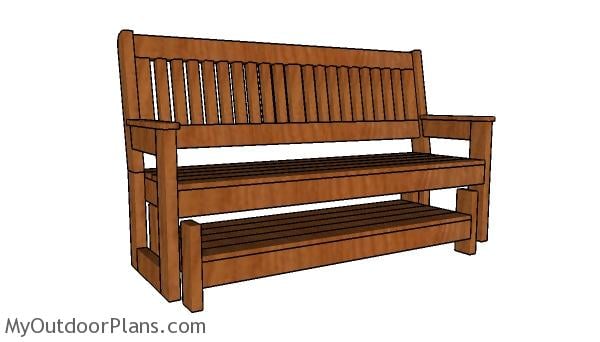
This step by step diy project is about glider stand plans. This is PART 2 of the glider bench project, where I show you how to build the stand. This stand is super easy to build and it will create a nice support for the glider bench. Take a look over the rest of my woodworking plans, if you want to get more building inspiration.
When buying the lumber, you should select the planks with great care, making sure they are straight and without any visible flaws (cracks, knots, twists, decay). Investing in cedar or other weather resistant lumber is a good idea, as it will pay off on the long run. Use a spirit level to plumb and align the components, before inserting the galvanized screws, otherwise the project won’t have a symmetrical look. If you have all the materials and tools required for the project, you could get the job done in about a day. See all my Premium Plans HERE.
Projects made from these plans
It’s that simple to build a glider bench!
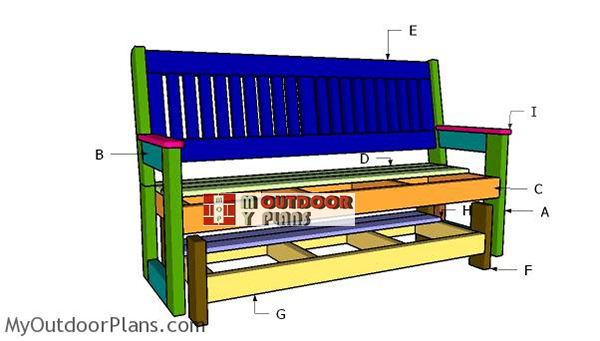
Glider Stand Plans
Building-a-glider-bench
Cut & Shopping Lists
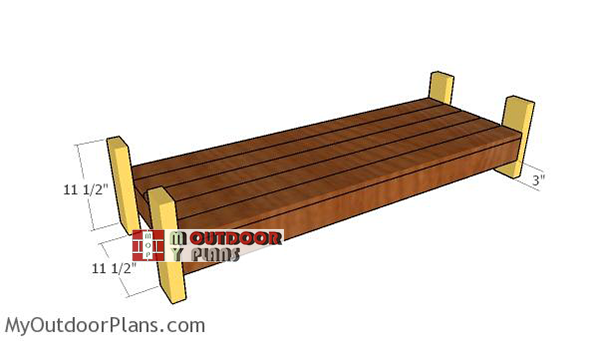
- F – 4 pieces of 2×4 lumber – 11 1/2″ long LEGS
- G – 2 pieces of 2×4 lumber – 51″ long, 4 pieces – 15 1/2″ long FRAME
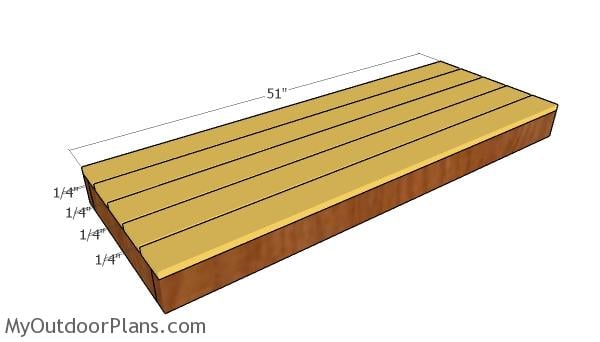
- H – 5 pieces of 1×4 lumber – 51″ long TOP SLATS
- 2 pieces of 2×4 lumber – 10′
- 5 pieces of 1×4 lumber – 6′
- glider brackets
- 2 1/2″ screws
- 2 1/2″ screws
- 1 5/8″ screws
- wood filler , wood glue, stain/paint
Tools
![]() Kreg Jig
Kreg Jig
![]() Hammer, Tape measure, Framing square, Level
Hammer, Tape measure, Framing square, Level
![]() Miter saw, Drill machinery, Screwdriver, Sander
Miter saw, Drill machinery, Screwdriver, Sander
Time
![]() One day
One day
Related
- PART 1: Glider Bench Plans
- PART 2: Glider Stand Plans
How to build a glider stand

Seat-frame
The first step of the project is to build the frame for the stand. Cut the components from 2×4 lumber and then lock them together with 2 1/2″ screws. Align the edges and make sure the corners are square. Drill pilot holes before inserting the screws, to prevent the wood from splitting.
Fitting the stand slats
Fit the 1×4 slats to the stand. Align the edges at both ends and then place a piece of 1/4″ plywood between the slats, so you create even gaps. Drill pilot holes and insert 1 5/8″ screws to secure them into place tightly.
Fitting-the-legs-to-the-stand-frame
Attach the 2×4 legs to the stand frame with 2 1/2″ screws and glue. Make sure the corners are square and align the edges with attention.
Glider Bench Plans – Free Plans
Check out PART 1 of the project, where I show you how to build the glider bench. Attach the bench to the stand using the brackets. Fill the holes with wood putty and then smooth the surface with 120-220 grit sandpaper. Apply a few coats of paint or stain to enhance the look of the glider bench and to protect them from the elements.
You can easily make adjustments to my plans to suit your needs and tastes. Moreover, you can adjust the height of the legs. See all my outdoor furniture projects HERE.
This woodworking project was about glider stand plans free. If you want to see more outdoor plans, check out the rest of our step by step projects and follow the instructions to obtain a professional result.

8 comments
I am yet to start on construction of the slider bench, but just one comment; here in Australia we use the metric system, so to make it easier for me I will need to convert your measurements from inches to centimetres. If possible, it would help if you could put the metric sizes in brackets next to the imperial sizes.
Hey there. I understand, but it’s not that simple as you think, because the 2x4s 1x4s etc have not a direct corespondent in the countries with metric system. Therefore, that would be useless since you can’t buy the same materials sizes I do the plans with. Take a look over this table, it should be a good starting point: https://myoutdoorplans.com/imperial-to-metric-conversion/
I don’t see any directions for attaching the bench to the stand.
Hiya mr. Hoffman, I wondered the same but I don’t suppose you’re going to get an answer in an appropriate amount of time… Sir consider the motion you desire for your bench. Do you a flat swing? Or a rocking, back to front, motion? The research I’ve done in building glider chairs, benches, and even my one and only Gliderbed, has taught me that for the flat motion leave the brackets straight, up and down, for a rocker motion angle one set, front typically, toward the back set just a little….
I hope this helps.
T.A.
I appreciate the many things this company does for us but its not professional to leave off directions to where it doesnt show you exactly how to connect the brackets. Why leave off an important step. It makes me not want to order any more plans. A bad taste left inside.
Step 14 in the Premium Plans come with two detailed diagrams and instructions on how to set the brackets to the bench and stand
how do you attach the bench to the stand
Thank you Glenn
Yes