This step by step diy woodworking project is about 2×4 bench plans. If you want to learn more about building a nice bench that could be used inside your home or outdoor, we suggest you to pay attention to the instructions described in the article. I have teamed up with Jack from HowToSpecialist.com for this project. You can see his step by step tutorial for this bench here.
Work with attention and don’t forget that a good planning will save you from many issues and it will keep the costs withing the total budget. Invest in high quality materials, such as pine, redwood or cedar. Drill pocket holes before inserting the galvanized screws, to prevent the wood from splitting. Add waterproof glue to the joints, in order to enhance the rigidity of the structure. See all my Premium Plans HERE.
Projects made from these plans
It’s that easy to build a 2×4 bench!
2×4 Bench Plans
Building-a-2×4-farmhouse-bench
Cut & Shopping Lists
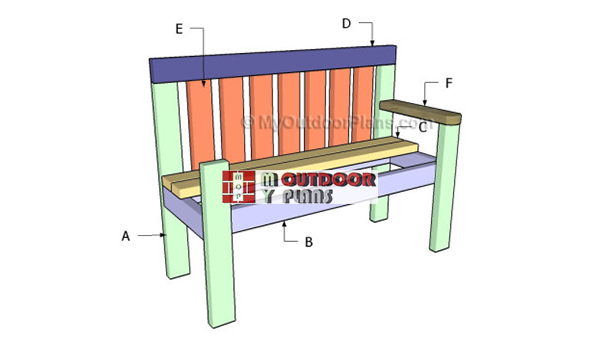
- A – 2 pieces of 2×4 lumber – 24″ long, 2 pieces – 32 1/2″ long LEGS
- B – 2 pieces of 2×4 lumber – 45″ long, 2 pieces – 15 1/2″ long, 1 piece – 12 1/2″ long SEAT FRAME
- C – 4 pieces of 2×4 – 48″ long SEAT
- D – 1 piece of 2×4 lumber – 48″ long TOP SLAT
- E – 7 pieces of 2×4 lumber – 16″ long BACKCREST
- F – 2 pieces of 2×4 lumber – 18″ long ARMREST
- 8 pieces of 2×4 lumber – 8 ft
- 2 1/2″ screws
- wood filler, glue
- stain / paint
Tools
![]() Hammer, Tape measure, Framing square, Level
Hammer, Tape measure, Framing square, Level
![]() Miter saw, Drill machinery, Screwdriver, Sander
Miter saw, Drill machinery, Screwdriver, Sander
![]() Post hole digger, Concrete mixer
Post hole digger, Concrete mixer
Time
![]() One day
One day
Related
How to build a 2×4 farmhouse bench with backrest
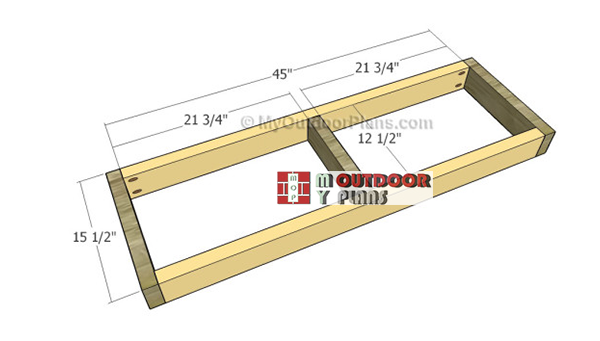
Building-the-seat-frame
The first step of the project is to assemble the seat frame for the 2×4 bench. Cut the components at the right dimensions and smooth the ends with sandpaper. Drill pocket holes at both ends at both ends of the 45″ long components and insert 2 1/2″ screws into the perpendicular slats. Make sure the corners are square and add glue for a proper bond. Drill pocket holes at both ends of the middle support and insert 2 1/2″ screws into the seat frame.
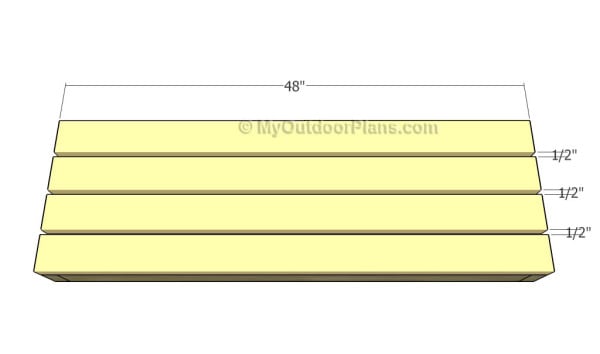
Attaching the seat slats
Next, you need to attach the 2×4 slats to the frame. Align the edges with attention and make sure the slats are equally-spaced. Drill pilot holes and insert 2 1/2″ screws to secure the slats into place. You can place a 1/2″ wood blog between the slats to get a professional result and equal gaps.
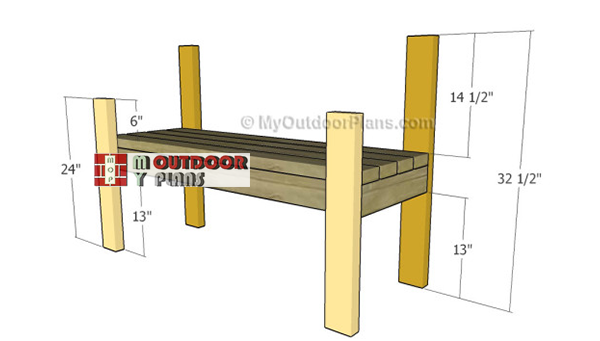
Attaching-the-legs-to-bench
Cut the legs at the right dimensions, using 2×4 lumber. Fit the legs to the seat, drill pilot holes from the inside and insert 2 1/2″ screws into the legs. Make sure the legs are plumb before inserting the screws.
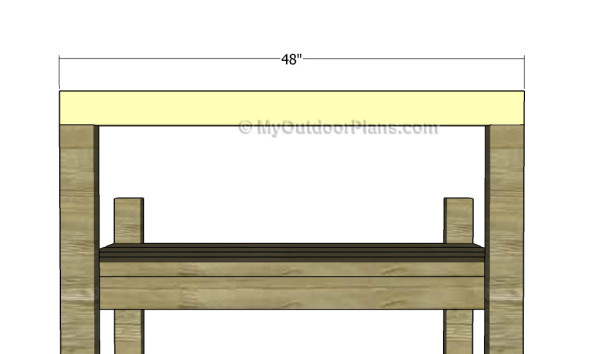
Fitting the top slat to the backrest
Drill pocket holes at the top of the back legs. Attach the top component, making sure the edges are flush. Insert 2 1/2″ screws to lock the components together, leaving no gaps.

Attaching the backrest slats
Building the backrest for the 2×4 bench can be done in a few ways, but the most straight-forward would be to attach vertical slats to the frame. Drill pocket holes along the top of the slats and insert 2 1/2″ screws into the fame. You can adjust the gaps between the slats according to your needs, by placing more or less slats.
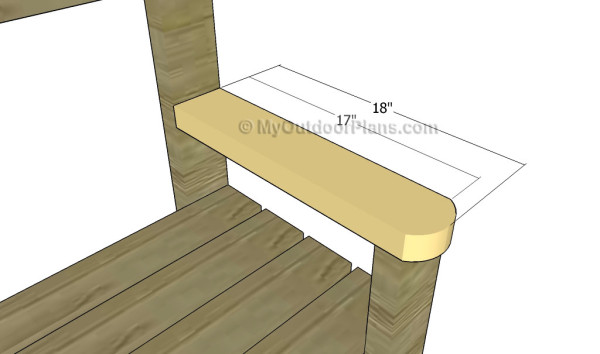
Fitting the armrests
One of the last steps of the project is to attach the 2×4 armrests to the bench. If you want to enhance the look of the rustic bench, we strongly recommend you to round the armrest using a jigsaw. Smooth the edges with sandpaper. Use 2 1/2″ screws to secure the armrests to the frame of the bench. Drill pilot holes through the armrests before securing them to the frame, to prevent the wood from splitting.
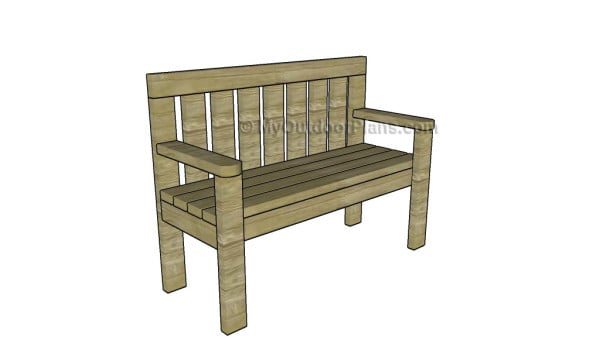
2×4 Bench Plans
One of the last steps of the woodworking project is to take care of the finishing touches. Therefore, fill the pilot holes with wood putty and smooth the surface with 120-150 grit sandpaper.
Top Tip: If you want to enhance the look of the woodworking project and to protect the bar stool from decay, we recommend you to cover the components with paint or stain.
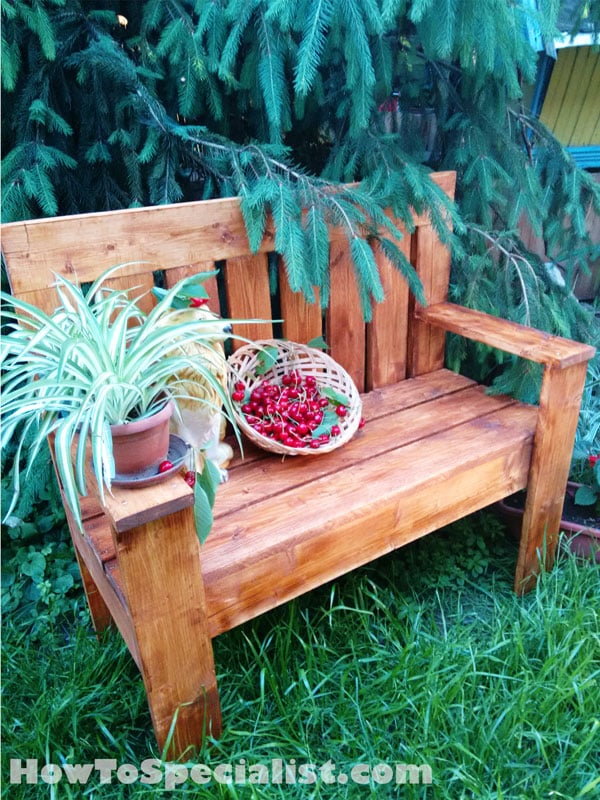
Diy-bench-plans
My friend Jack from HowToSpecialist.com built this amazing bench using my plans. If you like the plans take a look over his tutorial to get a better understand of the project. I would love if you pin, like and share my projects with your friends.
This woodworking project was about 2×4 garden bench plans. If you want to see more outdoor plans, we recommend you to check out the rest of our step by step projects. LIKE us on Facebook and Google + to be the first that gets out latest projects.
EXPLORE MORE IDEAS FOR:
 |
 |
 |
 |
31 comments
I forgot to ask how many 2×4’s you need for this. Sorry if you have it written someplace… 🙂
You need 7 pieces of 2x4s – 8 feet long
What if i don’t know how to do the pocket screw thing? Is it possible to just screw the board the normal way or will the wood split? Thank you.
It will work if you drill pilot holes before inserting the screws. In addition, the head of the screws will be exposed, but it will work.
that’s the thing, i’ve never drilled pilot holes so was trying to avoid doing it that way. I guess i’ll research what i need to buy and practice. Thank you.
I said pilot holes, not pocket holes. A pilot holes is a simple holes you drill before inserting the screws, nothing complicated. If you were to use pocket holes you would have needed a jig, but for pilot holes you only need a drill and a bit.
Sorry to bother you again…the back slats say 1×4…is that correct, or should it be 2×4?
thanks,
Debbie.
You can use either one. If you use the 1x4s you will decrease the weight of the bench. Other than this, there is no difference between the two alternatives.
Thanks Julian.. I was just making sure i wasn’t missing something.
Glad I could help. Looking forward to seeing your projects.
Hi, I’ve made a couple of these at 4 to 6 foot lengths. I have a friend who wants one 8 feet long. Do you think it would work as is at the length or would it need added support in the middle? Thanks
I think it should work, but I would add more 12 1/2″ supports to the seat frame.
I THINK IS INTERESTING YOU PROVIDE PLANS FOR A 2X4 BENCH, BUT IN THE FINAL PICTURE YOU SHOW US A BENCH MADE WITH 1X6’S INSTEAD. DO YOU NOT REVIEW THESE LAYOUTS? OR WAS THIS INTENTIONAL?
Yes, it’s international so the lumber dimensions don’t match perfectly. However, you can see at the “Made from This Plan” section… a lot of brag projects completed using 2x4s.
can I print this I like to have my 13 year old grandson to make
Yes, of course. Check out the FAQs: http://myoutdoorplans.com/faq/
If the top component is attached to the Back legs, how come the vertical slats would be attached to the seat frame
In the same way the legs are attached to the seat frame. The backrest slats are parallel to the back legs.
Great little afternoon project. I precut everything, then drilled all the pocket holes, assembly time from cuts to screwing was about 3.5-4 hours. I love it, and it is sturdy and will get a lot of use from us. don’t know how to load pictures of the finished product for you. Thanks.
That sounds awesome. You can send pics using this form: http://myoutdoorplans.com/contact/ or you can send them directly using my mail: admin@myoutdoorplans.com Looking forward to seeing it and featuring it on the site.
Hello. I’m not in the slightest experienced with outdoor projects. I was thinking about working on this project, but looking at the materials needed and looking around the lowe’s website, it appears the materials would be worth well over a thousands. Maybe I’m looking at a different wood type or using the wrong terms, but if you could show me where you found the price to be under $15, it would be greatly appreciated.
If you use regular lumber, no hardwood, you will get close to that number.
Hey i love this bench. I’m trying to figure out the measurements for a bench that needs a seat height of 25 inches.
I made a few of these for Christmas gifts. I love the plan. I would like to make a child sized one. I’m thinking of using 2×2’s instead of 2×4’s what would be a good hight for that?
13-15″ Looking forward to seeing your projects
Thanks!!
This bench was fun and easy to cut out and put together. Great plans!!!! Thank you!
You’re welcome. Looking forward to seeing your projects!
I made this bench and it didn’t take long. But, it wasn’t deep enough for me and I’m only 5 feet, 3 inches tall. So I’m going to make another one adding 1 more board on the seat. Then any other adjustments as needed.
I don’t have the tools or experience with pocket holes so I used a 2×3 and placed it horizontally on the top. I found attaching the back part difficult and frustrating. So next time I will build it separately, then attach it. There is no support under the vertical boards so I may add one to support the boards.
But overall, I like these plans better than any others I’ve used.
I made the 2BY4 Garden Bench. Went together fast and is very sturdy. Thanks …Everyone who has set in it including me think the back is too upright… Could a modification to the 2 back boards and how they connect be made to put a slight angle on the back.?? Any ideas or help you can provide would be much appreciated…
Built mine from some left over 2 x4’s. Had 5 to work with so I made a few changes. Across the back instead of the 16’s I went with 1 2×4 in between, and on the seat I did 4 12 1/2 pieces and than a had a flat board 48 x16 1/4 thick I laid across. Will get a 48×16 outdoor cushion soon. I have been using it since Wednesday