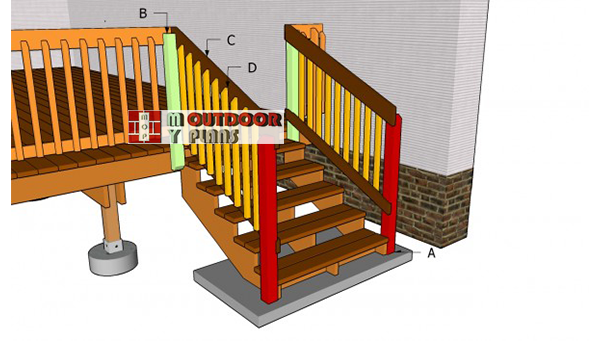
This step by step project is about deck stair railing plans. Building railings for your deck stairs is easy, provided you plan everything from the very beginning. It is essential to choose a design that matches the style of the deck, as well as the rest of your property. After installing the deck stair railing, you should round the exposed edges with a router and a 3/4″ bit. Measure the angles carefully, if you want to get a professional result.
When building a deck there are many requirements you have to comply with. Therefore, we strongly recommend you to study the local building codes before starting the construction of deck stair railing, as to get a professional result. There are many things you should take into account, such as the distance between the balusters, the materials you need to use or the depth of the post footings. See all my Premium Plans HERE.
Projects made from these plans
Cut & Shopping Lists
- A – 2 pieces of 4×4 lumber – 94″ long POSTS
- B – 2 pieces of 4×4 lumber – 46″ long BOTTOM RAIL
- C – 2 pieces of 2×4 lumber, 2 pieces of 2×6 lumber RAILS
- D – 2×2 lumber – 33″ long BALUSTERS
Tools
![]() Hammer, Tape measure, Framing square
Hammer, Tape measure, Framing square
![]() Miter saw, Drill machinery, Screwdriver, Sander
Miter saw, Drill machinery, Screwdriver, Sander
Time
Related
- Part 1: Outdoor Deck Plans
- Part 2: Deck Framing Plans
- Part 3: Deck Stairs Plans
- Part 4: Deck Railing Plans
- Part 5: Deck Stair Railing Plans
Building deck stair railing
Deck-stair-railings
Top Tip: Building stair railing for you deck is a straight forward project, but there are many things you should decide before starting the project on your own. First of all, make sure the size and the style of the components fits the design of your deck and house.
Deck Stair Railing Plans
Posts-plans
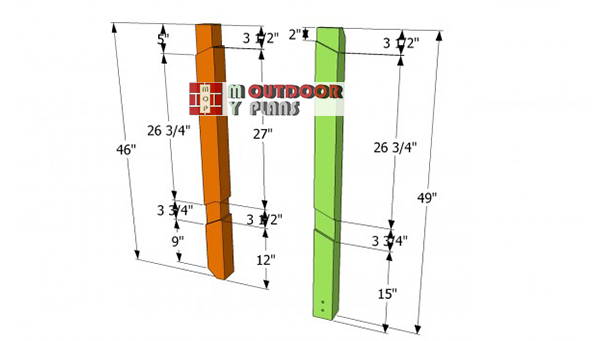
The first step of the woodworking project is to build the posts for your deck railing. As you can see in the image, you should use 4×4 lumber and to adjust the size of the components to your needs. All the dimensions and figures you see in the image are for an informational purpose, as they vary according to your project.
Cut 1/2″ notches inside the posts and clean the recess with a chisel.
Installing the posts
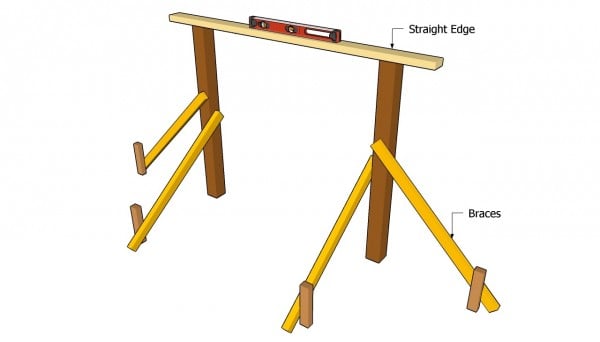
It is important to point out that you need to secure the front posts into concrete. Therefore, dig 3-4′ deep holes in the ground, pour a 1-2″ thick layer of concrete and set the posts into place. Use temporarily braces to support the posts into place, after plumbing them with a spirit level.
Place a straight edge on top of the posts to check if they are at the same level, as in the image.
Fitting the posts to the framing
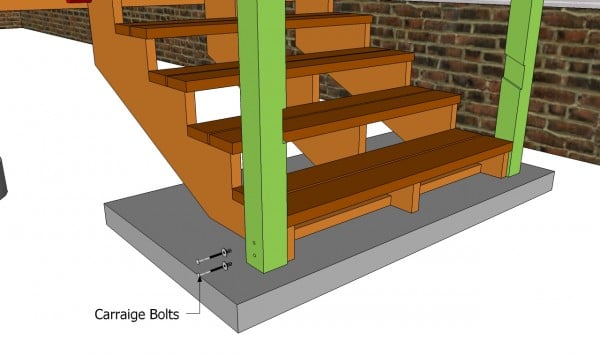
Afterwards, you need to drill pilot holes trough the posts and to secure them to the stairs framing with carriage bolts. As you can notice in the plans, you should drill several pilot holes both trough the posts and trough the stringers, before inserting the carriage bolts.
In this manner, you will get a rigid structure that will be highly durable on the long run. Work with attention and with great care, if you want to get a professional result.
Fitting the rails
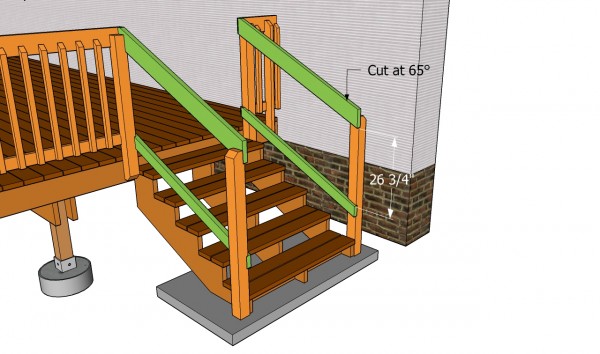
Secure the rails to posts with several C-clamps, according to the plans you use. In our case, we follow the same pattern use when building the deck railing. Therefore, make sure the distance between the top and bottom rails is the same, both on the front and on the back of the railing.
Top Tip: Make marks on the posts and them several parallel cuts. Clean the 1/2″ recess with a chisel and smooth the surface with a sand-block.
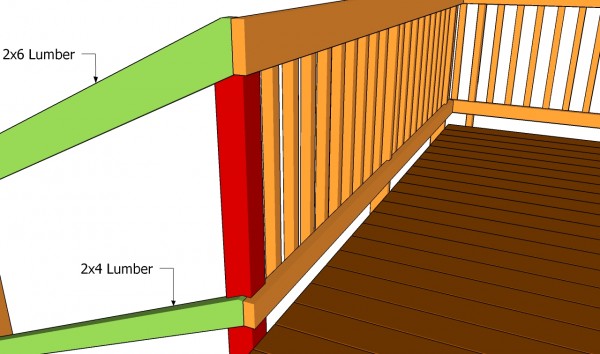
Fitting the rails to the post
As you can see in the image, you need to cut the top of the stair railing, as to fit the width of the deck railings. Work with attention, if you want to get a neat appearance.
Fitting-the-balusters
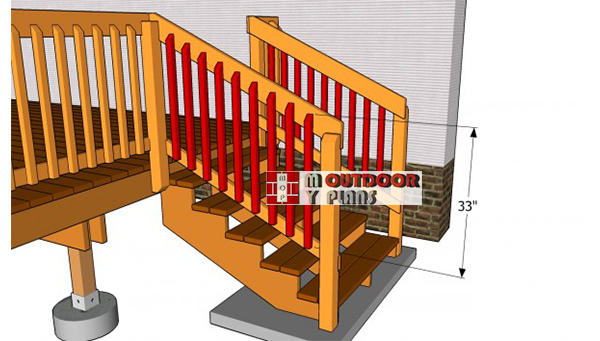
Place 2×2 balusters to the both sides of the deck stairs. It is important to install the balusters equally spaced, if you want to get the job done as a professional. Place a piece of wood between the balusters, in order to get consistent gaps.
Align the bottom of the balusters with the bottom edge of the rail, as in the image. In addition, cut the top of the balusters at 45º, if you want to get a professional result. Drill pilot holes trough the balusters before securing them to the rails with 2 1/2″ screws.
Deck stair railing plans
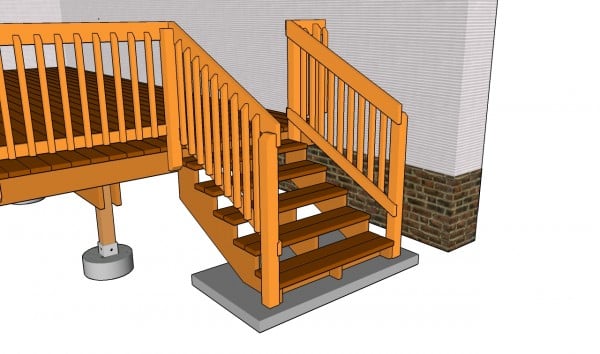
Last but not least, you should take care of the finishing touches. Therefore, fill the holes with wood putty and let the compound to dry out for several hours. Smooth the surface with medium-grit sandpaper along the wood grain.
Top Tip: Apply several coats of stain or paint to enhance the look of the deck stairs and to protect the components from decay. Check out the rest of the project, to how how to build the deck stair rails.
This project was about deck stair railing plans. If you want to see more outdoor plans, we recommend you to check out the rest of the projects. Don’t forget to share our projects with your friends, by using the social media widgets.

2 comments
I’m planning (in my mind) to build steps on the outward corner of my deck which I’m currently building, BUT, I want to build the steps on the corner with access on both the front and side of the deck, I call a corner configuration. Any ideas??
thanks in advance,
Rav.
It shouldn’t be hard to make the modifications you want. You need to fit the stringers on the two sides of the corner, and then add another on the diagonal of the L-shape at 45 degrees. Next, you cut one end of the decking at 45 degrees and secure them into place with screws.