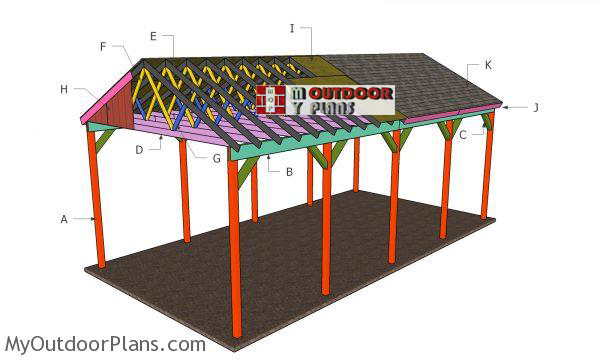
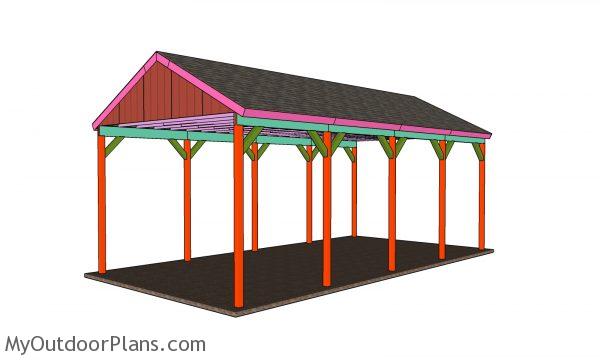
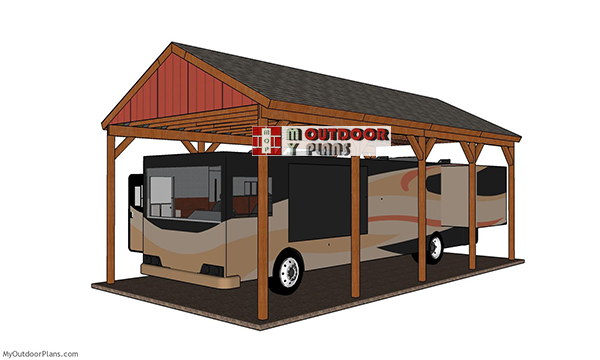
This step by step woodworking project is about 20×40 rv carport plans. This is one of my latest designs, so it contains all the knowledge I have gained throughout the years of work. This carport features a sturdy structure and a gable roof with a 6:12 pitch. You can get the job done in a few days if you have all the materials on the construction site. The cost estimate for this project is 4-5000 us dollars.
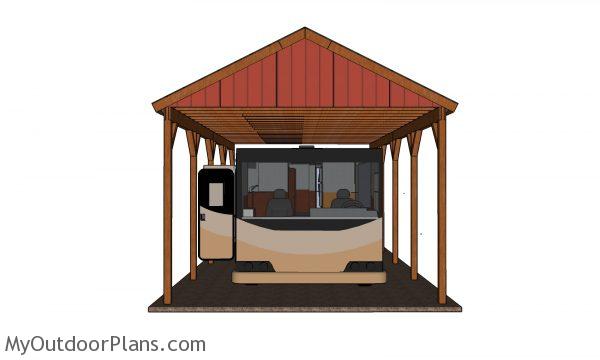
This carport has a gable roof and a super sturdy structure. If you have a large boat or a recreational vehicle, this is the structure to choose. First of all, you need to measure the vehicle and to design the size of the carport accordingly. Make sure you set the posts into concrete (3-6′ according to the soil structure), otherwise the structure won’t be rigid enough to resist to strong winds. Premium Plans for this project available in the Shop.
Projects made from these plans
Building a 20×40 RV carport
Building-a-20×40-rv-carport
Cut & Shopping Lists
- A – 10 pieces of 6×6 lumber – 14 ft long (above ground) POSTS
- B – 8 pieces of 2×12 lumber – 20 ft long SUPPORT BEAMS
- C – 16 pieces of 6×6 lumber – 36” long BRACES
- 6×6 lumber 14 ft long – 10 pieces
- 6×6 lumber – 12 ft long – 4 pieces
- 2×12 lumber – 20 ft long – 8 pieces
- 2×6 lumber – 20 ft long – 20 pieces
- 2×6 lumber – 12 ft long – 42 pieces
- 2×4 lumber – 10 ft long – 42 pieces
- 1×8 lumber – 8 ft long – 1 piece
- 1×8 lumber – 10 ft long – 8 pieces
- 1×8 lumber – 12 ft long – 4 pieces
- 1/2″ plywood – 4’x8′ – 30 pieces
- 6 pieces of 5/8″ T1-11 siding – 4’x8′
- Tar Paper & Asphalt Shingles – 1000 sq ft
- 6×6 Post Anchors – 10 pieces
- 16″ diameter tube form – 10 pieces
- Concrete – several bags
- Stain – 6 cans
- Rafter ties – 42 pieces
- 1 5/8″ screws – 1000 pieces
- 5 1/2″ screws – 64 pieces
- 2″ nails – 400 pieces
- 1 1/2″ structural screws – 4 boxes
- 1 1/2″ structural nails – 4 boxes
- 6″ carriage bolts – 30 pieces
- 3×6 truss plate – 300 pieces
- Drip edge – 130 sq ft
- Staples for tar paper – 5000 pieces
- 3/4″ Roofing Nails – 5000 pieces
Tools
![]() Hammer, Tape measure, Framing square, Level
Hammer, Tape measure, Framing square, Level
![]() Miter saw, Drill machinery, Screwdriver, Sander
Miter saw, Drill machinery, Screwdriver, Sander
![]() Post hole digger, Concrete mixer
Post hole digger, Concrete mixer
Time
![]() One day
One day
Rv Carport Plans
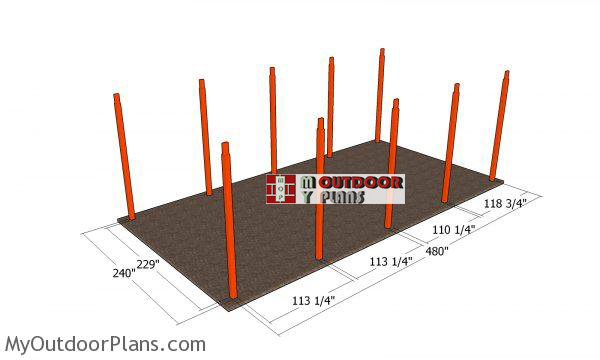
Laying-out-the-posts
The first step of the project is about laying out the carport and fitting the posts into place. In order to get a professional result, we recommend you to use batter boards and string. Check if the corners are right-angled and make sure the diagonals are equals.
You should adjust the length and the width of the rv carport according to the size of the motor home. Read the local codes to see if you need to set the posts into concrete or to pour footings and use post anchors.

Anchoring the post into concrete
Therefore, you could dig holes in the ground and set the posts into concrete, or you could use post anchors. Nevertheless, taking into account the height of the construction, we recommend you to lock the posts into concrete.
Level the posts with a spirit level and secure them temporarily with 2×4 braces. Make sure the top of the posts are at the same level, otherwise the structure of the carport won’t be sturdy enough.
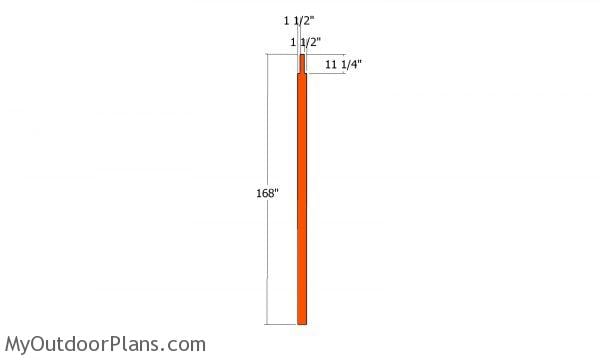
Posts
After setting the posts, you need to cut the top at the same height. Therefore, use a water level to mark the level to the top of the posts. Use a circular saw to make the cuts.
Make parallel cuts inside the marked areas and then remove the excess material with a hammer. Clean the recess with a chisel and sandpaper.
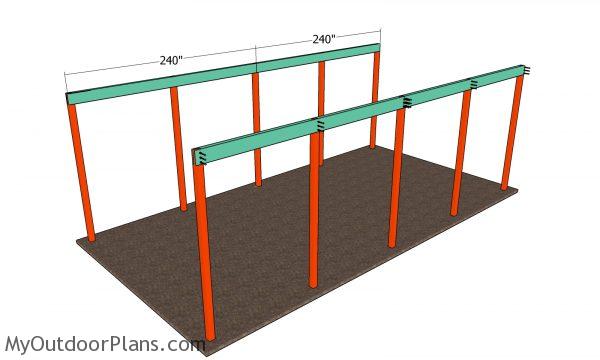
Fitting the top support beams
The next step of the woodworking project is to attach the support beams to the top of the posts. Clamp the 2×12 beams to the posts (on both sides ) level them, drill pilot holes and insert the 6″ carriage bolts into place. Use 3 bolts for each joint.
Top Tip: Place a spirit level to the top of the beams, in order to make sure they are perfectly horizontal. Proceed in the same manner on the opposite side of the carport.
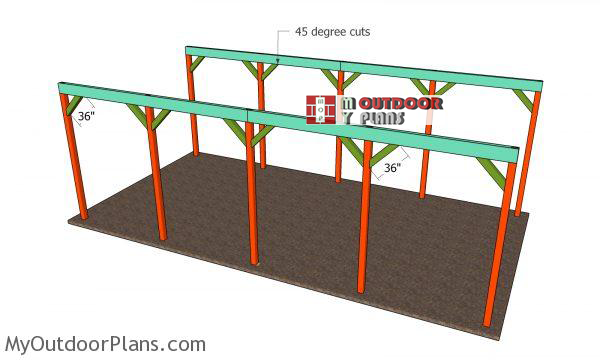
Fitting-the-braces-to-the-carport
We also need braces for the carport. Make 45 degree cuts to both ends of the braces. Fit the braces to the frame of the carport. Drill pilot holes and insert 5 1/2″ screws to lock the braces to the posts and to the top support beams.
20×40 RV Carport
Make sure you take a look over PART 2 of the carport. There, I will show you how to build the trusses for the RV carport and how to get the job done.
How-to-build-a-20×40-rv-carport
This large carport is ideal for a motorhome or for a boat. Make sure you also read the local codes, because the local weather conditions influence the requirements for the structure of the carport.
How to build a RV carport – plans
Last but not least, take care of the final touches. Therefore, fill the gaps with wood putty and let the compound dry out for several hours, before sanding the surface with medium grit sandpaper. Afterwards, clean the surface with a cloth and apply several coats of wood stain or paint, to protect the wood from rot.
Top Tip: You could fit lattice panels between the posts, if you want to protect your recreational vehicle from bad weather. In addition, the panels would add character to your construction. Premium Plans for this project available in the Shop. If you want to get PREMIUM PLANS for this project, in a PDF format, please press GET PDF PLANS button bellow. Thank you for the support.

This woodworking project was about rv 20×40 carport plans. If you want to see more outdoor plans, we recommend you to check out the rest of our step by step projects.

5 comments
Can I purchase these to print. I can’t figure it out
I added a GET PDF PLANS button to the end of the article. The button is for the Premium Plans.
Does this plan easily accommodate a metal roof instead of shingles?
Yes, of course. Use 1×4 purlins every 16″ OC instead of the plywood
Hi, can I get plans for a 14’wide 44’long and 16′ high carport just like this one