This step by step diy project is about wood cabin bed plans. If you want to surprise your kid with a thematic bed frame but don’t want to spend a fortune on it, this free plan will help you achieve than and even more. This bed frame is suitable for a twin size mattress and it features a cute gable roof and windows on all sides. The free plans come with full Cut and Shopping lists. The plans are PDF downloadable and Print friendly.
It is essential to choose the right materials before starting the construction and the assembly of the bed. As you will see in the project, you need to choose durable lumber with a nice appearance, such as pine, cedar or redwood. Make sure the components are in a good visual condition and choose professional tools when adjusting their size. Take accurate measurements and join the components with glue and screws. See all my Premium Plans HERE.
Projects made from these plans
Wood Cabin Bed Plans
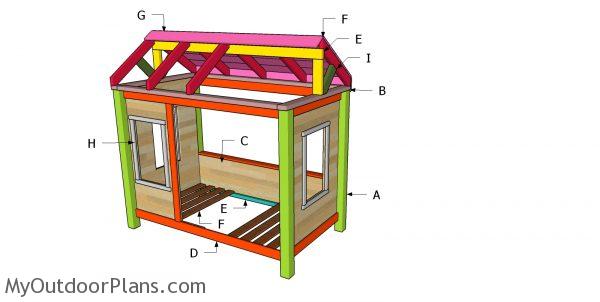
Building a cabin bed
Cut & Shopping Lists
- A – 4 pieces of 4×4 lumber – 60 1/2″ long POSTS
- B – 2 pieces of 2×4 lumber – 48″ long, 2 pieces – 75 1/2″ long TOP PLATES
- C – 2 pieces of 3/4″ plywood – 55 1/2″x37 3/4″ long, 2 pieces – 39 1/2″x55 1/2″ long, 1 piece – 17 1/2″x75 1/2″ long PANELS
- E – 2 pieces of 2×4 lumber – 12 1/2″ long, 1 piece – 82 1/2″ long RIDGE BEAM
- F – 10 pieces of 2×4 lumber – 31″ long RAFTERS
- G – 12 pieces of 1×6 lumber – 82 1/2″ long ROOF
- E – 2 pieces of 2×2 lumber – 75 1/2″ long CLEATS
- F – 13 pieces of 1×4 lumber – 39 1/2″ long SLATS
- H – 8 pieces of 1×2 lumber – 20″ long, 8 pieces – 26″ long TRIMS
- I – 4 pieces of 2×4 lumber – 13″ long TRIMS
- 4 pieces of 4×4 lumber – 8 ft
- 10 pieces of 2×4 lumber – 8 ft
- 7 pieces of 1×4 lumber – 8 ft
- 4 pieces of 3/4″ plywood – 4’x8′
- 2 pieces of 2×2 lumber – 8 ft
- 6 pieces of 1×4 lumber – 8 ft
- 7 pieces of 1×2 lumber – 8 ft
- 1 1/4″ pocket screws
- 1 5/8″ screws
- 2 1/2″ screws
- 3 1/2″ screws
- 1 1/4″ nails
- 2″ nails
- wood stain
- wood glue
- wood filler
- 5″ screws
- twin mattress
Tools
![]() Hammer, Tape measure, Framing square
Hammer, Tape measure, Framing square
![]() Miter saw, Drill machinery, Screwdriver, Sander
Miter saw, Drill machinery, Screwdriver, Sander
Time
![]() One day
One day
Related
Wood Cabin Bed – Free DIY Plans
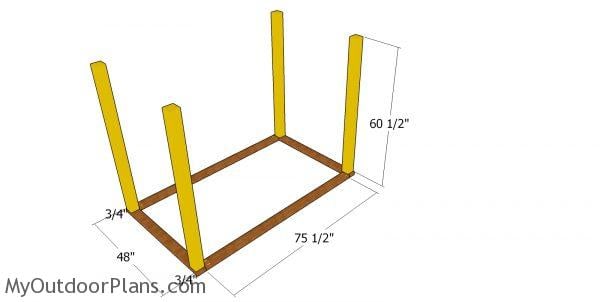
Assembling the frame of the cabin bed
First, we need to attach the top plates to the top of the 4×4 posts. Assemble the plates together with 2 1/2″ screws and pocket holes. Add glue to the joints and make sure the corners are square. Attach the plates to the top of the posts and check if the front and back overhangs are equal. Drill pilot holes through the plates and insert 3 1/2″ screws into the posts. Plumb the posts before inserting the screws.
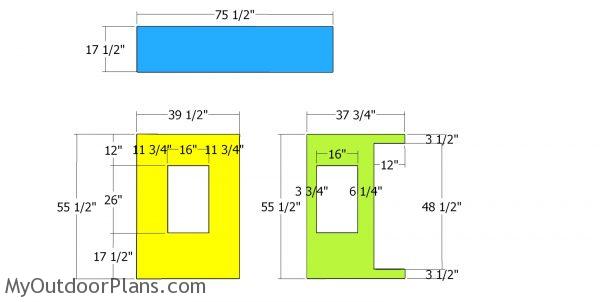
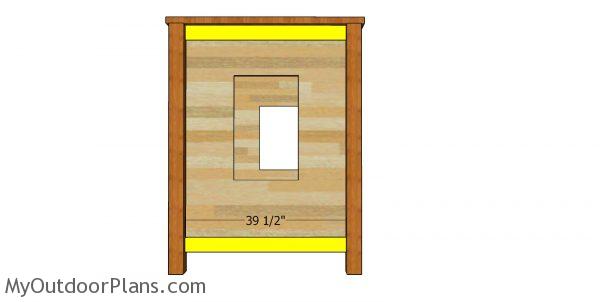
Panels for cabin bed
Use 3/4″ plywood for the cabin wall panels. Make the cuts as shown in the free plans. Drill pocket holes along the side edges.

Fitting the panels to the cabin bed
Fit the panels to the frame of the cabin bed. Insert 1 1/4″ screws through the pocket holes into the posts. In addition, lock the panels to the top plates. Drill pilot holes and insert 1 5/8″ screws. Add glue to the joints, as well.

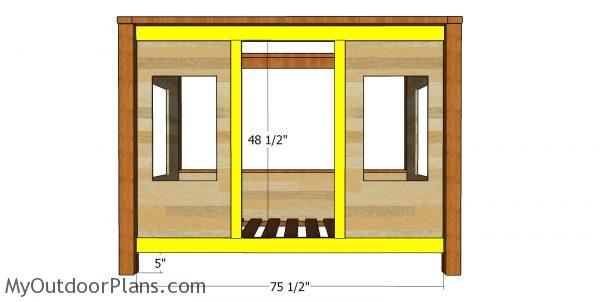
Cleats for bed
Next, we need to frame the actual toddler bed frame. Use 2×2 lumber for the cleats. Clamp the cleats to the plywood panels and add glue to the joints. Drill pilot holes through the plywood and insert 1 5/8″ screws into the cleats. We will also secure the cleats to the trims that will be placed on the side panels of the bed frame.
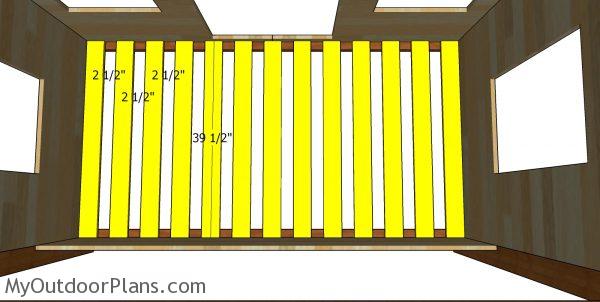
Fitting the bed slats
Use 1×4 lumber for the slats of the bed frame. Cut a piece of wood at 2 1/2″ and place it between the slats to create even gaps. Drill pilot holes through the slats and insert 1 5/8″ screws into the cleats. It is important to secure the slats with screws, because that will enhance the rigidity of the bed frame and thus support more weight.
Side wall trims
Fit the 1×4 trims to the side walls. Add glue to the joints and insert 1 1/4″ nails to lock the trims into place tightly.
Cabin Bed – front wall trims
Fit the 1×4 and 1×3 trims to the front of the bed frame. Add glue to the joints ans insert 1 1/4″ nails to secure them to the panels. Align the edges flush before inserting the nails.
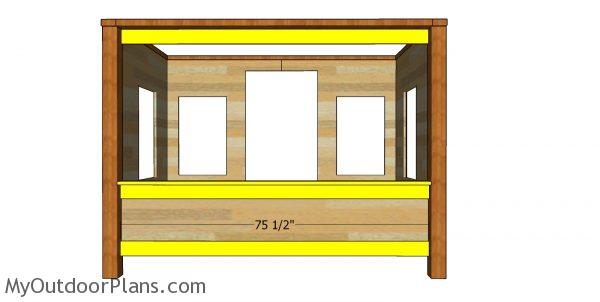
Back wall trims
Fit the 1×4 trims to the back of the cabin bed.
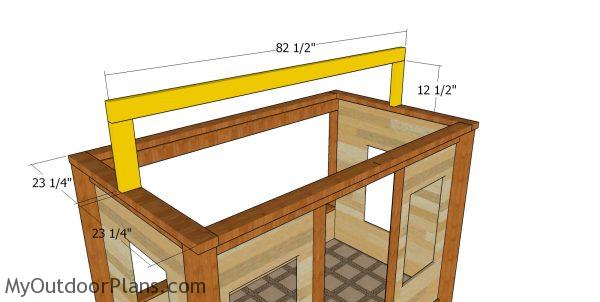
Fitting the ridge beam
Use 2×4 lumber for the ridge beam and for its supports. Drill pocket holes at both ends of the supports and insert 2 1/2″ screws to lock them to the center of the top plates. Use a carpentry square to make sure the corners are right angled. Attach the ridge beam to the top of the supports.
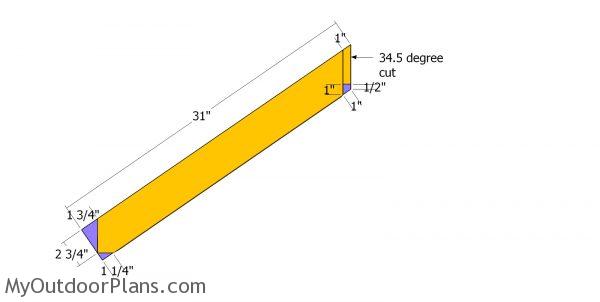
Rafters – cabin bed
Use 2×4 lumber for the rafters. Mark the cut lines on the 2x4s and then get the job done with a circular saw. Smooth the edges with sandpaper.

Fitting the rafters
Fit the rafters to the top of the cabin bed. Place the rafters equally spaced. Drill pilot holes through the rafters and insert 5″ screws into the frame of the bed frame.
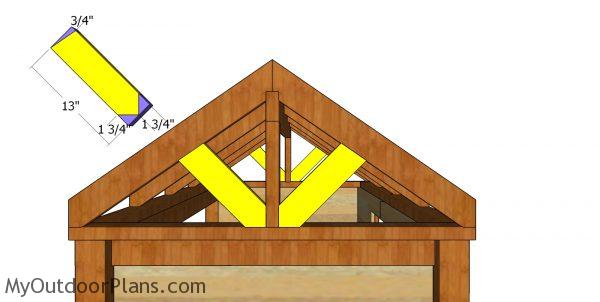
Roof trims
Use 2×4 lumber for the gable end trims. Use a miter saw to make the angle cuts to the trims. Drill pocket holes and insert 2 1/2″ screws to lock them to the frame of the roof.
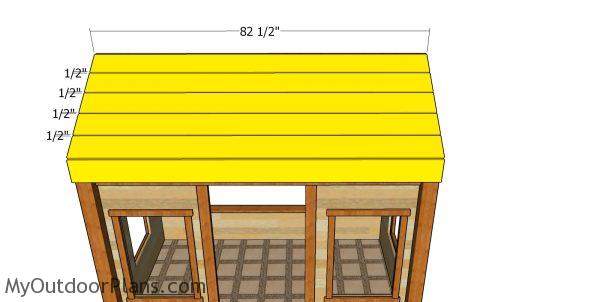
Roof slats – cabin bed
Fit the 1×6 slats to the top of the cabin bed frame. Place pieces of 1/2″ plywood between the slats to create even gaps. Drill pilot holes and insert 1 5/8″ screws to secure the slats to the rafters.
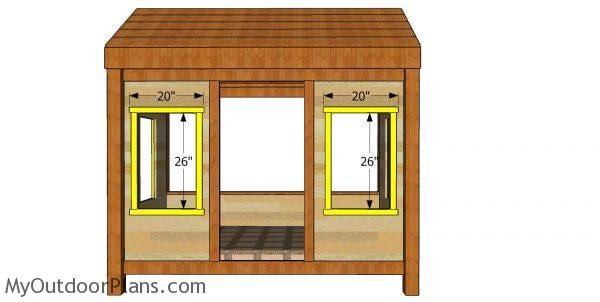
Window trims – cabin bed
Fit the twin size mattress to the bed frame, after taking care of the finishing touches. Install the 1×2 trims around the window openings. Use glue and 1 1/4″ nails to secure the trims into place.
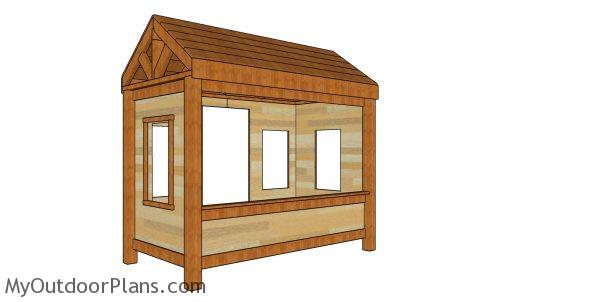
Cabin Bed Plans – Twin Size – Back view
This cabin bed is simple to build with materials you can find at ant DIY store. Therefore, you can make this kids bed at a fraction of its retail price. You can also add your personal touch to the kids bed frame.
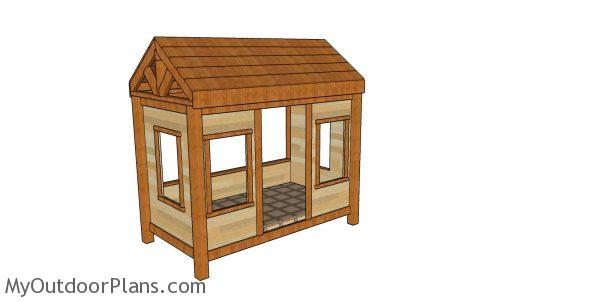
Cabin Bed Plans – Twin Size – MOP
One of the last steps of the woodworking project is to take care of the finishing touches. Therefore, fill the pilot holes with wood putty and smooth the surface with 120-grit sandpaper.
Top Tip: In order to protect the lumber from water damage, we recommend you to cover the components with several coats of paint.
This woodworking project was about high twin size cabin bed plans. If you want to see more outdoor plans, we recommend you to check out the rest of our step by step projects. LIKE us on Facebook to be the first that gets our latest plans. Send us pictures with your plans.
- EXPLORE MORE IDEAS FOR -
 |
 |
 |
 |