This step by step diy project is about platform bird feeder plans. Building a bird feeder is easy but you should choose the design that suits your needs and that is adequate for the birds you want to attract in your yard. Moreover, choose a proper location that is protected from cats and other predators. Hang the feeder in a tree (6′ above ground) or attach it to a wooden post.
Before starting the actual construction of the bird feeder, we recommend you to adjust its size and design to your own needs. In addition, don’t forget that you should invest in the best materials you could afford, such as pine, cedar or redwood. Align the slats at both ends and drill pilot holes before inserting the galvanized screws or nails, to prevent the wood from splitting. See all my Premium Plans HERE.
Projects made from these plans
Cut & Shopping Lists
- A – 1 pieces of 3/4″ plywood – 16×16” long BASE
- B – 2 piece of 1×3 lumber – 16″, 2 pieces – 17 1/2″ long TRIMS
- C – 2 pieces of 1×8 lumber – 18 1/2″ long SUPPORTS
- D – 2 pieces of 1×4 lumber – 17 1/2″ long RAFTERS
- E – 4 pieces of 1×4 lumber (1/4″ thick) – 22 1/2″ long ROOF
Tools
![]() Hammer, Tape measure, Framing square
Hammer, Tape measure, Framing square
![]() Miter saw, Drill machinery, Screwdriver, Sander, Post-hole digger
Miter saw, Drill machinery, Screwdriver, Sander, Post-hole digger
Time
![]() One weekend
One weekend
Related
Building a Platform Bird
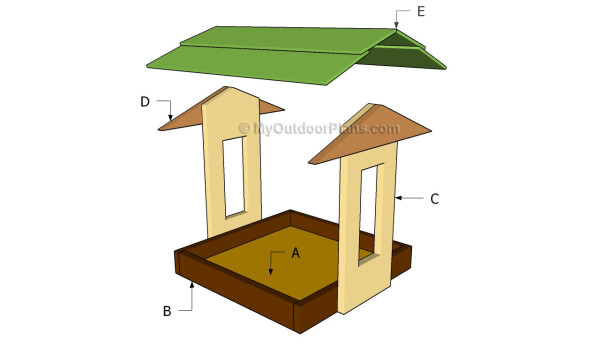
Building a platform bird feeder
Top Tip: There are many designs and plans you could choose when building a platform bird feeder. You can build just a simple platform or you could add a simple roof, as in the image.
Platform Bird Feeder Plans
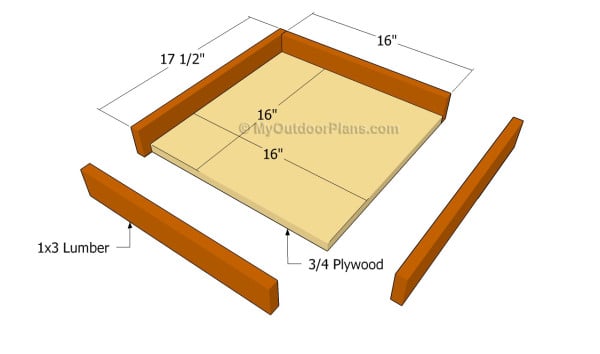
Building the base of the bird feeder
The first step of the project is to build the floor of the bird feeder. As you can easily notice in the image, you need to build the base from 3/4″ plywood and attach 1×3 trims to the four sides.
After cutting the 16×16 plywood, you need to apply waterproof glue to the trims and attach them to the edges of the plywood. In addition, we recommend you to drive several finishing nails into the plywood, to get rigid joints.
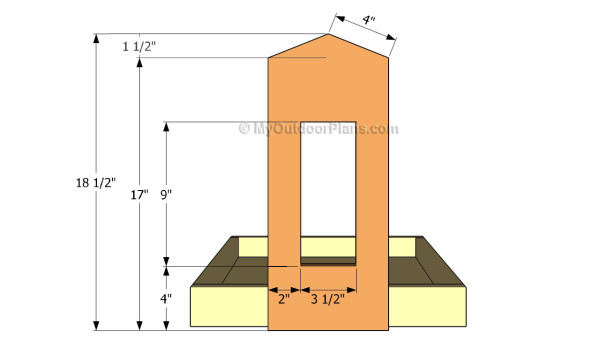
Building the supports
Next, you need to build the front and back supports, using the information from our free plans. As you can easily notice in the image, we recommend you to build the supports from 1×8 lumber.
Mark the cut lines on the slats and make the cuts with a good circular saw. Afterwards, cut out the rectangle inside the slat with a jigsaw. Smooth all the edges with fine-grit sandpaper.
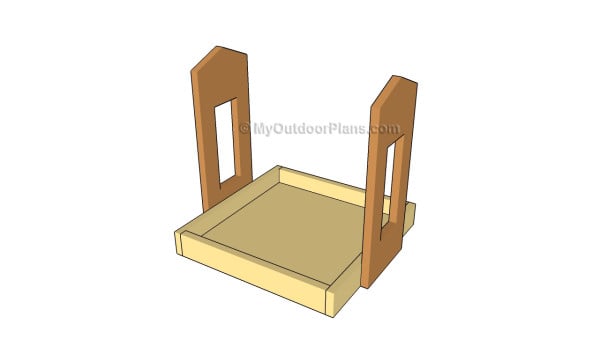
Attaching the supports
Continue the woodworking project by attaching the supports to the trims, as in the image. Center the components to the trims, align them with the bottom of the floor and lock them into place with waterproof glue and finishing nails.
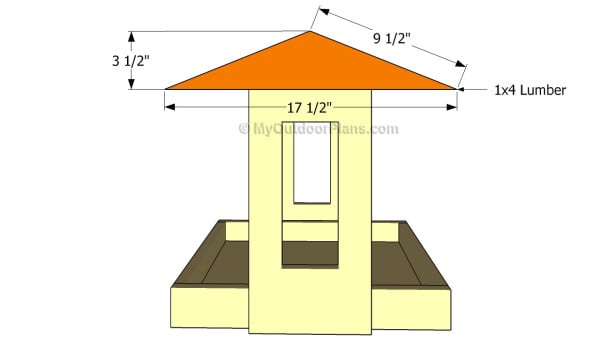
Attaching the gable ends
One of the last steps of the project is to build the rafters and to attach them to the top of the supports. As you can easily see in the plans, you need to make the component from 1×4 lumber.
Top Tip: Use a circular saw with a sharp blade to make the cuts and smooth the edges with sandpaper. Attach the rafters to the supports and lock them into place with glue and several 1 1/4″ finishing nails.
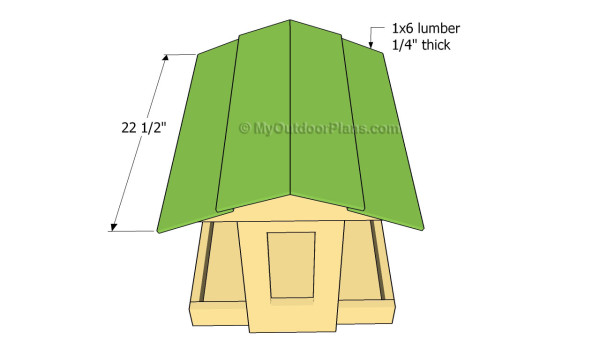
Attaching the roof slats
In order to protect the structure from rain and snow, we recommend you to attach several 1×4 slats (1/4″ thick) to the rafters. As you can see in the plans, the slats should overlap several inches. Drill small pilot holes and insert 1 1/4″ nails into the rafters.
Use weather-resistant lumber when building the components, if you want to get a professional and durable result. Make sure the slats are in a good shape, without cracks or other flaws.
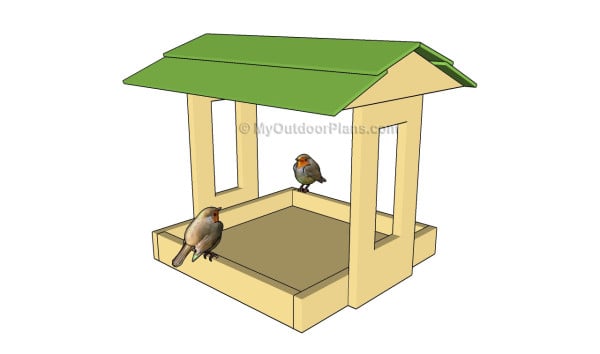
Platform bird feeder plans
Last but not least, you have to take care of the finishing touches. Therefore, fill the holes and the cracks with wood filler and let it dry out for several hours, before sanding the surface with 120-grit sandpaper.
Top Tip: Protect the wooden components from rot by applying several coats of paint. Choose colors that match the design of the rest of your property, as to enhance the look of the bird feeder.
This woodworking project was about platform bird feeder plans. If you want to see more outdoor plans, we recommend you to check out the rest of our step by step projects.


2 comments
I like this web site gives me some great Ideas
Goof to hear that. I’m looking forward to seeing what you build.