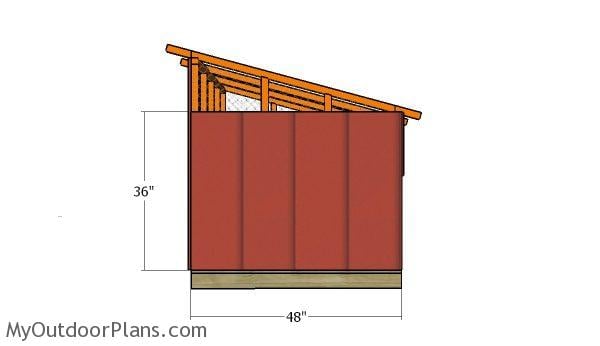
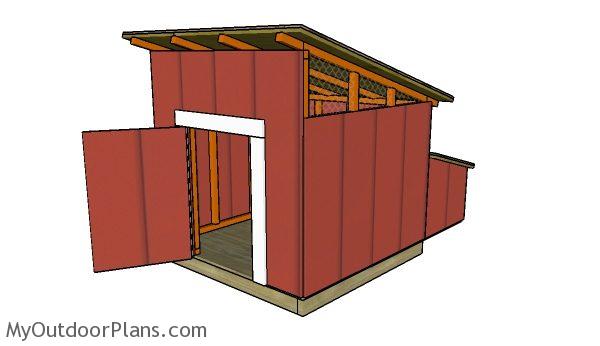
This step by step diy project is about duck coop plans. I have designed this 4’x4′ duck house with nesting boxes, so you can build one for your ducks. This basic lean to shelter features a large front door and separate nesting boxes with a lid for easy access to the eggs. Make sure you also cek out PART 2 of the project to learn how to make the boxes for the nests. Take a look over the rest of my woodworking plans, if you want to get more building inspiration.
When buying the lumber, you should select the planks with great care, making sure they are straight and without any visible flaws (cracks, knots, twists, decay). Investing in cedar or other weather resistant lumber is a good idea, as it will pay off on the long run. Use a spirit level to plumb and align the components, before inserting the galvanized screws, otherwise the project won’t have a symmetrical look. If you have all the materials and tools required for the project, you could get the job done in about a day. See all my Premium Plans HERE.
Projects made from these plans
Duck Coop Plans

Building-a-duck-house
Cut & Shopping Lists
- A – 2 pieces of 2×4 lumber – 48″ long, 5 pieces – 45″ long FLOOR FRAME
- B – 1 piece of 3/4″ plywood – 48″x48″ long FLOOR
- C – 2 pieces of 2×2 lumber – 45″ long, 4 pieces – 33″ long 2xSIDE WALLS
- D – 2 pieces of 2×2 lumber – 48″ long, 3 pieces – 33″ long, 4 pieces – 21 3/4″ long, 2 pieces – 11 1/2″ long BACK WALL
- E – 1 piece of 2×2 lumber – 48″ long, 2 pieces – 13 1/4″ long, 4 pieces – 45 1/2″ long, 1 piece – 21 3/4″ long, 1 piece – 14″ long FRONT WALL
- F – 2 pieces of T1-11 siding – 48″x36″ long, 1 piece – 48″x48 1/2″ long, 1 piece – 48″x14 1/2″ long WALLS
- G – 4 pieces of 2×2 lumber – 60″ long, 2 pieces – 8 1/4″ long, 2 pieces – 4 1/4″ long RAFTERS
- H – 2 pieces – 48″x14″ long VENTS
- I – 1 piece of 3/4″ plywood – 35 3/4″x60″ long, 1 piece – 20 1/4″x60″ long ROOF
- J – 25 sq ft of tar paper, 25 sq ft of asphalt shingles ROOFING
- K – 2 pieces of 1×4 lumber – 31 1/2″ long, 1 piece – 28 3/4″ long JAMBS
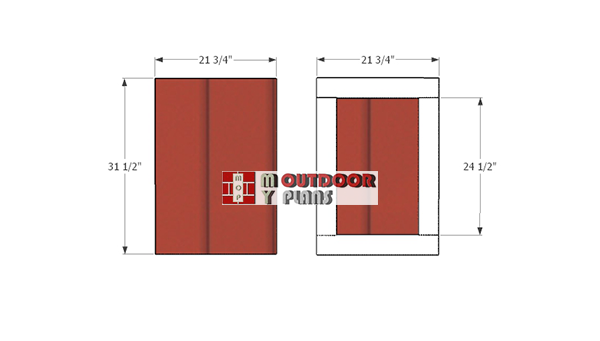
- L – 2 pieces of 1×4 lumber – 24 1/2″ long, 2 pieces – 21 3/4″ long, 1 piece of T1-11 siding – 21 3/4″x31 long DOOR
- 4 pieces of 2×4 lumber – 8′
- 3 pieces of 3/4″ plywood – 4’x8
- 18 pieces of 2×2 lumber – 8′
- 2 pieces of T1-11 siding – 4’x8′
- 2 pieces of 1×4 lumber – 8′
- 2 hinges, 1 latch , 1/4 hardware cloth
- 2 1/2″ screws, 1 1/4″ screws, 1 5/8″ screws
- 25 sq ft of tar paper, 25 sq ft of asphalt shingles
- wood filler , wood glue, stain/paint
Tools
![]() Hammer, Tape measure, Framing square, Level
Hammer, Tape measure, Framing square, Level
![]() Miter saw, Drill machinery, Screwdriver, Sander
Miter saw, Drill machinery, Screwdriver, Sander
![]() Safety Gloves, Safety Glasses
Safety Gloves, Safety Glasses
Time
![]() One day
One day
Related
- PART 1: Duck house plans
- PART 2: Duck house nesting boxes plans
Building a duck coop

Building-the-floor-frame
The first step of the project is to build the floor frame for the duck house. Cut the joists from 2×4 lumber and smooth the edges with sandpaper. Drill pilot holes through the 48″ long components and insert 2 1/2″ screws into the short joists. Align the edges with attention before inserting the screws, for a neat result.
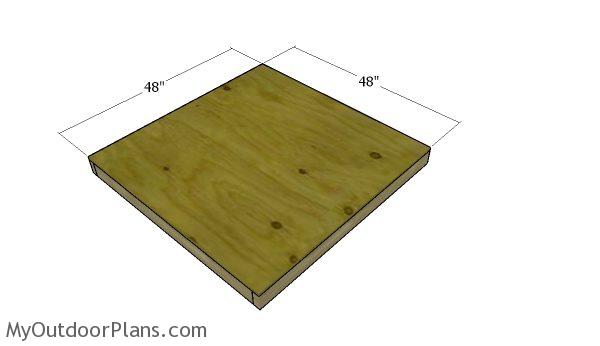
Fitting the floor
Use 3/4″ plywood for the floor of the duck house. Align the edges, drill pilot holes and insert 1 5/8″ screws every 8″ to lock the panel into place. Make sure you staple some vinyl flooring to clean the house easily.
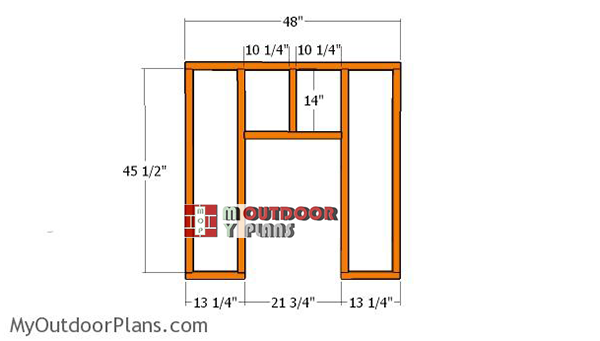
Building-the-front-wall-frame
Continue the project by assembling the front wall for the duck house. Cut all the components from 2×2 lumber. Drill pilot holes through the plates and insert 2 1/2″ screws into the studs. In addition, make sure the corners are square and leave enough room for the door opening.
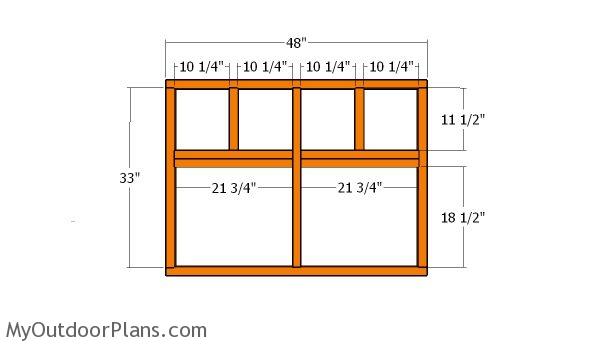
Building the back wall
Build the back wall for the duck house using 2×2 lumber, as well. As you can see in the diagram, you need to leave enough roof for the nesting boxes. Use 2 1/2″ screws for the joists between the components. Align the edges flush and make sure the corners are square for a neat result.
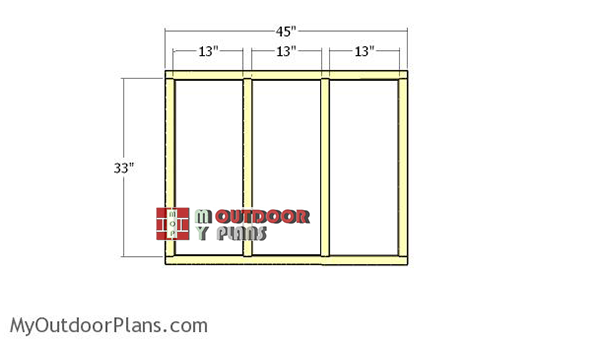
Building-the-side-wall-frames
Frame the back wall for the duck house using the same techniques described above, making sure you cut the components at the right dimensions.
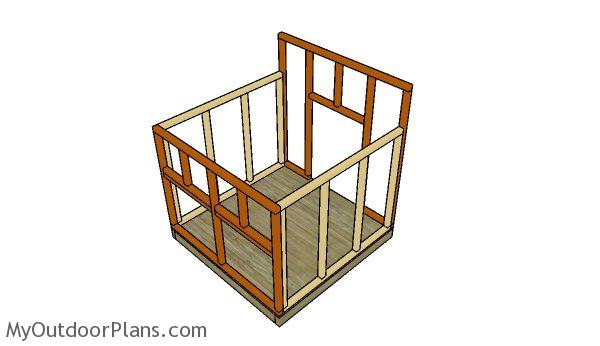
Assembling the frame of the duck house
Fit the wall frames to the floor of the duck house. Align the edges with attention, drill pilot holes through the bottom plates and insert 2 1/2″ screws into the joists. Plumb the walls with a spirit level to make sure the frames are plumb. In addition, lock the adjacent walls together, by drilling pilot holes and inserting 2 1/2″ screws.

Fitting the front wall
Use T1-11 siding or 1/2″ plywood for the exterior walls. Align the edges with attention and secure the sheets to the framing with 8d nails. Insert the nails every 8″ along the wall framing.

Back wall
Fit the T1-11 siding panel to the back of the duck house with 8d nails. Align the edges with attention before inserting the nails.
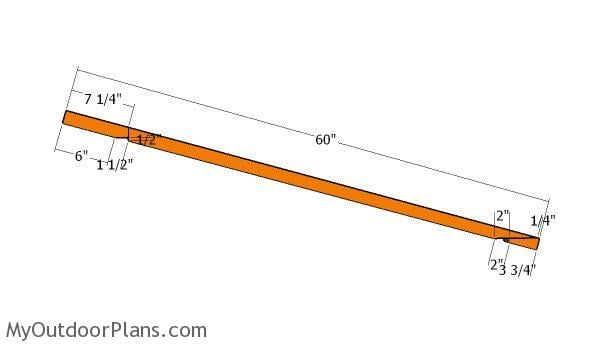
Building the rafters
Build the rafters from 2×2 lumber. Mark the cut lines on the slats for the birds mouths and get the job done with a circular saw. Smooth the edges with sandpaper.

Fitting the rafters
Fit the 2×2 rafters to the top of the duck house. Align the edges with attention, drill pilot holes and insert 2 1/2″ screws.
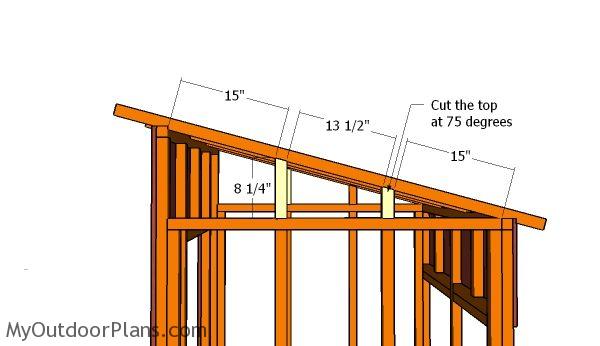
Fitting the side supports
Fit 2×2 supports to the sides of the duck house, as shown in the free plans. Cut the top of the supports at 75 degrees and secure them into place with 2 1/2″ screws, after drilling pilot holes.
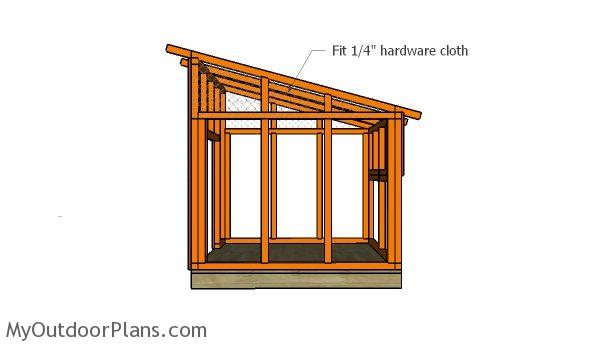
Hardware cloth
The next step of the project is to attach 1/4″ hardware cloth to the lean to sides of the duck house, using a stapler. These areas will help ventilate the interior of the duck house, especially when the door is closed.
Attaching the sides
Continue the outdoor project by fitting the T1-11 siding panels to the sides of the duck house. Use 8d nails to secure the panels to the framing.

Fitting the roof
Continue the project by fitting the 3/4″ plywood sheets to the rafters. Align the sheets with attention and lock them to the rafters with 1 5/8″ screws. Leave no gaps between the components.
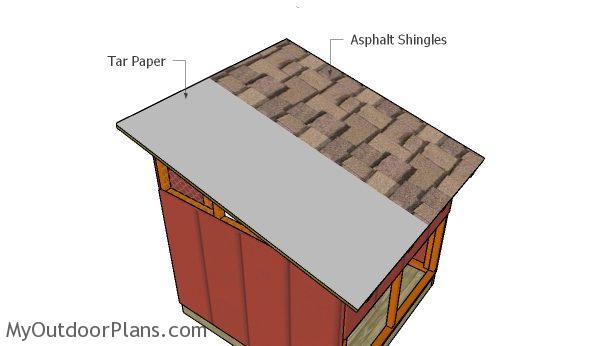
Fitting the roofing
Cover the roof of the duck coop with roofing felt, making sure the strips overlap at least 2″. Secure the tar paper to the plywood sheets with roofing staples. Fit the side drip edges over the roofing felt, while the bottom drip edges should be fit under. Next, install the asphalt shingles, starting with the bottom left side of the roof and go up to the top. Make sure you read the manufacturer’s instructions for more ideas on how to install the shingles properly.

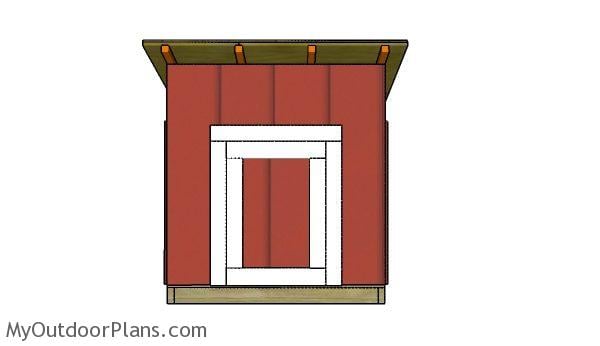
Fitting the door trims
Continue the project by attaching the 1×4 trims around the door opening. Align the edges with attention and secure them into place with 1 1/2″ brad nails. Leave no gaps between the components for a professional result.
Door-frame
Build the door for the duck house from T1-11 siding and 1×4 trims. Align the trims to the panel and secure them into place with glue and 1 1/4″ nails. Make sure you leave no gaps between the components and check if the corners are right angled.
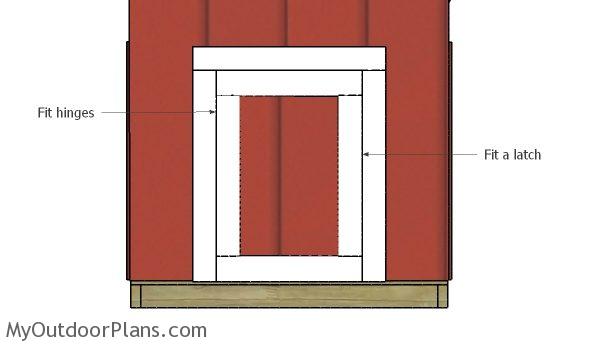
Fitting the door into place
Fit the door into place and lock it to the door jambs with hinges. In addition, install a door latch so you can keep the duck house safe from predators.
Duck coop plans
I strongly recommend you to take a look over PART 2 of the project, so you can learn how to build the nesting boxes for the project.
Duck house plans
This duck house is a straight forward project and anyone should be able to get the job done in a few days without much effort. If you are new to this site, I also recommend you to take a look over the rest of my plans, as I am sure you can find there something to suit your needs.
This woodworking project was about duck coop plans free. If you want to see more outdoor plans, check out the rest of our step by step projects and follow the instructions to obtain a professional result.

21 comments
how many duck can this hold? also would it work for geese as well?
can someone also tell me what the actual estimated cost to purchase all the wood? thanks
It can host about 4 ducks. I am not sure if it can host geese, as I am not an expert in the field. Regrading the estimate, you have the material list which you can add up the costs very easily.
When I built the 4×4 the wood alone, all green treated, was around $300. I also doubled the plywood from the plans because I fully framed and insulated mine, I used steel sheet siding from the bargain bin at menards and linoleum on the floor and walls of the inside, all in all the finished house was 500 bucks. I just recently used the same plans just added 2 feet in both directions, so a 6×6 also insulated, only thing different is I used 2×4’s for the roof supports instead of 2×2, I’m $700 into that one.
Why in the heck would you present plans with a solid wood floor? Where will all the duck poop go????
You clean it. Some people have this habit.
Where are the laying box plans?
See the NEXT button at the bottom of this article. Press it for PART 2 of the project.
Thank you for these plans! In most cases, ducks need approximately 4-6 square feet each in a shelter. They are floor nesting, so their floor space needs are greater than chickens because ducks do not roost. Some don’t like to use nesting boxes. They lay where they feel like, sometimes outside under bushes. Ducks are crazy.
A linoleum floor is great as long as there is plenty of bedding to keep the ducks from slipping. A duck house placed on a concrete foundation helps keep them safe from burrowing predators. A door latch that allows for a padlock is best to keep raccoons out – they are incredibly dexterous.
Some people run the linoleum a foot or so up the inside walls to keep duck mucky muck from getting under the linoleum. Linoleum makes it easier to hose out the house.
Ducks have a hard time climbing sleep ramps to their houses, but you also don’t want the floor and door so low that the ducks are swimming in their house in a downpour when the surrounding ground is saturated, although they would be thrilled. (I live in the PNW.) The doorway needs to be wide enough that two ducks can exit side by side, because that’s what the crazy things do, annnnd they can wedge themselves in the doorway and get stuck, which is amusing but potentially harmful.
Ducks expire more moist air then chickens, so their houses need more ventilation than chicken coops. I would probably use a jigsaw to create a wide and narrow vent at the top front and cover it with hardware cloth.
How would one modify the house to make it larger or possibly rectangular which might be a more efficient shape for ducks? It would also be helpful to have a hinged roof (in two halves maybe?) for egg collection and cleaning because ducks often nest in corners. If they don’t use the nesting boxes, I think it would be hard on the back to rummage around for eggs through the door, and wet bedding needs to be replaced everyday. The house needs a thorough cleaning weekly.
I love this house. I’m thinking about how to modify it for six ducks. Single ducks get lonely, and if you’re going to have a drake, you need at least four hens/ducks, or they can be over mated and harmed.
Many thanks!
Thank you for the awesome feedback. Let me know how your project comes out.
Do you do custom plans appon request? Like if I wanted to modify these plans?
No, I rarely design custom plans.
Hunny and I built our chicken coop taking care to have adequate ventilation as well as draft protection. I am guessing for ducks you do not need the draft protection? We are planning 3 hens and one drake. 4’x4’x4′ without nesting box is the size of our duck house. We are making it in modular form so we can assemble it in place.
I should have done more research before I built this duck house. That being said, it has 4 sq.ft. floor space for 2 mallards. Guess that is going to be tight. What I can’t find is, how high should the door opening be? And since I really didn’t make it big enough, do you think they’ll both try to use it at the same time? This is a floating house for the pond and I’m putting the house on a 4’X4′ deck and protruding the roof over the entire deck to protect them from the eagles. we lost our hen last fall and replaced it before my granddaughter found out.
Thanks.
This plan is 16 sq ft not 4 sq ft
48″ = 4′
4′ x 4′ = 16′
We just built this and it turned out great. Used OSB instead of plywood to save costs. Anticipating the poop problem, I used hardware cloth for the floor instead of plywood. It can be hosed down and drain through. As designed, it would be very hard to keep clean. Our 3 ducks seem happy.
That’s amazing. I would love to see and feature your coop. That will also help the community. You can send a few pics here: https://myoutdoorplans.com/contact/ I appreciate it.
you have clearer detail you can send me on those birds mouth cuts?? my first project…making this for my pet goose!
I recently built your 10×10 gable pavilion with the premium plan I purchased and it turned out great. I”m now looking to build this duck coop but don’t see anything listed under the premium plans. Do you have a premium version or should I just stick with this free version. Thanks, George
Just the free version atm
Great plan, easy to follow, built in a weekend
That’s awesome. I would be very happy to see a few pics of your coop and share it with our DIY community. You can send the images here: https://myoutdoorplans.com/contact-us/