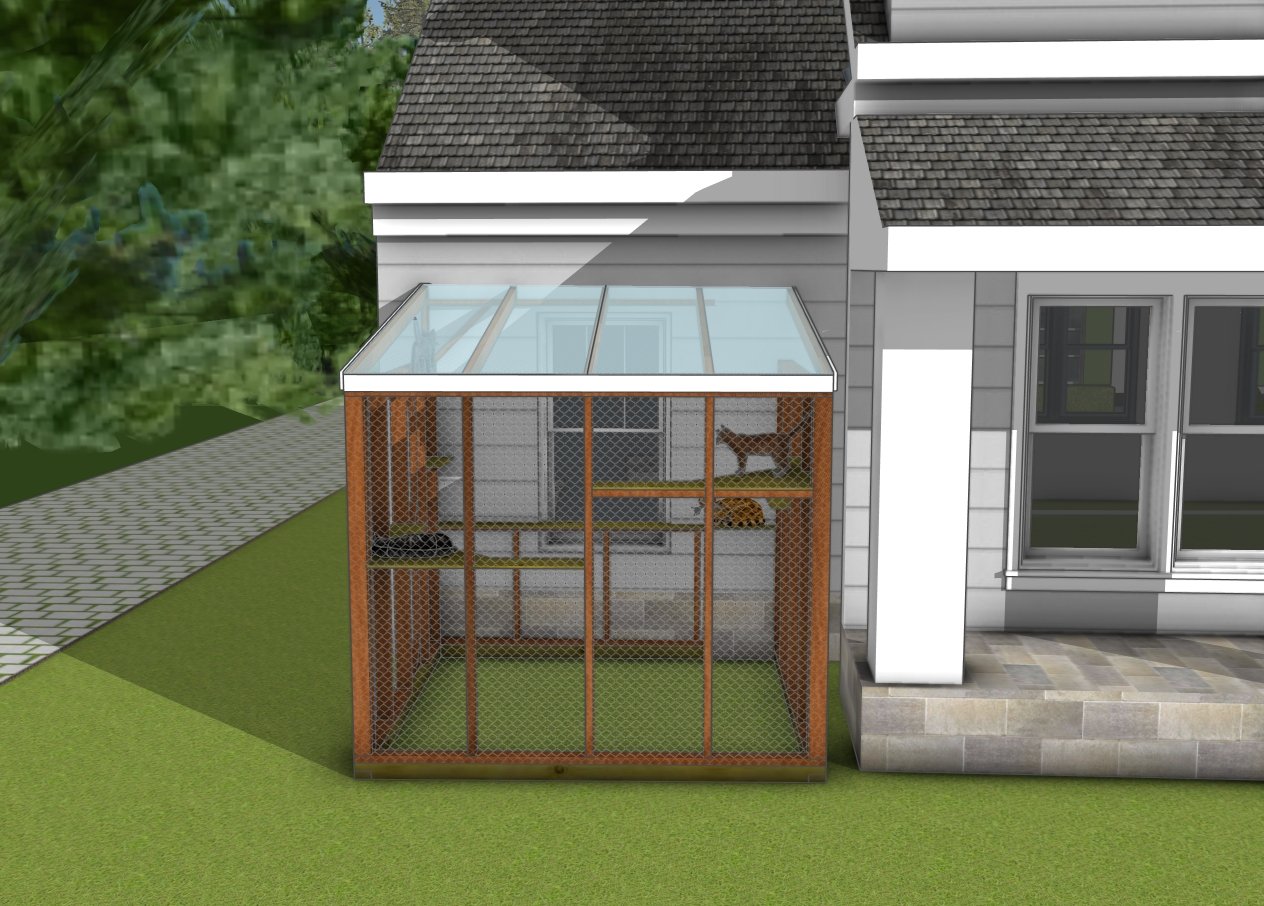
Cats love the outdoors, but letting them roam freely comes with risks – traffic, predators, and all kinds of trouble. That’s where my DIY catio plans come in! This 8×8 catio is the perfect way to give your cats the fresh air and sunshine they crave while keeping them safe and secure. With plenty of space for climbing, lounging, and exploring, this enclosure transforms your backyard into a feline paradise.
In this guide, I’ll walk you through how to build your own 8×8 catio with detailed steps, materials, and pro tips to make the project smooth and stress-free. Whether you want a free-standing structure or an extension to your home, this plan is designed for stability, durability, and ease of construction. Let’s dive in and build a catio your furry friends will love!
When buying the lumber, you should select the planks with great care, making sure they are straight and without any visible flaws (cracks, knots, twists, decay). Investing in cedar or other weather resistant lumber is a good idea, as it will pay off on the long run. Use a spirit level to plumb and align the components, before inserting the galvanized screws, otherwise the project won’t have a symmetrical look. If you have all the materials and tools required for the project, you could get the job done in about a day.
Projects made from these plans
8×8 Outdoor Catio Plans – Free DIY Plans
Cut and Shopping Lists
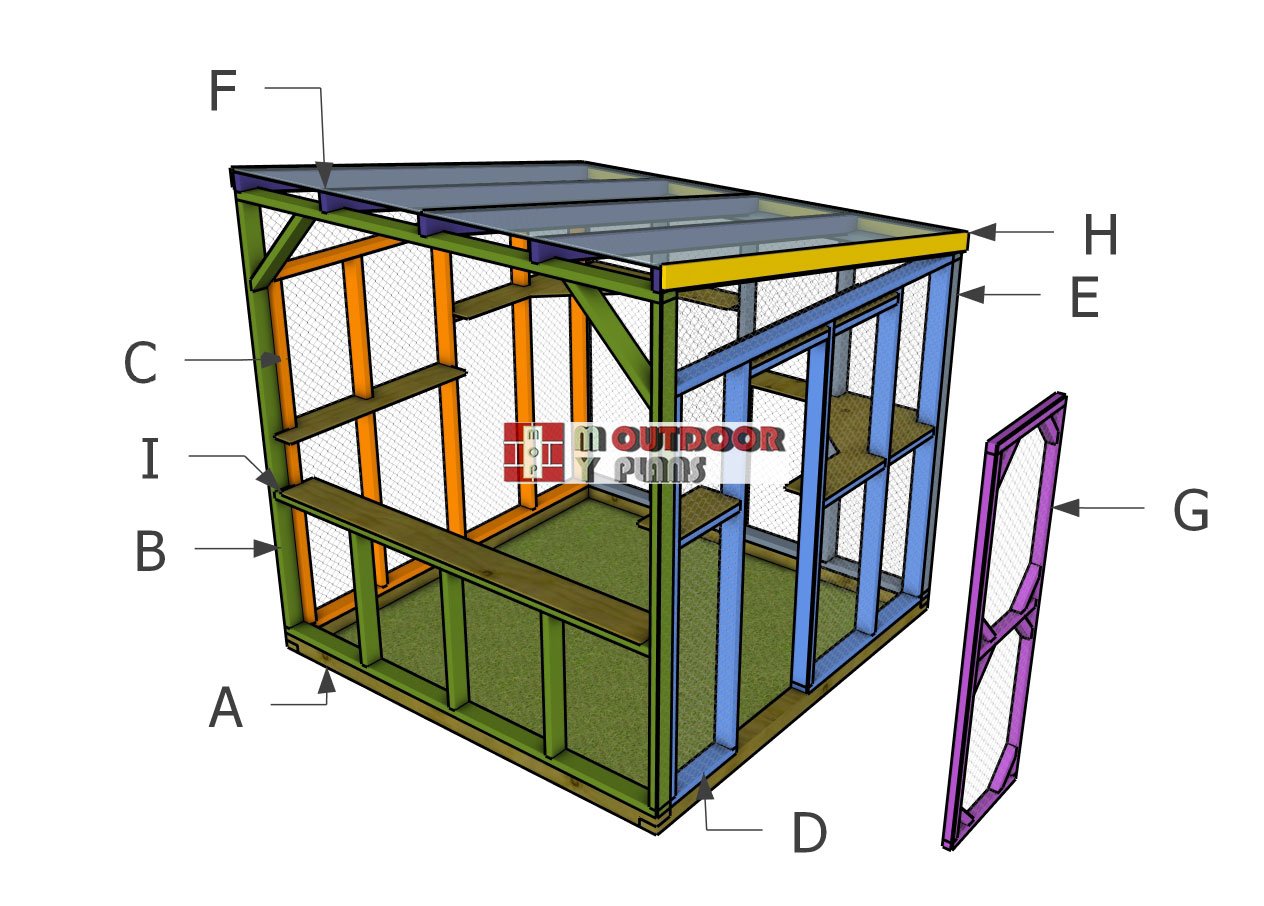
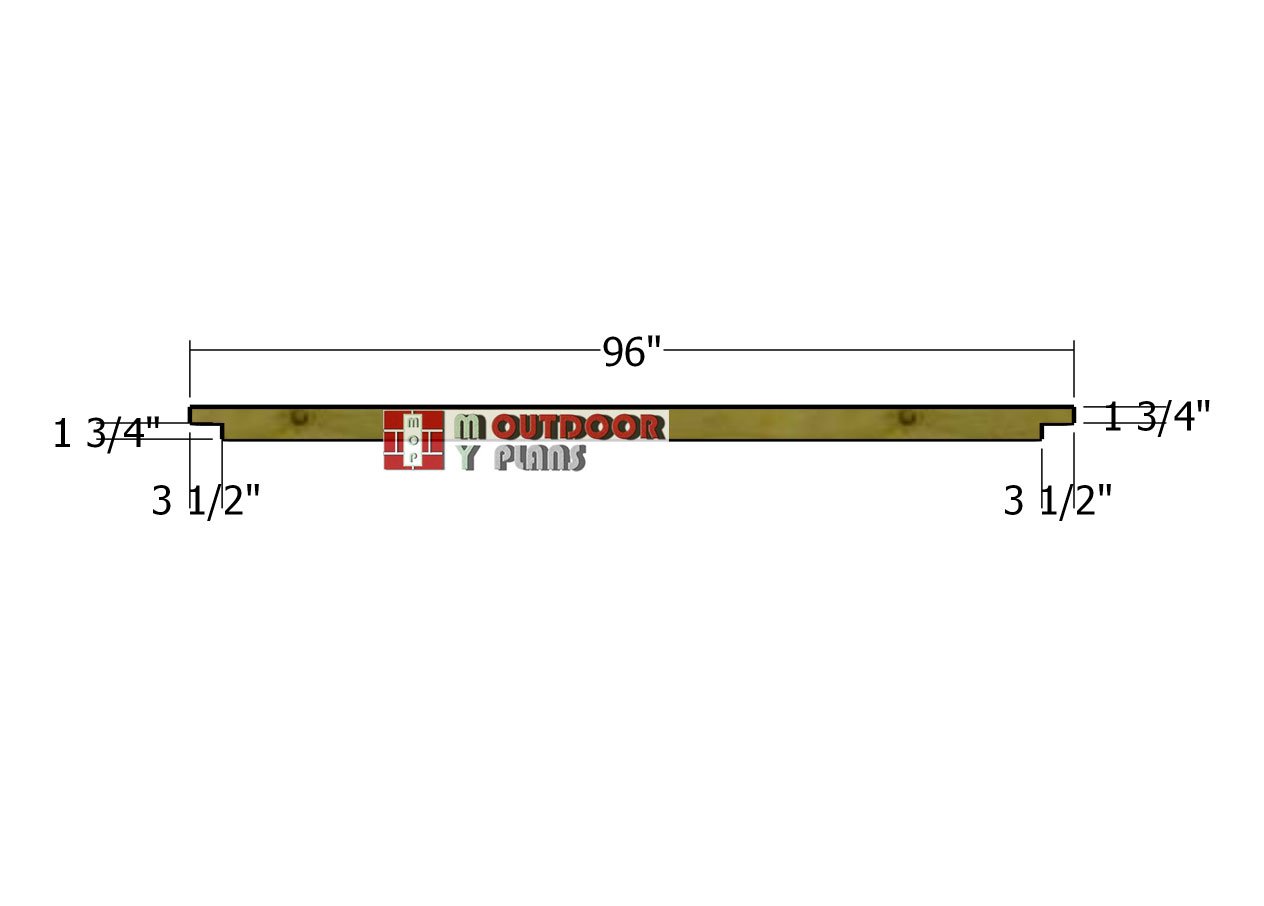
A – 4×4 lumber – 96″ long BASE – 4 pieces
B – 2×4 lumber – 88 7/8″ long SIDE WALL – 2 pieces
B – 2×4 lumber – 93″ long SIDE WALL – 1 piece
B – 2×4 lumber – 96″ long SIDE WALL – 2 pieces
B – 2×4 lumber – 29 1/2″ long SIDE WALL – 3 pieces
B – 2×4 lumber – 24″ long SIDE WALL – 2 pieces
C – 2×4 lumber – 89″ long BACK WALL – 2 pieces
C – 2×4 lumber – 73 1/2″ long BACK WALL – 5 pieces
C – 2×4 lumber – 22 1/2″ long BACK WALL – 2 pieces
C – 2×4 lumber – 18 1/4″ long BACK WALL – 2 pieces
D – 2×4 lumber – 89″ long FRONT WALL – 1 piece
D – 2×4 lumber – 19 3/4″ long FRONT WALL – 1 piece
D – 2×4 lumber – 16 3/4″ long FRONT WALL – 1 piece
D – 2×4 lumber – 45 1/4″ long FRONT WALL – 1 piece
D – 2×4 lumber – 73 1/2″ long FRONT WALL – 5 pieces
D – 2×4 lumber – 24″ long FRONT WALL – 1 piece
D – 2×4 lumber – 22 1/2″ long FRONT WALL – 2 pieces
D – 2×4 lumber – 18 1/4″ long FRONT WALL – 1 piece
E – 2×4 lumber – 96″ long SHORT SIDE WALL – 2 pieces
E – 2×4 lumber – 73 1/2″ long SHORT SIDE WALL – 5 pieces
E – 2×4 lumber – 22 1/2″ long SHORT SIDE WALL – 1 piece
E – 2×4 lumber – 21 3/4″ long SIDE WALL – 1 piece
Tools
![]() Hammer, Tape measure, Framing square, Level
Hammer, Tape measure, Framing square, Level
![]() Miter saw, Drill machinery, Screwdriver, Sander
Miter saw, Drill machinery, Screwdriver, Sander
![]() Safety Gloves, Safety Glasses
Safety Gloves, Safety Glasses
Time
![]() One week
One week
Related
- PART 1: 8×8 catio plans
- PART 2: 8×8 catio roof plans
- 6×8 catio plans
Pin it for later!
8×8 catio plans
It’s that easy to build a outdoor catio!
STEP 1: Building the base
Skids
Start by building the 8×8 catio base using 4×4 pressure-treated lumber for durability. Notch both ends of the skids with a circular saw—set the blade depth to 1 3/4″, make a series of parallel cuts inside the marked area, then clean it up with a hammer and chisel.
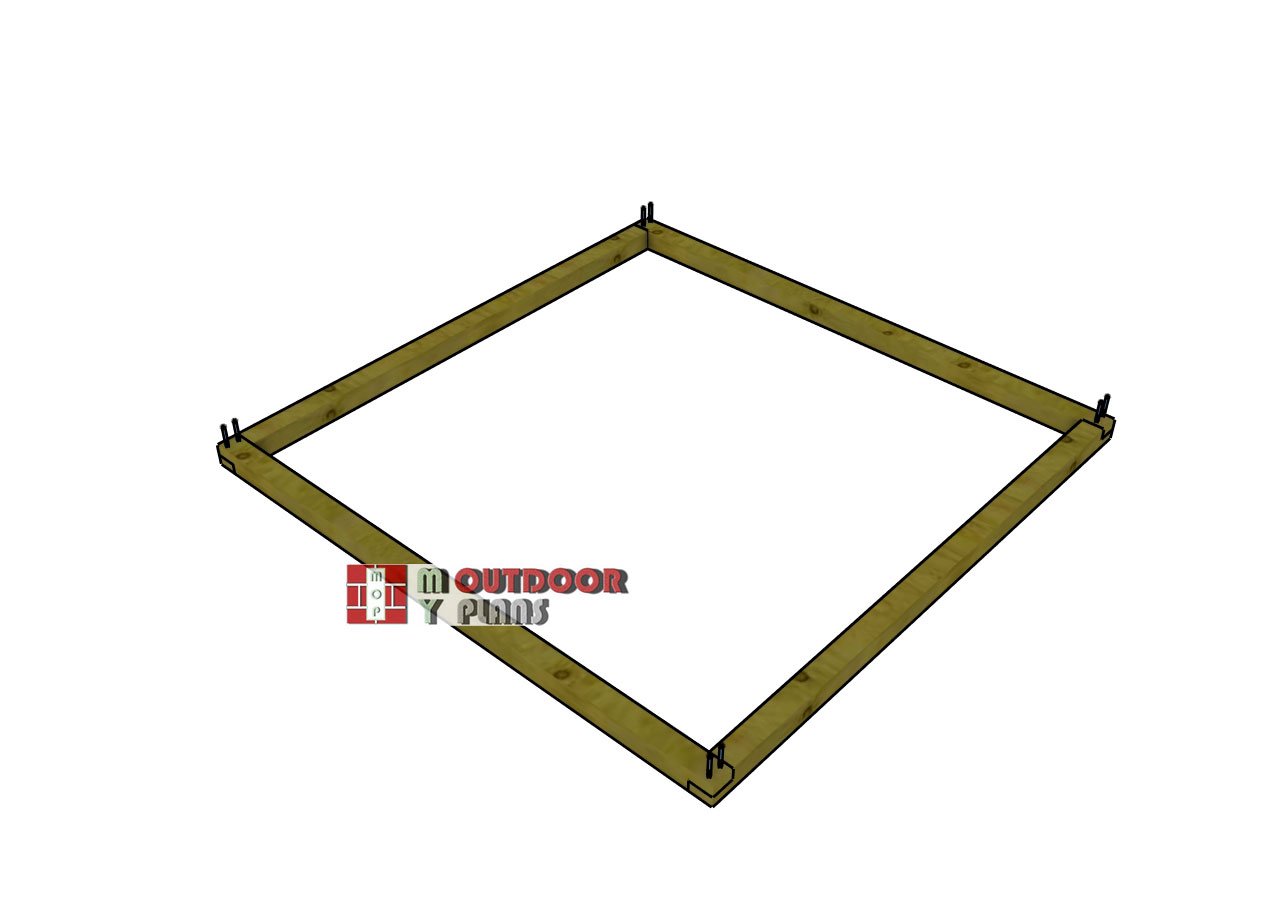
Assembling-the-base
Assembling-the-baseOnce the skids are ready, drill pilot holes and assemble the base with 3 1/2″ screws, using at least two screws per joint for a solid connection. Before fully tightening, double-check that the corners are square and the edges line up flush—because a precise base makes everything else easier down the line! Using 4×4 pressure-treated (PT) lumber for a catio base is generally safe and a solid choice for durability, especially if it’s rated for ground contact. Modern PT wood uses safer treatments like MCA or ACQ, making it non-toxic for pets, but avoid older CCA-treated wood. To extend its lifespan, consider placing it on concrete pavers or gravel to reduce moisture exposure. Sealing it with a pet-safe, non-toxic sealer adds extra protection, and if you’re concerned about chemicals, cedar, redwood, or composite decking are great alternatives.
STEP 2: Building the wall frames
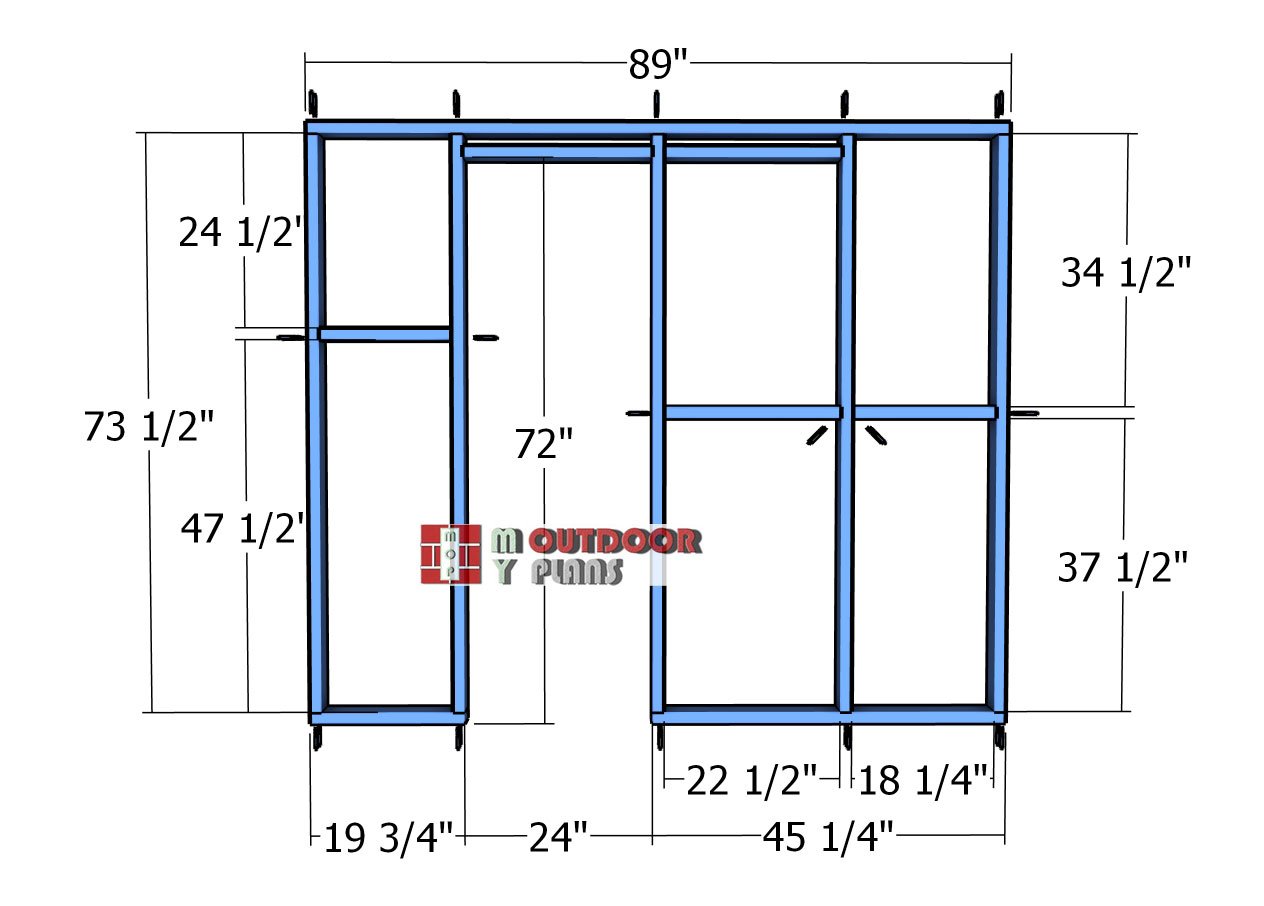
Front-wall-frame
Next up, it’s time to frame the wall with the door opening. Cut all the 2×4 components to size and lay them out on a level surface. Drill pilot holes through the top and bottom plates, then secure the studs with 3 1/2″ screws to keep everything sturdy. For the shelf supports, drill pilot holes before fastening them in place. In those tight spots where drilling straight isn’t an option, go ahead and drive the screws at an angle, just like in the diagram. A little creativity goes a long way in getting everything locked in securely!
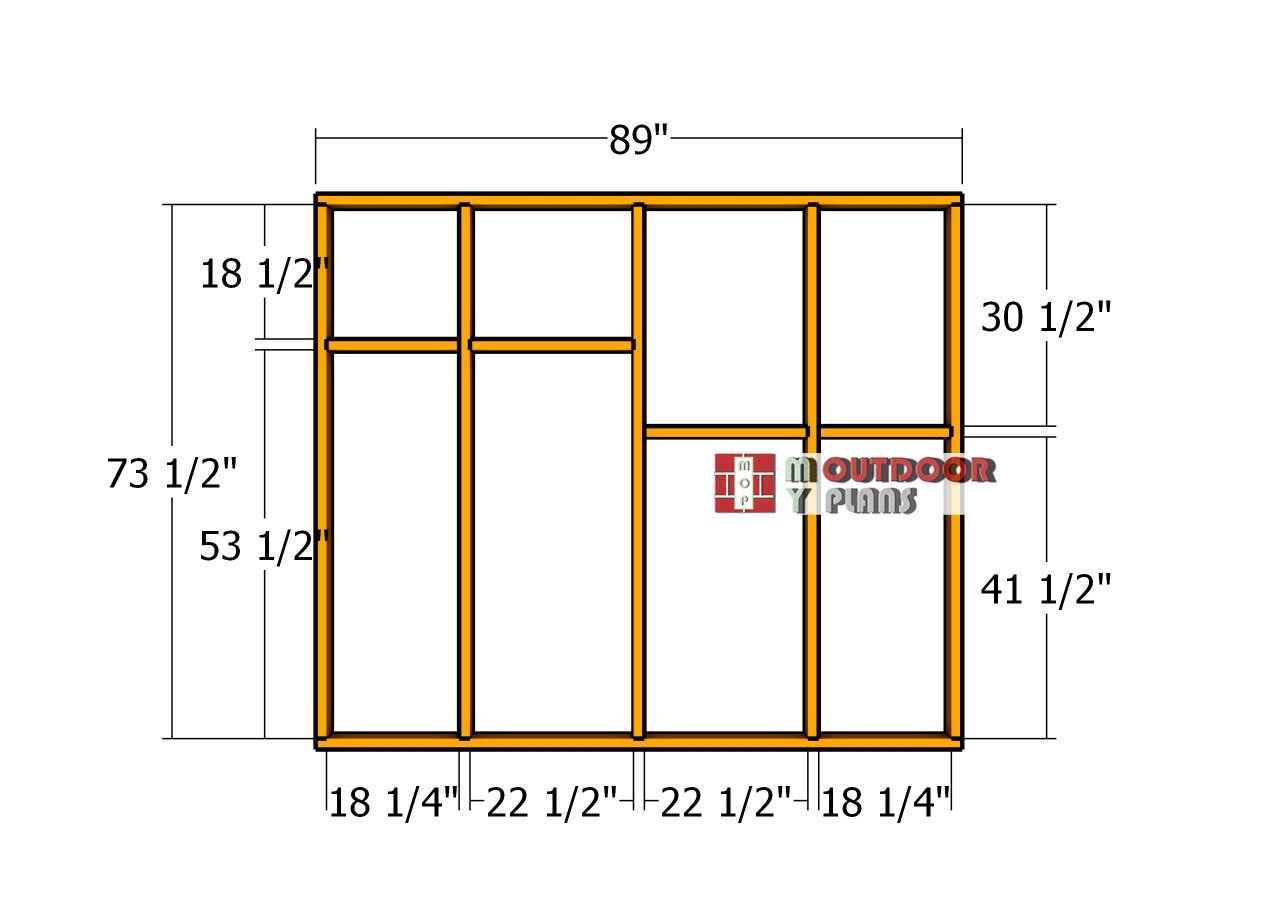
Back-wall-frame
Now, let’s tackle the opposite side wall of the catio. Cut all the 2×4 components to size, following the diagram’s dimensions. Drill pilot holes through the top and bottom plates, then secure the studs with 3 1/2″ screws to keep the frame solid. Once assembled, install the shelf supports, making sure they’re positioned correctly—because a wobbly shelf is no cat’s dream. Before calling it done, check that the corners are square so everything fits together smoothly in the next steps!
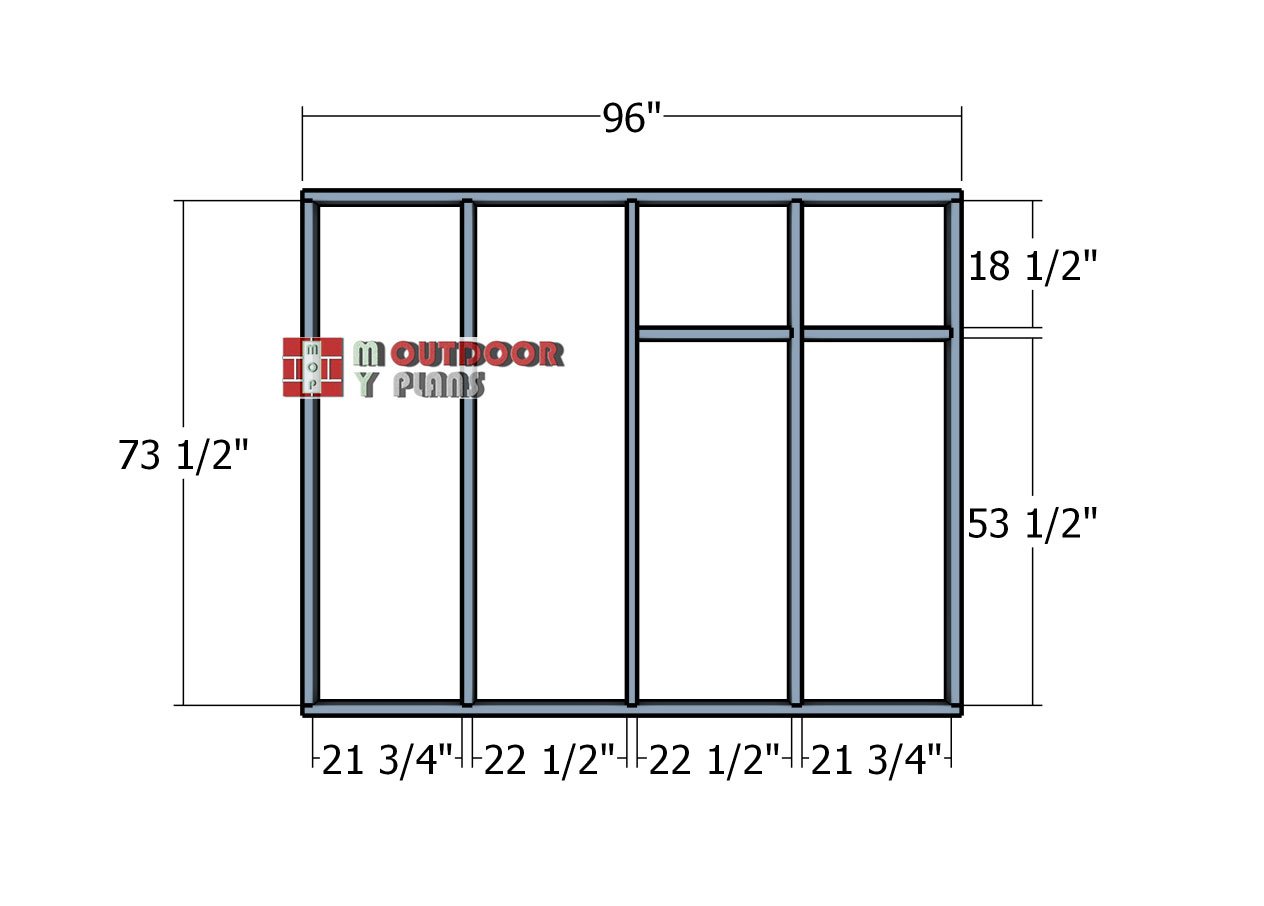
Short-side-wall
Now, let’s build the opposite wall of the catio. Follow the diagram, cut the 2×4 components to size, and assemble the frame. Drill pilot holes through the plates, then secure the studs with 3 1/2″ screws to keep everything rock solid. Before moving on, make sure the corners are square and the edges line up flush for a clean, precise fit. Double-check that this wall aligns perfectly with the others—because a seamless connection now means an easier assembly later!
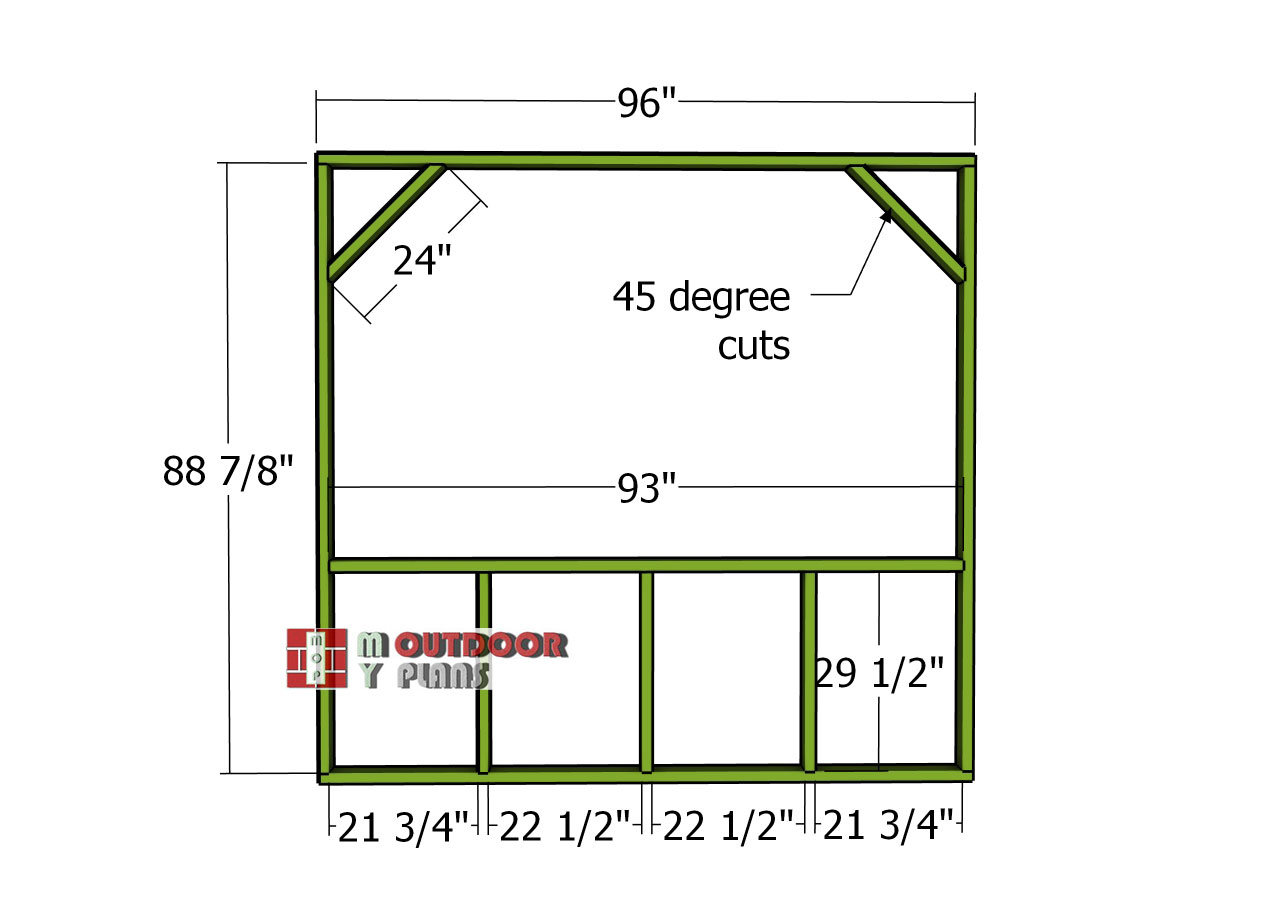
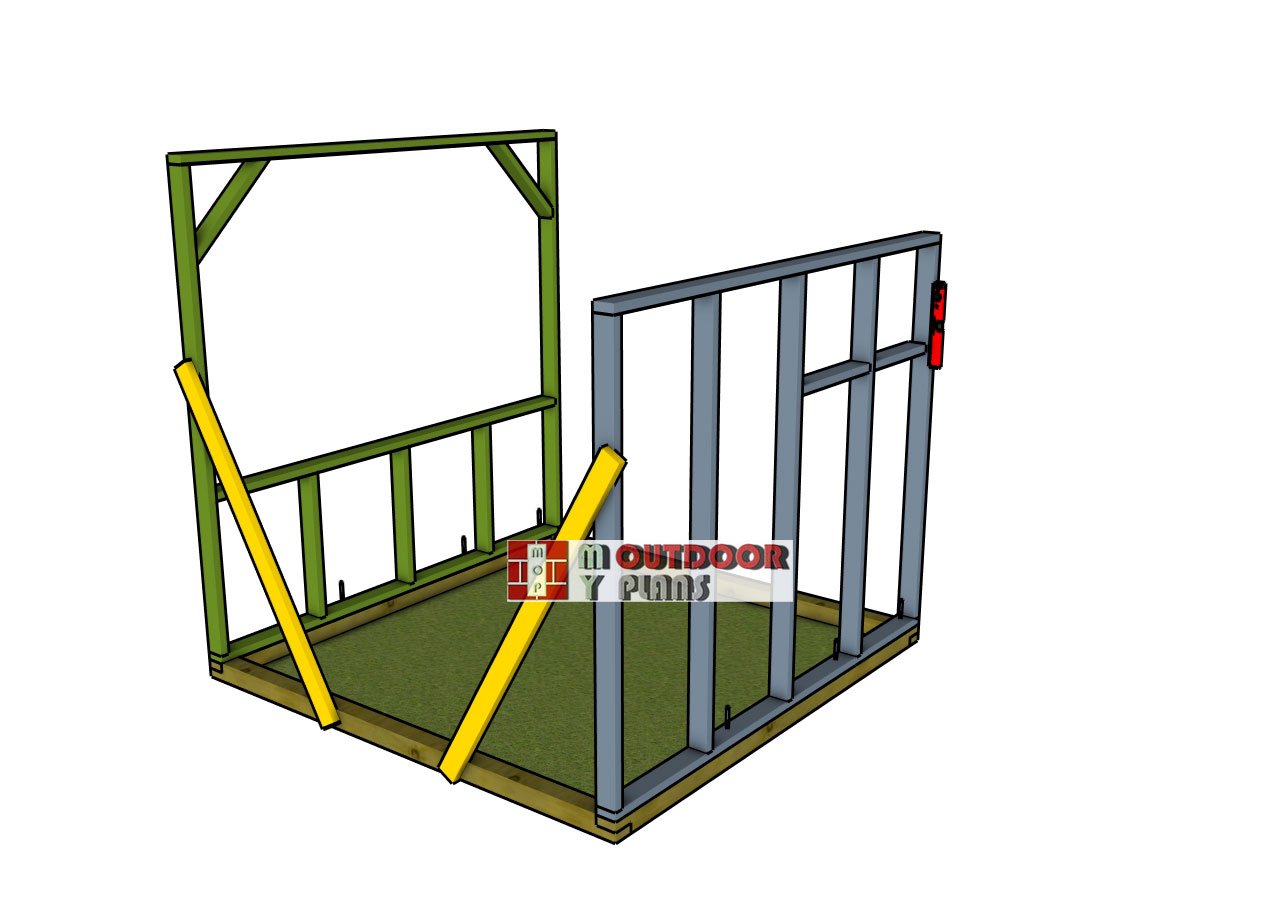
Tall-side-wall-frame
You can build this catio as a free-standing structure or attach it to your house, depending on what works best for you. If you’re connecting it to your home, adjust the shelf height to match your window opening, so your cats can move in and out like VIPs.
No matter where you place it, make sure it’s properly secured for stability—whether anchored in the garden or fastened to the house. For extra support, cut the braces at 45 degrees on both ends and attach them to the wall frame. Drill pilot holes to prevent splitting, then drive in 2 1/2″ screws to lock them in place. Solid bracing means a sturdy, wobble-free catio—because nobody wants a shaky adventure zone!
STEP 3: Assembling the catio
Fitting-the-side-wall-frames
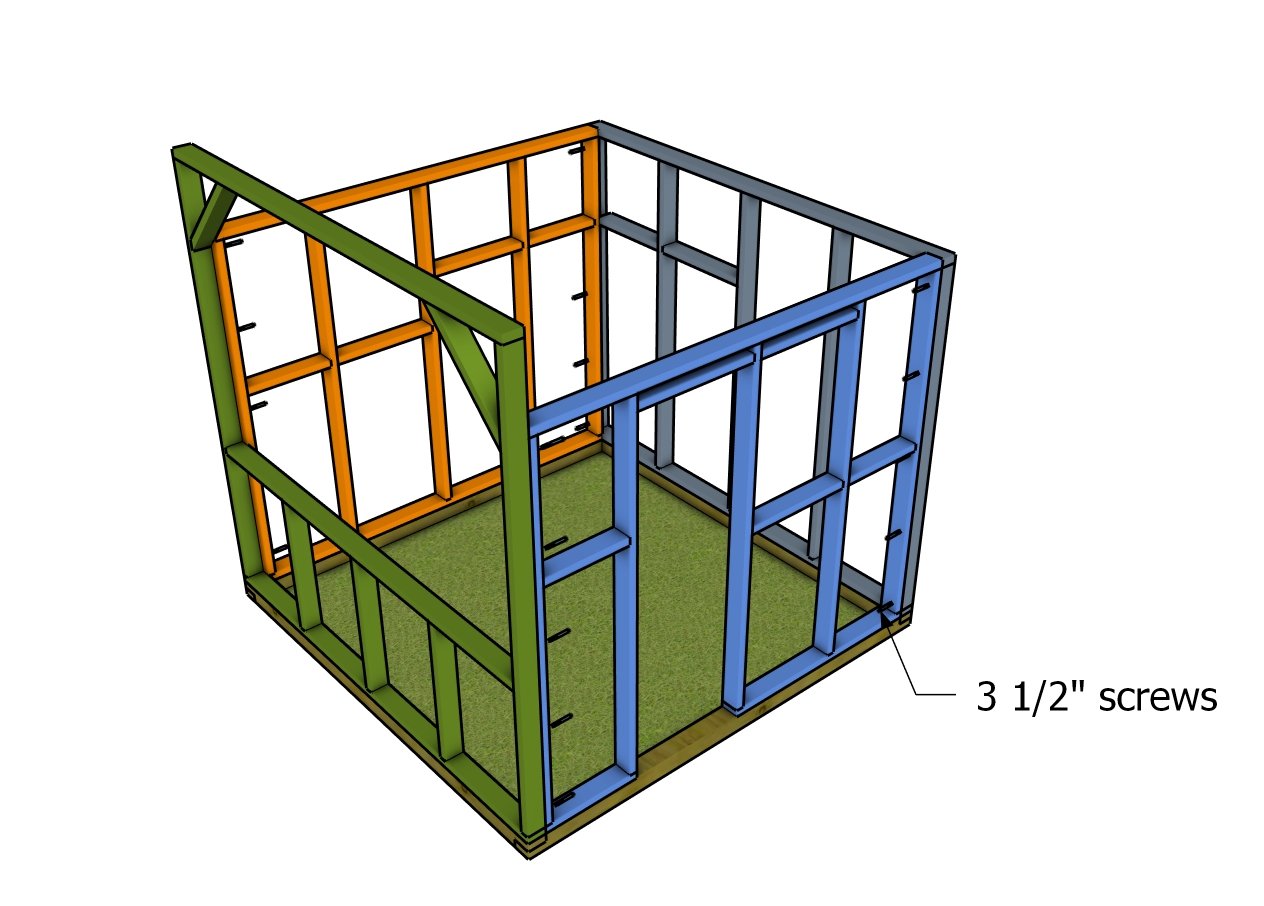
Assembling the outdoor catio
With the wall frames assembled, it’s time to bring the catio to life! Position the walls on the base, making sure the bottom plates align flush for a precise fit. Drill pilot holes through the plates and secure them to the base with 3 1/2″ screws, spacing them every 24 inches for a solid hold. Before locking everything in place, double-check that the corners are square and the frames are properly aligned. Once everything looks good, drill a few more pilot holes and drive in 3 1/2″ screws at each connection. A tight, sturdy frame now means a catio that’ll stand strong for years to come!
STEP 4: Fitting the shelves

Shelves
Now’s the perfect time to cut the shelves for the catio. Mark the cut lines on a 1/2″ plywood sheet, then grab your circular saw and make the cuts. For those small notches, switch to a jigsaw for precision. Clean cuts now mean a smooth fit later—your cats will appreciate the extra craftsmanship!
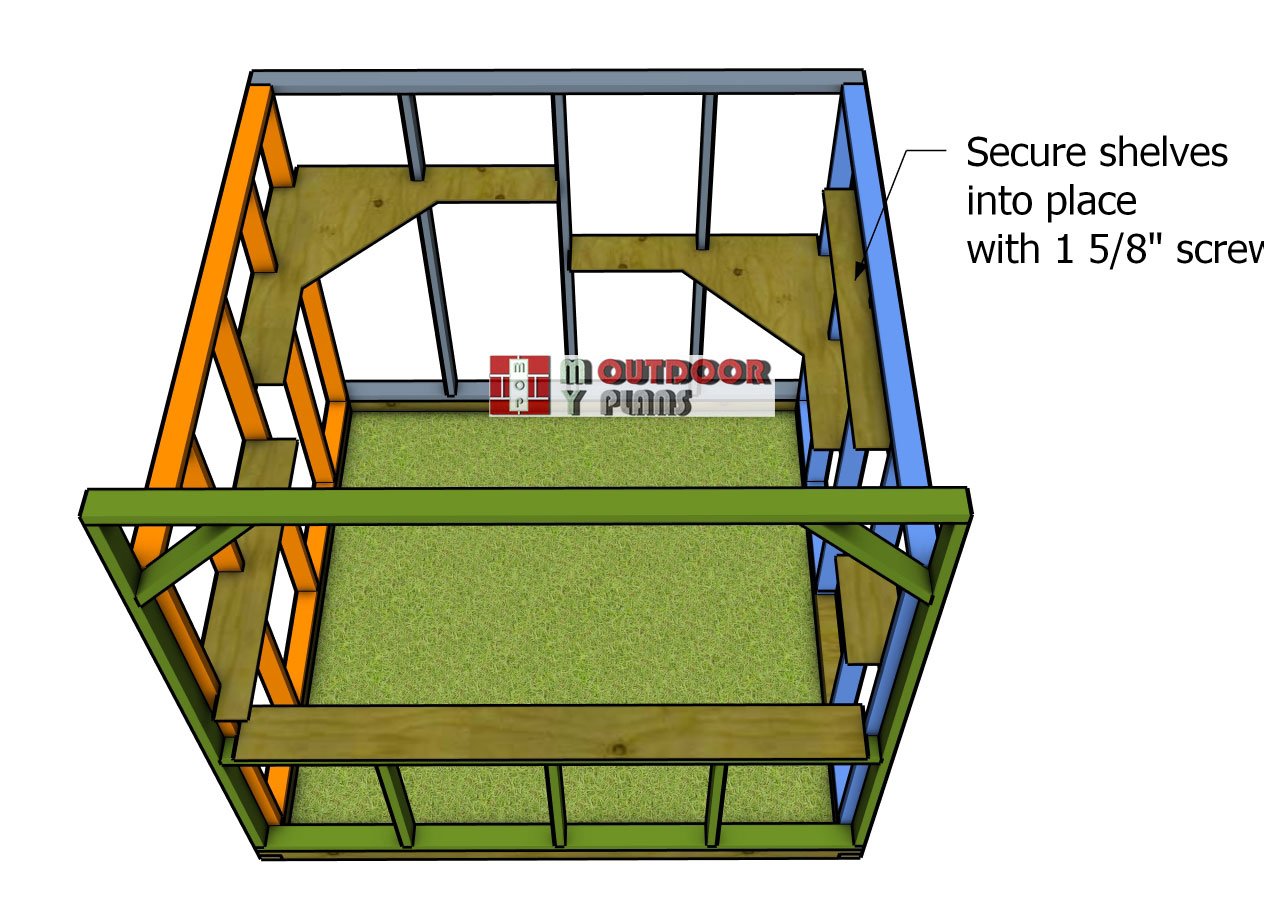
Fitting-the-screws
Now, install the shelves in the catio, following the diagram for placement. Make sure they are properly aligned and sitting level—because no cat wants a wobbly perch! Secure each shelf to the supports using 1 5/8″ screws, spacing them every 8 inches for a firm hold. Once locked in place, your feline friends will have the perfect spots to lounge and climb!
Front view – 8×8 catio
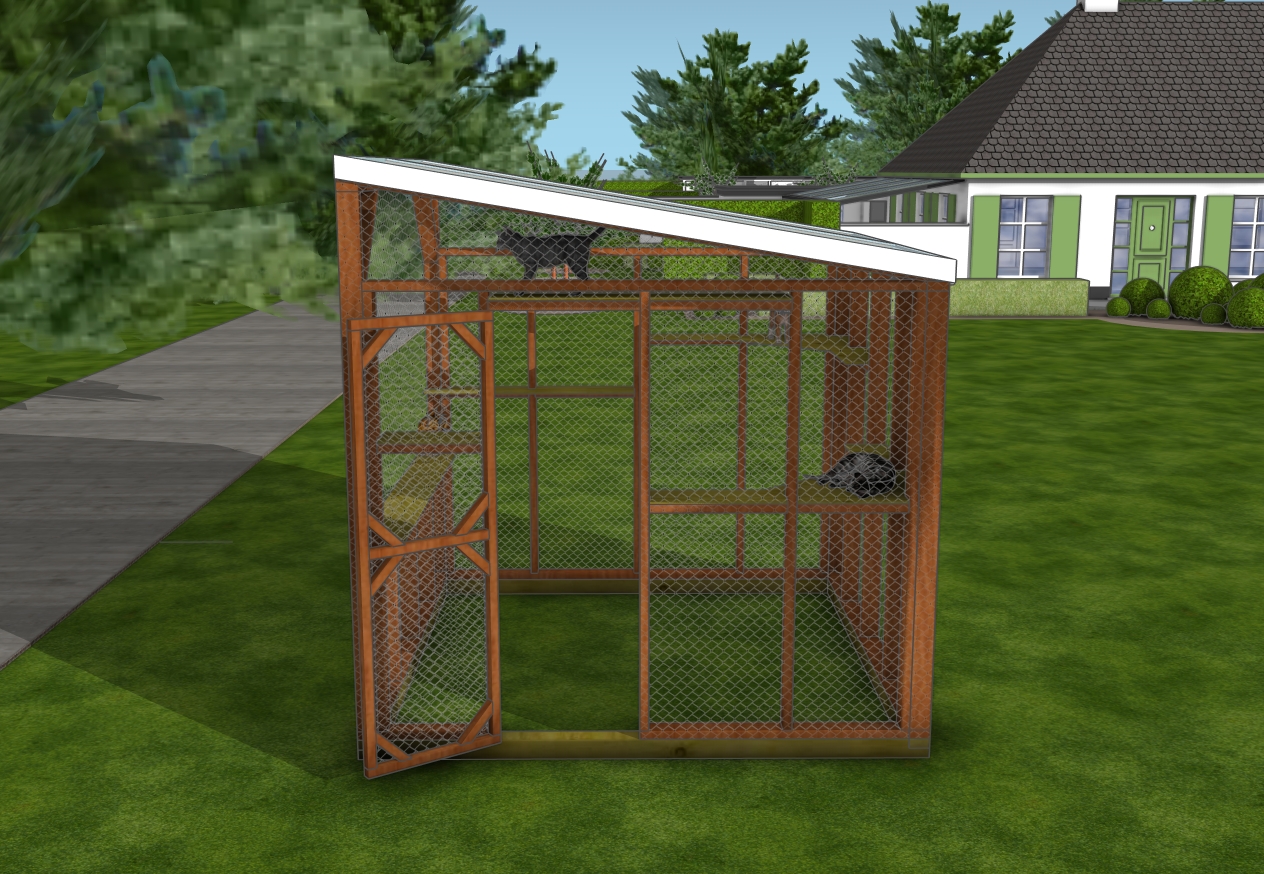
8×8 catio – diy plans
Don’t miss PART 2 of this project, where we bring the catio to life by tackling the roof construction and adding the all-important finishing touches. Ready to see it all come together? Head over now to watch the final steps and transform your shed into a complete, functional structure!
If you want to get Premium Plans, just press the GET PDF PLANS bellow. If you want to get the free version, please read the blog FAQs.

This woodworking project was about 8×8 outdoor catio plans. If you want to see more outdoor plans, check out the rest of our step by step projects and follow the instructions to obtain a professional result.
