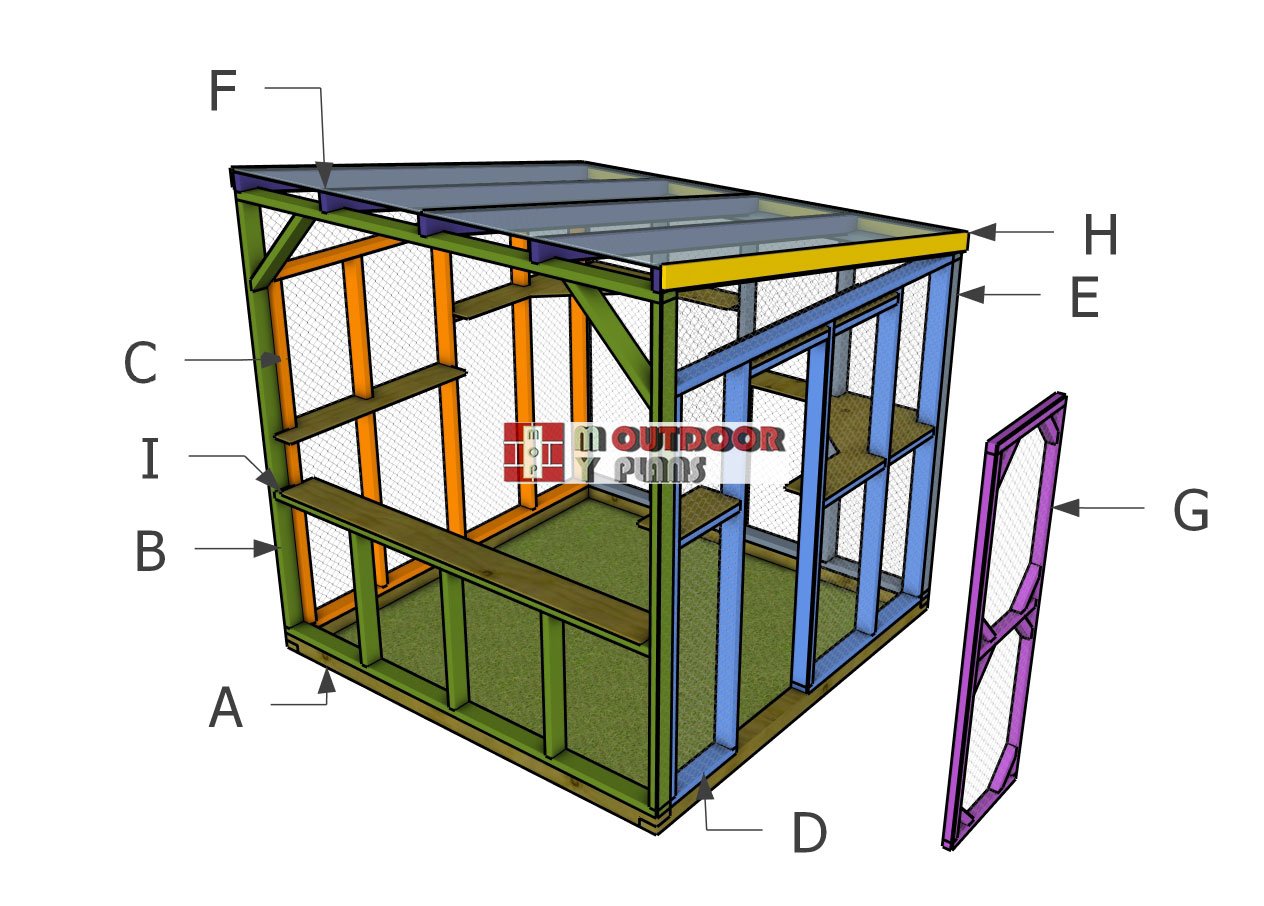
With the catio frame secured, it’s time to focus on building the door and roof to complete the enclosure. A sturdy door is essential for easy access while keeping your cats safely inside. I’ll show you how to build a strong yet lightweight frame, attach the wire mesh, and install hinges and a latch for smooth operation. A well-built door ensures convenience for you and security for your feline friends.
Next, we’ll tackle the roof, using 6mm twin-wall polycarbonate panels to provide shade and weather protection while keeping the space bright and airy. I’ll walk you through cutting and securing the panels, using an H-channel for seamless joints, and fastening everything with screws and rubber washers to ensure a watertight finish. With the door and roof in place, your catio will be fully enclosed, safe, and ready for adventure!
When buying the lumber, you should select the planks with great care, making sure they are straight and without any visible flaws (cracks, knots, twists, decay). Investing in cedar or other weather resistant lumber is a good idea, as it will pay off on the long run. Use a spirit level to plumb and align the components, before inserting the galvanized screws, otherwise the project won’t have a symmetrical look. If you have all the materials and tools required for the project, you could get the job done in about a day.
Projects made from these plans
Building an Outdoor Catio
Building-a-8×8-catio
Cut and Shopping Lists
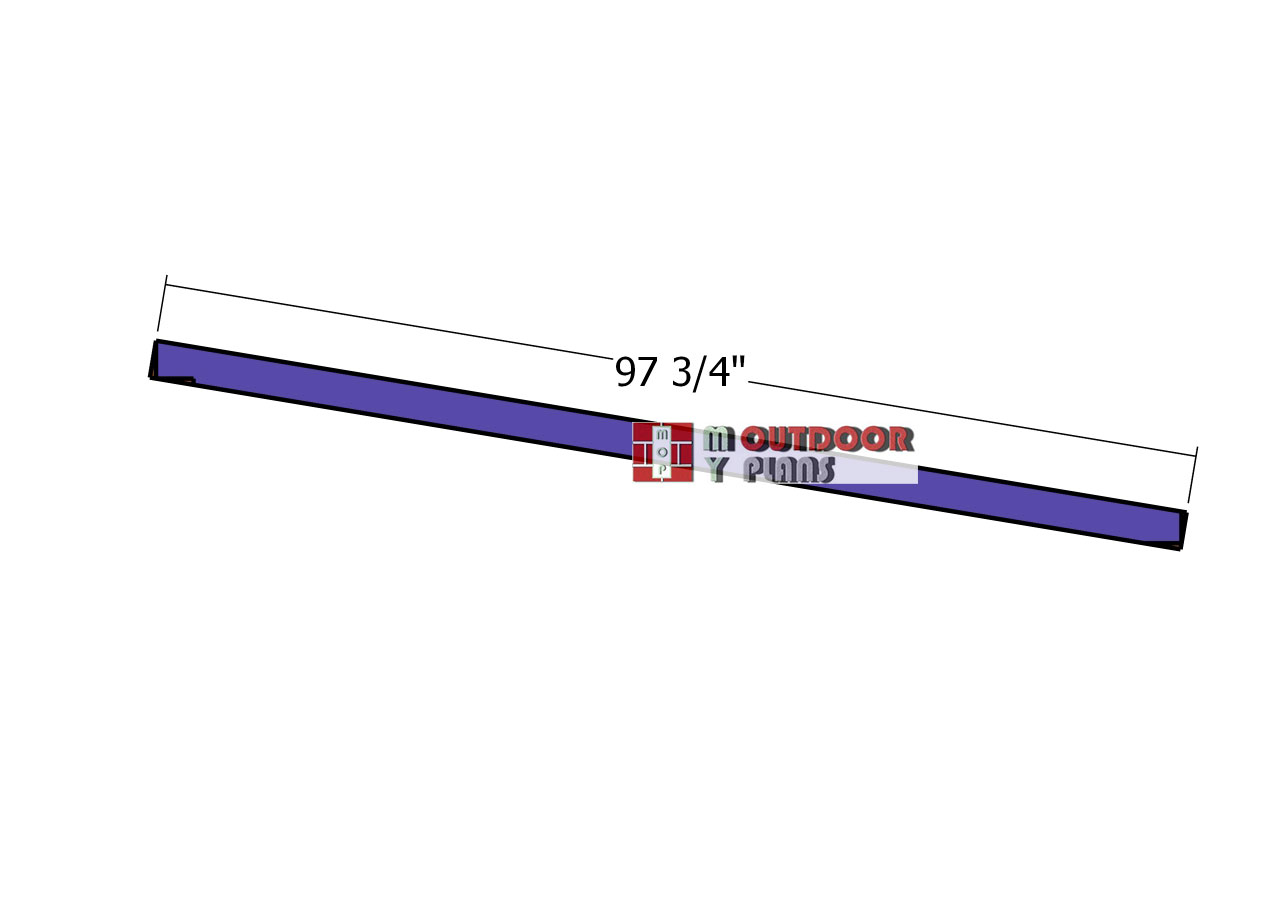
F – 2×2 lumber – 97 3/4″ long RAFTERS – 5 pieces
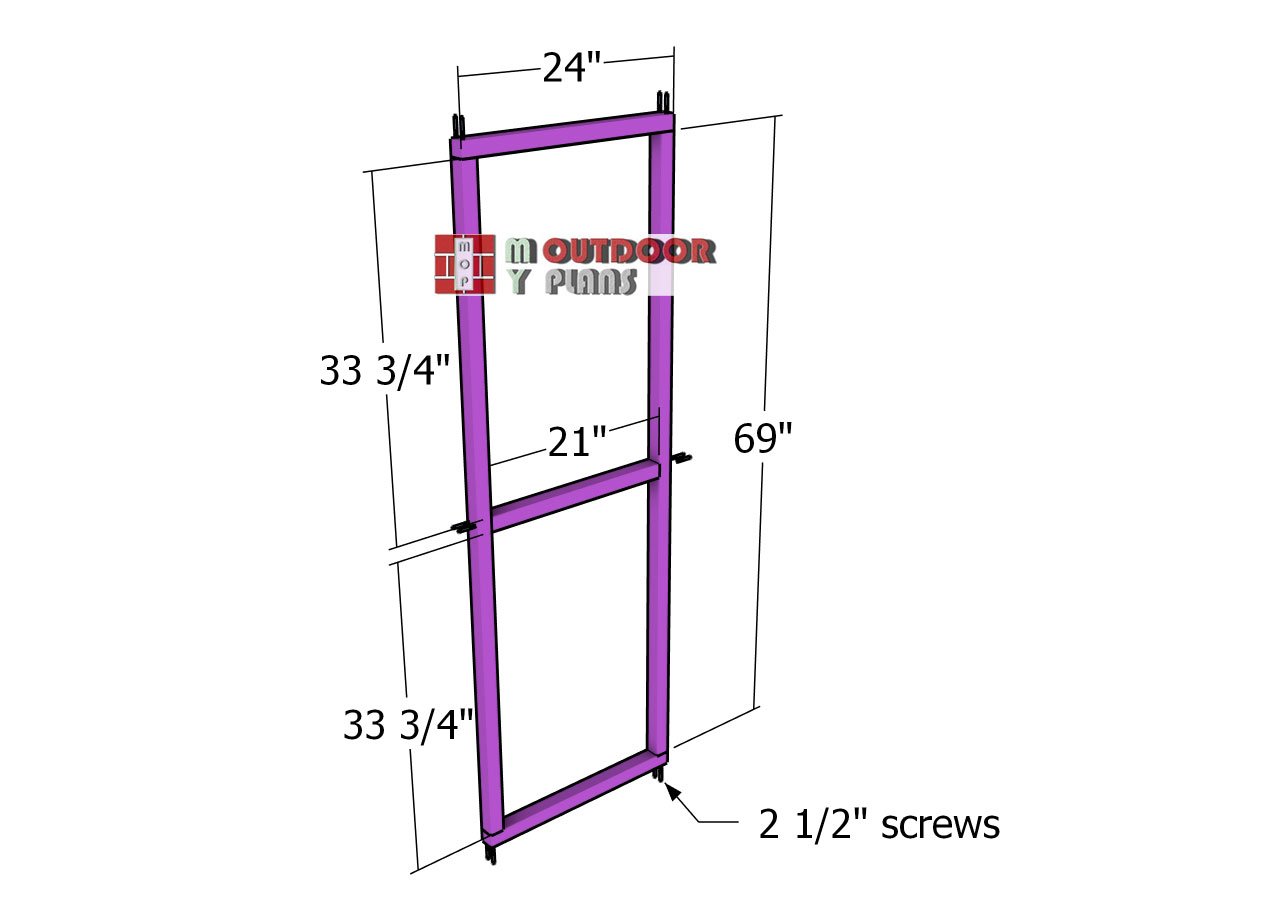
G – 2×2 lumber – 24″ long DOOR – 2 pieces
G – 2×2 lumber – 69″ long DOOR – 2 pieces
G – 2×2 lumber – 21″ long DOOR – 1 piece
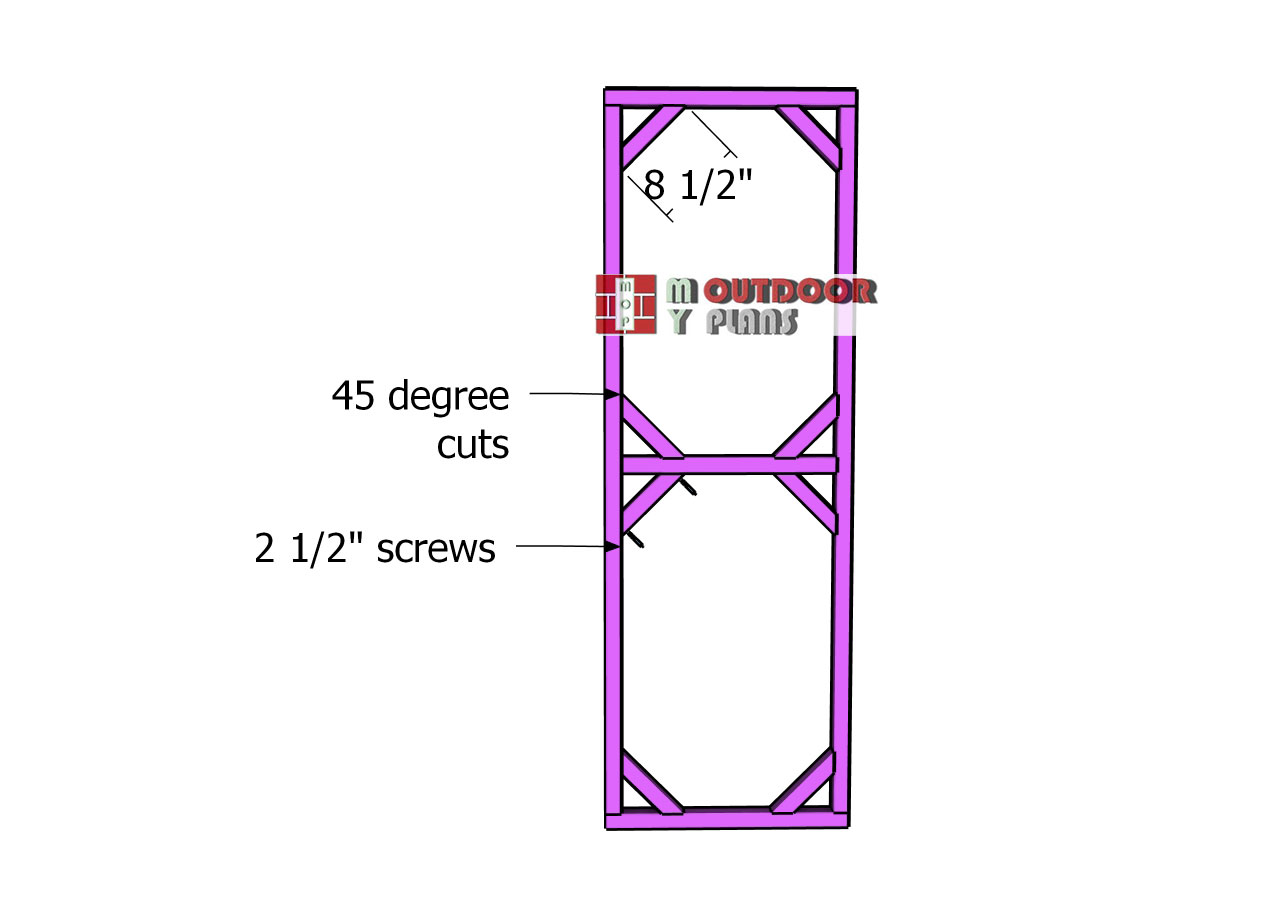
G – 2×2 lumber – 8 1/2″ long DOOR – 8 pieces
H – 1×4 lumber – 96″ TRIMS – 1 piece
H – 1×4 lumber – 98 5/8″ TRIMS – 2 pieces
I – 1/2″ plywood – 47 1/4″x47 1/4″ SHELVES – 2 pieces
I – 1/2″ plywood – 8’x78 1/2″ SHELVES – 1 piece
I – 1/2″ plywood – 8’x48″ SHELVES – 1 piece
I – 1/2″ plywood – 8’x47 1/4″ SHELVES – 1 piece
I – 1/2″ plywood – 8’x10 1/2″ SHELVES – 1 piece
I – 1/2″ plywood – 8’x16 3/4″ SHELVES – 1 piece
Tools
![]() Hammer, Tape measure, Framing square, Level
Hammer, Tape measure, Framing square, Level
![]() Miter saw, Drill machinery, Screwdriver, Sander
Miter saw, Drill machinery, Screwdriver, Sander
![]() Safety Gloves, Safety Glasses
Safety Gloves, Safety Glasses
Time
![]() One week
One week
Related
- PART 1: 8×8 Outdoor Catio Plans
- PART 2: 8×8 Outdoor Catio Roof Plans
STEP 5: Building the roof
Rafters
Time to build the rafters! Cut the 2×4 lumber to size, following the diagram for precise angles. Mark the cut lines on both ends, then grab your circular saw and make the cuts. A clean, accurate cut here means a perfect fit later—so take your time and get it right!
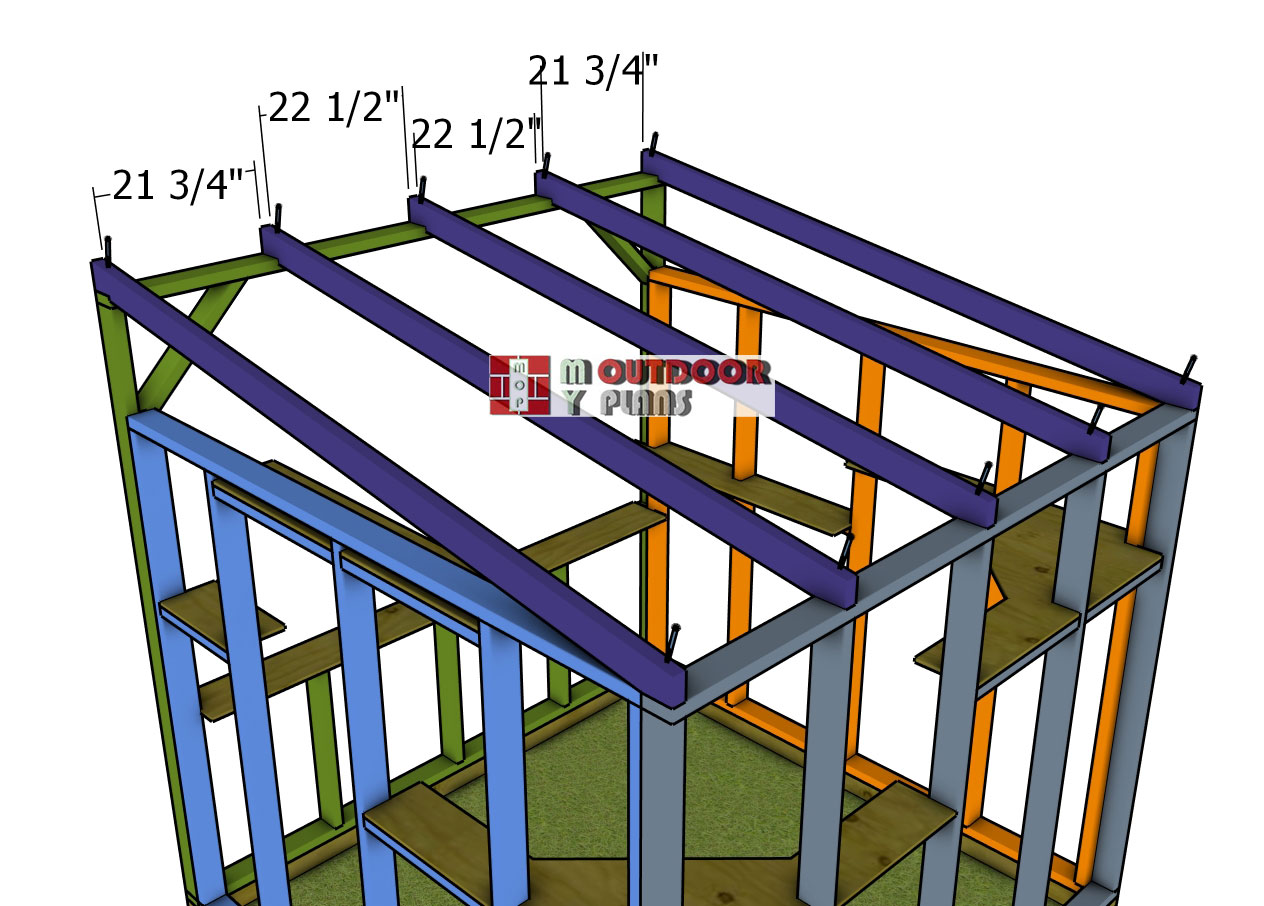
Fitting-the-rafters
Now, let’s install the rafters on top of the catio. Space them 24 inches on center for even support. Drill pilot holes through each rafter, then secure them to the wall plates using 3 1/2″ screws—two screws per joint for solid rigidity. A sturdy roof means your catio stays strong through all their climbing adventures!

Fitting-the-wire-mesh
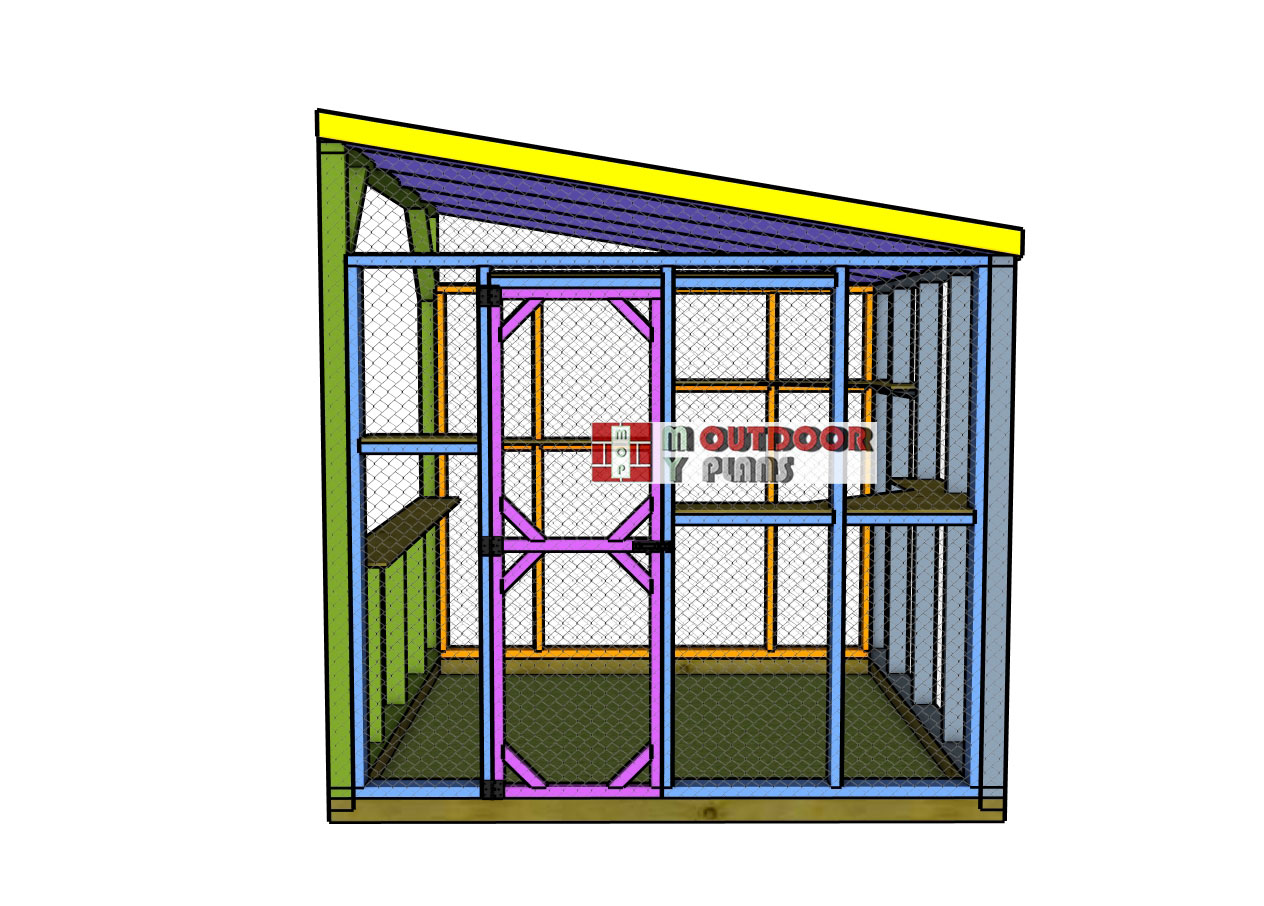
Now, it’s time to enclose the catio with 16-19 gauge welded wire mesh. Attach the mesh to the exterior frame, making sure it’s tight and secure. Fasten it using U-nails or screws with washers, spacing them every 8 inches for a strong hold. Carefully cut the mesh to fit around the catio structure and door opening, keeping edges clean for a professional finish. A secure mesh means a safe and sturdy playground for your cats!
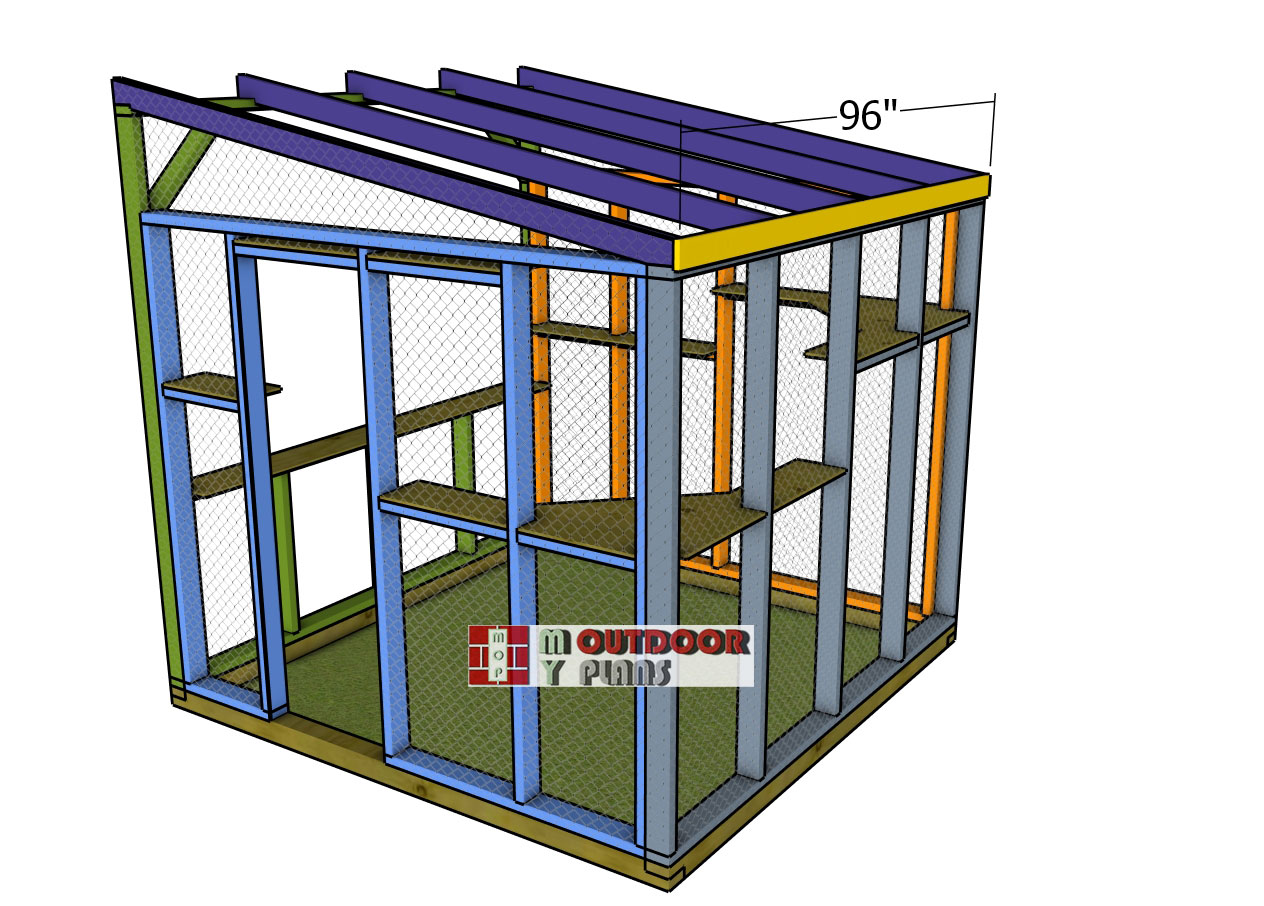
Front-trims
Now, let’s add the 1×4 trim to the low roof end for a clean, finished look. Align it carefully, making sure it sits flush with the edges. Secure it in place using 1 5/8″ screws, driving them in evenly for a solid hold. A little attention to detail here makes the catio look polished and professional!
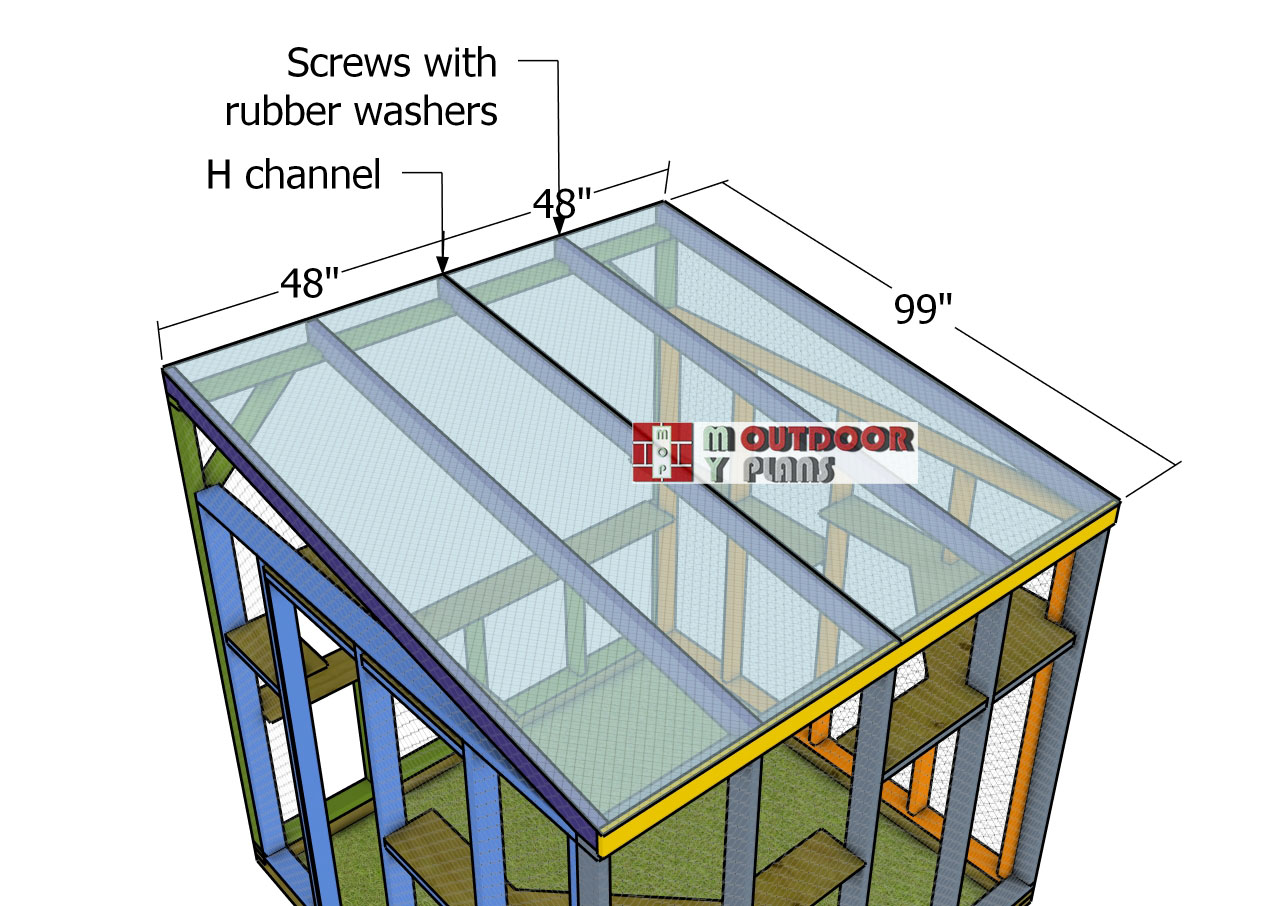
Roof-sheets
Now, let’s install the 6mm twin-wall polycarbonate sheets on top of the lean-to roof. Align the edges with the sides for a precise fit, then use an H-channel to securely join the panels together. The sheets should overhang the front trim, to help with water drainage. Fasten the sheets to the roof structure using screws with rubber washers, which are designed to keep everything watertight and secure. A properly installed roof means your cats stay dry and shaded, no matter the weather!
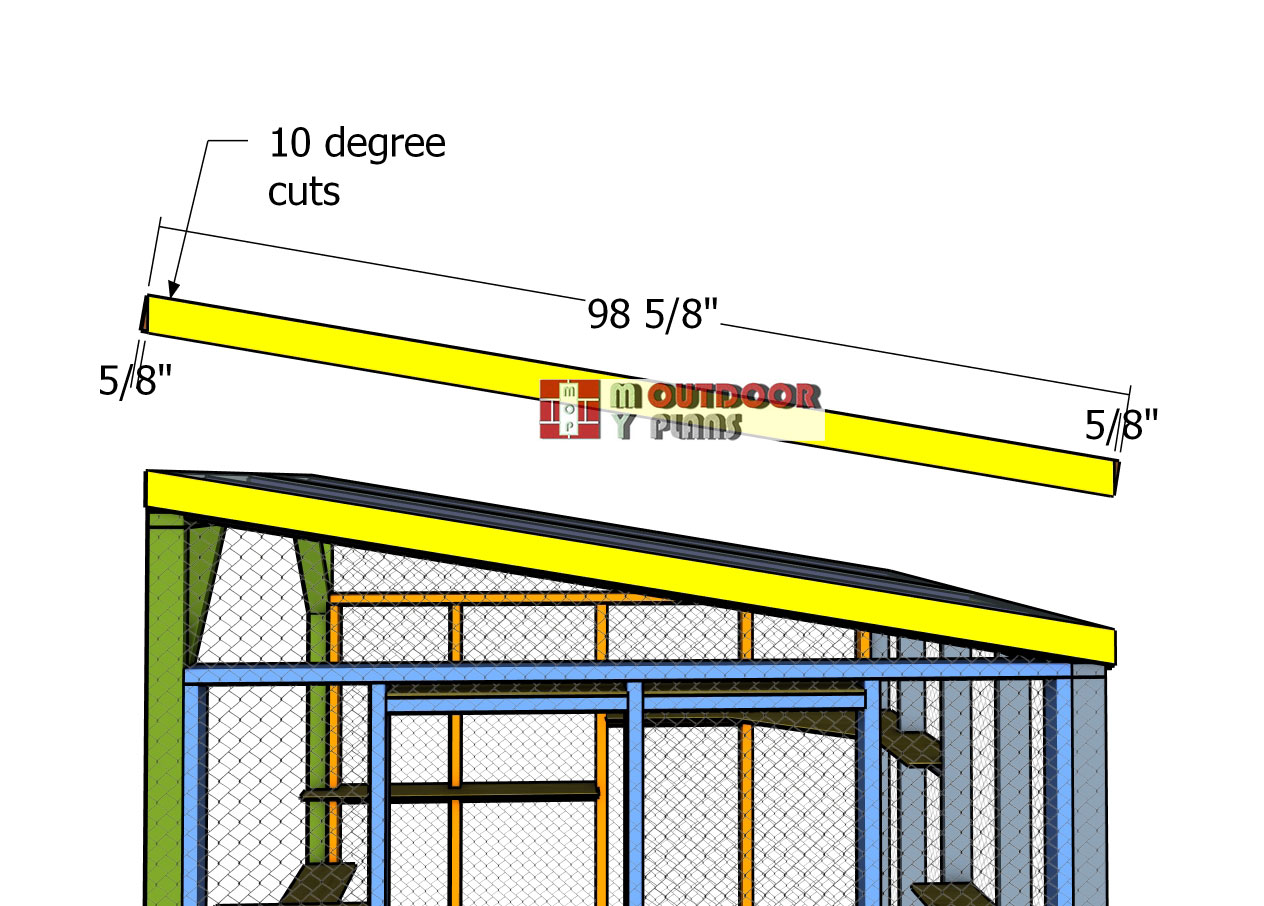
Side-roof-trims
Now, let’s finish off the side trims using 1×4 boards for a clean, polished look. Cut both ends at a 10-degree angle for a snug fit. Once aligned, secure them in place with 2″ finish nails. A few careful touches here will make your catio look sharp and professionally built!
STEP 6: Building the door
Door-frame
Use 2×2 lumber to build the door frame for the catio. Cut all components to size, then assemble the frame by drilling pilot holes through the top, bottom and side components. Assemble the frame with 2 1/2″ screws.
Door-braces
Next, cut 2×2 braces to reinforce the door. Make 45-degree cuts at both ends of each brace for a precise fit. Secure the braces in place using 2 1/2″ screws, ensuring the frame remains square and sturdy.
Attaching-the-door
Attach the 16-gauge fencing wire (with 2” x 3” spacing) to the door frame to ensure durability and security. Start by cutting the wire mesh to the correct size using wire cutters, allowing for a slight overlap along the edges for a secure fit. Position the mesh over the door frame, keeping it tight and properly aligned. Secure it by using staples or 1″ screws with washers along the perimeter. Space the fasteners every 3-4 inches to prevent sagging and ensure the mesh stays firmly in place. Attach the door to the opening and secure it into place with 3″x3″ hinges and a door latch.
STEP 7: Finishing touches
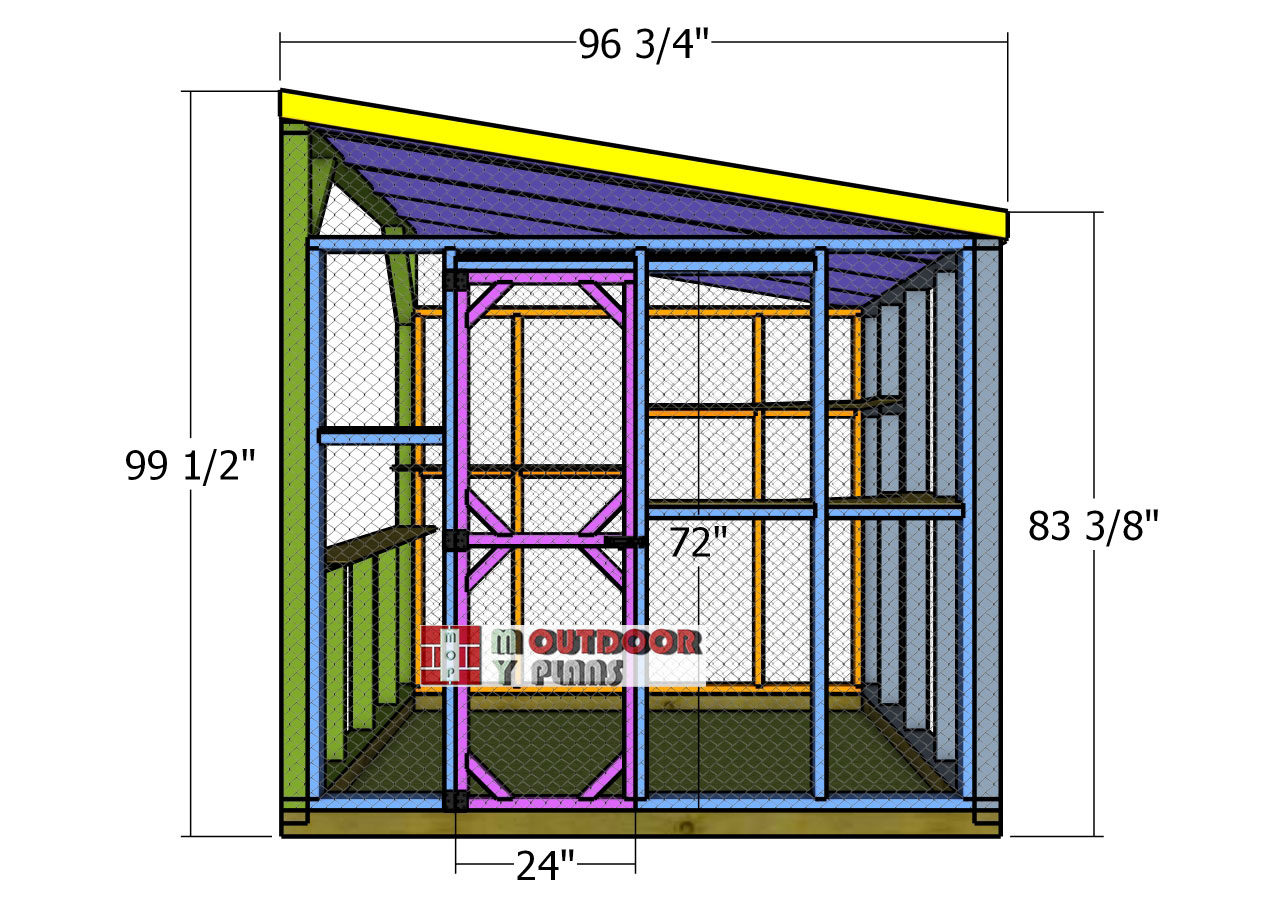
Front-view—dimensions
With the mesh fully installed, take a moment to inspect the entire structure for any sharp edges or loose sections. If you find any stray wires, bend them inward or cover them with trim pieces to keep your cats safe. For a polished look and extra durability, consider adding a wood trim border along the edges of the mesh. Now for the finishing touches—go over all connections and tighten any loose screws or staples.
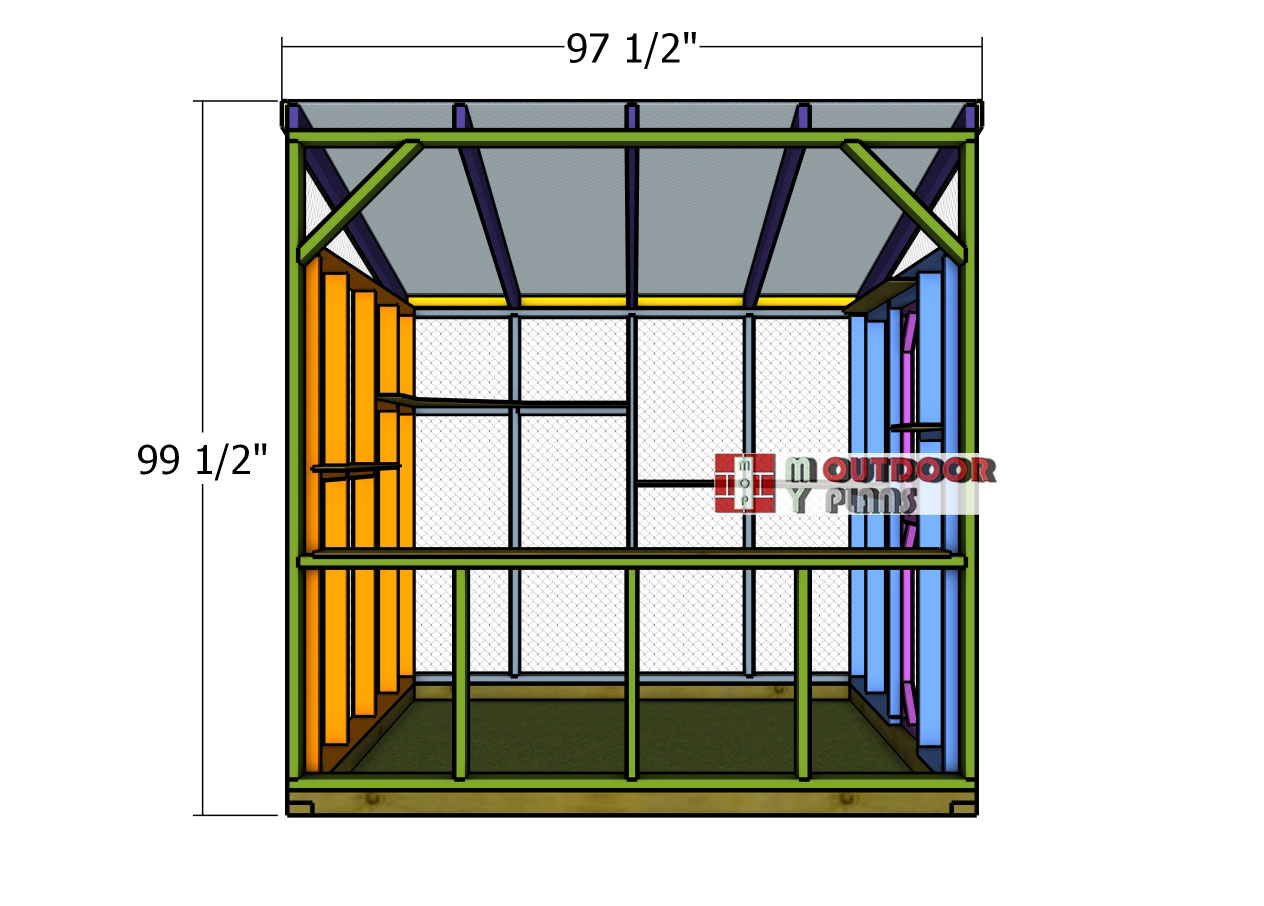
Dimensions—8×8-catio
To protect the wood, apply a high-quality outdoor stain or paint to keep moisture and rot at bay. If the catio is free-standing, anchoring it to the ground will add extra stability, especially in windy conditions. Finally, make it fun! Install shelves, ramps, or climbing elements to create an exciting space for your cats to lounge and explore. And with that, your catio is complete—a safe, stylish, and adventure-packed retreat for your feline friends!
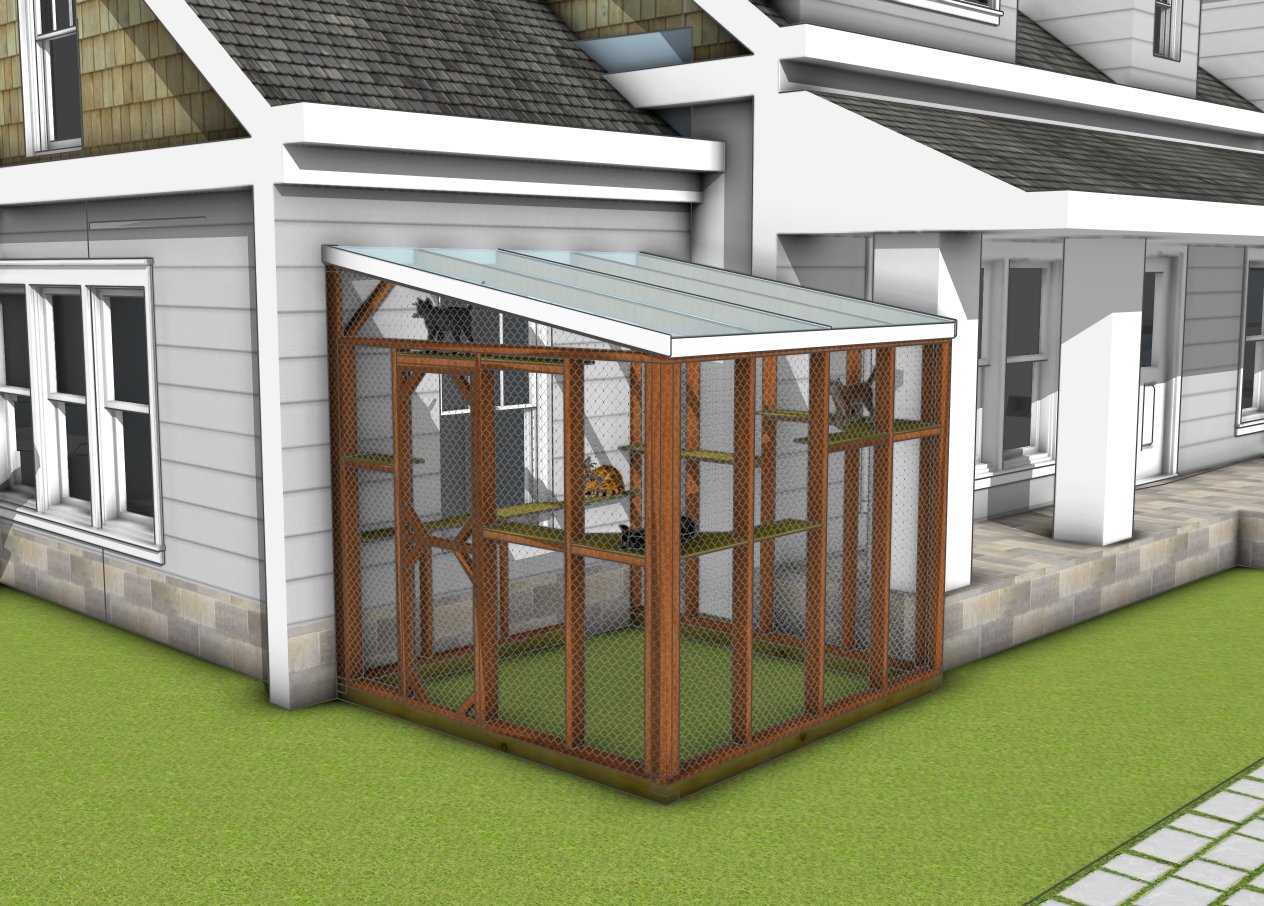
DIY 8×8 wooden catio plans
If you enjoyed this build, be sure to check out PART 1, where I walk you through the step-by-step process of constructing the main frame of this catio. It’s the foundation that set the stage for this entire project, and you won’t want to miss those key details!
This woodworking project was about 8×8 catio plans. If you want to see more outdoor plans, check out the rest of our step by step projects and follow the instructions to obtain a professional result.
