This step by step diy project is about 8×10 large chicken coop gable roof plans. This is PART 2 of the large chicken coop plans, where I show you how to build the gable roof. Moreover, I show you how easy it is to build the large front door and the small side chicken door. Take a look over the rest of my woodworking plans, if you want to get more building inspiration.
When buying the lumber, you should select the planks with great care, making sure they are straight and without any visible flaws (cracks, knots, twists, decay). Investing in cedar or other weather resistant lumber is a good idea, as it will pay off on the long run. Use a spirit level to plumb and align the components, before inserting the galvanized screws, otherwise the project won’t have a symmetrical look. If you have all the materials and tools required for the project, you could get the job done in about a day. See all my Premium Plans HERE.
Projects made from these plans
8×10 Chicken Coop Roof Plans
Building-a-large-chicken-coop-8×10
Cut & Shopping Lists
- G – 4 pieces of T1-11 siding – 26 1/4″x48″ long SIDING
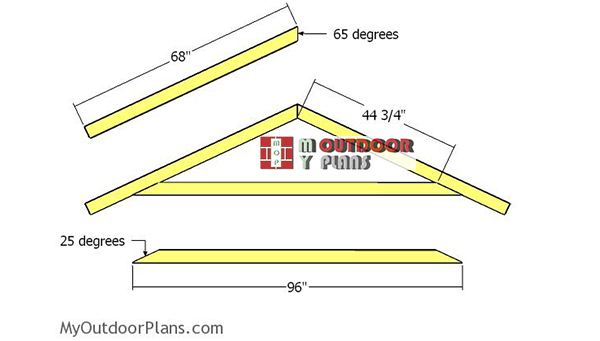
- H – 2 pieces of 2×4 lumber – 68″ long, 1 piece – 96″long, 1 piece – 19″ long 6xTRUSS
- I – 2 pieces of 3/4″ plywood – 48″x96″ long, 2 pieces – 24″x48″ long, 2 pieces – 20″x96″ long, 2 pieces – 20″x24″ long ROOF SHEETS
- I – 4 pieces of 2×4 lumber – 68″ long OVERHNAGS
- J – 4 pieces of 1×4 lumber – 68″ long, 2 pieces of 1×6 lumber – 127″ long, 4 pieces – 69″ long TRIMS
- K – 180 sq ft of tar paper, 180 sq ft of asphalt shingles ROOFING
- L – 2 pieces of 2×4 lumber – 80″ long, 1 piece – 39″ long JAMBS
- M – 2 pieces of T1-11 – 32″x80″ long, 1 piece of 1×4 lumber- 25″ long, 2 pieces – 32″ long, 2 pieces – 73″ long DOOR
- N – 2 pieces of 1×4 lumber – 24″ long, 1 piece – 29 1/2″ long JAMBS
- O – 1 piece of T1-11 siding – 22 1/2″x22 1/2″ long, 2 pieces of 1×4 lumber – 22 1/2″ long, 2 pieces – 15 1/2″ long DOOR
- 28 pieces of 2×4 lumber – 8′
- 6 pieces of 1×4 lumber – 8′
- 4 pieces of 1×6 lumber – 8′
- 2 pieces of 1×6 lumber – 12′
- 1/2″ plywood
- 4 pieces of 3/4″ plywood – 48″x96″
- 1 piece of T1-11 – 48″x96″
- chicken door hinges
- front door hinges
- rafter ties
- 8d nails, 2 1/2″ screws, 3 1/2″ screws
- wood filler , wood glue, stain/paint
Tools
![]() Hammer, Tape measure, Framing square, Level
Hammer, Tape measure, Framing square, Level
![]() Miter saw, Drill machinery, Screwdriver, Sander
Miter saw, Drill machinery, Screwdriver, Sander
Time
![]() One day
One day
Related
- PART 1: Large Chicken Coop Plans
- PART 2: Large Chicken Coop Roof Plans
- PART 3: Large Chicken Coop Nest Boxes Plans
- PART 4: 8×10 Chicken Run Plans
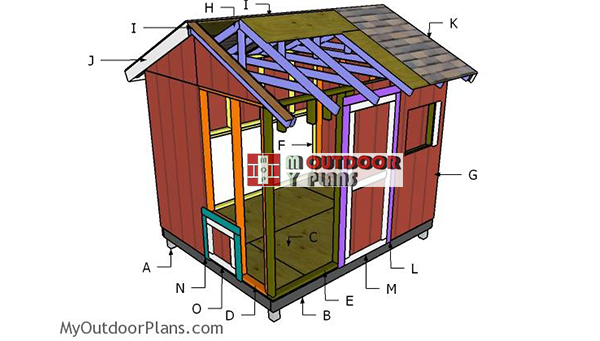
Building a 8×10 chicken coop gable roof
Building-the-trusses
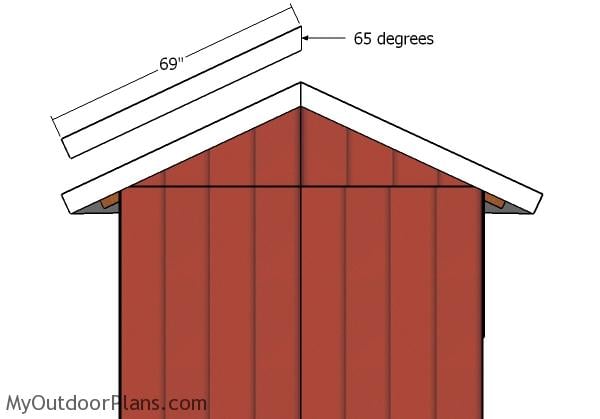
The first step of the project is to build the trusses for the 8×10 chicken coop. Cut the rafters at the right dimensions and angles, using the information from the diagram. Lay the trusses on a level surface and leave no gaps between them.
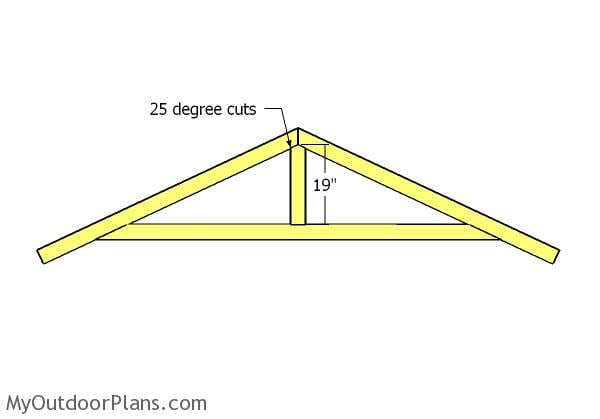
Truss supports
Use 2×4 lumber for the middle support. Make the angle cuts to the top of the support and then fit them to the trusses.
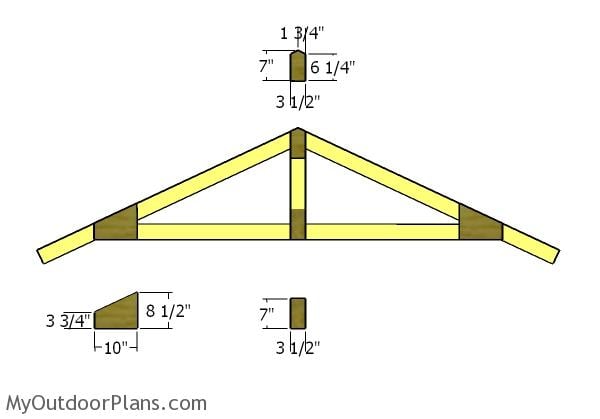
Fitting the gussets
Make the gussets from 1/2″ plywood and then lay them over the joints. Leave no gaps between the components and then insert 1 5/8″screws to secure the components together tightly.
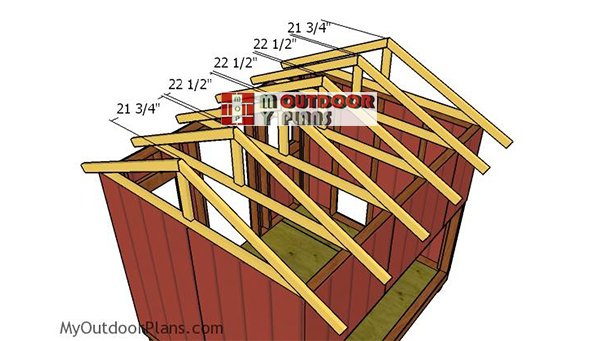
Fitting-the-trusses—8×10-coop
Fit the trusses to the top of the shed and place them every 24″ on center. Use a spirit level to plumb the trusses and then secure them into place with rafter ties.
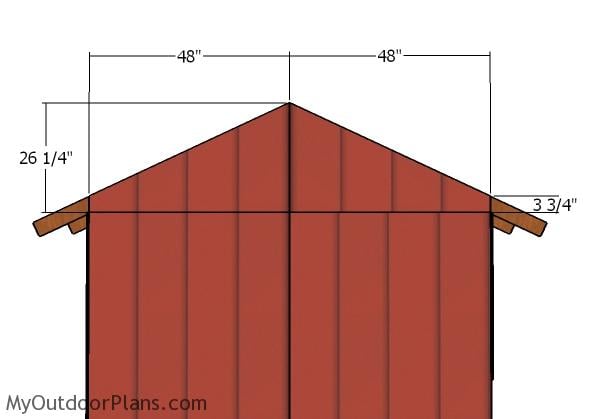
Gable end panels
Cut the panels for the gable ends from T1-11 siding. After cutting the panels you need to attach them to the side gable ends. Align the edges flush and insert 6-8d nails along the framing, every 8″.
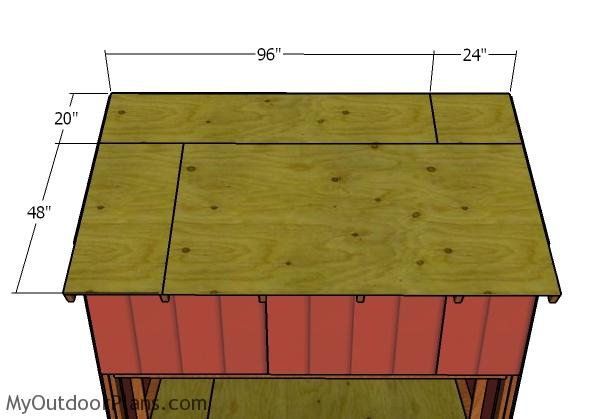
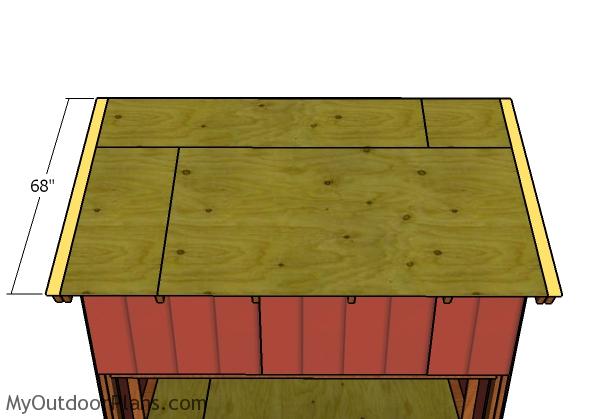
Roof sheets
Fit the 3/4″ plywood sheets to the top of the roof. Align the edges flush, leaving no gaps between them. Insert 1 5/8″ screws through the sheets into the rafters, every 8″.
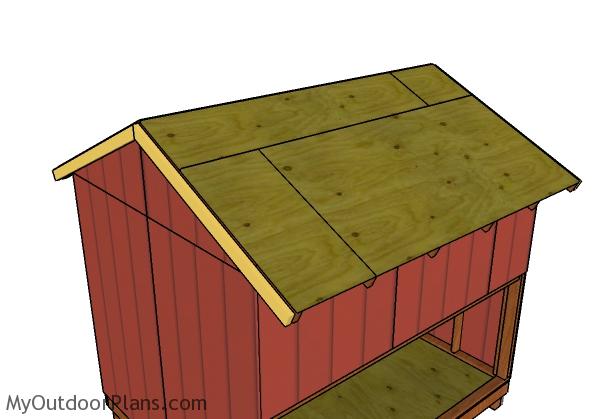
Side overhang rafters
Next, you need to make the overhangs for the 8×12 chicken coop. Fit the 2×4 rafters to the sides of the coop, as shown in the diagram. Drill pilot holes and insert 2 1/2″ screws to lock them into place tightly. Insert the screws every 8″ along the framing.
Overhangs
Fit 1×4 overhangs to the roof of the large chicken coop, as shown in the plans. Insert 1 5/8″ screws to secure the overhangs into the underneath rafters.
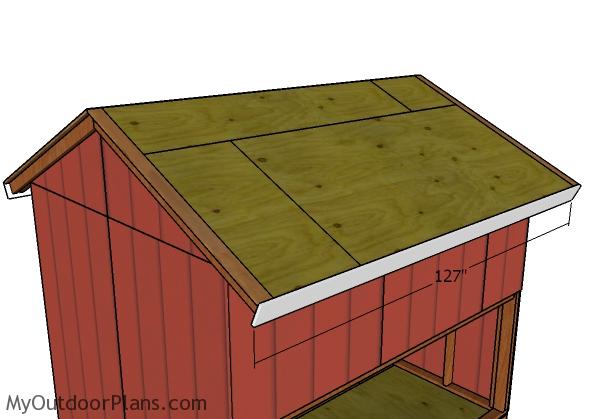
Front and back roof trims
Fit 1×6 trims to the front and to the back of the chicken coop. Align the edges flush and then insert 2″ brad nails to secure them into place tightly.
Side roof trims
Cut trims for the roof from 1×6 lumber. Make the angle cuts to one end of the trims and then secure them into place with 2″ brad nails. Align the edges flush and make sure you leave no gaps between the components.
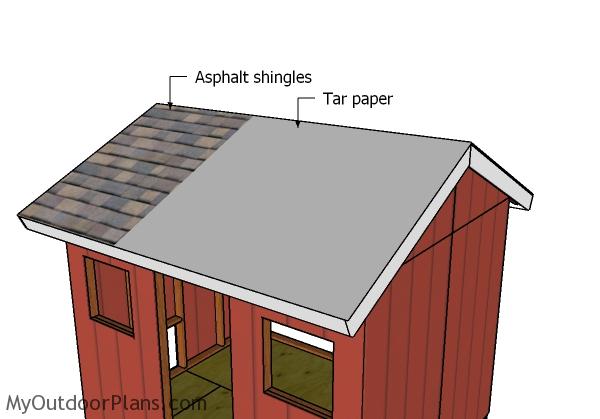
Fitting the roofing
Cover the roof of the shed with roofing felt, making sure the strips overlap at least 2″. Secure the tar paper to the plywood sheets with roofing staples. In addition, cut a large piece for the top ridge. Fit the side drip edges over the roofing felt, while the bottom drip edges should be fit under.
Read the instructions labeled on the asphalt shingle packs before installing them into place tightly. Start with the bottom left side of the roof and install them all the way to the top.
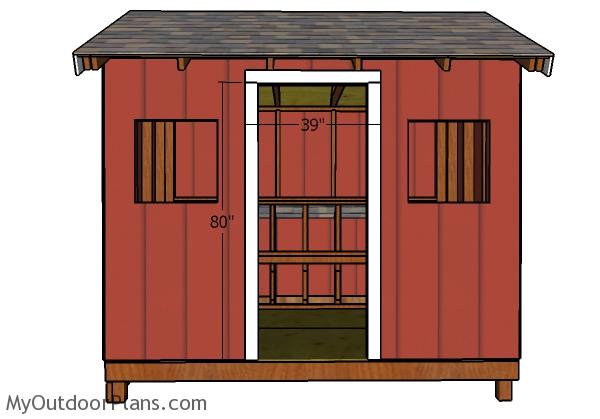
Door Jambs
Fit the 2×4 jambs around the door opening. Align the edges with attention and then secure them into place with 2 1/2″ screws. Insert the screws every 8″along the framing for a professional result.

Front-door—chicken-coop
Use T1-11 siding for the door panel and 2×4 lumber for the trims. First, build the frame for the door from the slats by using 2 1/2″ screws pocket screws. Next, lay the door panel to the frame and align the edges flush. Insert 2″ nails to secure the door panel to the frame.
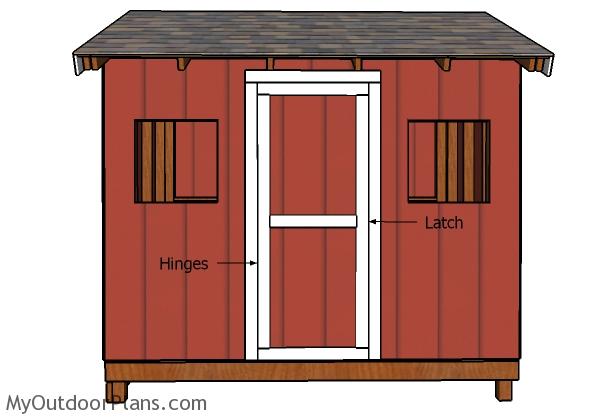
Fitting the front door
Fit the door to the opening and secure it to the jambs with hinges. Install a latch so you can lock the door into place tightly. Fit handles to the door so you can open and close it easily.
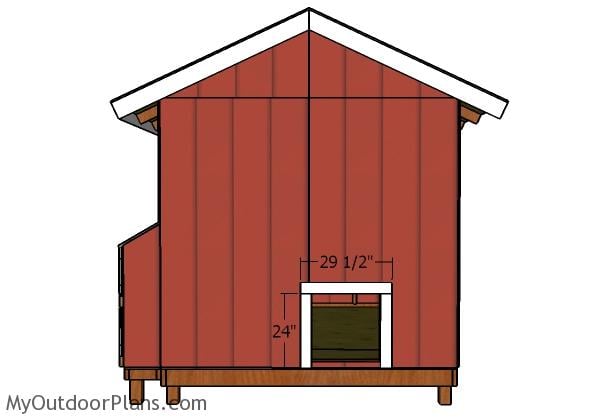
Chicken door jambs
Fit the 1×4 jambs around the chicken coop door opening. Use 2″ nails to secure the jambs flush with the opening.
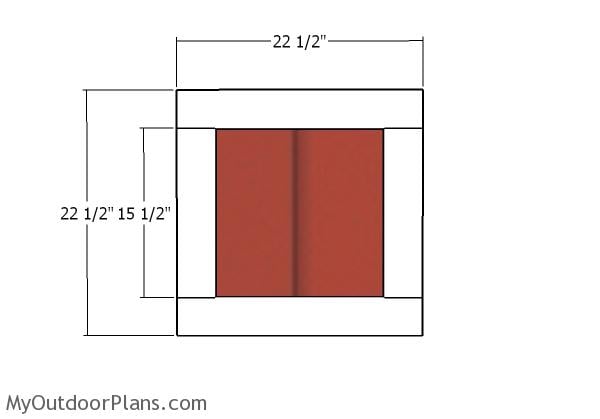
Chicken door
Build the chicken coop from the panel that you have cut out when fitting the siding to the side wall. Attach 1×4 trims to the panel and then lock them together into place with 1 1/2″ nails.
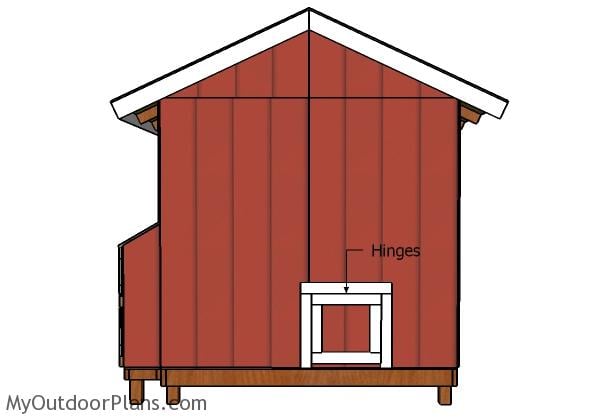
Fitting the chicken door
Fit the chicken coop to the opening and then secure it to the jambs with hinges.
Fitting the next box doors
Make sure you take a look over PART 3 of the project, where I show you how to build the nesting boxes. Building these boxes is tricky, so I recommend you to take a look over my plans.
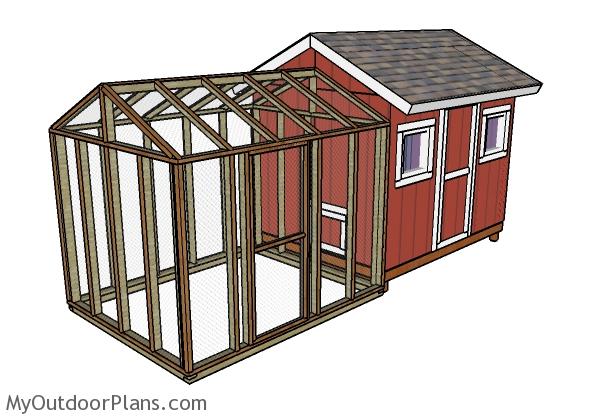
Large chicken coop plans
Last but not least, in PART 4 of the large chicken coop project I show you how to build the 8×10 run. This is a straight forward project that will help you raise up to 20-30 chickens. Remember that you can also make adjustments to my plans so it suits your needs.
This woodworking project was about 8×10 chicken coop gable roof plans free. If you want to see more outdoor plans, check out the rest of our step by step projects and follow the instructions to obtain a professional result.
 |
 |
EXPLORE MORE IDEAS FOR:
 |
 |
 |
 |
17 comments
Your plans are very detailed, so I’m sure I am missing something. How do I fill the space between the top edge of the siding and the underside of the roof between the rafters? I have a 3 1/2″ gap.
Thanks!
You have 2 options. Firstly, you install soffit or secondly, you install 1×4 blockings between the rafters.
We are having difficulty with cutting the angles for the roof trusses…65 degrees seems extreme for the top angle as it appears it will make the roof very steep…this is our first project so we are very much beginners but it just doesn’t seem to work with that angle. What is the pitch of the roof supposed to be?
65 degrees is what is left after the cut. Set the miter saw at 25 degrees.
Your plans show the horizontal section of the trusses at 96″. Since the coop is already sided at the point that the trusses will be put on, does this dimension need to be longer to account for the width of the siding? For example, if the siding was 1/2″, then does the length of the piece need to be 97″ to account for 1/2″ on each side? Otherwise it seems the angled portion of the rafter will hit the siding. Thank you
That is correct, but there is no need to cut 10′ beams to 97″ and lose that much wood. Therefore, you can use a chisel to make small cut outs in the siding, where the trusses will fall.
I’m building this chicken coop step by step but I’ve run into a problem with the rafters and the 96” cross piece. I’ve used numerous board trying to make them fit but I’m doing something wrong because no matter what I do they still wont fit. What setting should I set my mitre saw? Should I continue trying to make a 68 degree cut for the rafters and a 25degree cut for the cross piece, the 96” crosspiece. I was doing great until I started this step. The 25degree doesn’t seem like it’s enough of an angle to attach the rafter pieces. Thx for any help
first of all it is 25 and 65. Make 25 degree cuts to the regular rafters (the rafter will have 65 degree ends) and make a 65 degree cut to both ends of the bottom rafters (the bottom rafters will have 25 degree ends)
Sorry I’m new to building trusses do I need to put gussets on both sides of the truss and if I do what happens on the end ones when I sheet it with the siding?
No, one side is enough. If you want to go the extra mile, fit the gussets on both sides for the inside trusses and only on one side for the end trusses.
What kind of rafter ties did you use?
These: https://amzn.to/2LhcNip
Are the measurements for the Large Chicken Coop Plans correct? It seems that the rafter assembly seem to not work with the measurements given in
the website.
They are correct. But I will make a few clarifications. Make a 25 degree cut to the rafters (after you make the cut, the end of the rafters will have 65 degrees). Make 65 degree cuts to both ends of the bottom rafters (after you cut both ends they will have 25 degrees).
Not understanding your response. I just made all these cuts, and the bottom chord of the rafter should be cut at 65 degrees, not 25.
The directions for actually installing the door are lacking. If the door is the same size as the opening, and it is installed with the hinges screwed into the door jam, the 2×4’s on the door will hit the 2×4’s around the door opening. How far inset is the door?
I would have to agree with Ed’s and Stephen’s comments that the plans for the 8′ x 10′ chicken coop roof rafters are incorrect. In order to get the roof slope correct and have the other dimensions correct, the 68″ components need to be cut at 25 degrees, not 65. The 96″ component needs to have a 65 degree cut on each end. The 19″ center component is correct and should have a 25 degree bevel on each side on center.