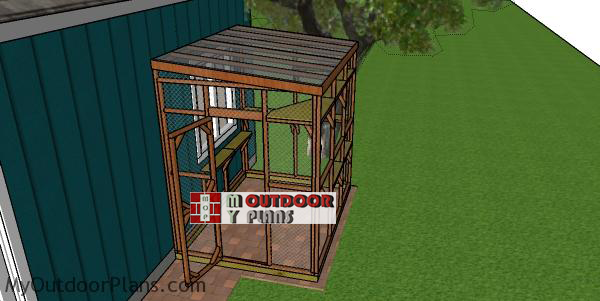
This step by step diy woodworking project is about a 6×8 catio plans. I have designed this super simple enclosure that you can build using 2x2s so you can keep your cats outdoors, while being protected from the predators. This catio features a translucent roof so your pets can enjoy the fresh air even on rainy days. Take a look over the rest of our woodworking plans, if you want to get more building inspiration.
When buying the lumber, you should select the planks with great care, making sure they are straight and without any visible flaws (cracks, knots, twists, decay). Investing in cedar or other weather resistant lumber is a good idea, as it will pay off on the long run. Use a spirit level to plumb and align the components, before inserting the galvanized screws, otherwise the project won’t have a symmetrical look. If you have all the materials and tools required for the project, you could get the job done in about a day. See all my Premium Plans HERE.
Projects made from these plans
6×8 Catio Plans

Building-a-6×8-catio
Cut & Shopping Lists
- A – 2 pieces of 2×2 lumber – 72″ long, 2 pieces – 93″ long BASE
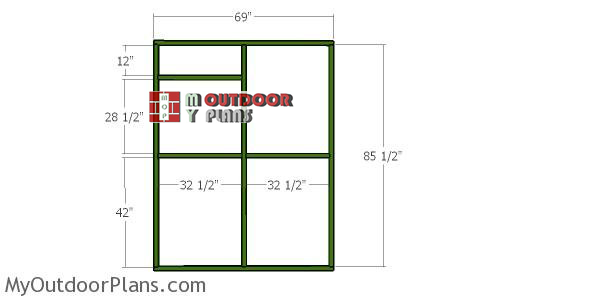
- B – 3 pieces of 2×2 lumber – 85 1/2″ long, 2 pieces – 69″ long, 3 pieces – 32 1/2″ long BACK WALL
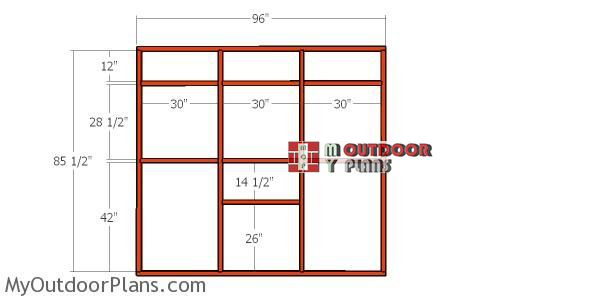
- C – 4 pieces of 2×2 lumber – 85 1/2″ long, 2 pieces – 96″ long, 6 pieces – 30″ long SIDE WALL
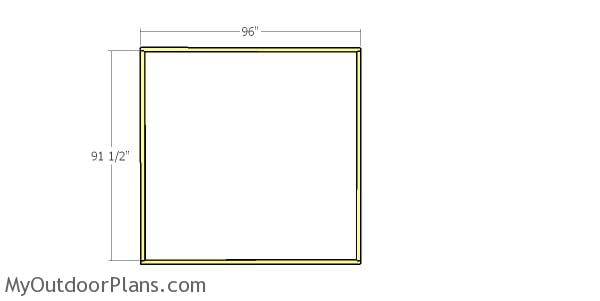
- D – 2 pieces of 2×2 lumber – 96″ long, 2 pieces – 91 1/2″ long SIDE WALL
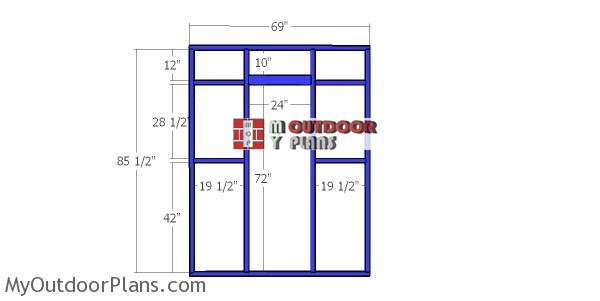
- E – 2 pieces of 2×2 lumber – 69″ long, 4 pieces – 85 1/2″ long, 4 pieces – 19 1/2″ long, 2 pieces – 24″ long FRONT WALL
- J – 1 piece of 2×2 lumber – 33 3/4″ long, 1 piece – 87 1/4″ long, 1 piece – 67 1/2″ long SUPPORTS
- 30 pieces of 2×2 lumber – 8 ft
- 4 pieces of 2×4 lumber – 8 ft
- 3 1/2″ screws, 2 1/2″ screws
- hinges, latch
- hardware cloth
- wood glue, stain/paint
Tools
![]() Hammer, Tape measure, Framing square, Level
Hammer, Tape measure, Framing square, Level
![]() Miter saw, Drill machinery, Screwdriver, Sander
Miter saw, Drill machinery, Screwdriver, Sander
![]() Safety Gloves, Safety Glasses
Safety Gloves, Safety Glasses
Time
![]() One weekend
One weekend
Related
It’s that easy to build a catio!
How to build a 6×8 catio
Tall side wall frame – catio
The first step of the project is to build the wall frame that goes against the house. Cut all the components from 2×2 lumber, as shown in the diagram. Drill pilot holes through the plates and insert 3 1/2″ screws into the studs. Make sure the corners are square and check if the diagonals are equal.
Side-wall-frame-catio
Next, but the opposite side wall for the catio. Start by cutting all the components from 2×2 lumber, following the info in the diagram. Drill pilot holes through the plates and then insert 3 1/2″ screws into the studs. Last but not least, attach the supports for the shelves. Make sure the corners are right angled and leave no gaps between the components.
Fomt-wall-catio-6×8
Build the front wall for the catio. Frame the door by installing the double 2×4 header. Make sure all the corners are square and align the edges flush.
Back-wall-frame-6×8-catio
Build the back wall as shown in the free plans.
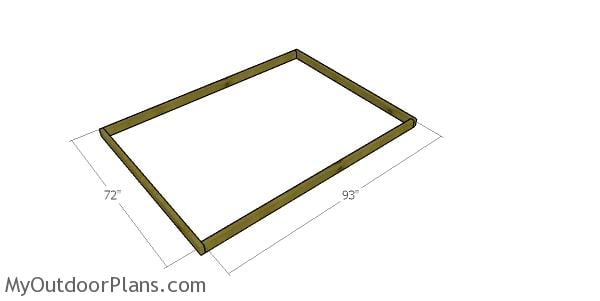
Catio skids
Use 2×4 lumber for the base of the catio. Drill pilot holes and insert 3 1/2″ screws to lock them together. Make sure the corners are square and align the edges flush.
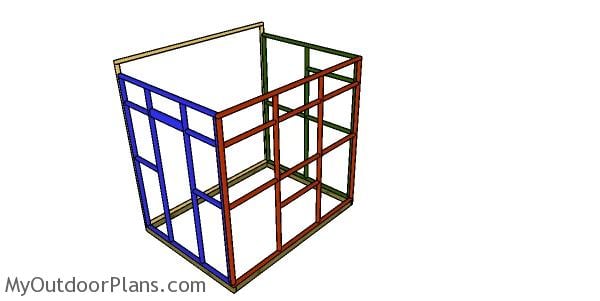
Assembling the frame of the 6×8 catio
After building all the wall frames, you need to assemble the catio. Align the bottom plates to the base of the catio, making sure the edges are flush. Drill pilot holes through the plates and insert 2 1/2″ screws into the base. Check if the corners are square and align the edges. Drill pilot holes and insert 2 1/2″ screws to lock everything together tightly.
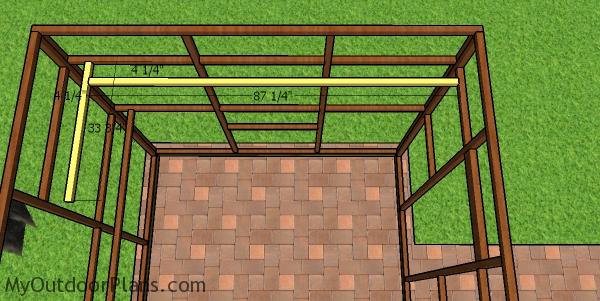
Supports for the shelves – catio
Fit the 2×2 supports for the shelves. Drill pilot holes and insert 2 1/2″ screws to lock the supports into place tightly.
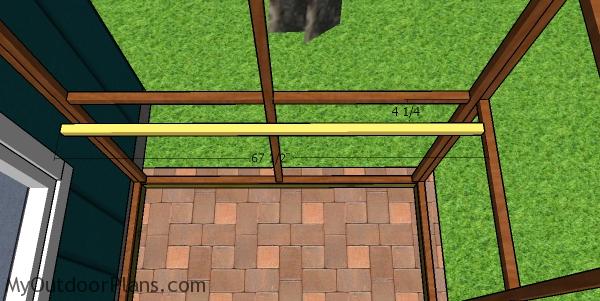
Supports for the catio shelves
Fit the rest of the supports to the catio.
How-to-build-a-6×8-catio
This is a beautiful catio that you can build in a few days. This 6×8 catio is simple to build and it features an elegant design.

6×8-covered-patio-plans
Make sure you check out PART 2 of the catio where I show you how to build the roof, the door and the shelves.

Catio plans – 6×8

How to build a 6×8 catio
If you want to get PREMIUM PLANS for this project, in a PDF format, please press GET PDF PLANS button bellow. Thank you for the support.

This woodworking project was about 6×8 catio plans free. If you want to see more outdoor plans, check out the rest of our step by step projects and follow the instructions to obtain a professional result.

5 comments
This looks fantastic. Do you have an estimate for how many screws I’d need, including the roof installation? Just a ballpark so I know if I need to go get more screws for the project?
Thank you so much for the free plans, I’m hoping to learn a lot! Just getting back into woodworking after many years. Thanks again!
200 maybe? It’s hard t o estimate screws, because each builder has its own style.
Thank you so much for the free catio plans! I am new to woodworking and I have a question. How do you get the screws in to the horizontal 2x2s in between the vertical studs? Do you put them in at an angle?
Hi, this looks incredible! Are the 2×2 measurements in inches? So it is 5cm x 5cm beams? Sorry if this sounds very stupid! I’m European and can’t get my head round inches at all lol.
You have here a table with conversion to mm: https://myoutdoorplans.com/woodworking-101/