In Part 3 of our 6×12 chicken coop project, we’re focusing on building the nesting boxes and the doors for the coop. The nesting boxes are essential for providing your hens with a comfortable and private space to lay their eggs. We’ll start by constructing the frames using 2×2 lumber, then add 1/2″ plywood for the floor and partitions, creating separate spaces for each hen. Once the boxes are built, we’ll attach them to the side of the coop, making sure they’re secure and easy to access for egg collection. This section of the build ensures your chickens have everything they need to feel at home.
Next, we’ll build the doors for the coop and the run, which are crucial for easy access and safety. The main coop door will provide entry for cleaning and feeding, while the run door allows your chickens to move freely in and out of their outdoor space. We’ll construct the door frames from sturdy 1×4 lumber, then add the necessary hardware, like hinges and latches, to keep the doors secure. With the doors and nesting boxes completed, your coop will be functional and ready for your chickens to move in!
When buying the lumber, you should select the planks with great care, making sure they are straight and without any visible flaws (cracks, knots, twists, decay). Investing in cedar or other weather resistant lumber is a good idea, as it will pay off on the long run. Use a spirit level to plumb and align the components, before inserting the galvanized screws, otherwise the project won’t have a symmetrical look. If you have all the materials and tools required for the project, you could get the job done in about a day.
Projects made from these plans
6×12 Chicken Coop Plans – Nesting Boxes
Building-a-6×12-chicken-coop-with-run
Cut & Shopping Lists
Tools
![]() Hammer, Tape measure, Framing square, Level
Hammer, Tape measure, Framing square, Level
![]() Miter saw, Drill machinery, Screwdriver, Sander
Miter saw, Drill machinery, Screwdriver, Sander
![]() Safety Gloves, Safety Glasses
Safety Gloves, Safety Glasses
Time
![]() One week
One week
Related
- PART 1: 6×12 Chicken Coop with Run Plans
- PART 2: 6×12 Chicken Coop with Run – Roof Plans
- PART 3: 6×12 Chicken Coop with Run – Nesting Boxes
STEP 5: Building the nest box
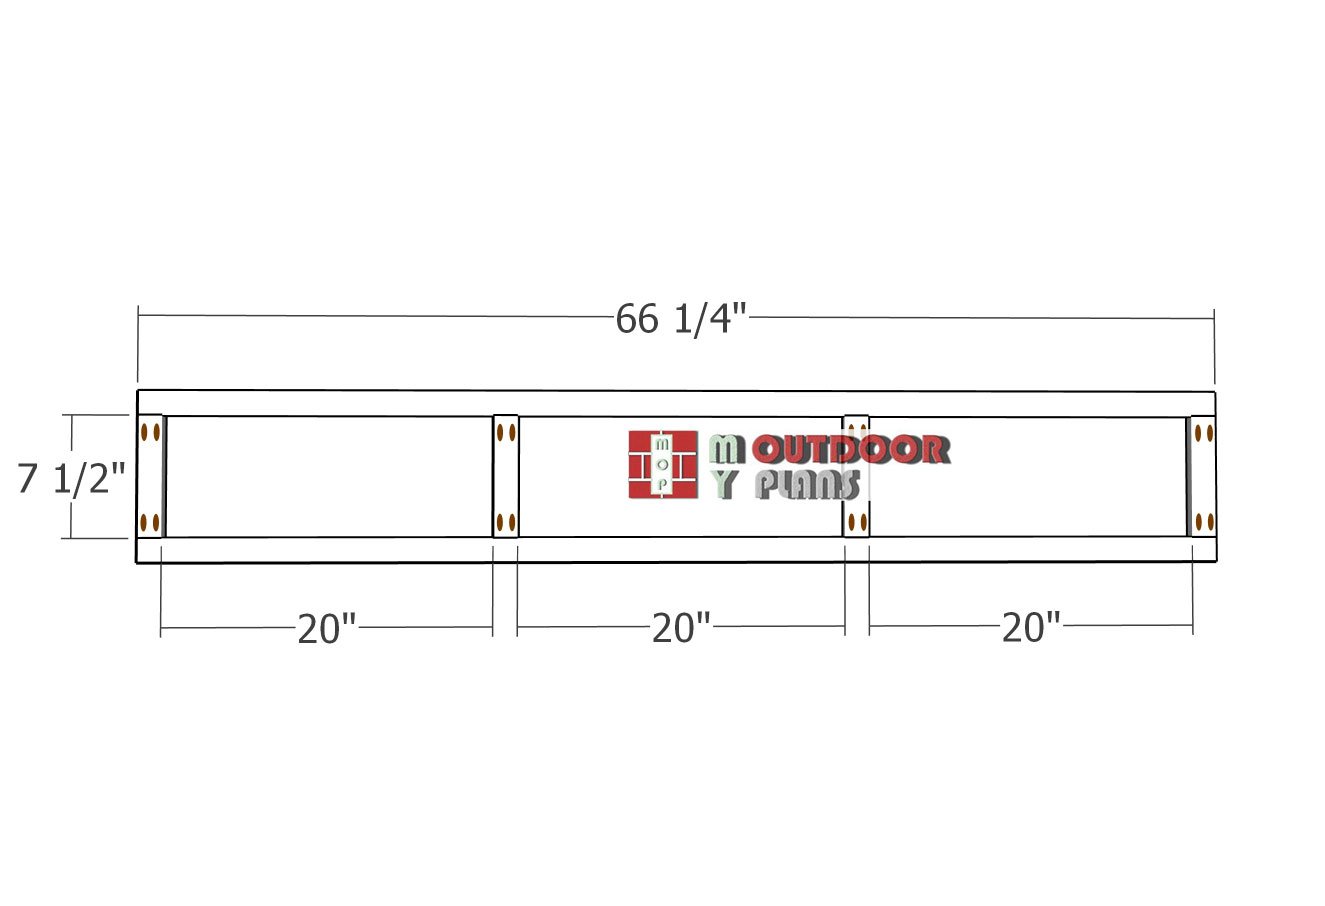
Nest-box-frame-1
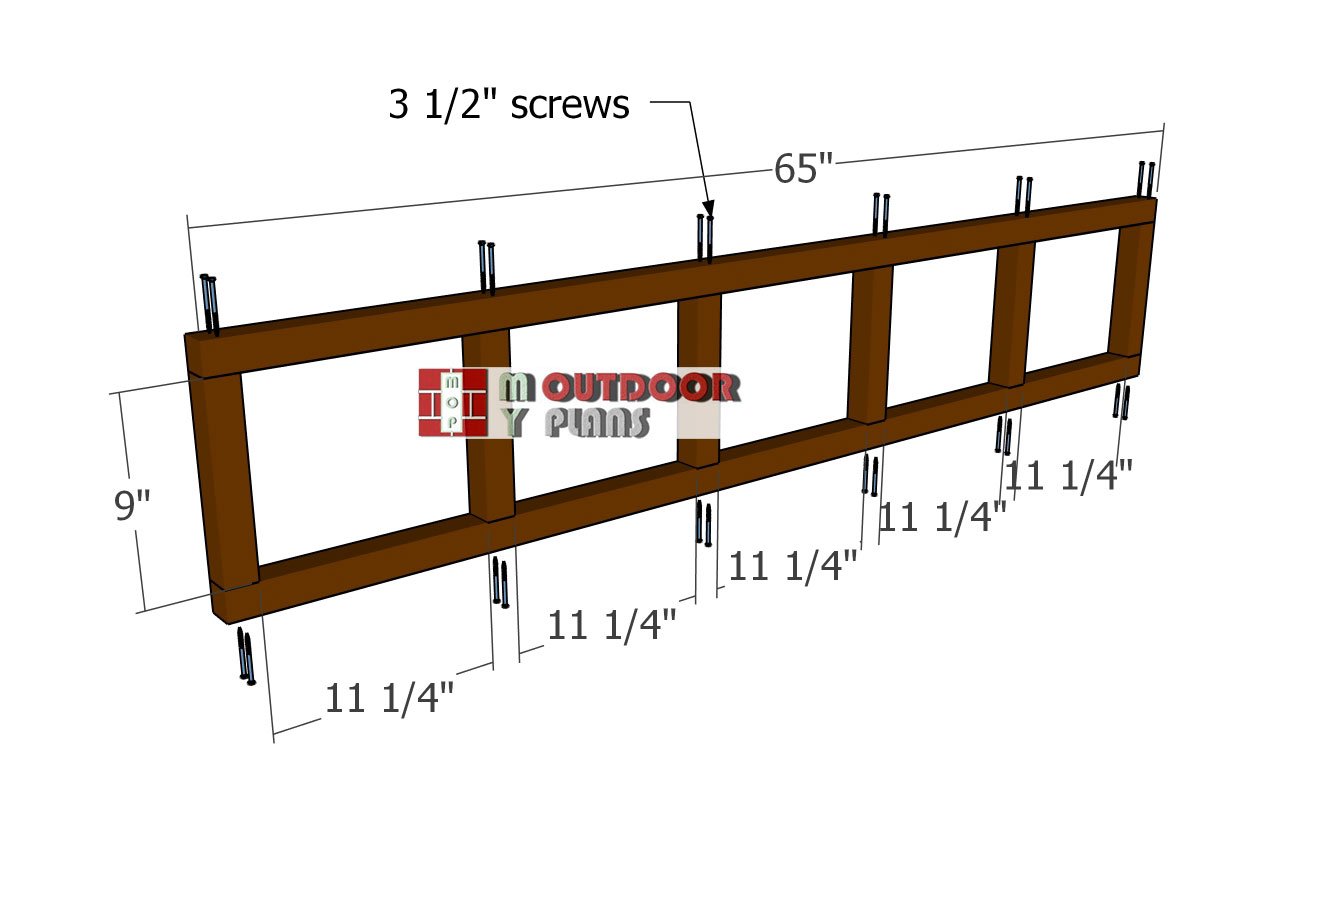
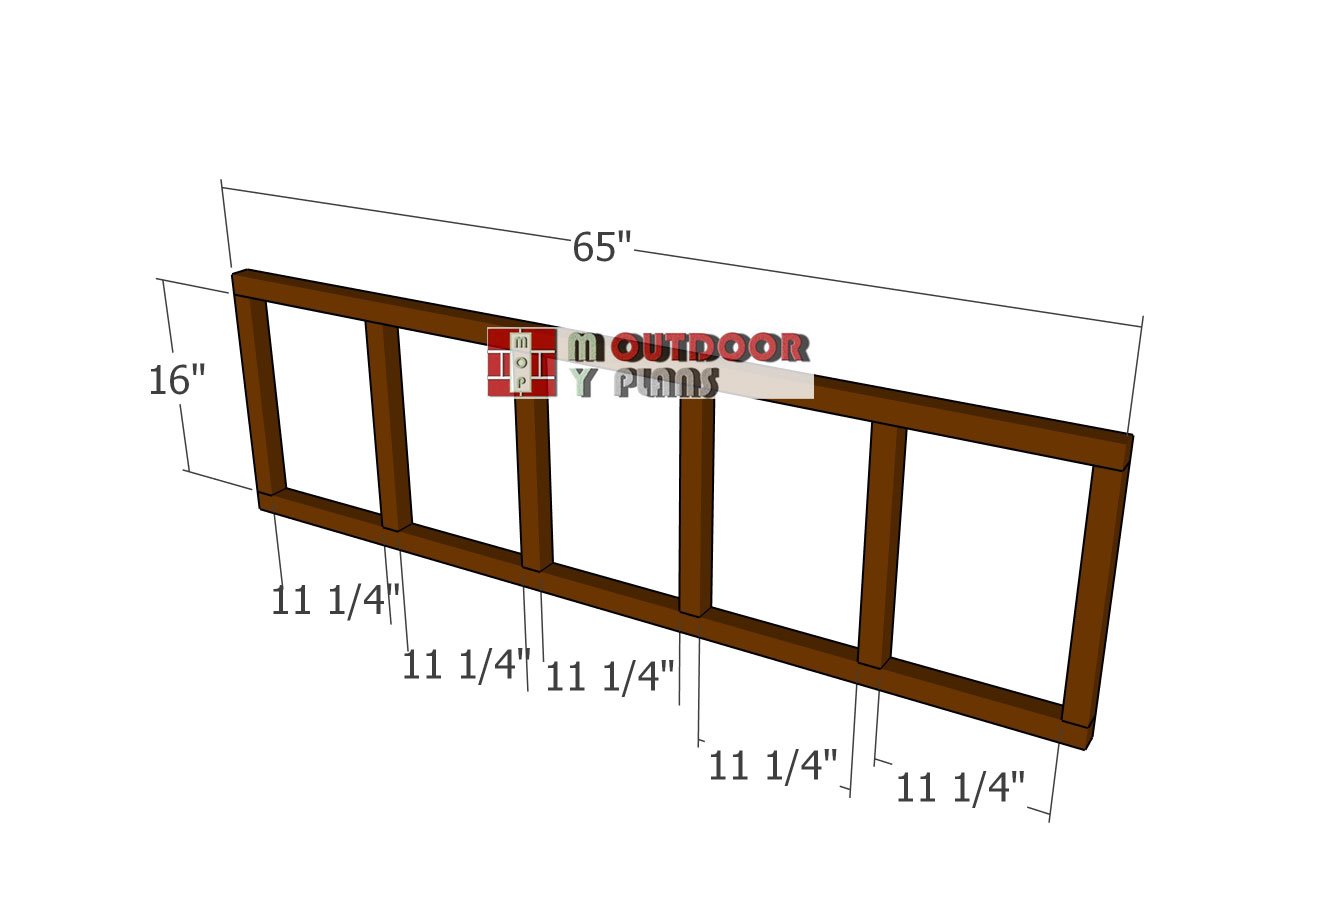
Now it’s time to put together the nest boxes. Start by assembling the two wall frames using 2×2 lumber. Cut all the components to size according to the plans, then lay them out on a flat surface.
Nest-box-frame-2
Drill pilot holes at each joint to prevent splitting, and use 3 1/2″ screws to fasten the pieces together. You should end up with two sturdy frames that will support the nest box structure.
Assembling-the-nest-box
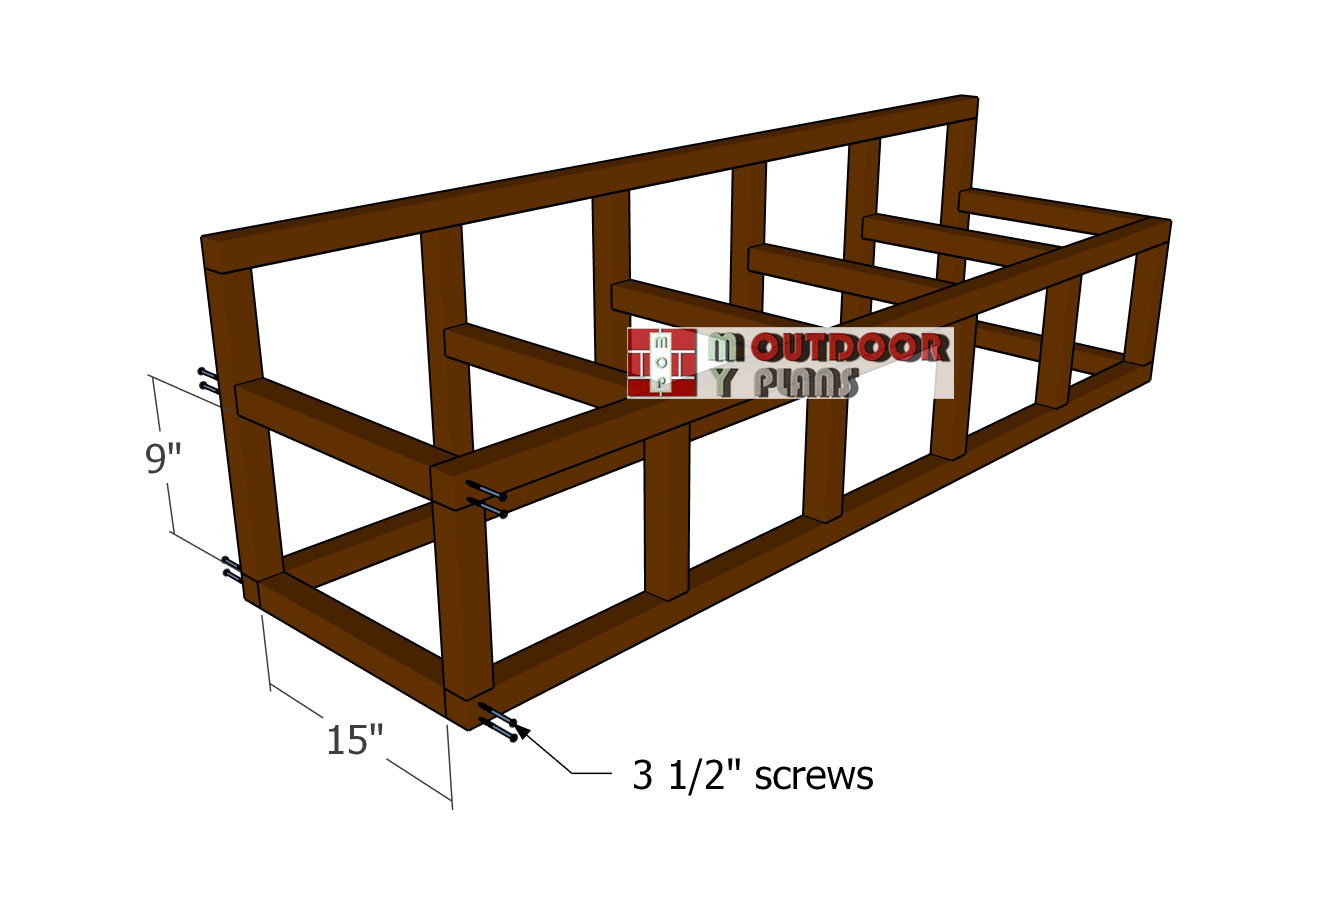
Join the two frames together using the 15″ supports to form the nest box structure. Make sure all the edges are aligned properly, then drill pilot holes at each connection point. Drive 3 1/2″ screws through the supports into the frames to lock everything together securely. The result should be a sturdy, box-like frame ready for the next step.

Fitting-the-floor-to-the-nest-box
Attach the 1/2″ plywood floor to the nest box frame, making sure the edges are flush on all sides. Once aligned, drill pilot holes and secure the panel with 1 5/8″ screws, spacing them every 8″ along the edges for a tight, solid fit.
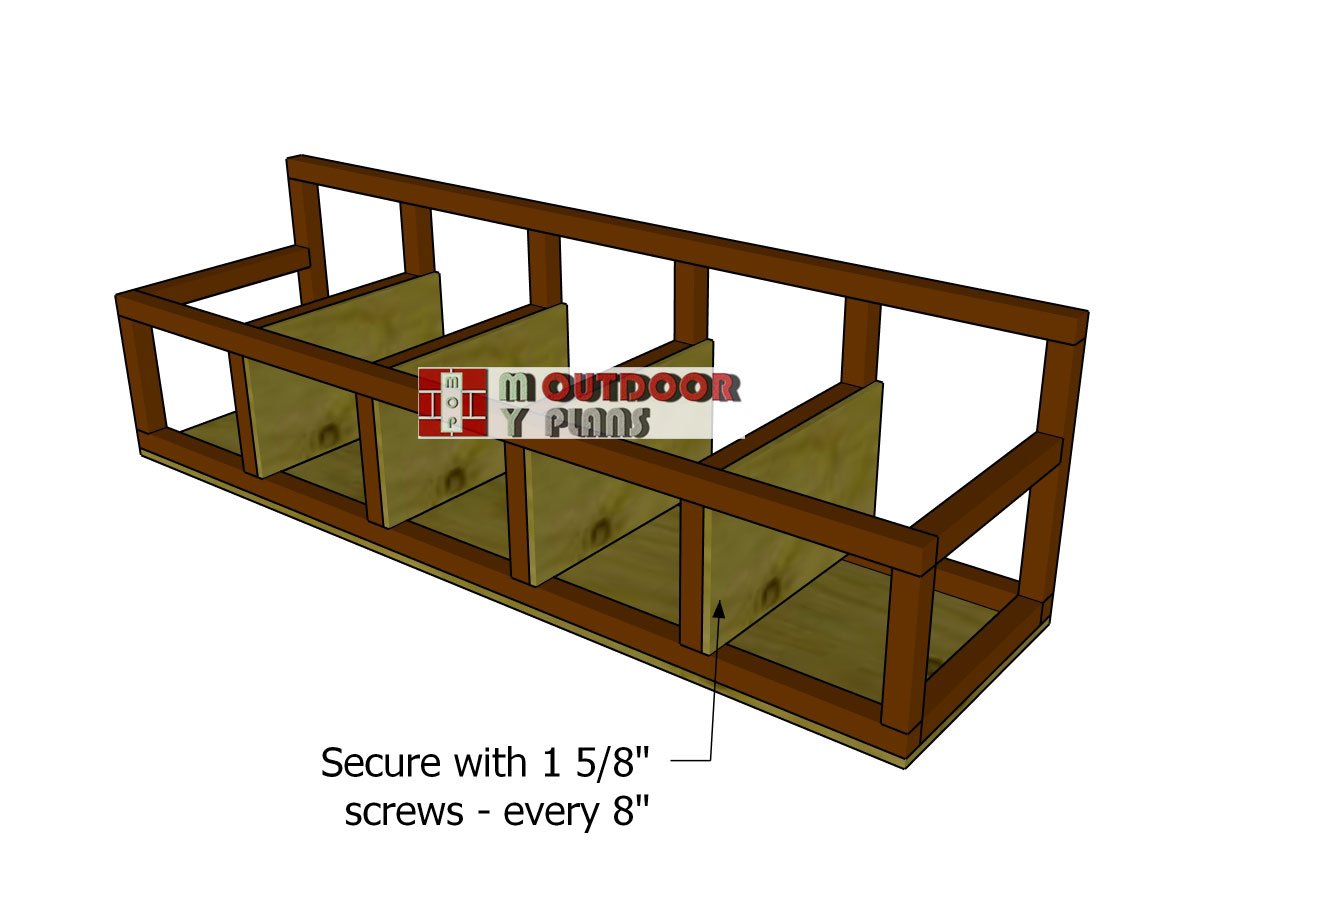
Nest-box-partitions
Cut the partitions for the nest box from 1/2″ plywood, following the diagram to make a notch in one corner of each panel. Position the partitions inside the frame, spacing them evenly. Secure them in place with 1 5/8″ screws, driving them in every 8″ along the edges to keep the partitions firmly attached.
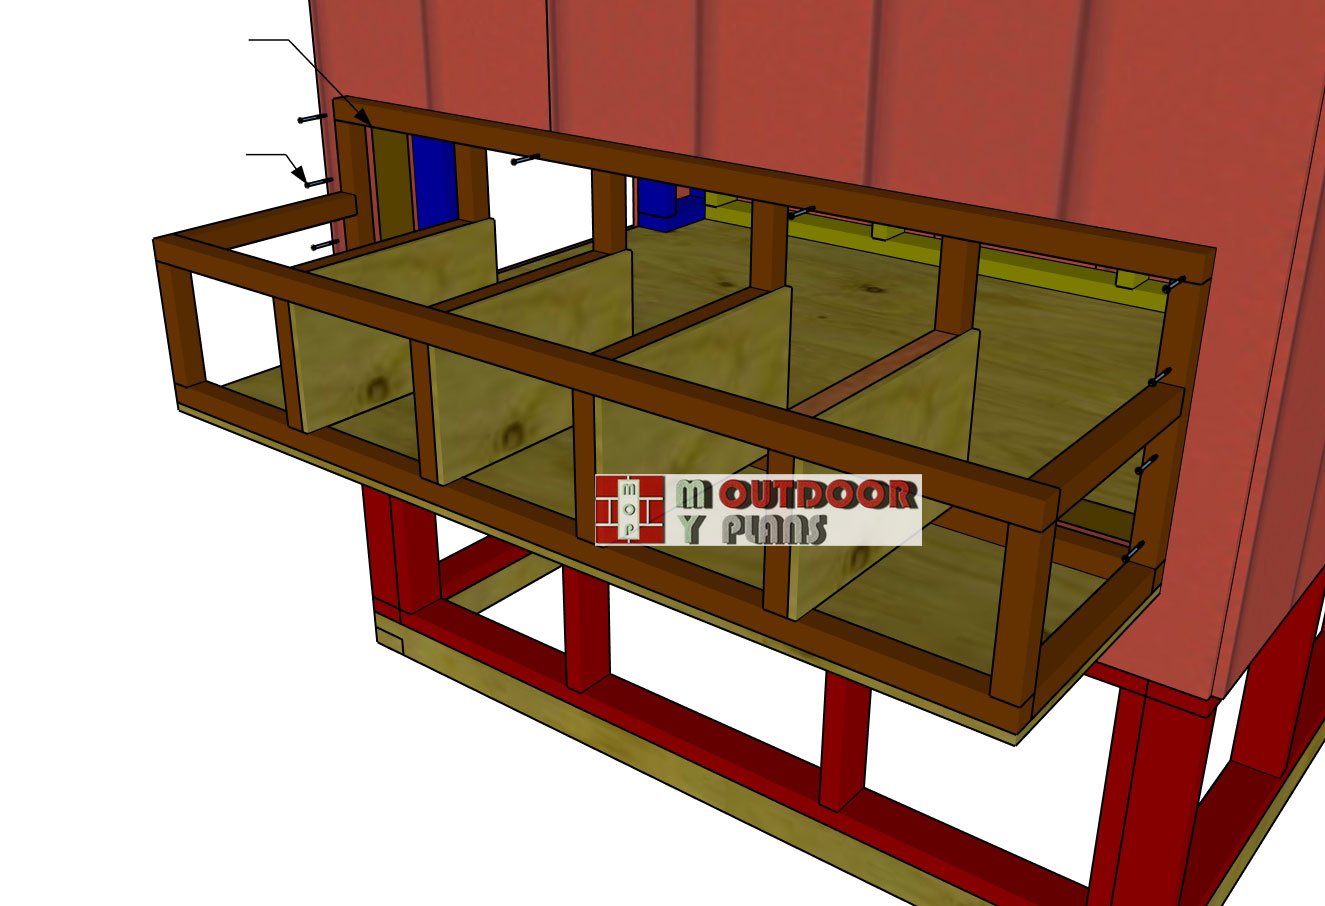
Fitting-the-nest-box-frame
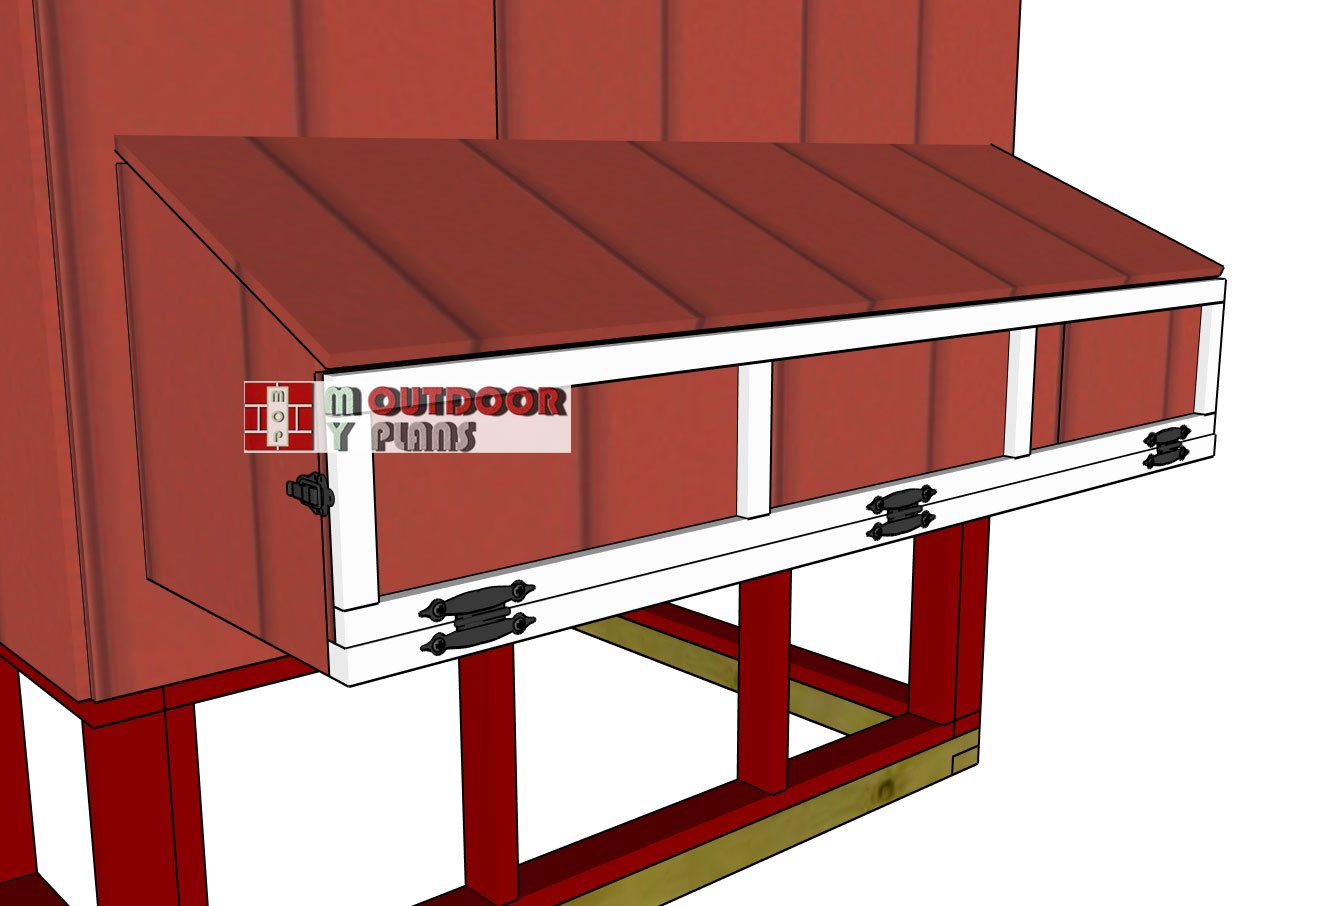
Attach the nest box to the side of the chicken coop, making sure the edges are flush with the opening. Drill pilot holes through the frame, then drive in 2 1/2″ screws every 8″ along the perimeter to secure it tightly to the coop wall. This will create a strong, seamless connection between the nest box and the main structure.
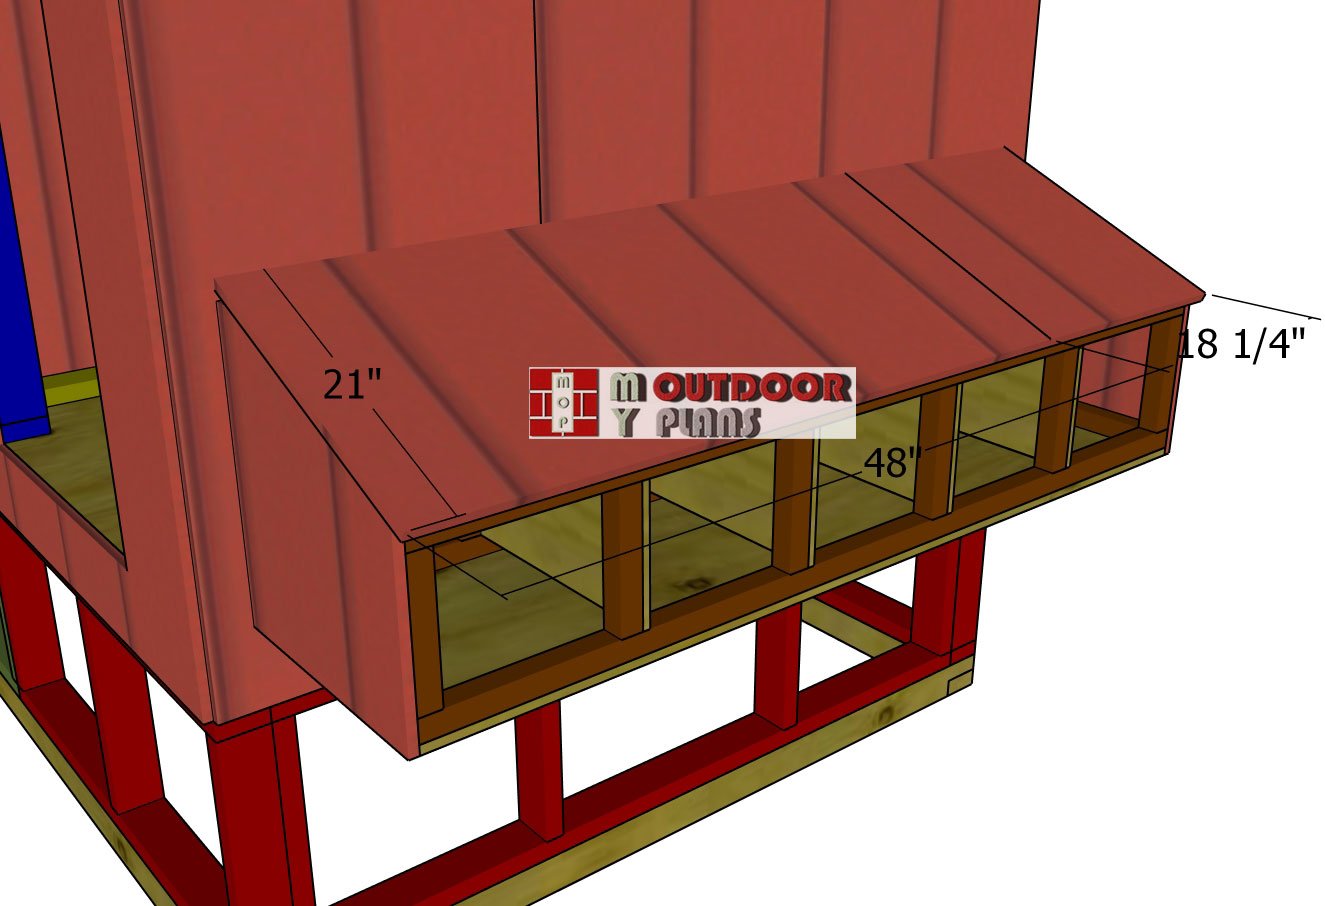
Nest-box-roof
Cut and fit the siding panel to cover the top of the nest box, making sure it sits flush on all sides. Once positioned, secure it with 6-8d nails, spacing them evenly to hold the panel firmly in place.
Nest-box-door-frame
Next up, let’s build the door for the nest box. Use 1×2 lumber to create the frame. Drill pocket holes at both ends of the vertical supports, then assemble the door frame using 1 1/4″ screws. Add wood glue to each joint before driving the screws to strengthen the connections and keep the frame square and solid.
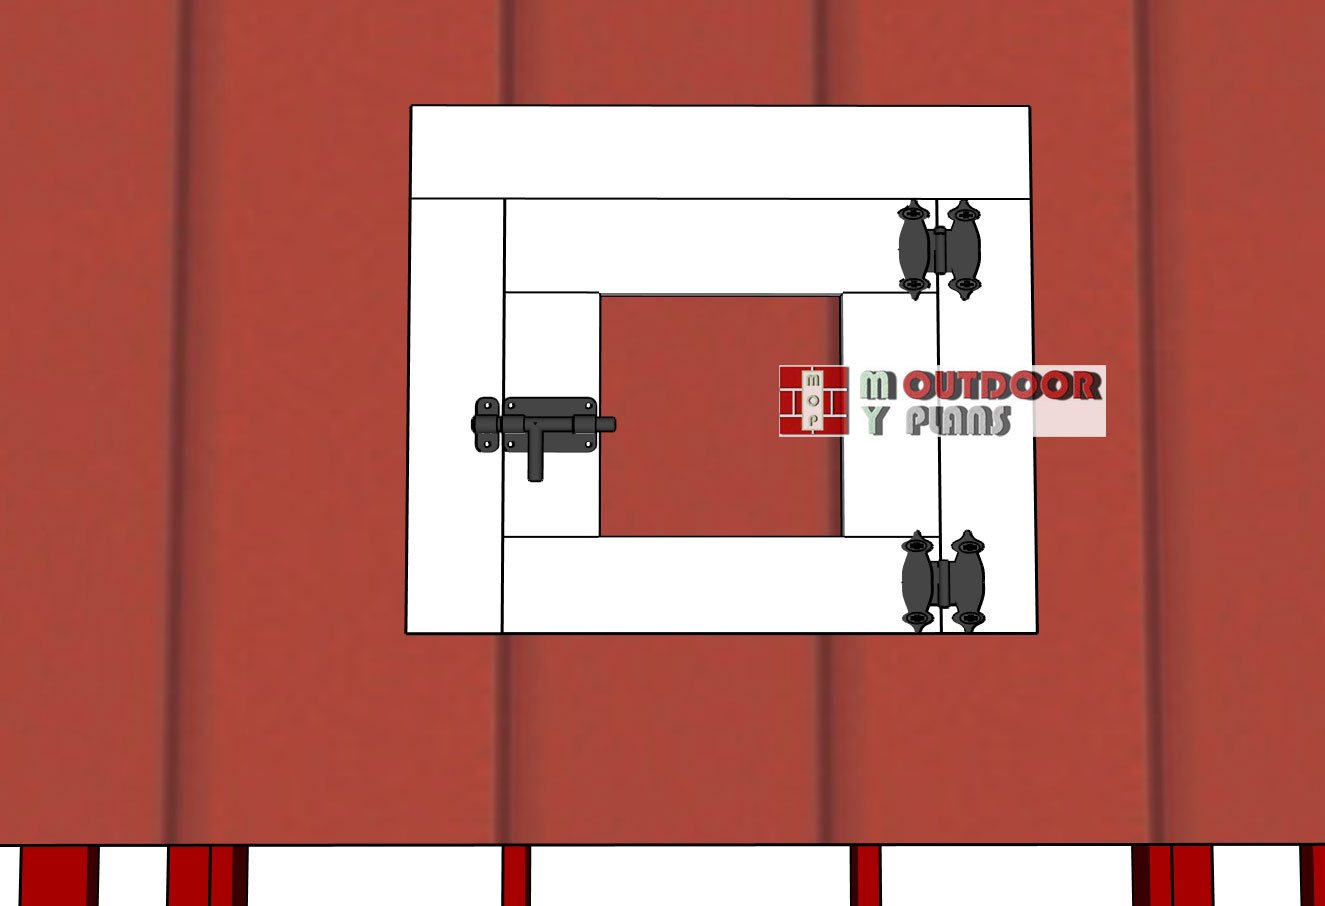
Fitting-the-nest-box-door
Attach the T1-11 siding panels to the nest box door frame, making sure all edges are flush. Drill pilot holes, then secure the panel with 1 1/4″ screws, spacing them every 8″ along the frame for a clean and sturdy finish.
Attach the door to the nest box using 3 hinges, spacing them evenly along the top edge for smooth, stable movement. Once the door is in place, install the latches on the sides of the nest box, just like shown in the diagram, to keep the door securely closed when not in use.
STEP 6: Building the doors
Clean-door-frame
Attach the 1×4 jambs around the chicken coop area door, making sure the edges are flush with the door opening. Once everything is aligned, secure the boards into place using 6-8d nails, spacing them evenly along the framing for a clean and solid installation.
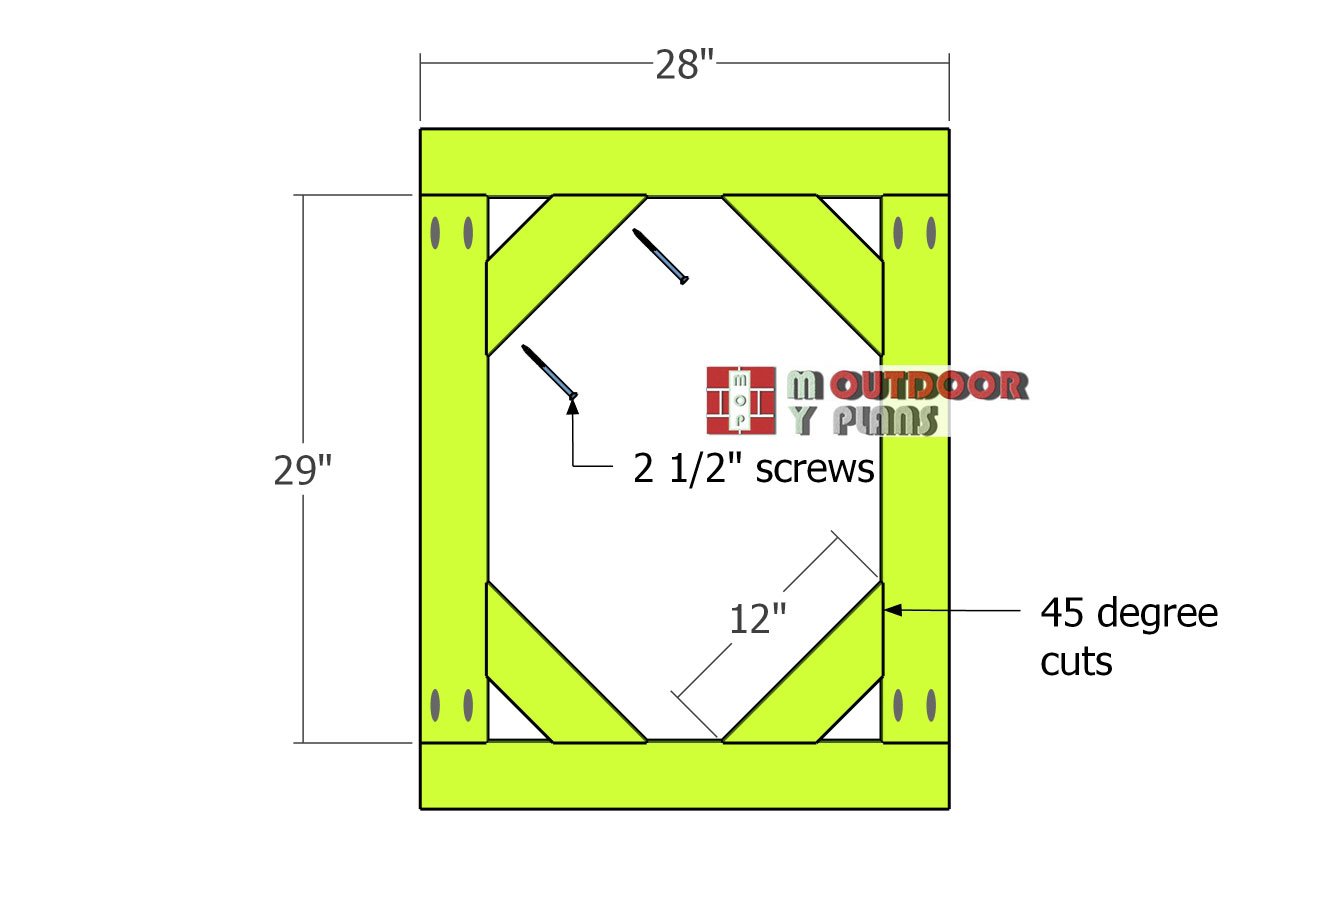
Back-door-frame
Assemble the door frame using 1×4 boards. Drill pocket holes as shown in the diagram and join the pieces together with 1 1/4″ screws for strong, clean joints. Cut the diagonal braces with 45-degree angles on both ends, then secure them to the frame using 2 1/2″ screws after drilling pilot holes.
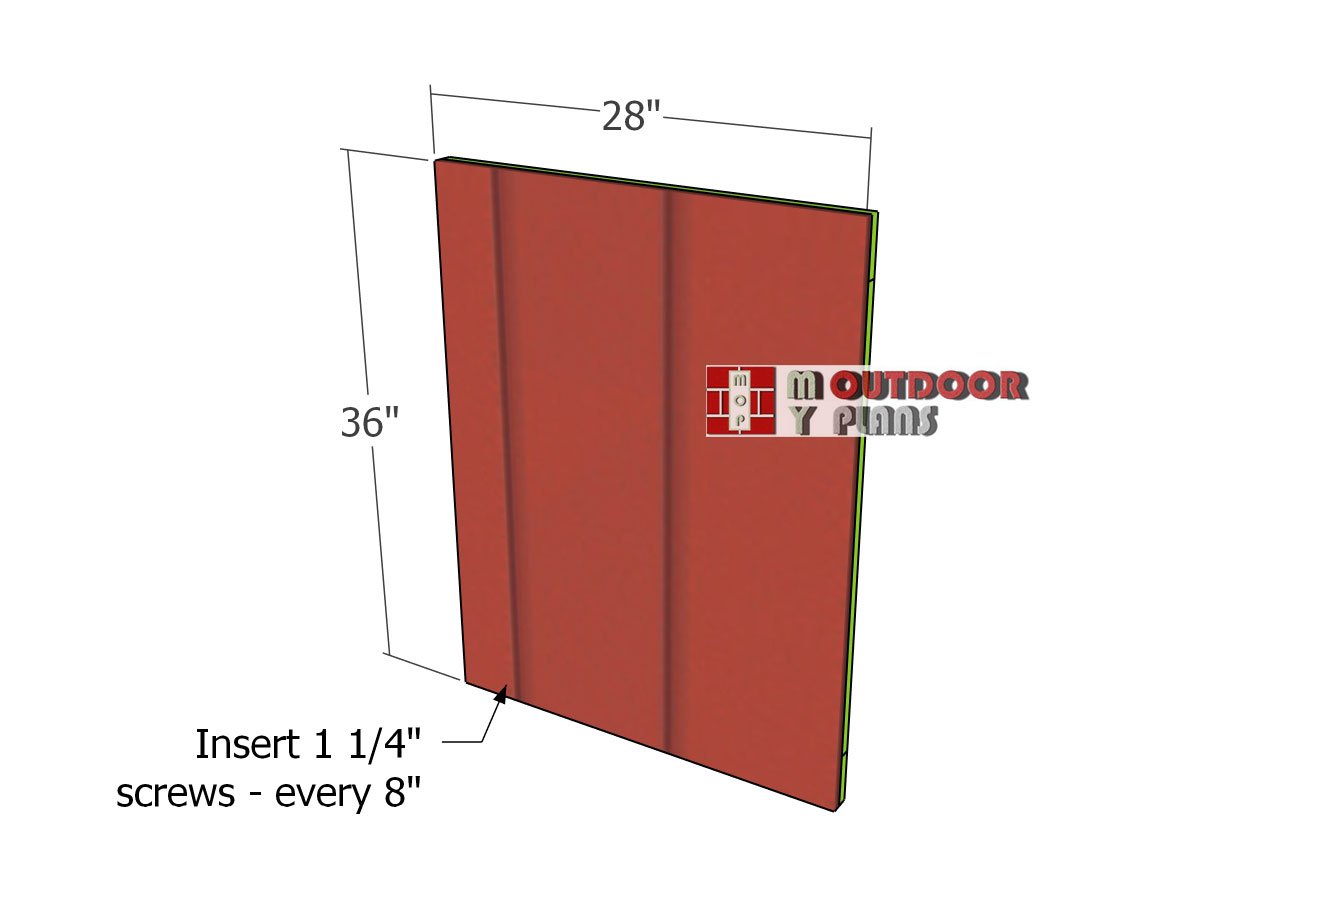
Back-door-panel
Once the frame is solid, attach the siding panel by aligning the edges flush and fastening it with 1 1/4″ screws spaced every 8″ along the framing to lock everything into place.
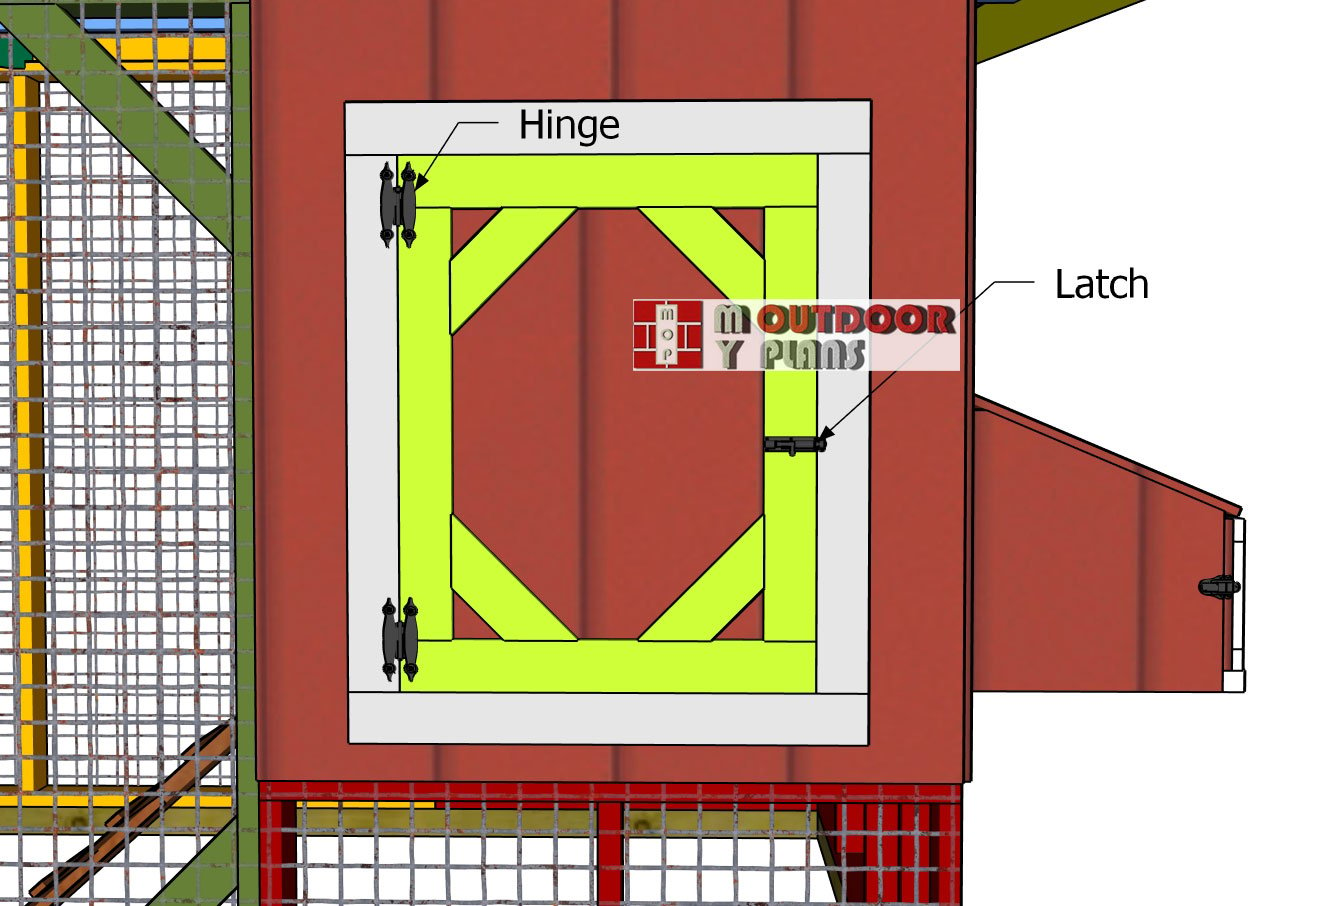
Fitting-the-cleaning-door
Fit the door to the coop area and secure it to the jambs using hinges, making sure it opens and closes smoothly. Install a latch to keep the door locked and secure from predators. This door will help you easily access the interior of the coop for cleaning, feeding, and collecting eggs.
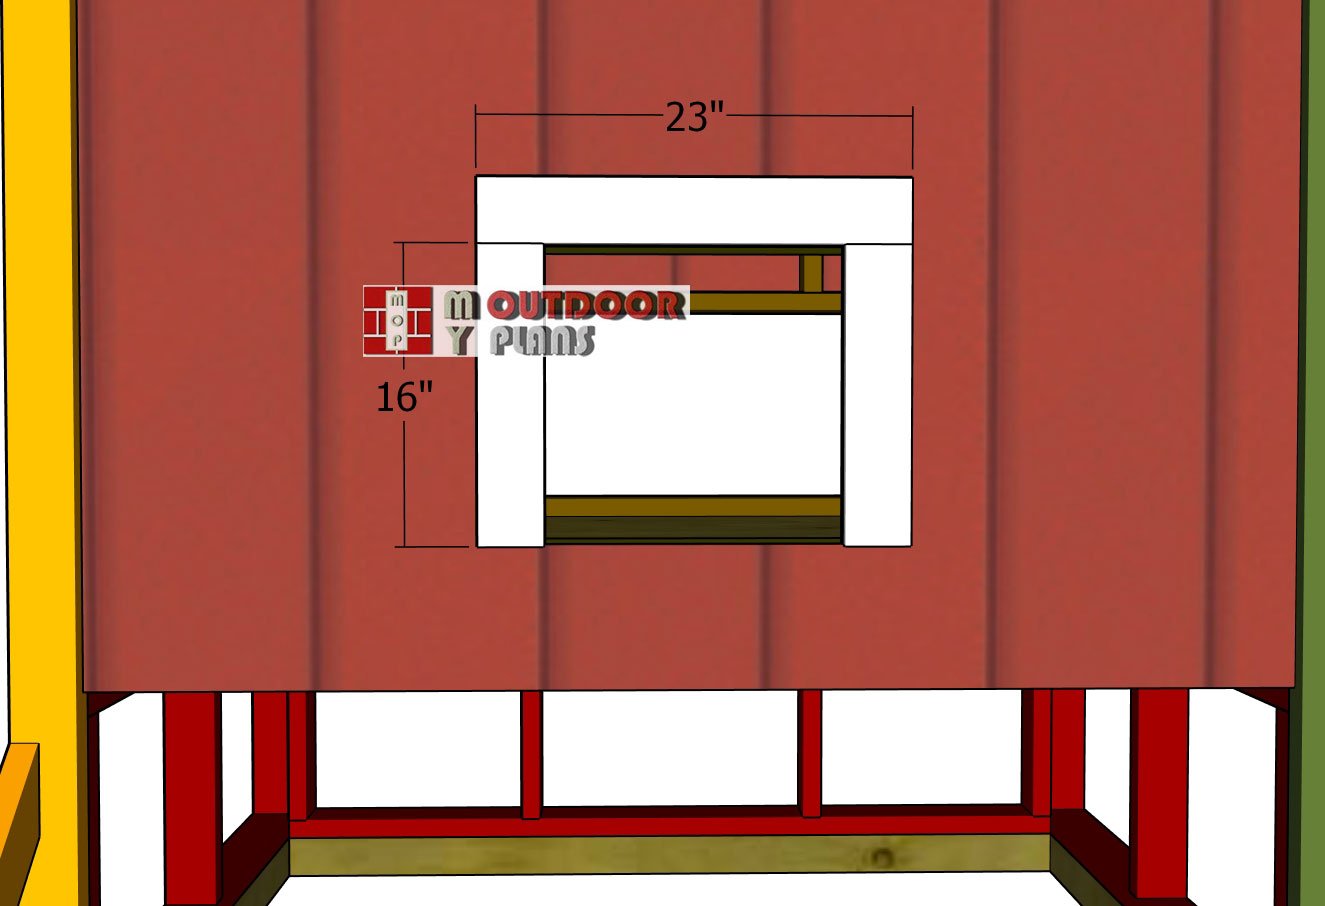
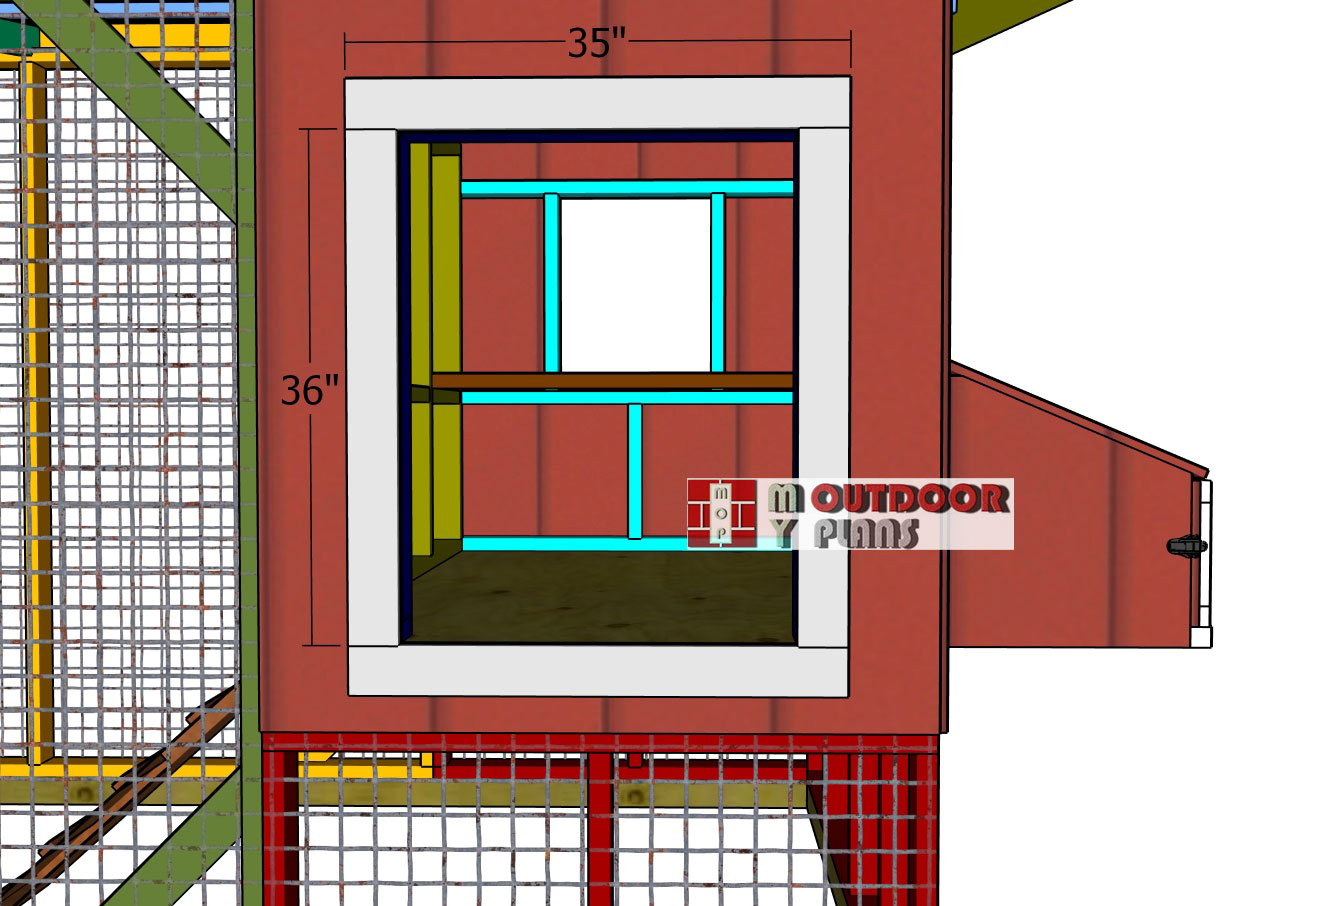
Chicken-door-jambs
Now let’s take care of the chicken door. Start by attaching the 1×4 trims around the opening, making sure they’re flush and aligned neatly. Secure the trims into place using 1 5/8″ screws, spacing them every 8″ for a tight, sturdy fit around the entry.
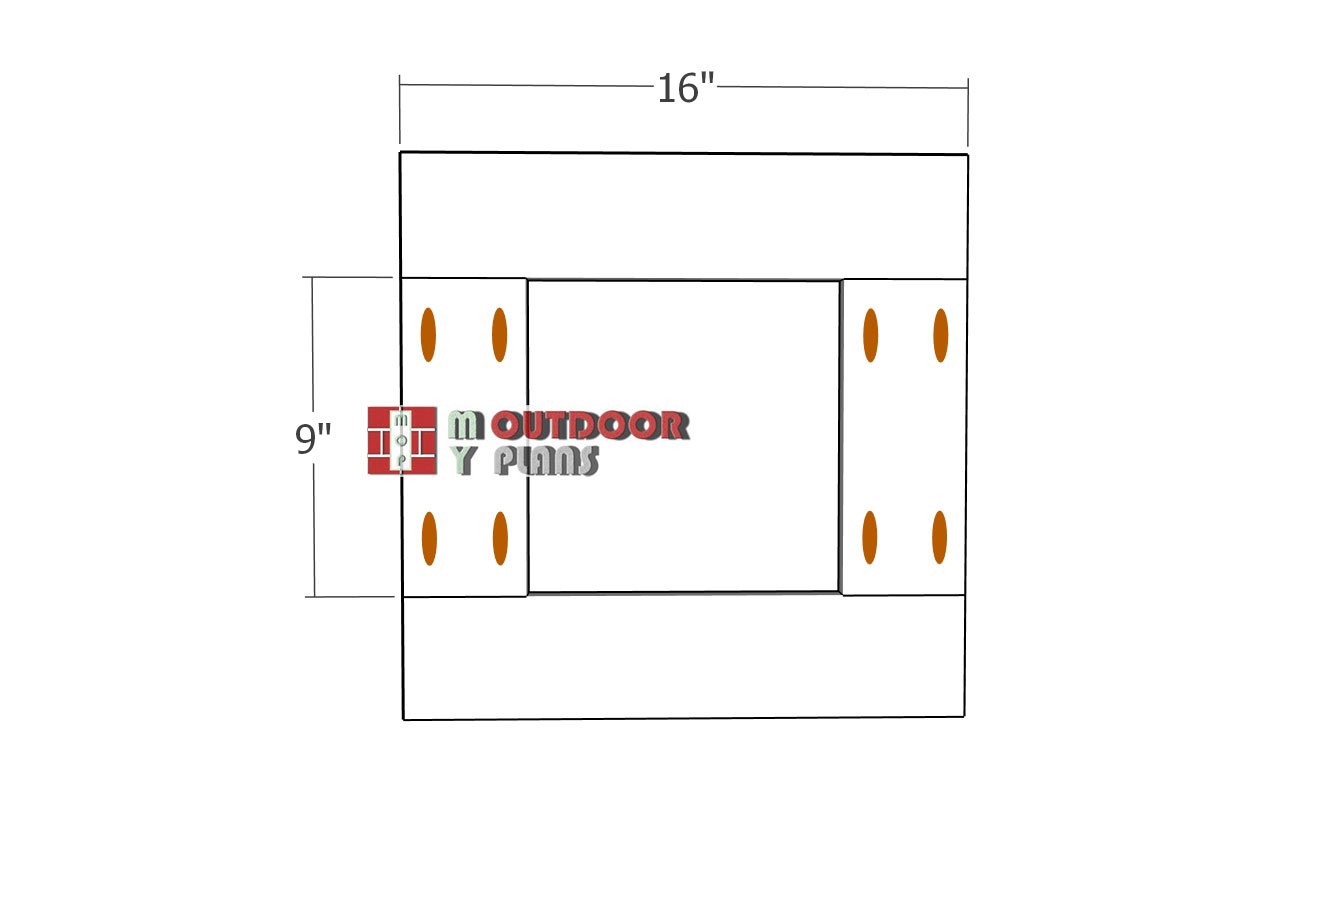
Chicken-door—frame
Build the chicken door frame from 1×4 boards. Drill pocket holes at both ends of the vertical pieces, then assemble the frame by driving 1 1/4″ screws through the pocket holes for a strong, square fit.
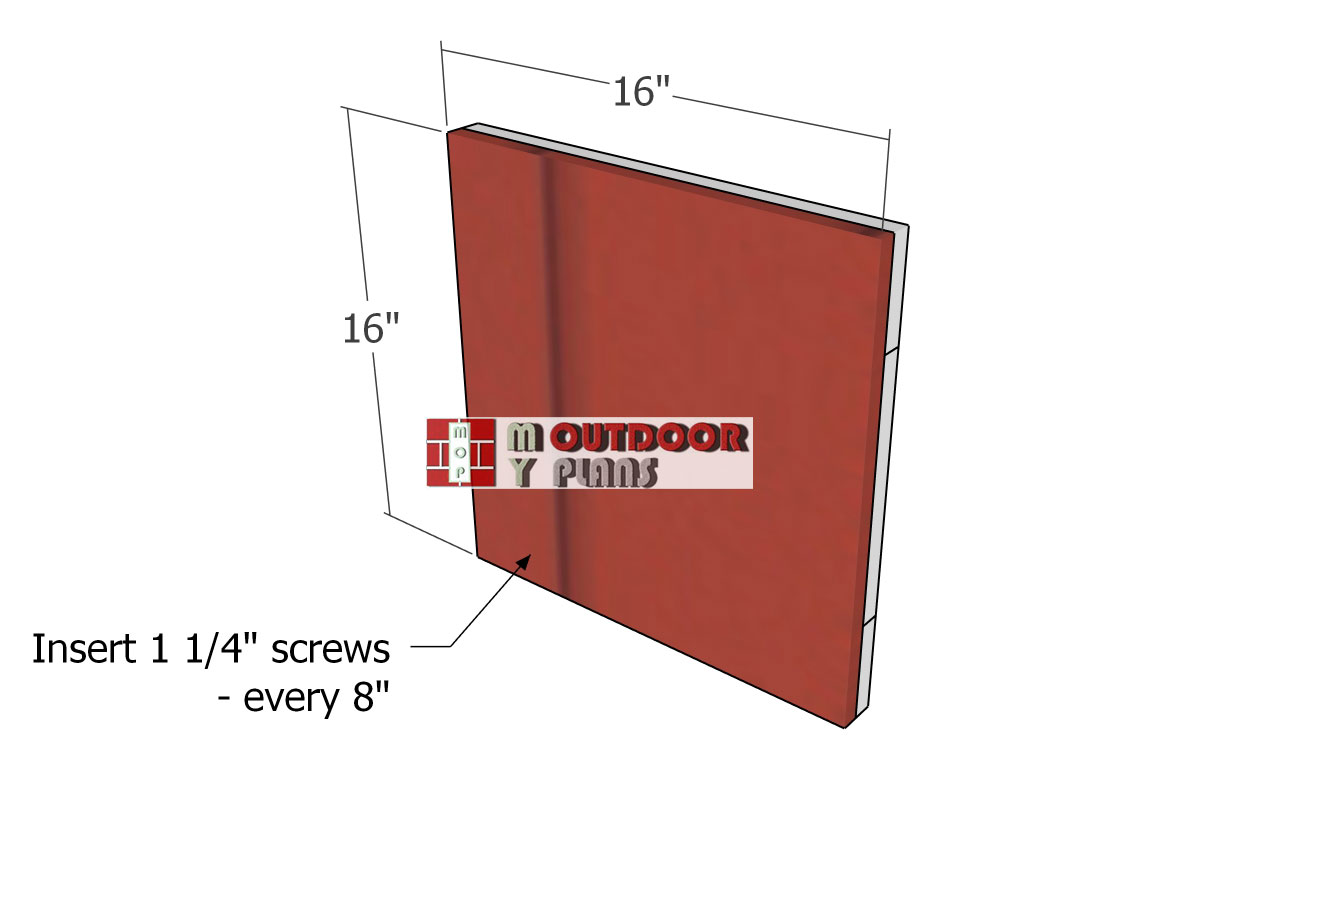
Chicken-door-panel
Once the frame is complete, attach the siding panel by aligning the edges flush and securing it with 1 1/4″ screws spaced every 8″ along the frame.
Fitting-the-chicken-door
Attach the door in place using sturdy hinges, ensuring it swings open and closed smoothly. Once the door is hung, install a latch to keep it securely closed, preventing it from being opened by predators or accidental movement.
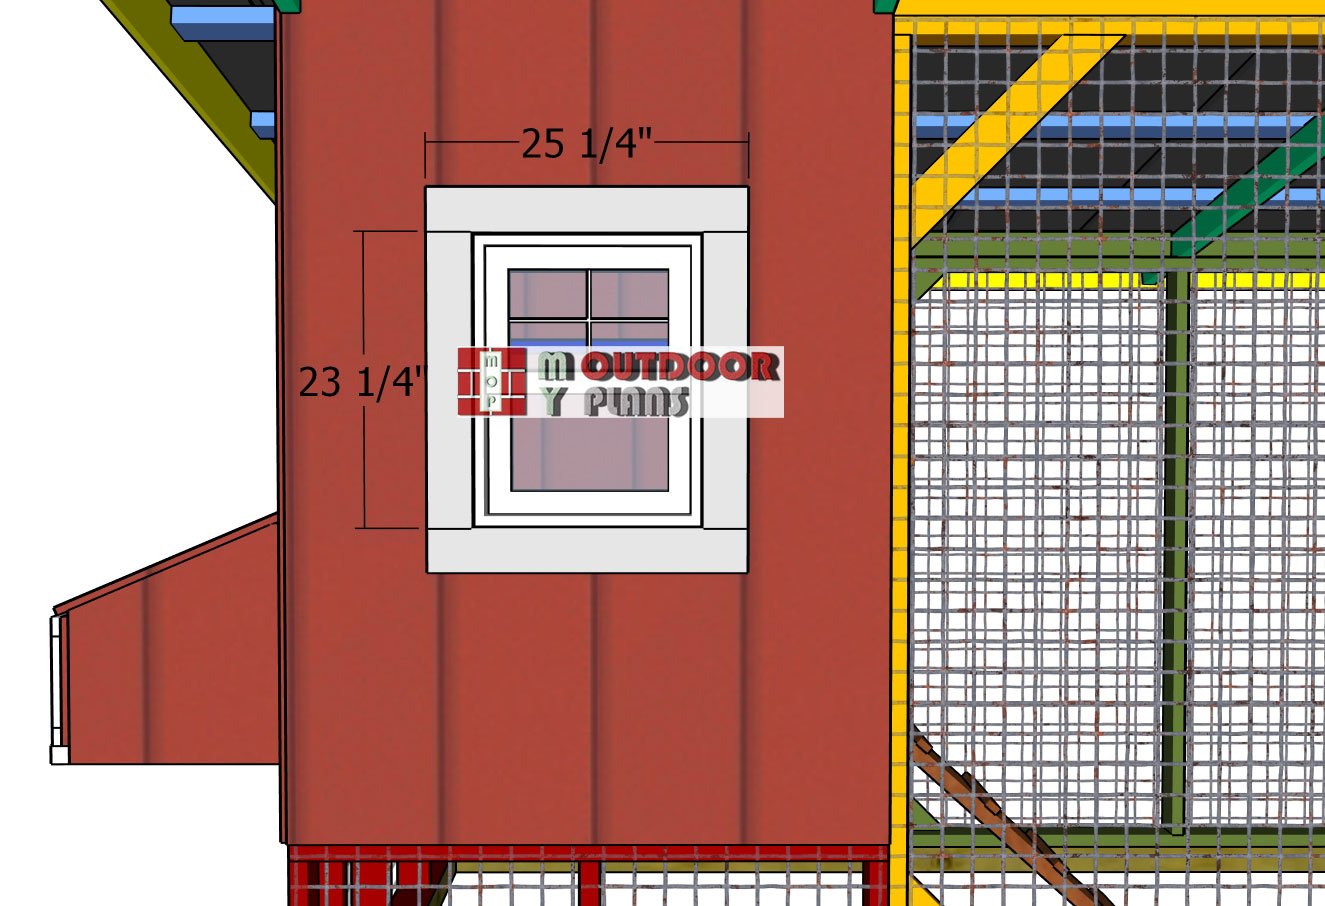
Window-trims
To install the chicken coop window, start by positioning it into the opening in the wall. Make sure the window is level and aligned properly with the edges of the frame. If needed, use shims to adjust the fit and ensure there are no gaps between the window and the frame. Once the window is correctly positioned, secure it to the frame using screws or nails, depending on the window’s design. If the window has a trim or casing, attach that around the edges for a clean and finished look. Be sure to drill pilot holes to prevent splitting the wood and to ensure a secure hold. Next, add weatherproofing to prevent drafts and ensure the window is sealed properly.
You can use weatherstripping around the edges of the window to create a tight seal when it’s closed. If your window has a hinged mechanism, attach the hardware and make sure the window opens and closes smoothly. For extra protection against the elements, consider applying a coat of weather-resistant sealant or paint to both the window and surrounding trim. This will protect the window from moisture and extend its lifespan, keeping your chickens comfortable and safe inside their coop.
STEP 7: Finishing touches
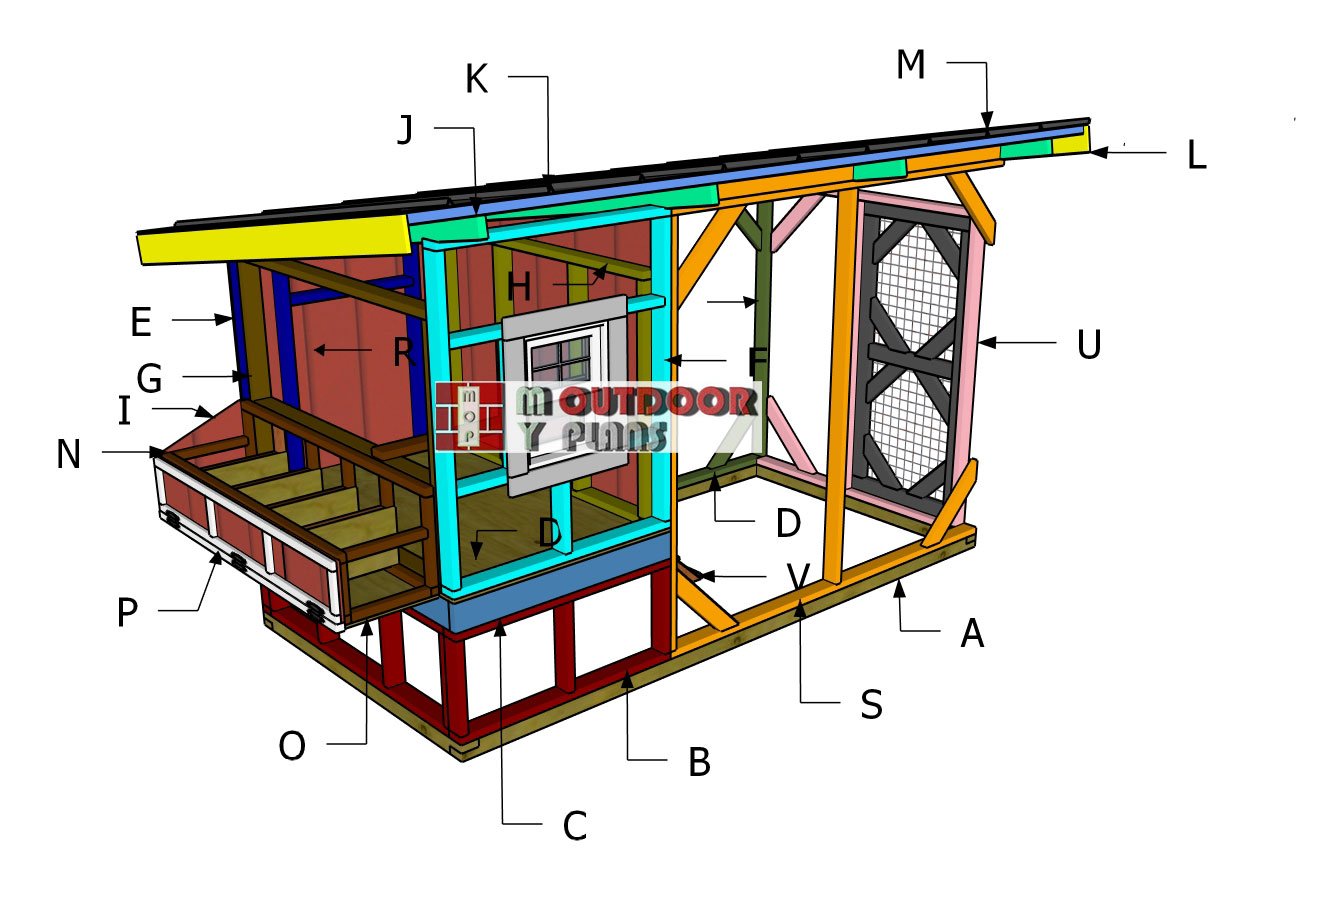
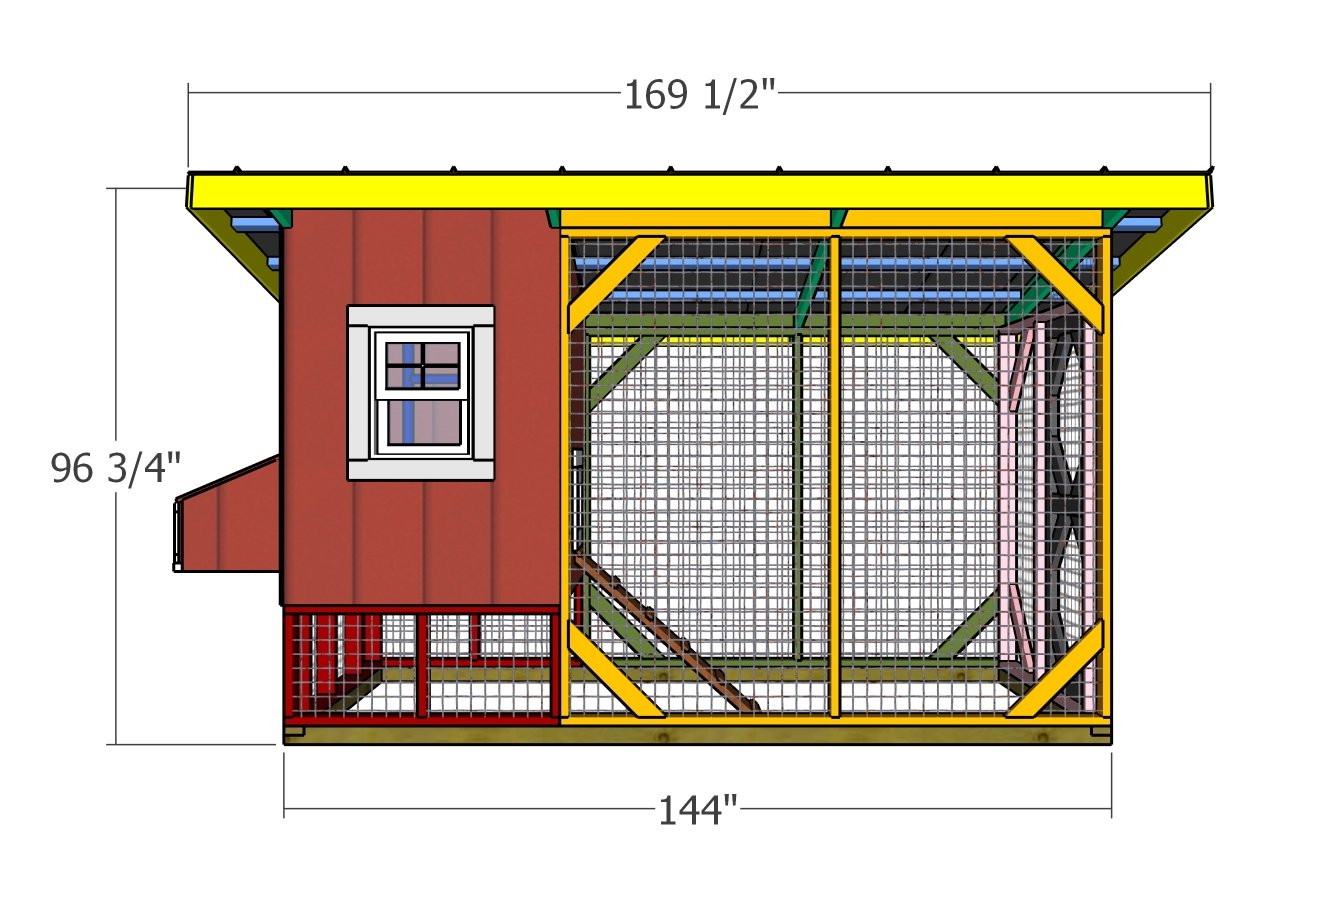
6×12 chicken coop dimensions – back view
Now that the major components are in place, it’s time for the finishing touches that will give your chicken coop a polished and functional look. Start by checking all the edges and corners for smoothness and alignment. You can fill in any gaps or holes with wood filler for a seamless finish. Sand down any rough spots to ensure the coop is safe for your chickens, especially around the door and window openings.
6×12 chicken coop – front view
This is also a great time to apply a coat of weatherproof paint or sealant to the exterior, which will help protect the wood from the elements and ensure the structure lasts for years to come. Once the coop is fully assembled and finished, don’t forget to double-check the hardware, like the latches and hinges, to make sure everything is secure and functional. You can also add some finishing touches inside the coop, such as bedding in the nesting boxes, roosting bars for the chickens, and any additional storage areas you might need for supplies. Finally, take a step back and admire your work—the chicken coop is now ready to provide a safe and comfortable home for your flock!
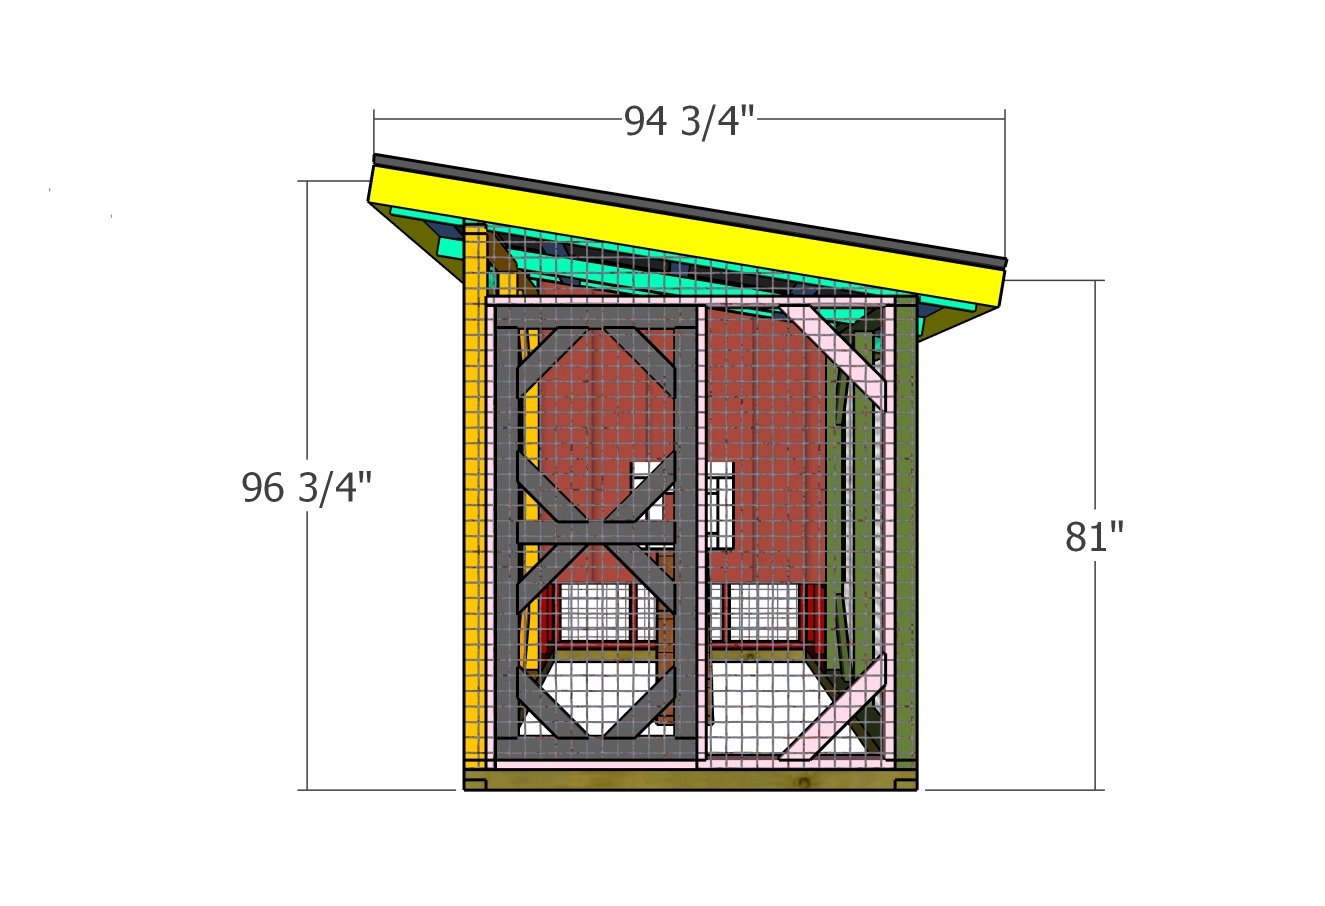
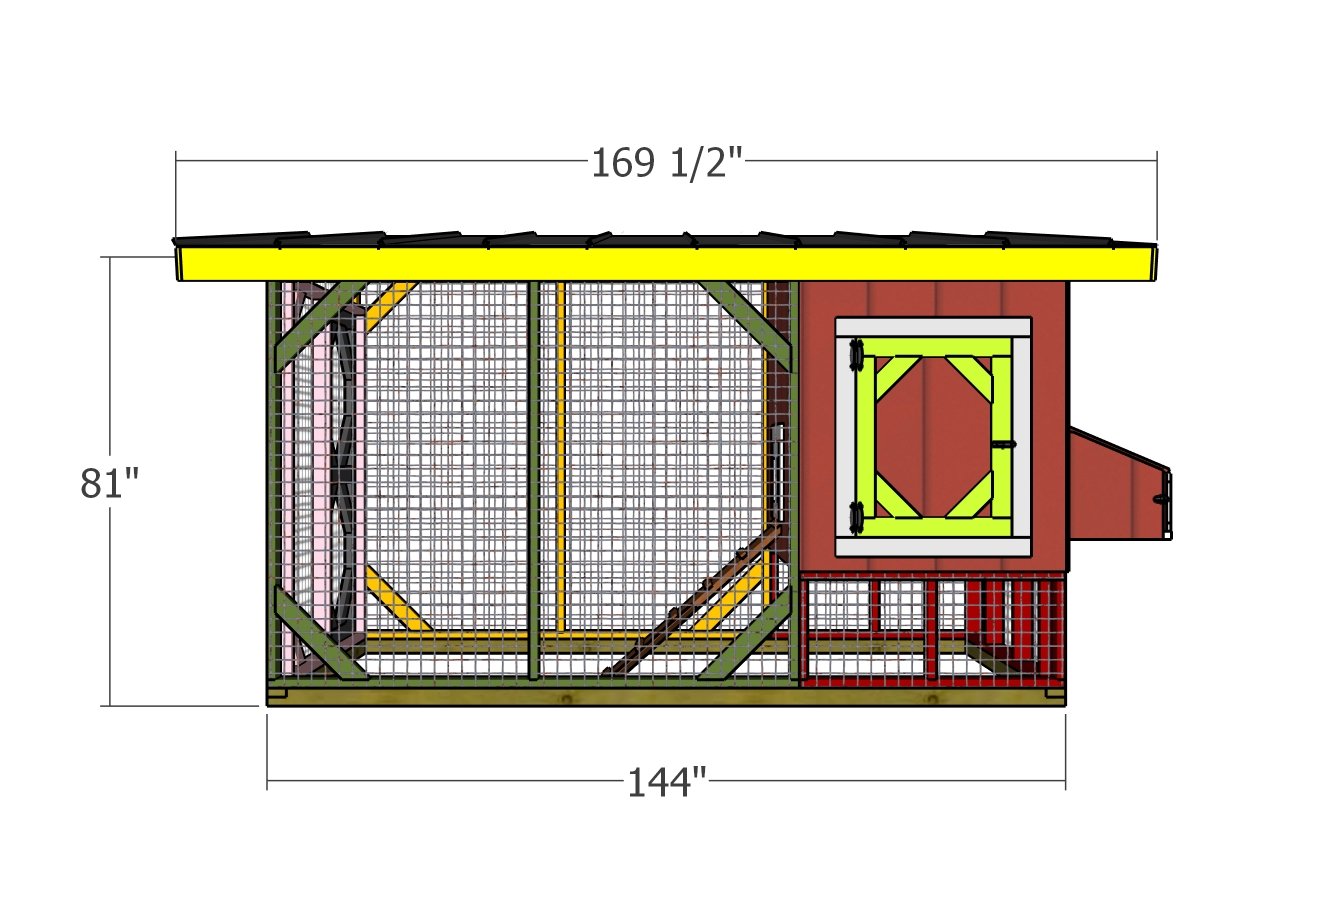
6×12 chicken coop dimensions – side view
With the lean-to roof and run area complete, your 6×12 chicken coop is now a fully functional and secure home for your chickens. This project not only provides them with ample space to roam and nest but also ensures they’re well-protected from the elements and predators. Whether you’re just starting your chicken-keeping journey or expanding your flock, this DIY coop offers a practical, durable solution..
This woodworking project was about chicken coop nesting boxes plans. If you want to see more outdoor plans, we recommend you to check out the rest of our step by step projects.

2 comments
how does the roof /top of the nest box mount?
It says in the instructions. With 6-8d nails.