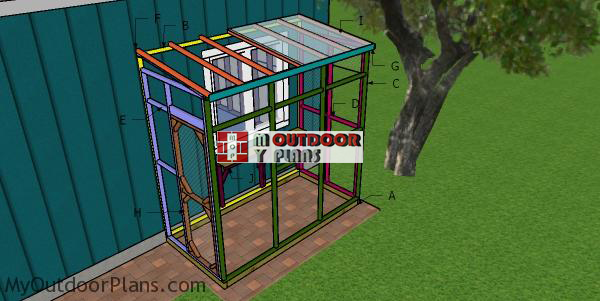
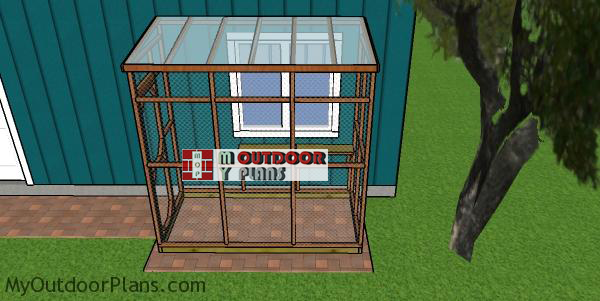
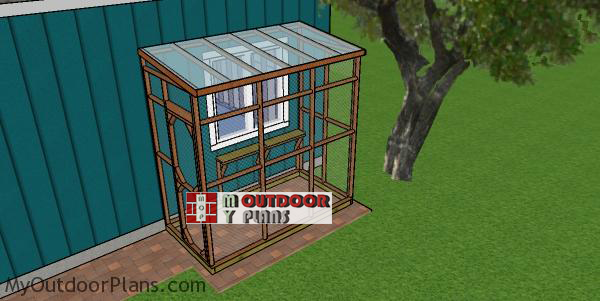
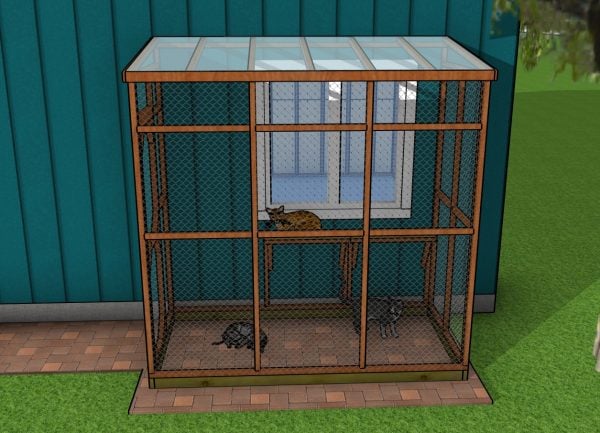
This step by step diy woodworking project is about a 4×8 catio plans. I have designed this small catio so you can create a sturdy enclosure for your cats, using basic tools and save a tone of money by doing the project by yourself. This catio features a lean to roof and a side door for easy access when cleaning the inside. Take a look over the rest of our woodworking plans, if you want to get more building inspiration.
When buying the lumber, you should select the planks with great care, making sure they are straight and without any visible flaws (cracks, knots, twists, decay). Investing in cedar or other weather resistant lumber is a good idea, as it will pay off on the long run. Use a spirit level to plumb and align the components, before inserting the galvanized screws, otherwise the project won’t have a symmetrical look. If you have all the materials and tools required for the project, you could get the job done in about a day. See all my Premium Plans HERE.
Projects made from these plans
4×8 Catio Plans
Building-a-4×8-cat-house
Cut & Shopping Lists
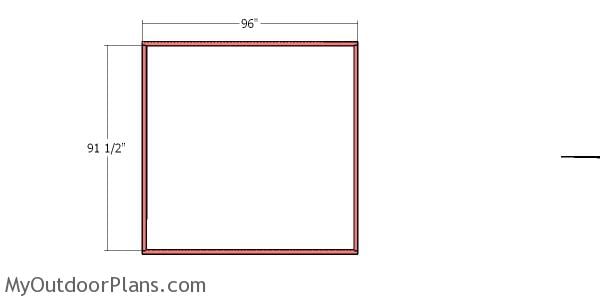
- A – 2 pieces of 2×4 lumber – 48″ long, 2 pieces -93″ long BASE
- B – 2 pieces of 2×2 lumber – 96″ long, 2 pieces – 91 1/2″ long BACK WALL
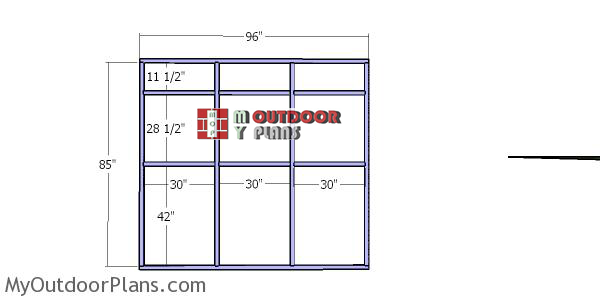
- C – 2 pieces of 2×2 lumber – 96″ long, 4 pieces – 85″ long, 6 pieces – 30″ long FRONT WALL
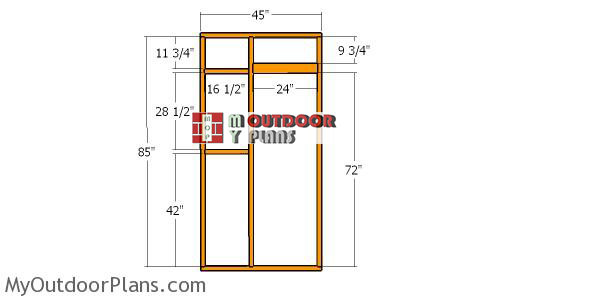
- D – 2 pieces of 2×2 lumber – 45″ long, 3 pieces – 85″ long, 2 pieces – 20 1/4″ long SIDE WALL
- E – 2 pieces of 2×2 lumber – 45″ long, 3 pieces – 85″ long, 2 pieces – 16 1/2″ long, 1 piece of 2×4 lumber – 24″ long SIDE WALL
- F – 7 piece of 2×2 lumber – 50 1/2″ long RAFTERS
- G – 2 pieces of 1×3 lumber – 51 1/2″ long, 1 piece – 96″ long TRIMS
- H – 2 pieces of 2×2 lumber – 69″ long, 2 pieces – 24″ long, 1 piece – 21″ long, 8 pieces – 8 3/4″ long DOOR
- I – 50 sq ft of policarbonate ROOF
- J – 4 pieces of 2×2 lumber – 26″ long, 4 pieces – 14 1/2″ long, 4 pieces – 30″ long, 2 pieces of 3/4″ plywood – 7 1/4″x30″ long SHELVES
- 32 pieces of 2×2 lumber – 8′
- 4 pieces of 2×4 lumber – 8′
- 3 pieces of 1×3 lumber – 8′
- 3 1/2″ screws, 2 1/2″ screws
- hinges, latch
- 40 sq ft of poly-carbonate
- 150 sq ft hardware cloth
- wood glue, stain/paint
Tools
![]() Hammer, Tape measure, Framing square, Level
Hammer, Tape measure, Framing square, Level
![]() Miter saw, Drill machinery, Screwdriver, Sander
Miter saw, Drill machinery, Screwdriver, Sander
![]() Safety Gloves, Safety Glasses
Safety Gloves, Safety Glasses
Time
![]() One weekend
One weekend
Related
How to build a 4×8 catio
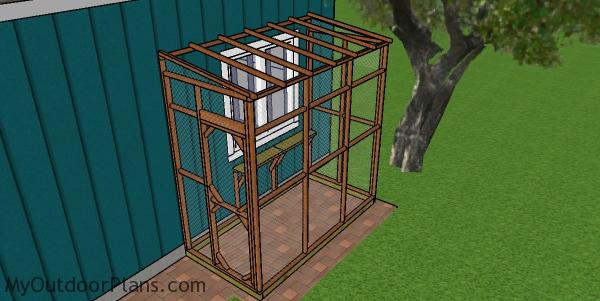
Back wall frame – 4×8 catio
The first step of the project is to build the wall frame that goes against the house. Cut all the components from 2×2 lumber, as shown in the diagram. Drill pilot holes through the plates and insert 3 1/2″ screws into the studs. Make sure the corners are square and check if the diagonals are equal.
Front-wall-frame
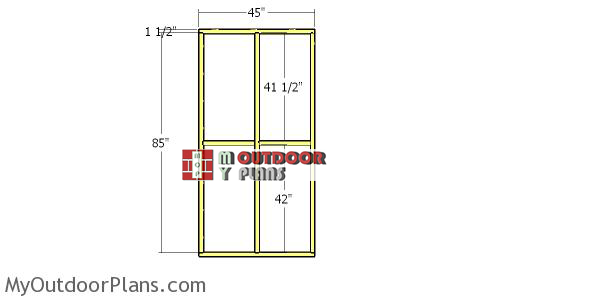
Next, but the opposite side wall for the catio. Start by cutting all the components from 2×2 lumber, following the info in the diagram. Drill pilot holes through the plates and then insert 3 1/2″ screws into the studs.
Side-wall-door-with-catio-plans
Build the side wall for the catio, that has the door opening. Frame the door by installing the double 2×4 header. Make sure all the corners are square and align the edges flush. You can adjust the size of the door to suit your needs.
Side-wall-frame-for-4×8-catio
Build the other side wall for the catio, using the info from the diagram. Drill pilot holes through the plates and insert 3 1/2″ screws into the studs.
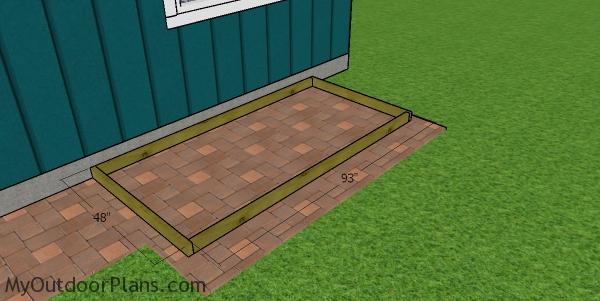
Assembling the base for the catio
Use 2×4 pressure treated lumber for the base of the catio. Drill pilot holes and insert 3 1/2″ screws to lock them together. Make sure the corners are square and align the edges flush. Select the location for the catio and level the ground thoroughly. You can pave the are under the catio.
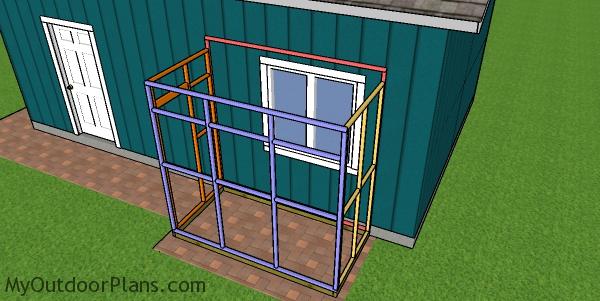
Assembling the 4×8 catio frame
Next, you need to assemble the catio. Align the bottom plates to the base of the catio, making sure the edges are flush. Drill pilot holes through the plates and insert 2 1/2″ screws into the base. Check if the corners are square and align the edges. Drill pilot holes and insert 2 1/2″ screws to lock everything together tightly.
Building the roof
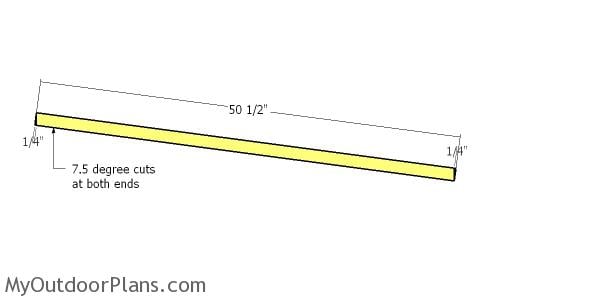
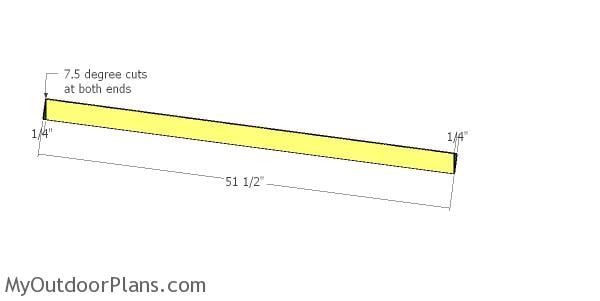
Building the rafters – 4×8 catio
Build the rafters for the catio roof using 2×2 lumber. Make the 7.5 degree cuts to both ends of the rafters using a miter saw.

Fitting the rafters
Fit the rafters to the top of the catio and place them every 16″ on center. Drill pilot holes and insert 3 1/2″ screws to lock them into place tightly.
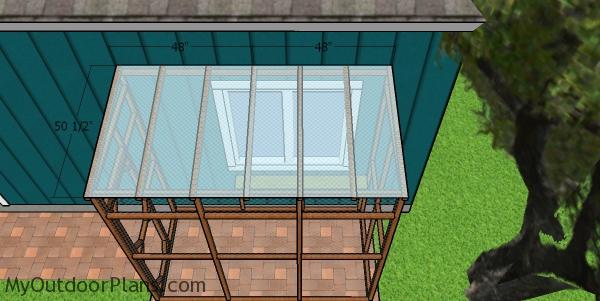
Fitting the roofing sheets – diy catio
Fit the policarbonate sheets to the top of the catio. Align the edges and insert the appropriate screws to lock the sheets to the rafters. The policarbonate sheets will protect the catio from the elements, but in the same time it will let the light get through.
Fitting the mesh to the 4×8 catio
Attach the wire mesh to the exterior of the catio. Make sure you staple the mesh to the frame of the cation thoroughly.
Side roof trims
Use 1×3 lumber for the roof trims. Make the angle cuts at both ends of the side trims using a miter saw.
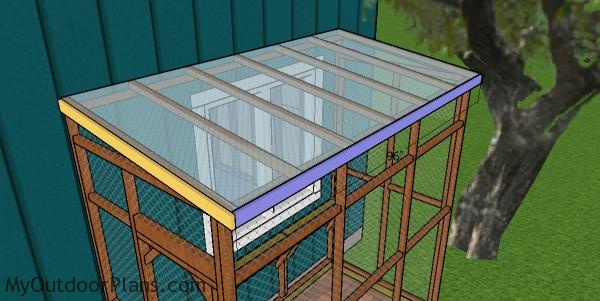
Fitting the roof trims
Fit the trims to the front and sides of the catio. Align the edges flush, drill pilot holes and insert 2 1/2″ screws to lock them into place tightly.
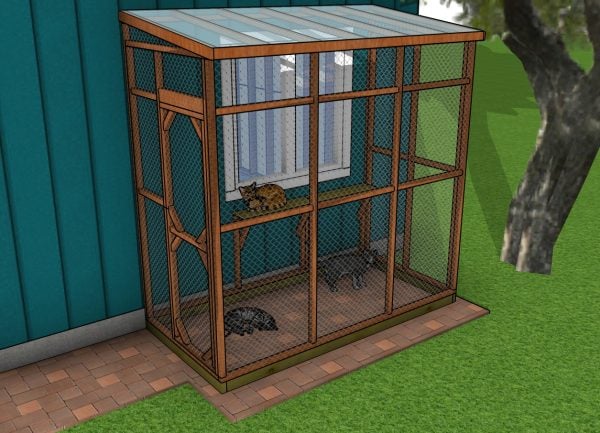
Building the shelves
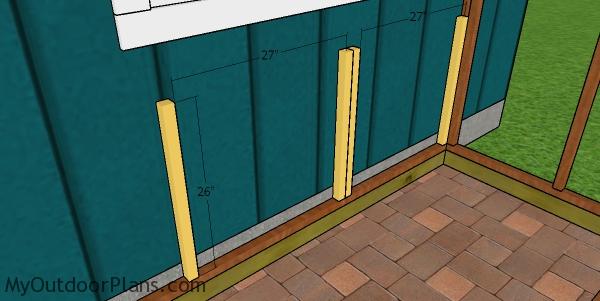
Vertical supports for shelves
Fit the vertical supports for the shelves. Drill pilot holes and insert 2 1/2″ screws to lock the supports to the house.
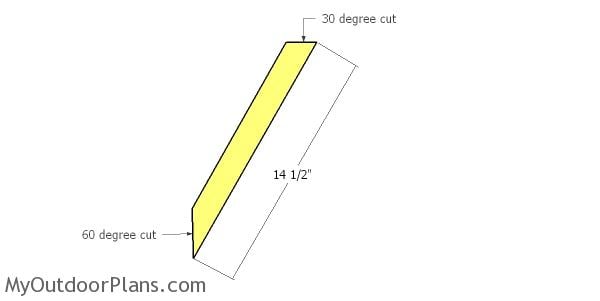
Shelf supports
Make angle cuts to the diagonal braces.

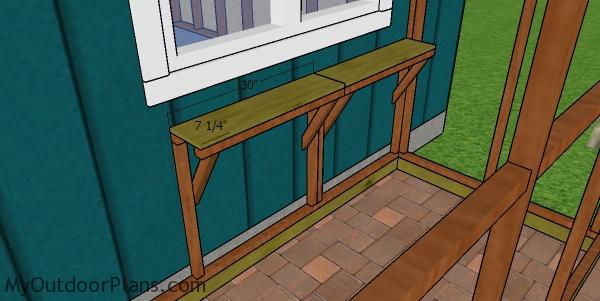
Fitting the supports for the shelves
Drill pilot holes and insert 2 1/2″ screws to lock the braces to the supports. Fit the horizontal supports, as shown in the diagram.
Shelves
Use 3/4″ plywood for the shelves. Fit the shelves to the frames and lock them into place with 2 1/2″ screws, after drilling pilot holes.
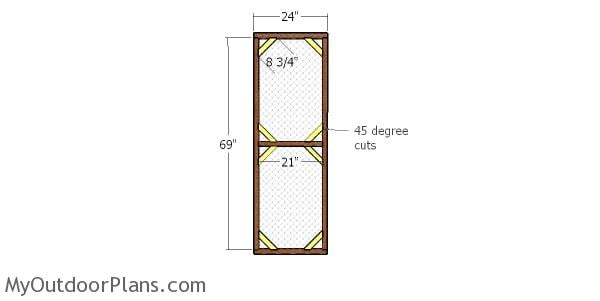
Door for 4×8 catio
Use 2×2 lumber for the door frame. Assemble the frame by drilling pilot holes and insert 2 1/2″ screws. Reinforce the door frame with diagonals. Make 45 degree cuts at both ends of the diagonals and secure them to the door with 2 1/2″ screws. Make sure the corners of the door are right angled. Cover the door with wire mesh.
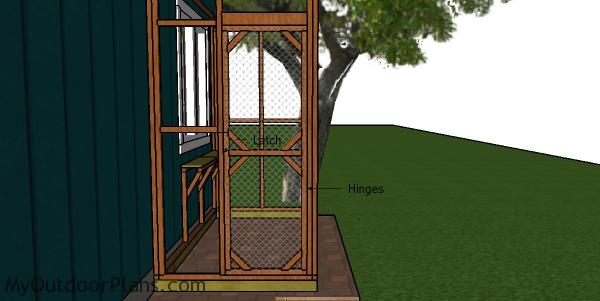
Fitting the door to the 4×8 catio
Fit the door to the opening and lock it to the frame with hinges. Install a latch so you keep the catio closed.
4×8-catio-plans—how-to-build
Last but not least, take care of the finishing touches. Therefore, smooth the edges and make sure there are no wire exposed to injure your pets.
4×8 Catio Plans
Apply a few coats of paint / stain to enhance the look of the catio and to protect the components from the elements. A 4×8 catio with a lean-to roof will run you about $500 to $1,000, depending on the materials and whether you go DIY or hire some help. Your main costs are lumber, mesh, and roofing, but don’t skimp on quality – your feline friends deserve the best! Invest in some comfy cat shelves and weatherproofing to make this the ultimate outdoor cat paradise.
How-to-build-a-4×8-catio
Make sure you take a look over the rest of my cat project plans HERE. Here are three killer add-ons for your 4×8 catio to make it a feline paradise. First, install multiple levels of sturdy cat shelves, giving your cats plenty of vertical space to climb and explore.
Next, add a secure tunnel connecting the catio to your house, allowing your cats easy access to their outdoor haven. Finally, include enrichment toys like hanging toys, scratching posts, and perches to keep your cats entertained and engaged in their new space.

4×8 catio – free plans
Building a 4×10 catio will likely cost you between $700 and $1,500, depending on the materials and design features you choose. The narrow footprint keeps costs down, while still offering plenty of space for your cats to safely explore and enjoy the outdoors. This investment gives your feline friends a secure, dedicated space where they can experience the outside world without the risks.

How to build a 4×8 attached catio
You can expect to spend about 1 to 2 weekends constructing your 4×10 catio. The build is relatively simple, but ensuring the structure is secure and comfortable for your cats will require careful planning and execution. With a bit of effort, you’ll soon have a sturdy, well-designed catio that fits perfectly into your outdoor space.

4×8 Catio – dimensions
This structure may be compact, but it provides plenty of room for your cats to stretch, play, and enjoy the fresh air, all within the safety of a protected environment. It’s a project that brings peace of mind for you and joy for your cats, adding a unique and functional feature to your home that they’ll love exploring.
4×8 Catio Plans – front view
I have tons of designs covering everything you need to keep you cat healthy and happy: insulated cat houses, window catio, large catio and cat trees. If you like my approach to designing woodworking plans, make sure you check out the list of all my free designs HERE.
This woodworking project was about 4×8 catio plans free. If you want to see more outdoor plans, check out the rest of our step by step projects and follow the instructions to obtain a professional result.
15 comments
I am trying to figure out how much this would cost. I’m a bit confused. The stuff listed below the line after the list of length and stuff of wood, is this what you need total? Like do I buy 30 of the 8 foot 2×2 or do i need to buy more than that? I just wanna make sure lol
Yes, the list below the line is the shopping list. The A to J list is the cut list (how you cut the lumber)
Looks great! How much wire mess do you need (I guess in square feet) and what size polycarbonate?
Updated the list. For polycarbonate choose anything thicker than 6 mm (1/4″)
The cut list seems off to me, the back wall measurements in the diagram are not matching to the cuts shown in the list. The front wall in the diagram matches a side wall in the cut list…
I’ve updated the list.
Great plan, thanks for sharing. We need to change the dimensions to fit our space. 42 inches deep x 60 inches long x 8 feet tall. Can you help us adjust the dimensions? Or recommend a calculator?
Finalizing our plans and think I’m misunderstanding something. Why is the base 93” wide and the front/back walls 96” wide?
The base is 96″, the 93″ represents the size of the joist. 93″+1 1/2″+1 1/2″ = 96″
Great plans. I framed this up over the weekend and I’m waiting on the mesh to cover it…I’ll be using pet-resistant screen mesh instead of wire mesh.
I ran into one issue, though. In the cut list, letter A specifies two pieces of 2×4 lumber, each 91-1/2″ long. However, when you get down to the assembly instructions, the diagram shows 93″. The latter is correct, so if you cut per the cut list (as I did) the long sides of the base are too short. I just added another 48″ 2×4 to one of the sides so it would all line up.
Thanks for these great plans. Can you clarify what you mean by ‘plates’. The directions say to drill pilot holes through the ‘plates’ but don’t understand and don’t see any plates on the materials list. Thanks in advance.
Top plates are the 2×2 horizontal. The components that the studs attach to.
Hi, Id love to have my cousin build this but i cannot print for him, help.
See the site FAQs
I haven’t gathered all the materials for the 4X8 Catio yet but I’m working on them. I just wanted to thank whoever took the time to put this step by step tutorial together for those of us who have never built anything from the ground up. It seems so plainly laid out that it gave me the courage to go ahead and try it. The worst that can happen is it will look like a Charlie Brown project. Lol! Can’t wait to start on it. So Thank You so much for taking your precious time to help someone like me gain 1 more step of confidence.