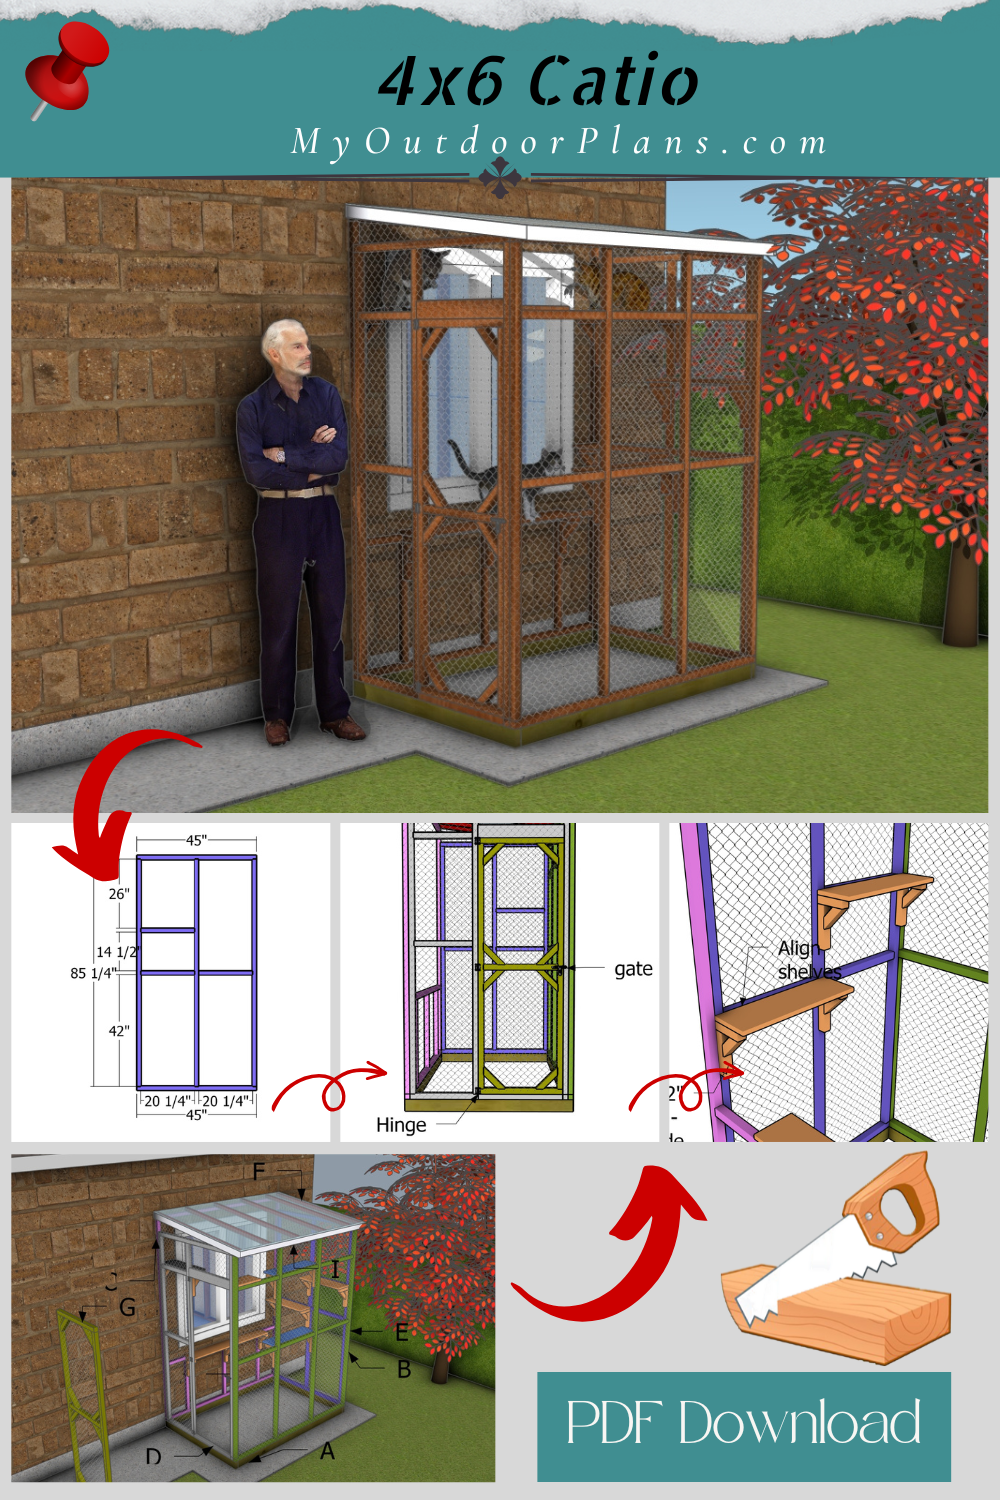
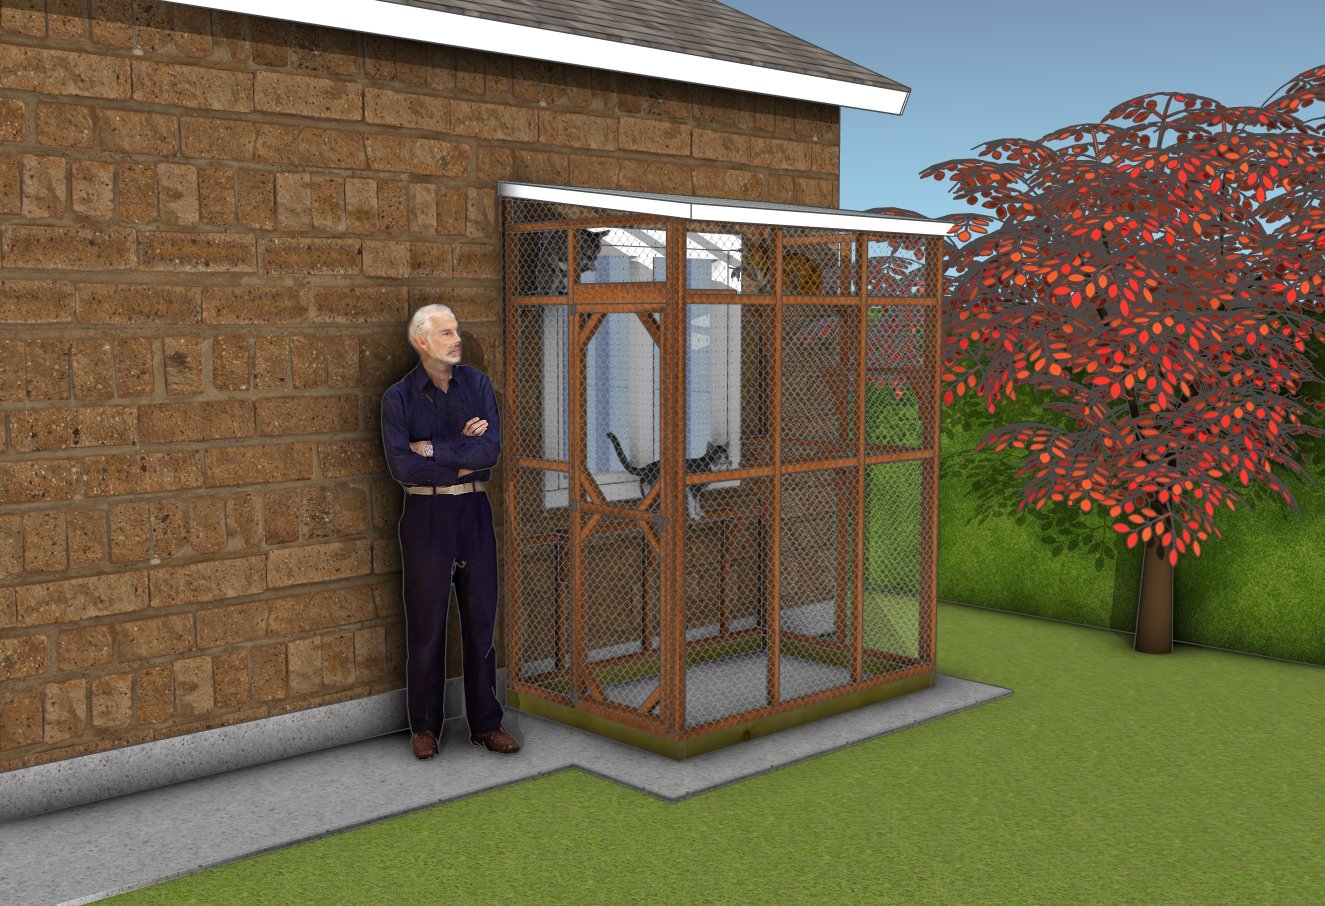
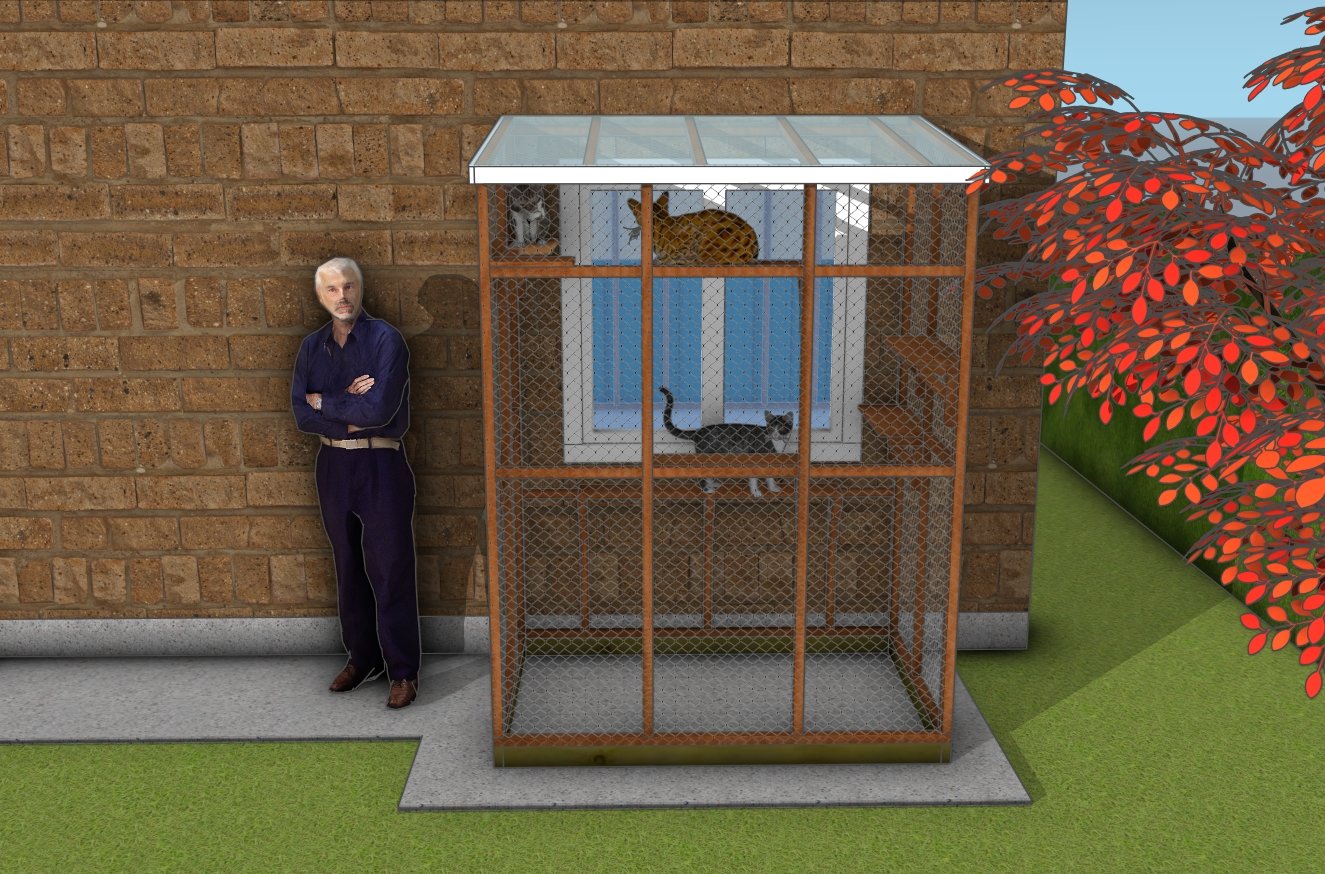
If you’re looking to give your cats a safe way to enjoy the great outdoors without worrying about predators or escape attempts, this 4×6 lean-to catio is the perfect solution. Designed to attach directly to your home, this compact yet functional structure creates a secure outdoor space for your furry friends to lounge, climb, and explore—all while staying protected from the elements. It’s ideal for small backyards, patios, or side yards, and it adds some serious style to your outdoor setup.
This project is DIY-friendly and super satisfying to build, even if you’re working solo. The lean-to design features a weather-resistant polycarbonate roof, a front-facing door for easy access, and space for multiple cat shelves (included in the premium plans) to turn the interior into a feline jungle gym. Whether you’re a first-time builder or a seasoned DIYer, this catio makes for an awesome weekend project your cats will love—and you’ll be proud to show off.
When buying the lumber, you should select the planks with great care, making sure they are straight and without any visible flaws (cracks, knots, twists, decay). Investing in cedar or other weather resistant lumber is a good idea, as it will pay off on the long run. Use a spirit level to plumb and align the components, before inserting the galvanized screws, otherwise the project won’t have a symmetrical look. If you have all the materials and tools required for the project, you could get the job done in about a day.
Projects made from these plans
Pin it for later!
Building a 4×6 Catio
Building-a-4×6-attached-catio
Cut & Shopping Lists
Tools
![]() Hammer, Tape measure, Framing square, Level
Hammer, Tape measure, Framing square, Level
![]() Miter saw, Drill machinery, Screwdriver, Sander
Miter saw, Drill machinery, Screwdriver, Sander
![]() Post hole digger, Concrete mixer
Post hole digger, Concrete mixer
![]() Safety Gloves, Safety Glasses
Safety Gloves, Safety Glasses
Time
![]() One week
One week
Related
It’s that easy to build a small catio!
STEP 1: Building the frame of the catio
Assembling-the-skid-base
Before you even think about swinging a hammer, you’ve got to prep the site. It’s not the flashiest part of the job, but it’s the foundation for everything that comes next—literally. Start by clearing out any brush, rocks, or leftover junk. Get down to clean, bare ground. Then, level it out as best you can—you want a nice, even base to build on.
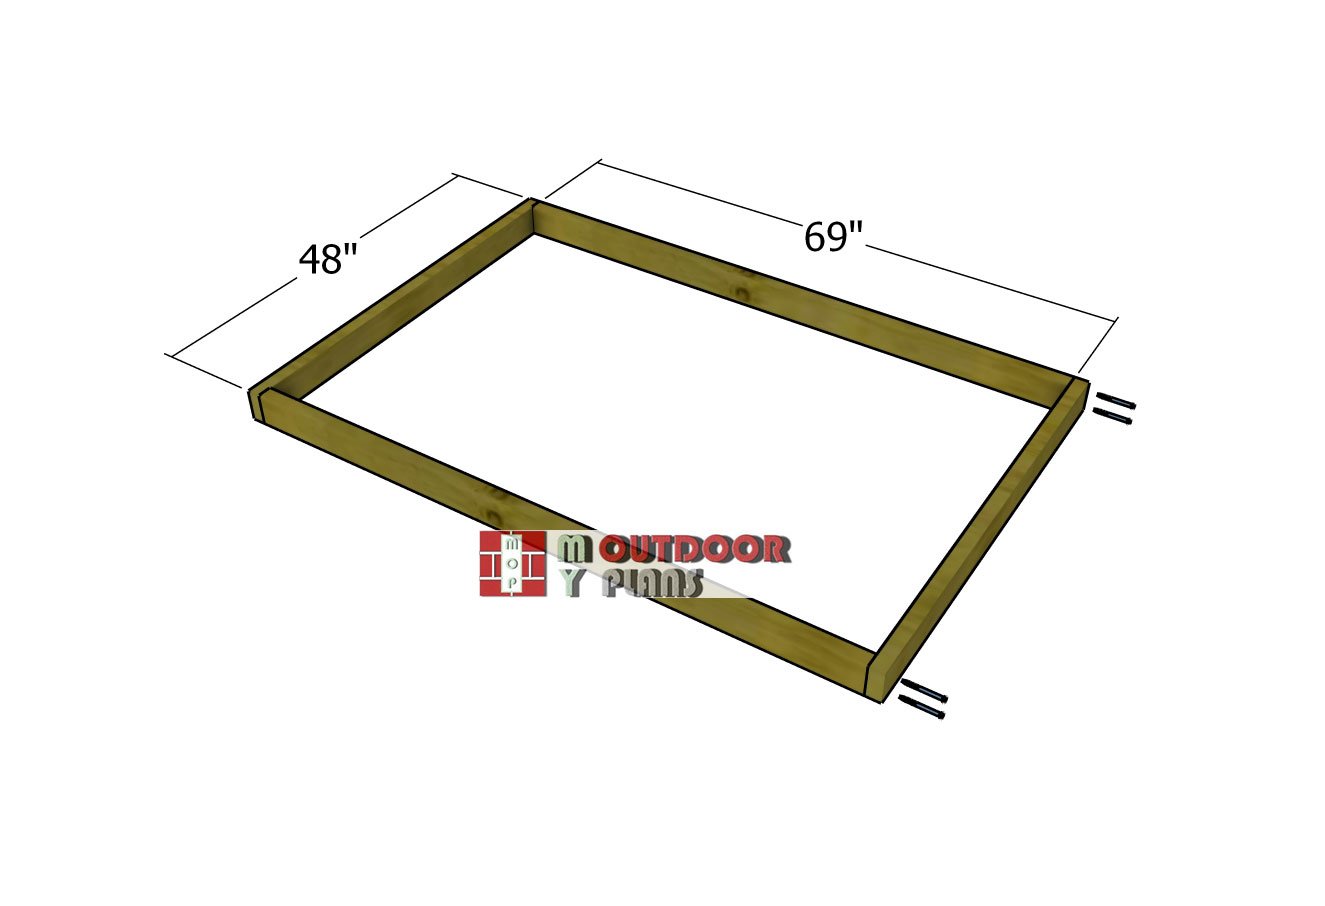
Kick things off by building the 4×6 base using 2×4 pressure-treated lumber—it’s tough, reliable, and built to handle the outdoors. Once you’ve got your skids in place, drill pilot holes and drive in 3 1/2″ screws—two per joint at a minimum. That’ll lock everything down nice and tight. Before you cinch it all together, take a minute to check your corners with a square and make sure the edges are lined up clean. Trust me, a square base makes the whole build go smoother from here on out.
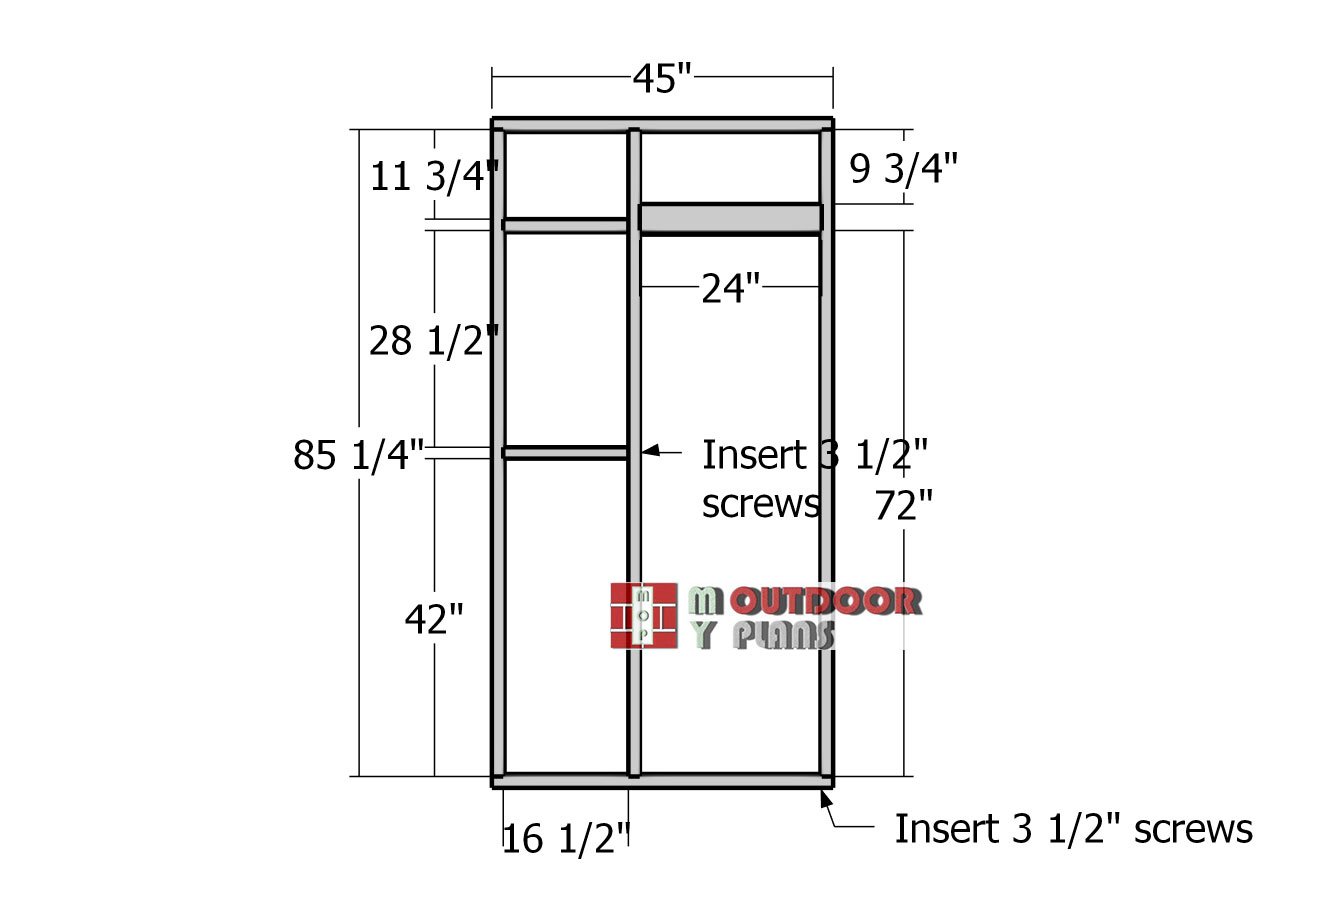
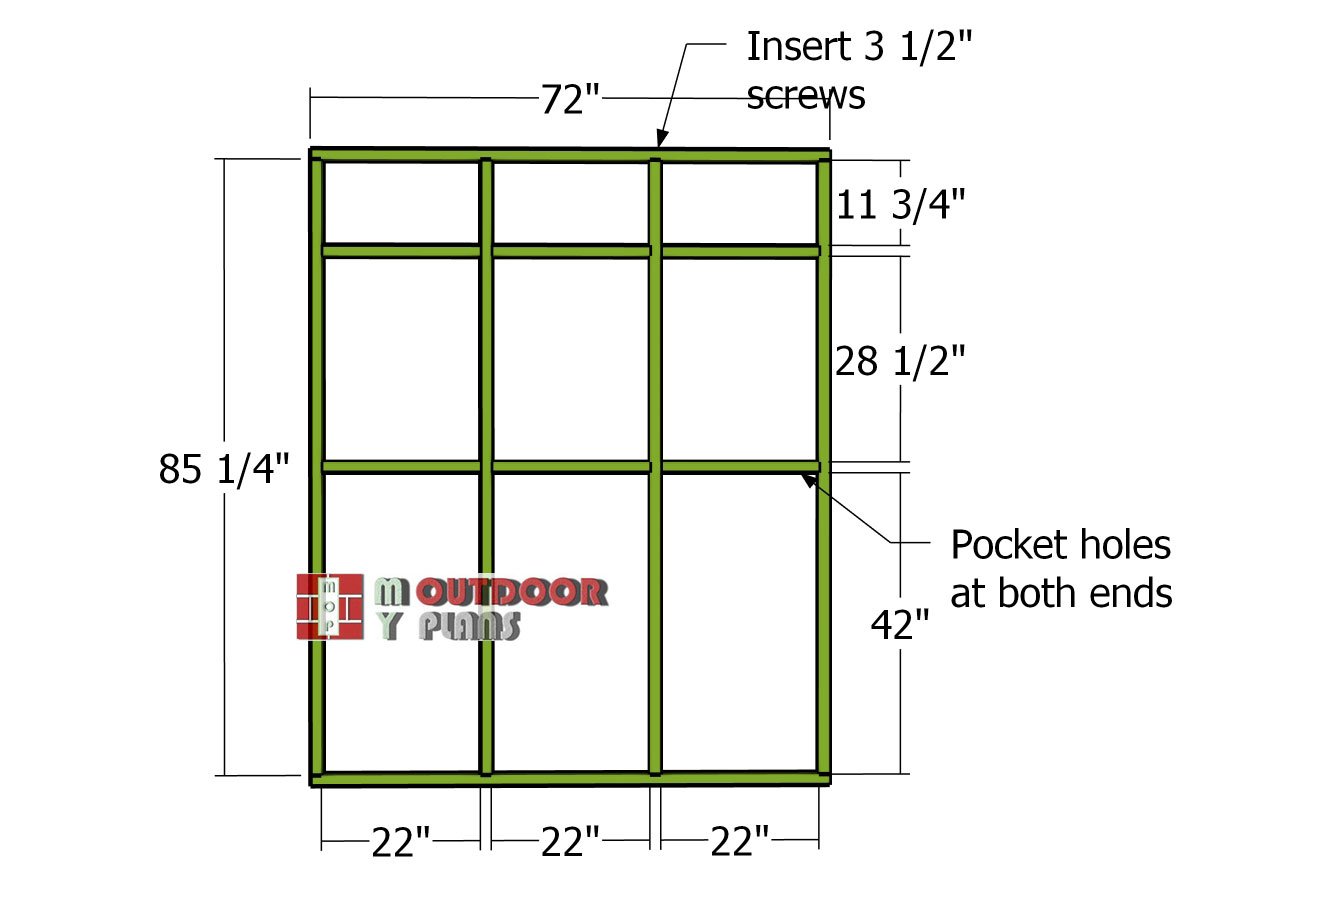
Front-wall-frame
Now it’s time to knock out the front wall of the catio. Grab your cut list, follow the diagram, and cut all the 2×2 pieces to length. Lay everything out on a flat surface, drill pilot holes through the plates, and secure those studs with 3 1/2″ screws. Nothing fancy—just tight, clean joints that’ll hold strong. Before you move on, square up the corners and make sure all the edges are flush.
This is where precision pays off. If this wall lines up perfectly with the others, your assembly down the line will go together like a puzzle. And don’t miss the 2×4 header over the door opening—that’s doing some heavy lifting. Set it in place, line the edges up flush, then drive 3 1/2″ screws at an angle into both ends. It’s a small detail, but it adds a lot of backbone where it counts.
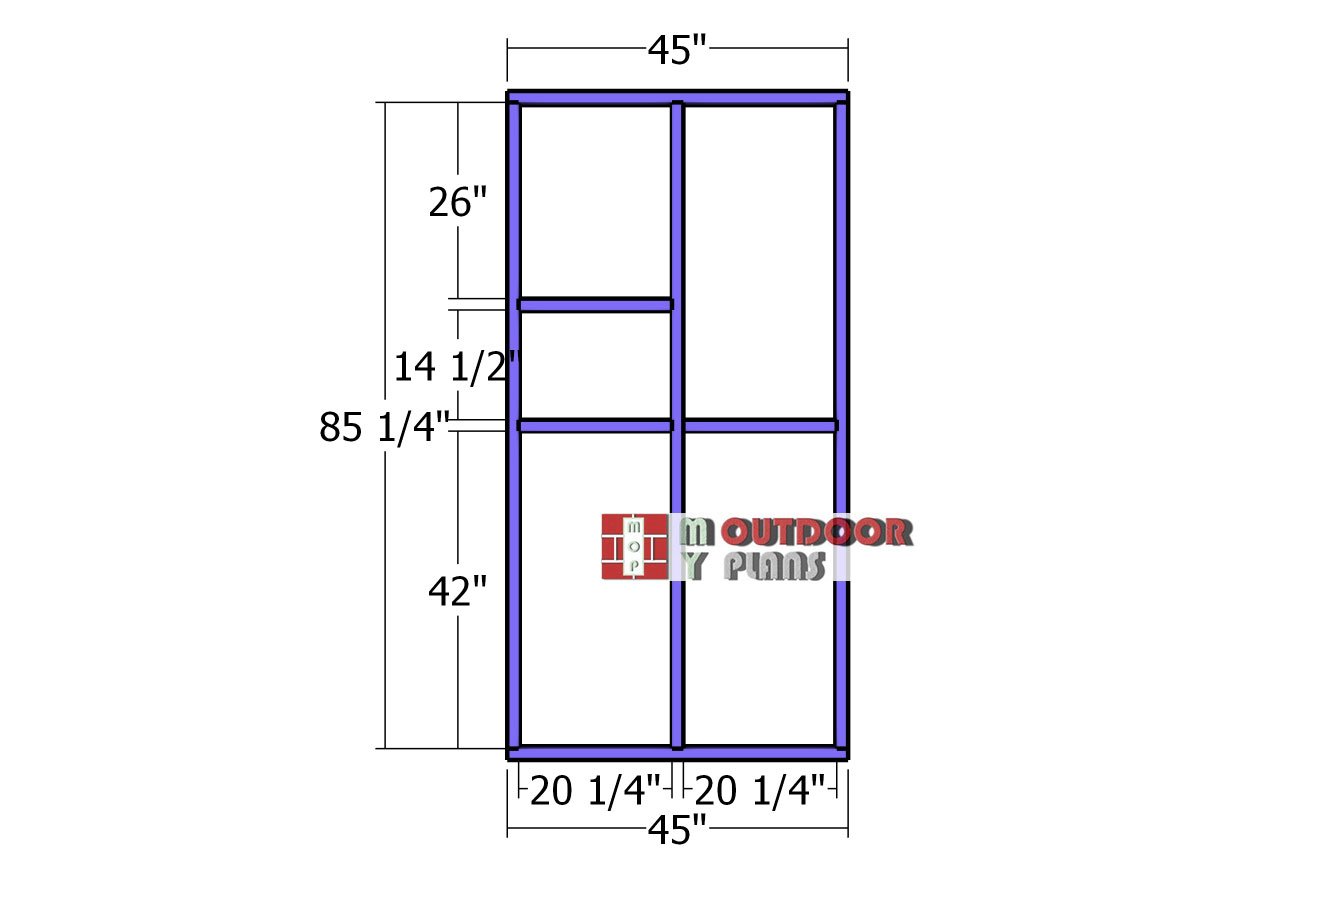
Back-wall-frame
Alright, next up—let’s frame the back wall. Cut all your 2x2s to size and lay ’em out on a flat, level surface so you’re working square from the start. Drill pilot holes through the top and bottom plates, then screw the studs in using 3 1/2″ screws. No need to overthink it—just keep things straight, tight, and solid. Now for the shelf supports.
Same drill: pre-drill your holes to prevent splitting, then drive your screws in. If you hit a spot where there’s no room for a straight shot, don’t sweat it—drive ’em in at an angle like shown in the diagram. Sometimes you’ve gotta get a little scrappy to make it work, and that’s totally fine. What matters is that everything ends up rock-solid.
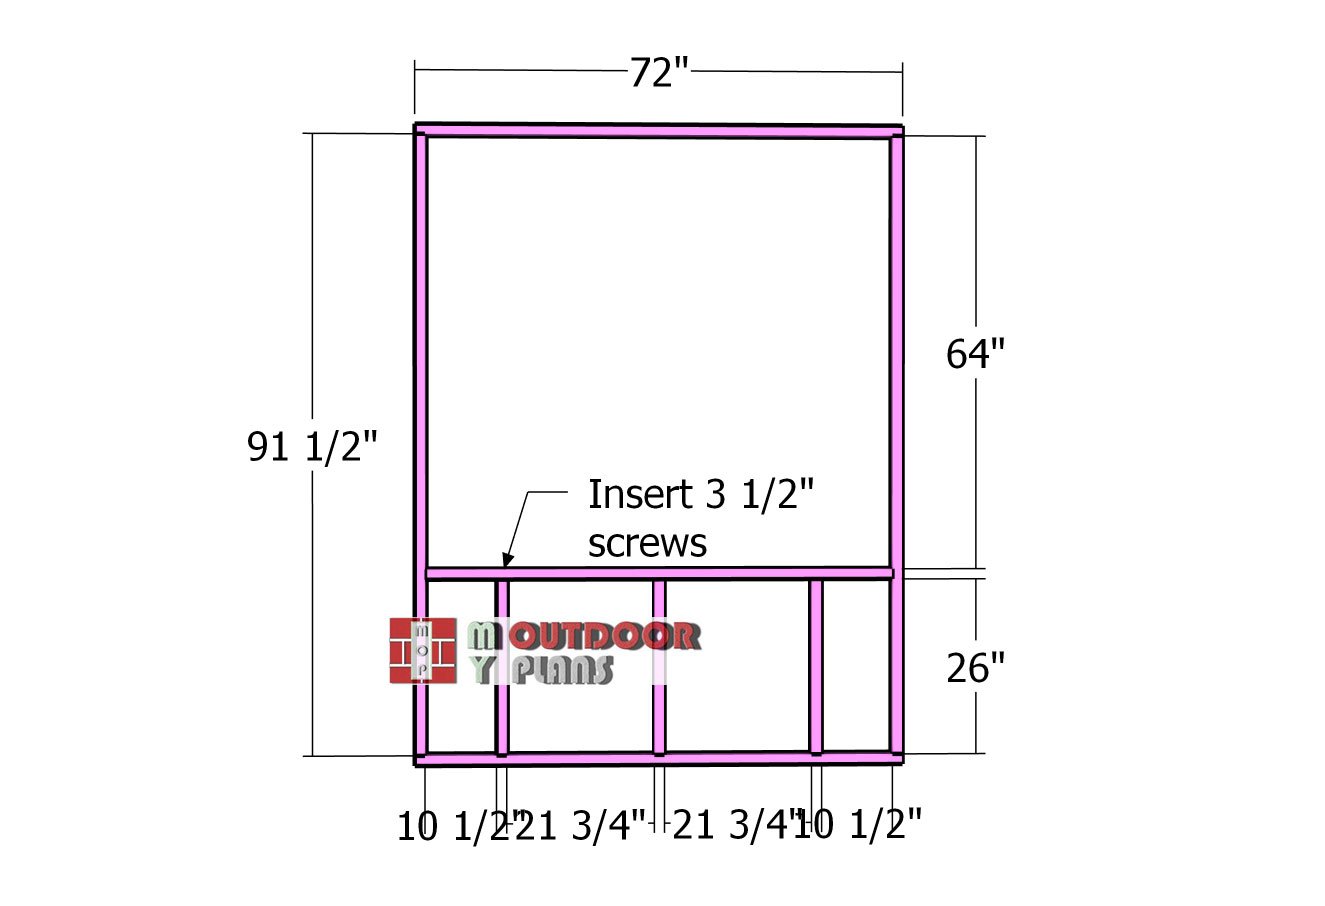
Side-wall-frame
Alright, let’s move on to the side wall. Just like before, follow the diagram, cut all your 2×2 components to length, and lay them out on a flat surface. Drill pilot holes through the top and bottom plates, then fasten the studs using 3 1/2″ screws.
Keep it tight and solid—this wall’s got to hold up over time. Before you call it done, square up those corners and make sure everything’s flush. That attention to detail here makes life way easier when it’s time to bring the whole catio together. If this wall lines up clean with the others, assembly’s gonna be smooth sailing—and solid enough to handle whatever your adventurous cats throw at it.
Side-wall-frame-2
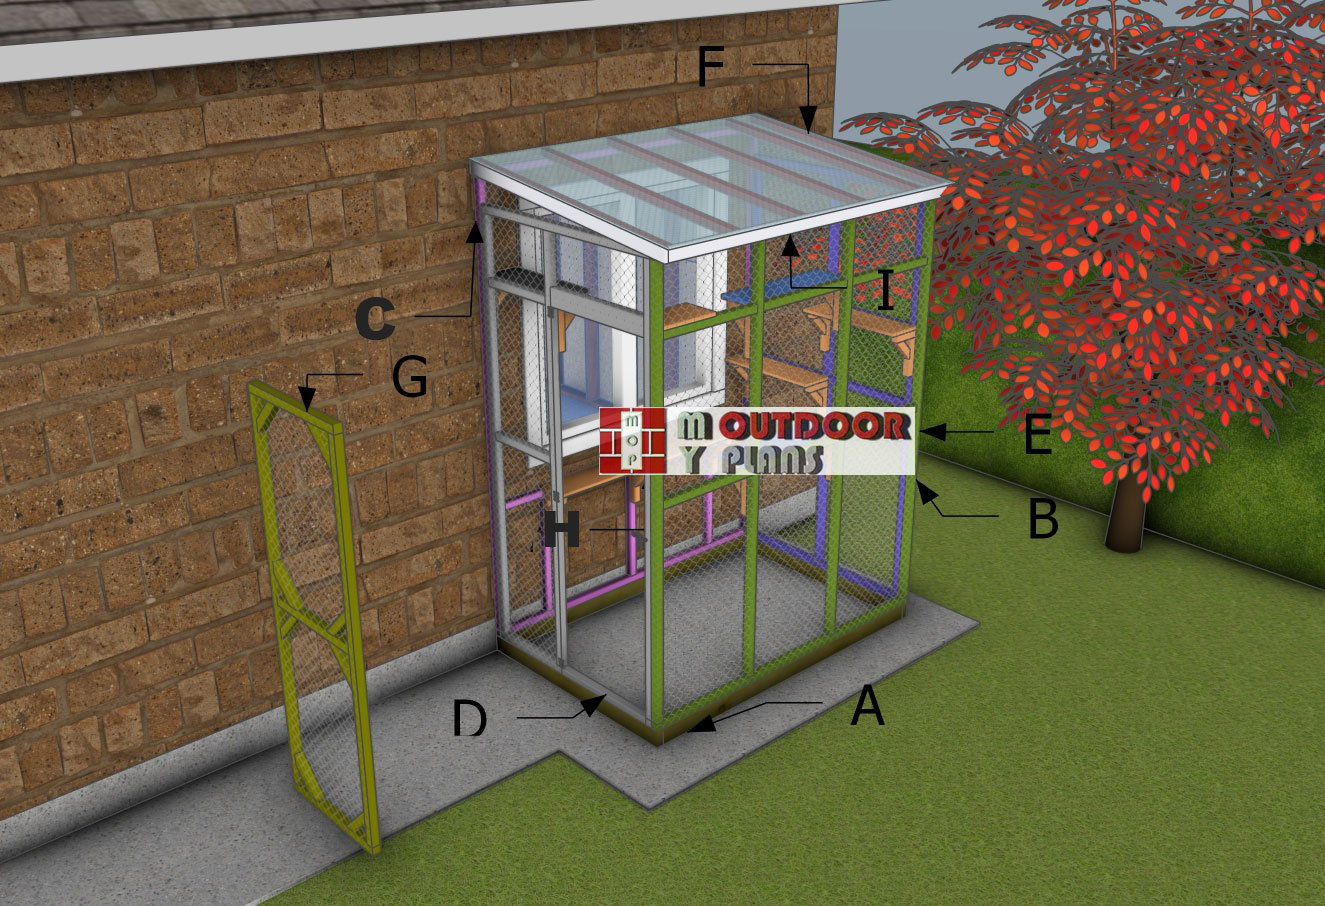
You’ve got options here—you can build this catio as a free-standing setup or attach it right to the house, depending on what makes sense for your space. If you’re tying it into your home, go ahead and adjust the shelf height to line up with your window. That way, your cats can come and go like they own the place—because, let’s be honest, they kinda do.
Wherever you decide to place it, just make sure it’s locked in solid. Anchor it into the ground if it’s in the yard, or bolt it to the house if it’s connected. Stability’s key—you want it to handle wind, weather, and even a hyper kitten on a mission.
Assembling-the-4×6-catio
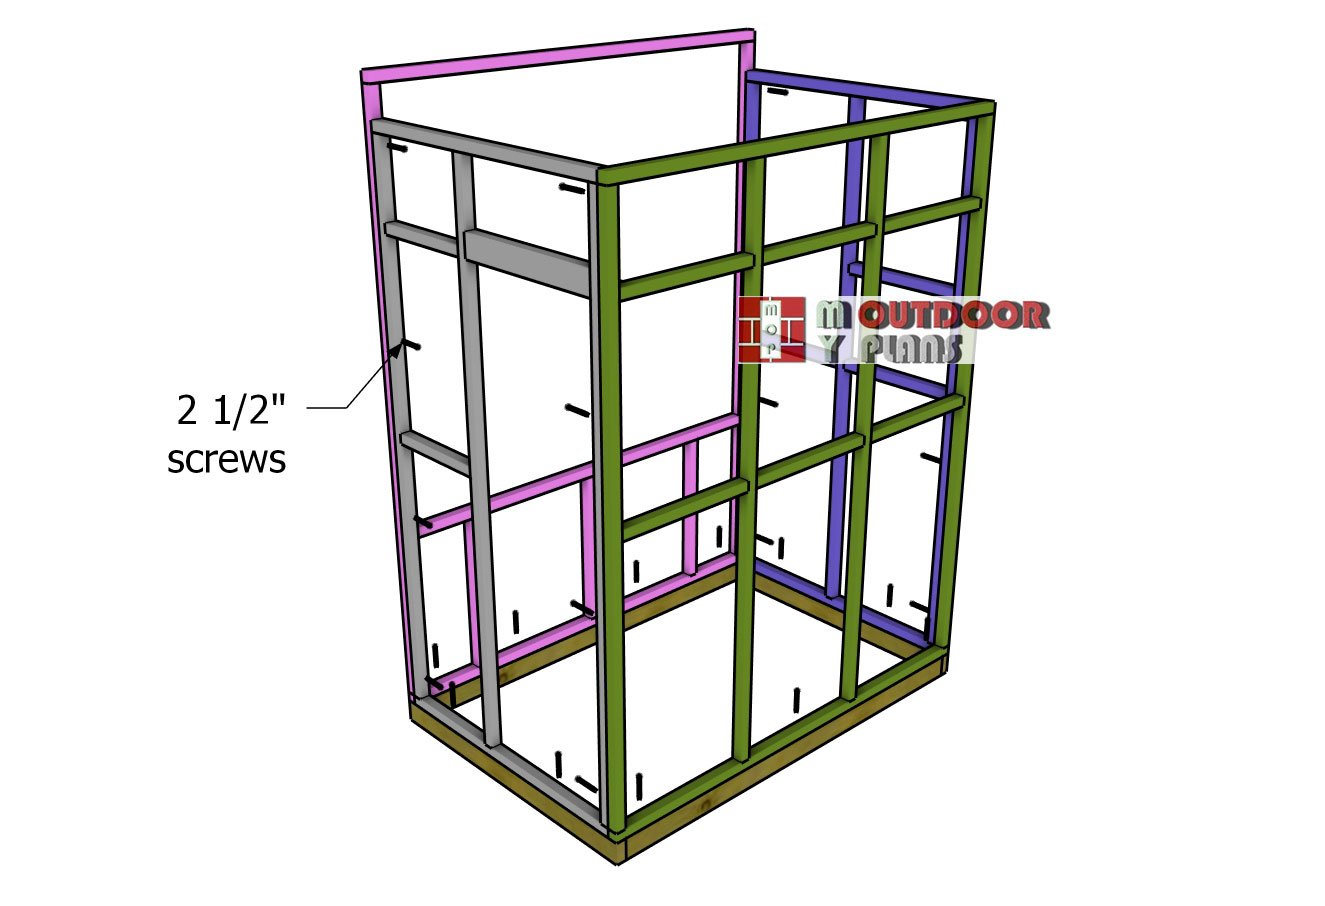
With all the wall frames done, it’s time to bring this catio to life. Start by standing the walls up on the base, making sure the bottom plates are sitting flush for a clean, accurate fit. Drill your pilot holes through the plates, then drive in 3 1/2″ screws every 24 inches or so—that’ll keep things locked in tight.
Before you go full send with the screws, double-check that all the corners are square and the frames line up the way they should. Take your time here—it’s worth it. Once everything’s sitting just right, go back and drill a few extra pilot holes at each joint and secure them with 2 1/2″ screws. Lock it all down tight. A strong frame now means you won’t be chasing repairs later—and your cats get a fortress that’s built to last.
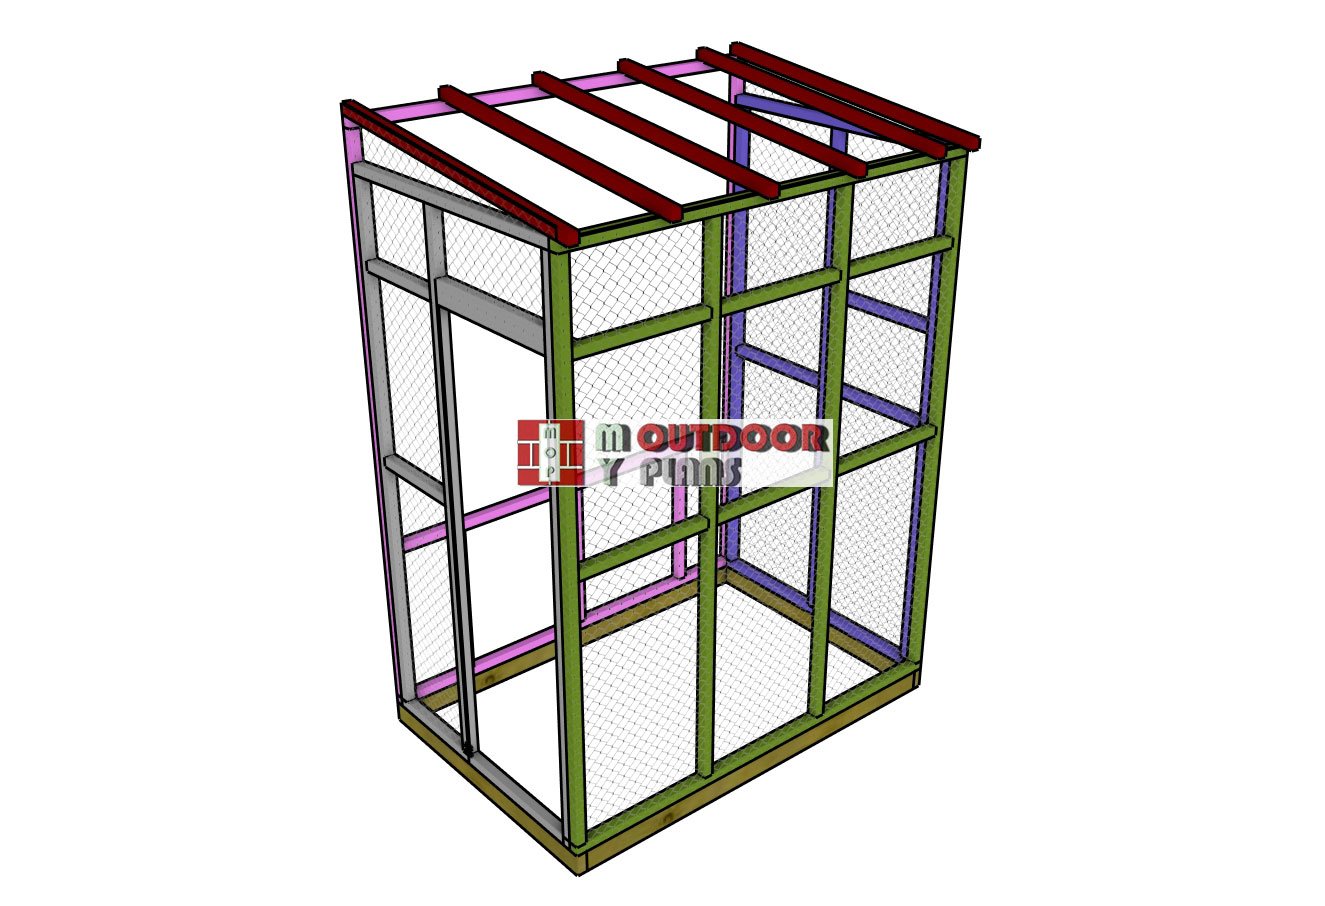
STEP 2: Building the roof
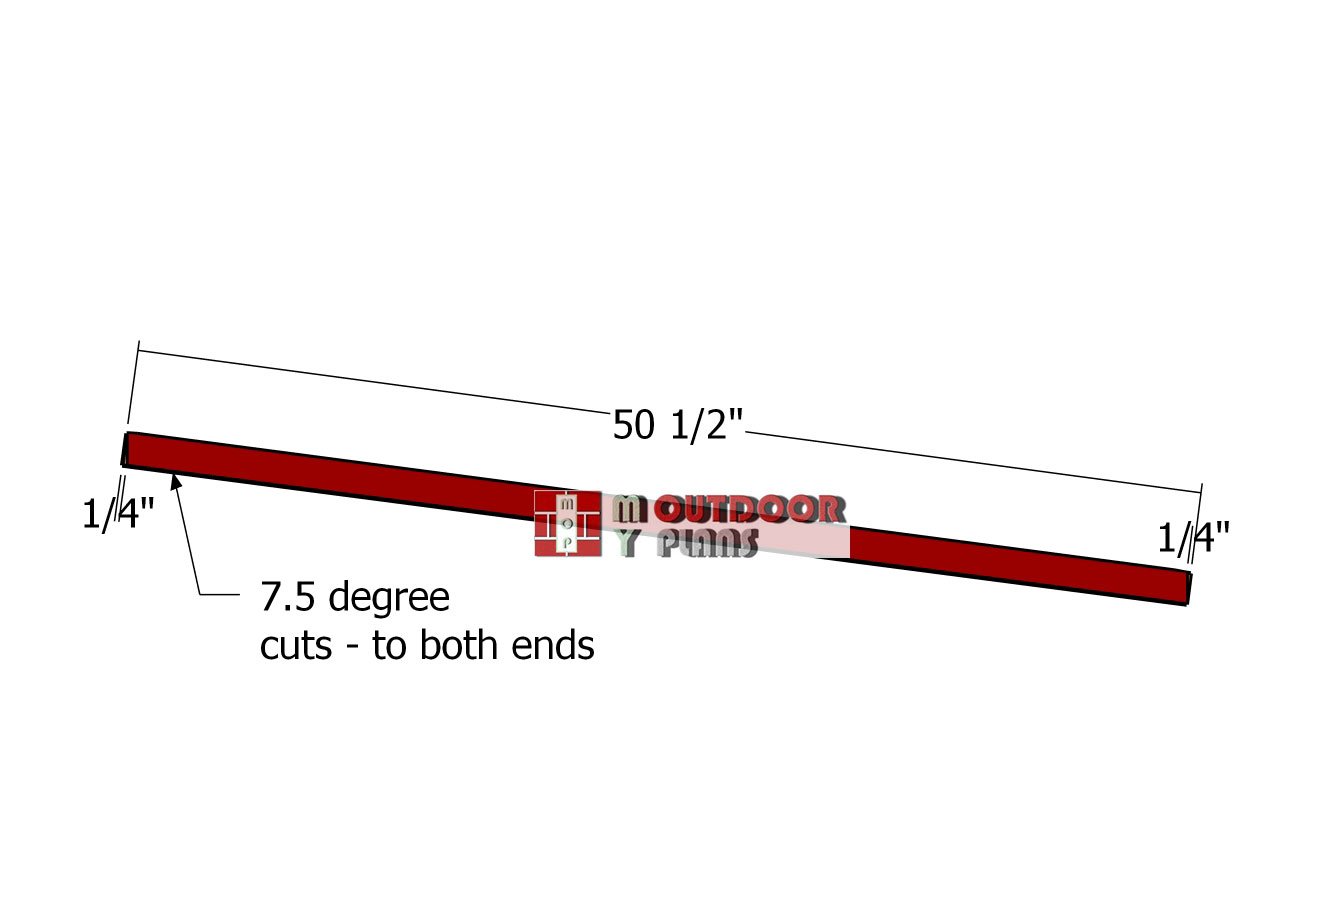
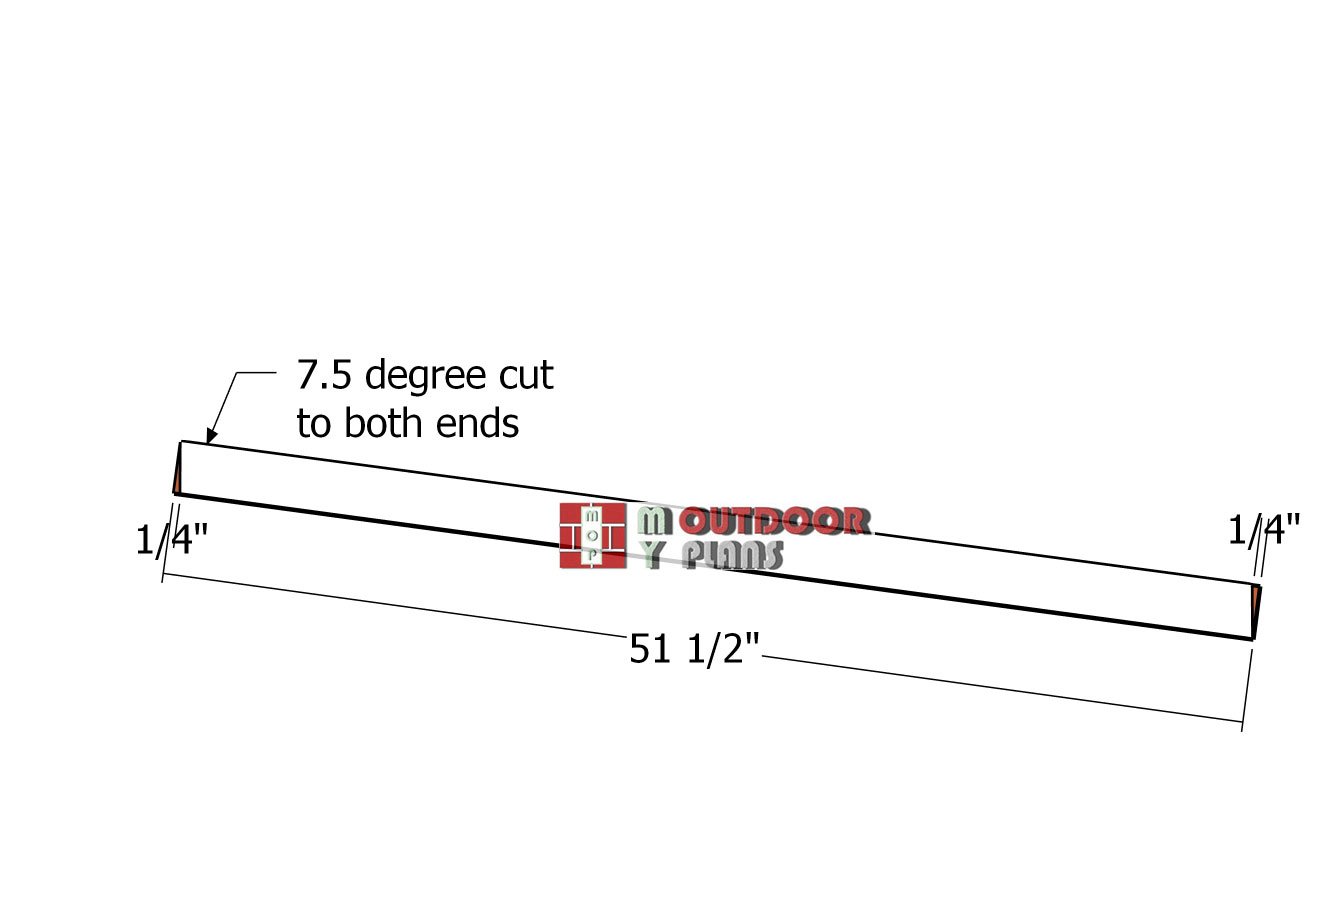
Rafters
Now it’s time to knock out the lean-to rafters. Grab your 2x2s and cut them to size, making sure to follow the diagram for those angle cuts. Mark both ends carefully—it’s one of those measure-twice situations. Then fire up your miter saw or circular saw and make the cuts nice and clean.
This part’s all about precision. A crisp, accurate cut now means you won’t be fighting gaps or weird fits later on. So slow it down, line it up, and get those angles dialed in. You’ll thank yourself when everything slots together like it was meant to.
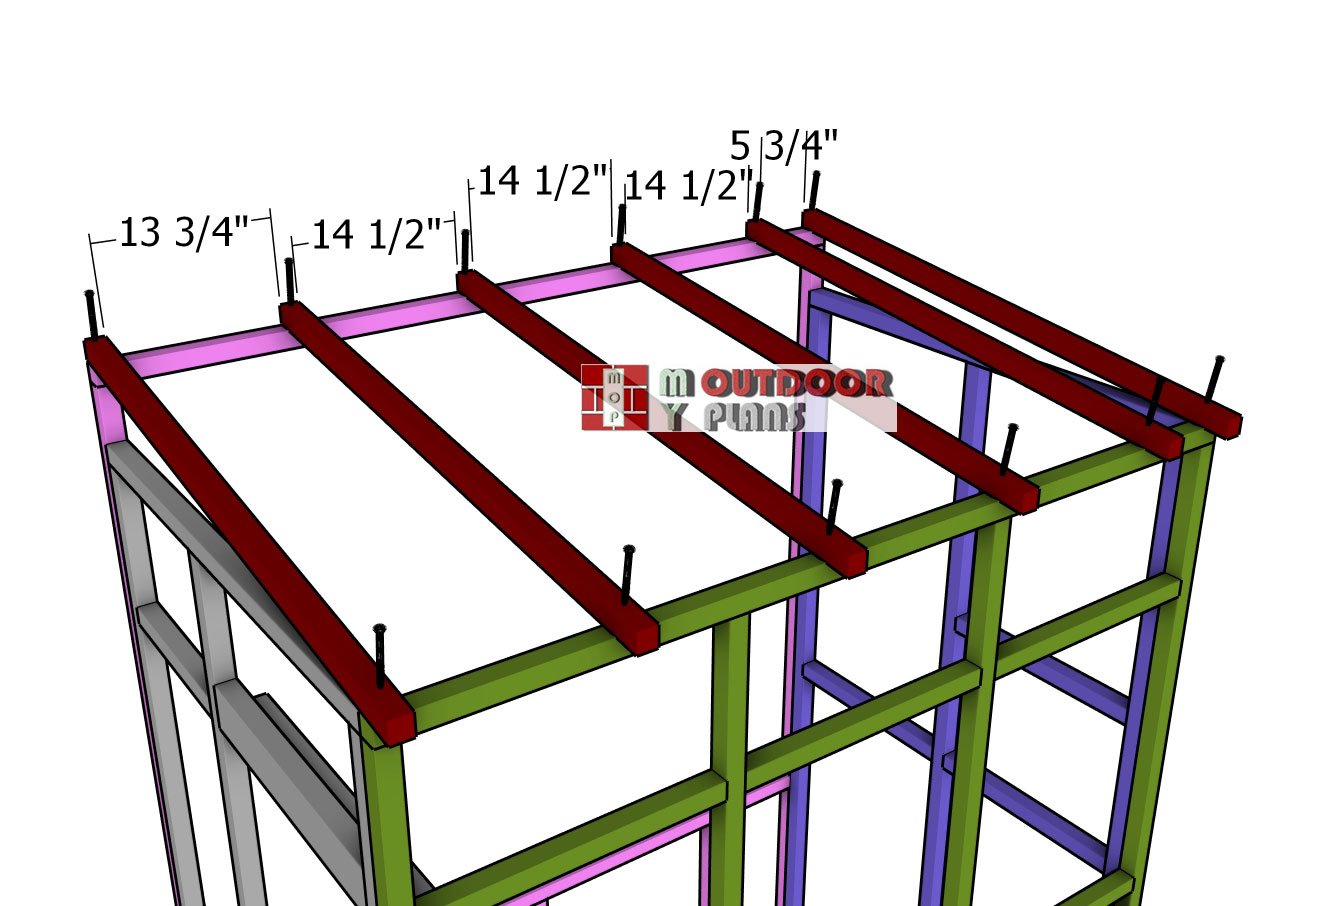
Fitting-the-rafters
Alright, let’s get those rafters up on the catio. Space them 16 inches on center so you’ve got solid, even support across the whole roof. Drill pilot holes through each rafter, then lock ’em down to the wall plates with 2 1/2″ screws—two per joint to keep everything rigid and rock solid.
This is what gives your roof its backbone, so don’t cut corners here. A sturdy rafter setup means the whole catio holds up through climbing, scratching, and whatever acrobatics your cats throw at it. Build it like it’s gotta last—because it does.
Fitting-the-wire-to-the-exterior-of-the-catio
Now, it’s time to enclose the catio with 16-19 gauge welded wire mesh. Attach the mesh to the exterior frame, making sure it’s tight and secure. Fasten it using U-nails or screws with washers, spacing them every 8 inches for a strong hold. Carefully cut the mesh to fit around the catio structure and door opening, keeping edges clean for a professional finish. A secure mesh means a safe and sturdy playground for your cats!
Side-trims
Now let’s finish off the low end of the roof with some 1×3 trim. Line it up so it sits flush with the edges—take your time getting it just right. Then drive in 1 5/8″ screws, spaced out nice and even to keep it tight and secure.
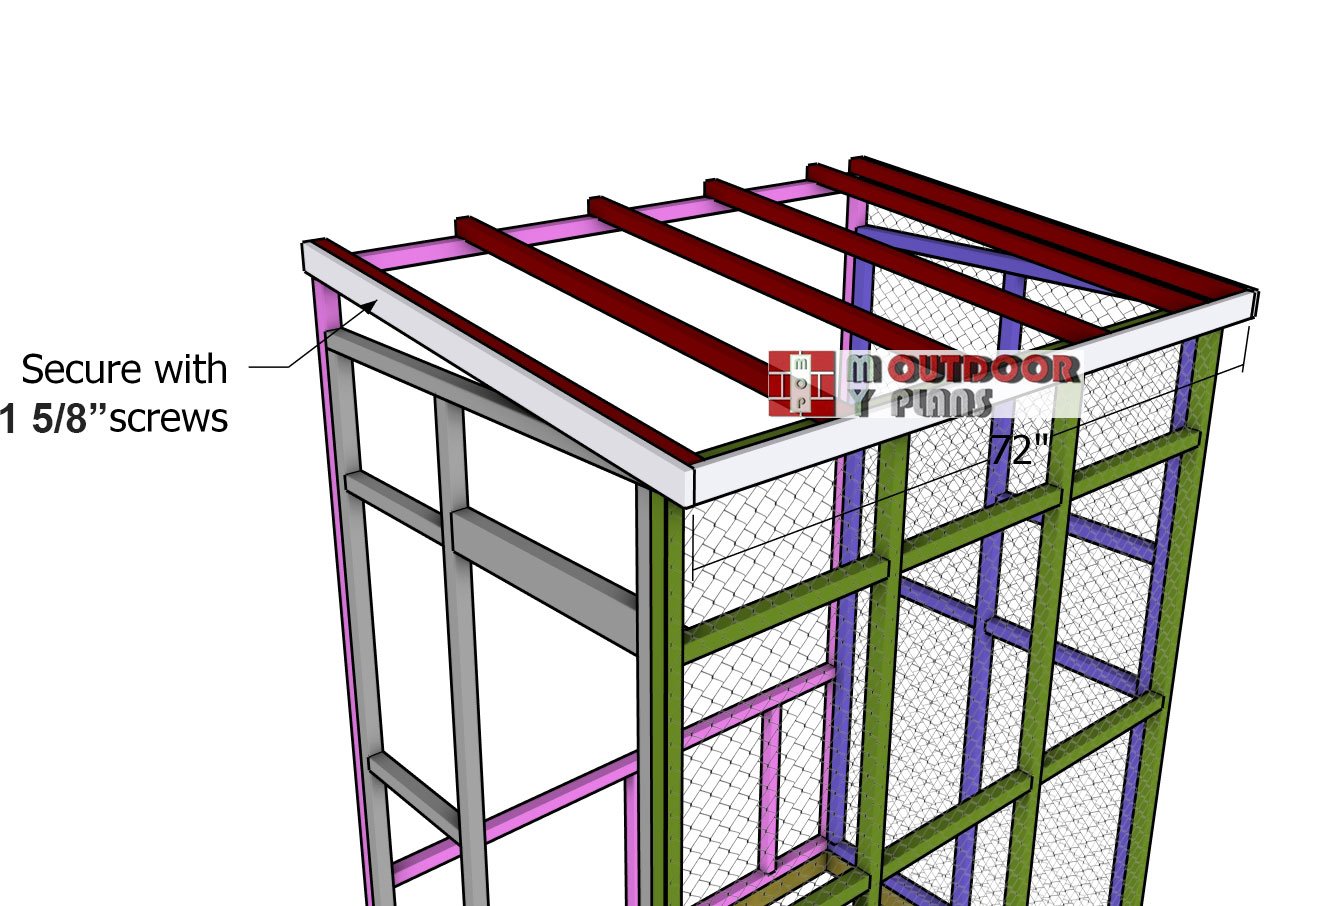
Roof-trims
This part might seem small, but it makes a big difference. That clean trim line pulls the whole look together and gives the catio a crisp, finished feel. A little extra care here takes it from homemade to handcrafted.
Fitting-the-roof-sheets
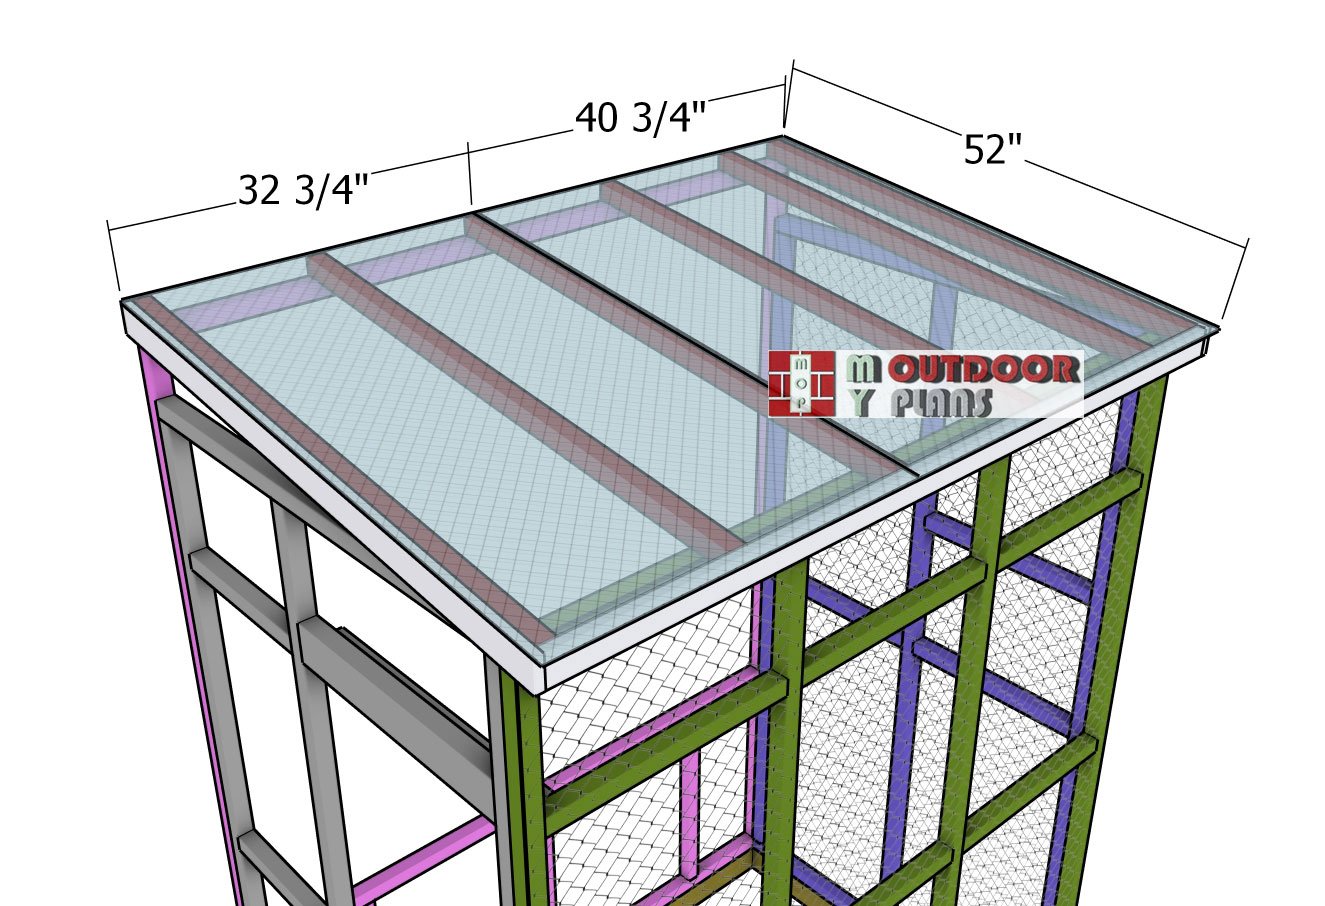
Alright, time to get the roof on. Grab your 6mm twin-wall polycarbonate sheets and lay them out over the lean-to frame. Line up the edges nice and straight with the sides, and make sure there’s a little overhang past the front trim—that helps shed water and keeps the inside dry. Use an H-channel to connect the panels cleanly and keep everything snug.
Then fasten the sheets down with screws and rubber washers—those washers are key for keeping it watertight. Don’t over-tighten, just firm enough to hold. With the roof locked in right, you’ll have a catio that stays dry, shaded, and solid no matter what the weather’s doing.
STEP 3: Building the door
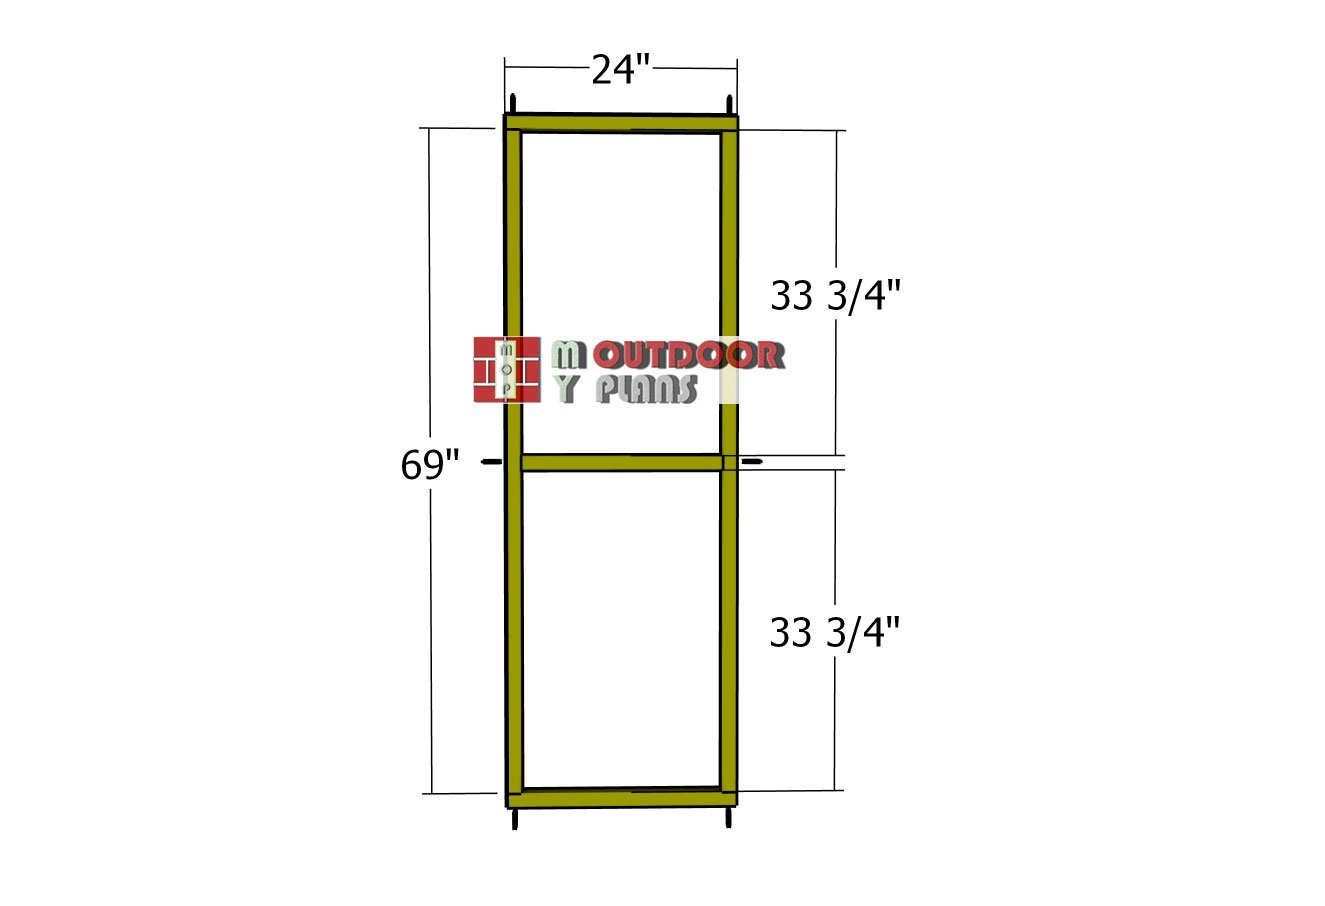
Door-frame
Let’s build the door frame using 2×2 lumber. Cut all your pieces to length, then lay them out and drill pilot holes through the top, bottom, and sides. Assemble the frame with 2 1/2″ screws, making sure everything’s tight and square. This is the entry point to the whole catio, so give it a solid start. Now for the braces.
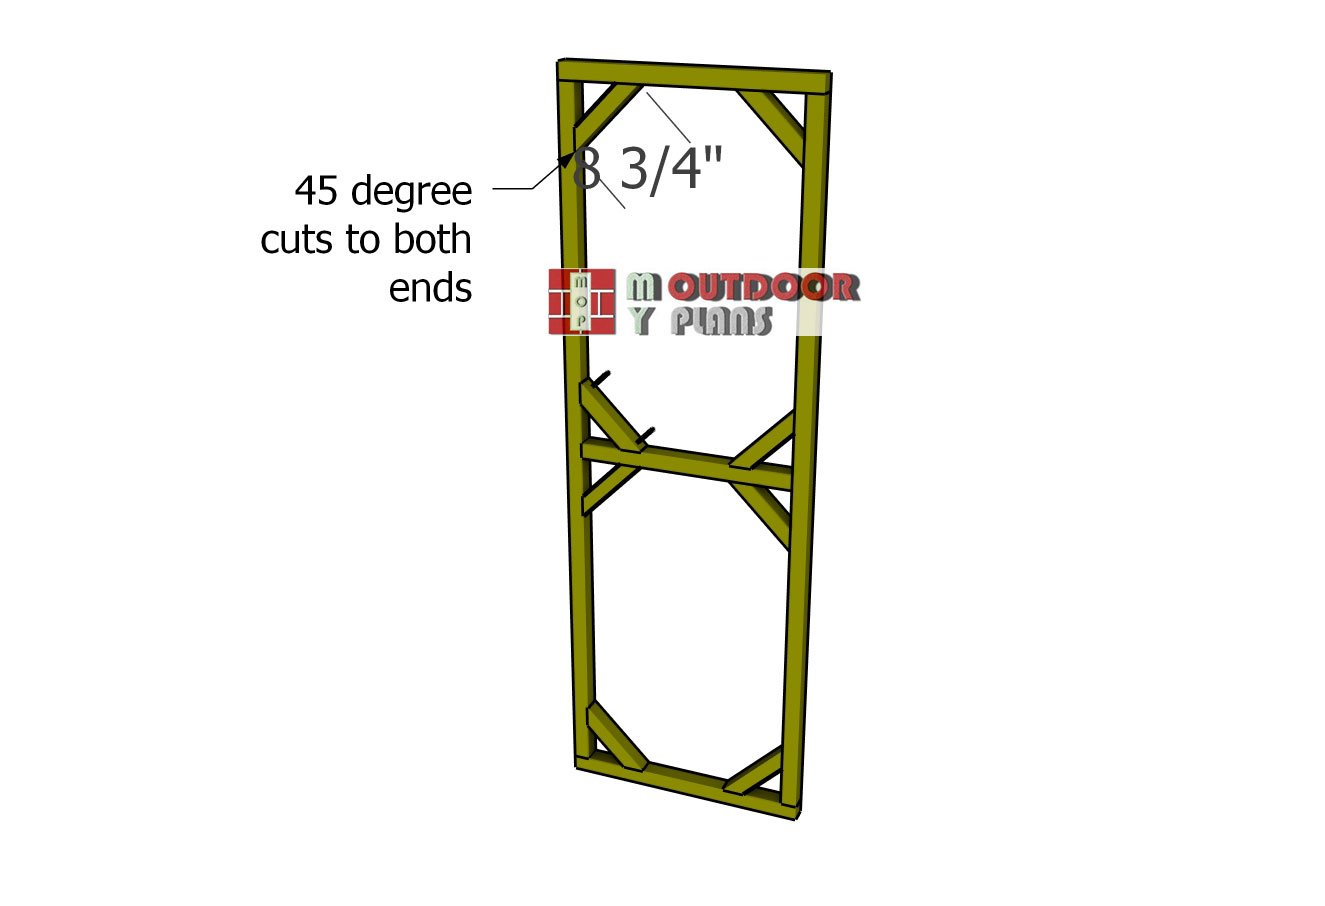
Fitting-the-door-braces
Cut a couple of 2x2s with 45-degree angles on both ends so they fit clean across the corners. These keep the door from racking over time. Once they’re cut, screw them in place with 2 1/2″ screws. Take your time lining it all up—strong and square is what we’re after here.
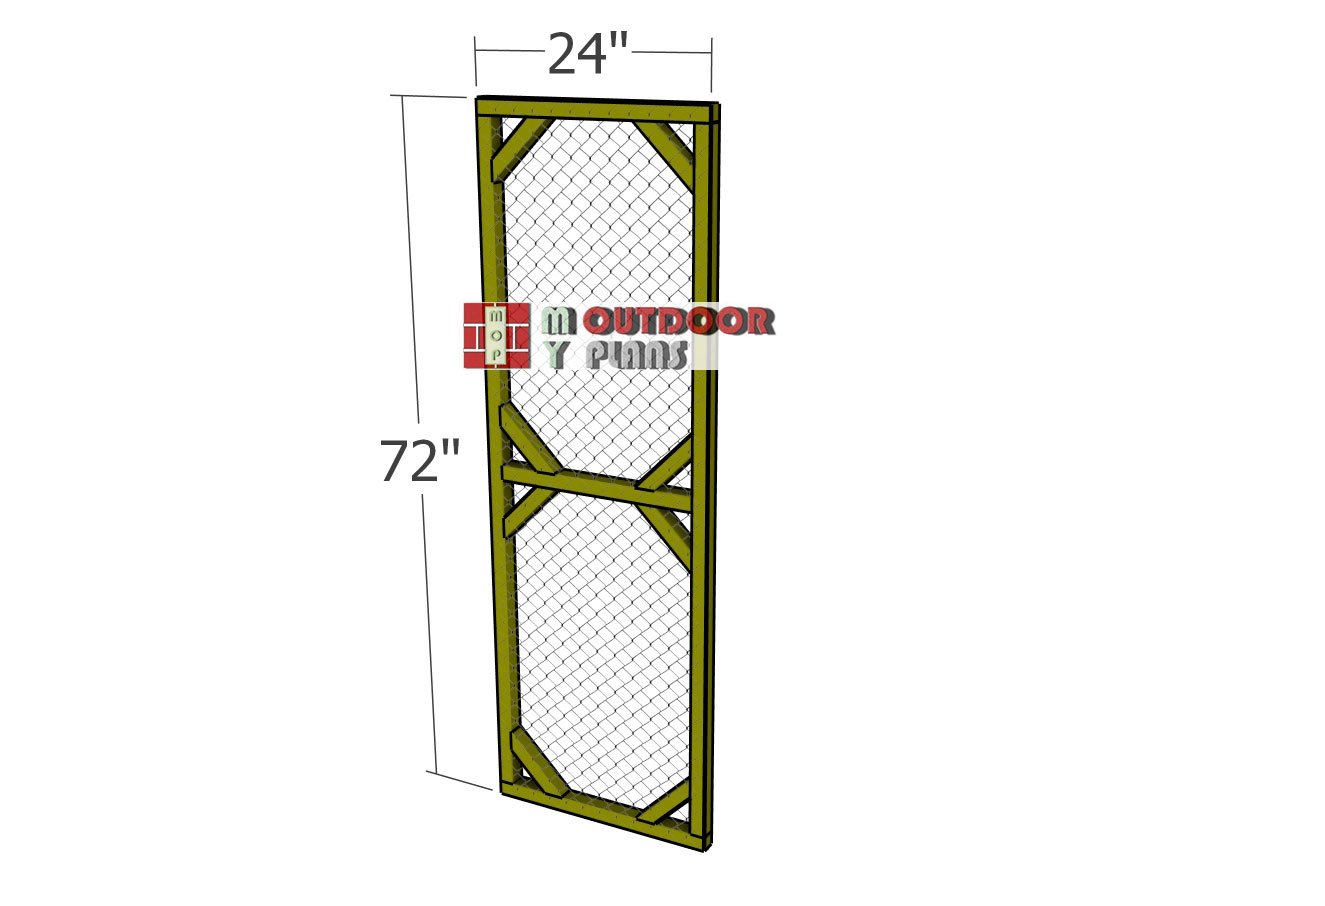
Door-wire
Now let’s get the 16-gauge fencing wire on the door frame. This stuff’s tough, with 2” x 3” spacing—perfect for keeping things secure. Cut the mesh to size with wire cutters, leaving just a little extra around the edges so you’ve got a good overlap. Lay the mesh over the door frame, pull it tight, and make sure everything’s lined up clean. Then fasten it down using either staples or 1″ screws with washers—your call. Space them out every 3 to 4 inches around the perimeter to keep the mesh tight and prevent any sagging over time.
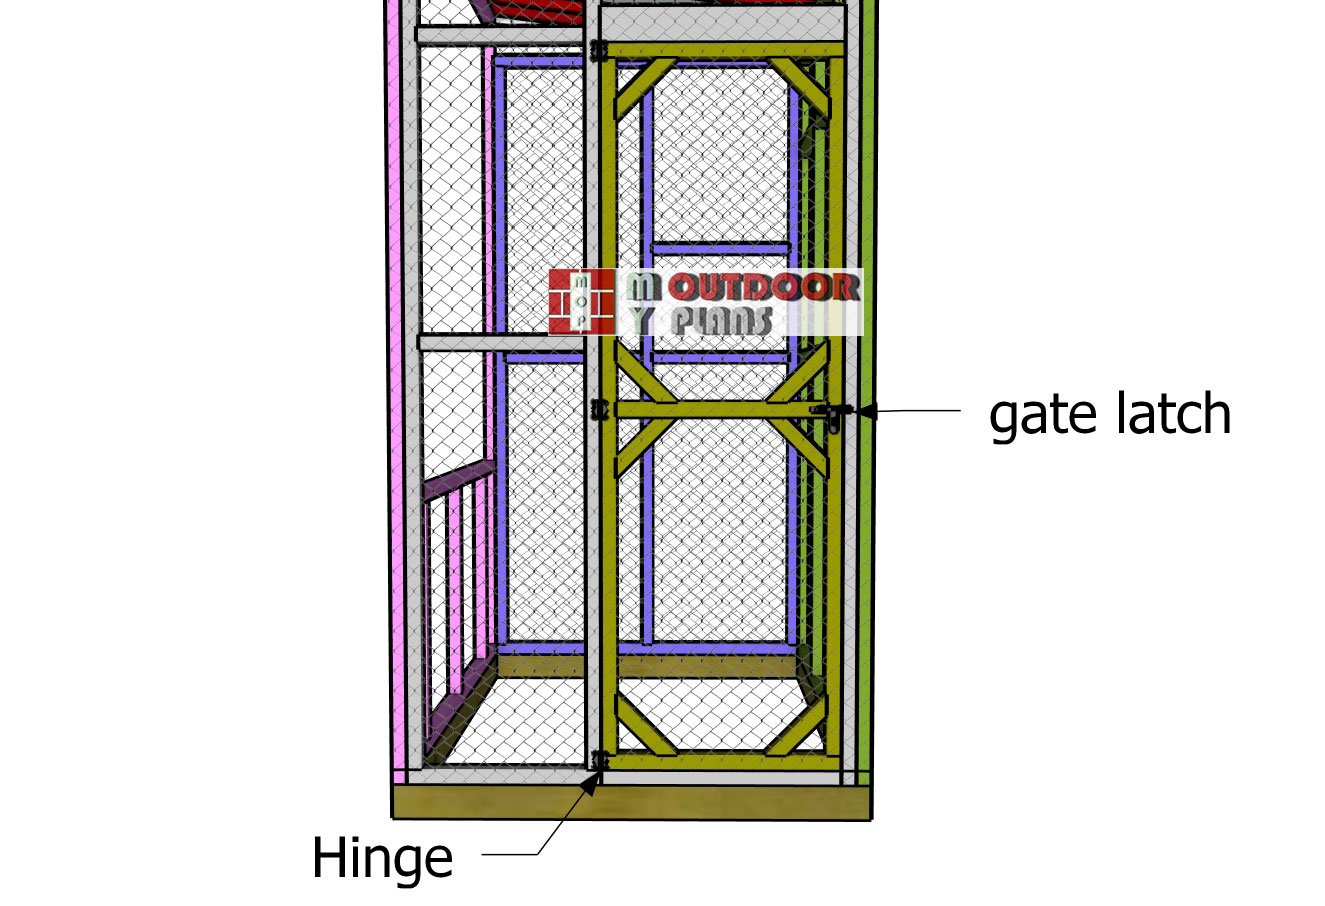
Attaching-the-catio-side-door
Once the mesh is on, hang the door using a pair of 3″x3″ hinges, and add a latch to keep things locked down. Take your time with alignment so it swings smooth and closes solid. That’s the last big step to locking this build into place.
Finishing touches
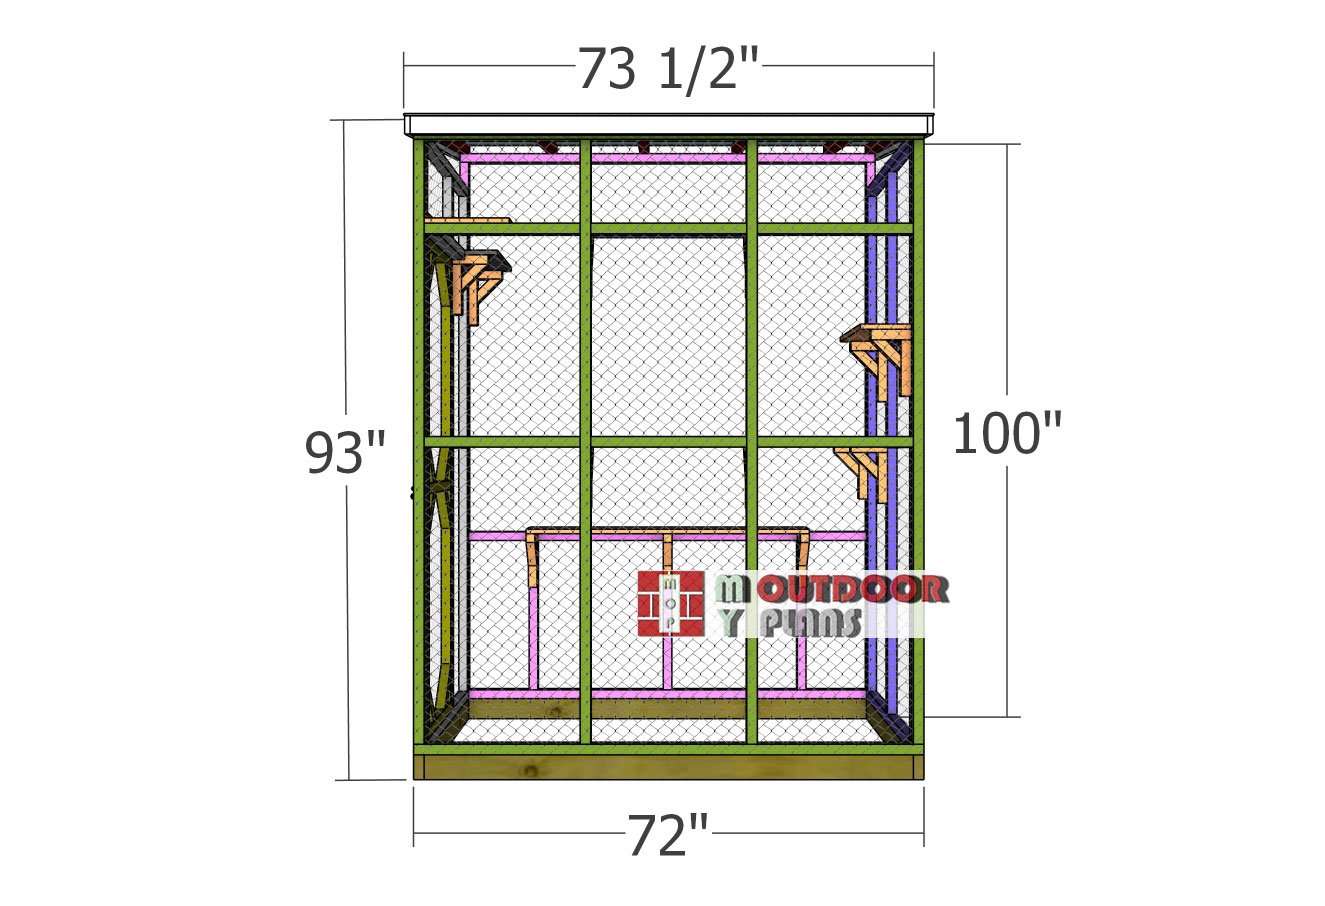
Front-view
With the mesh installed, now’s a good time to give the whole build a once-over. Run your hands along the edges and check for any sharp wires or spots that might snag a curious paw. If you find any, just bend them in or cap ’em off with a bit of trim—safety first. Want to take it up a notch? Add a wooden trim border around the mesh. It cleans up the look and gives the whole thing some added strength. Alright, time for the final passes.
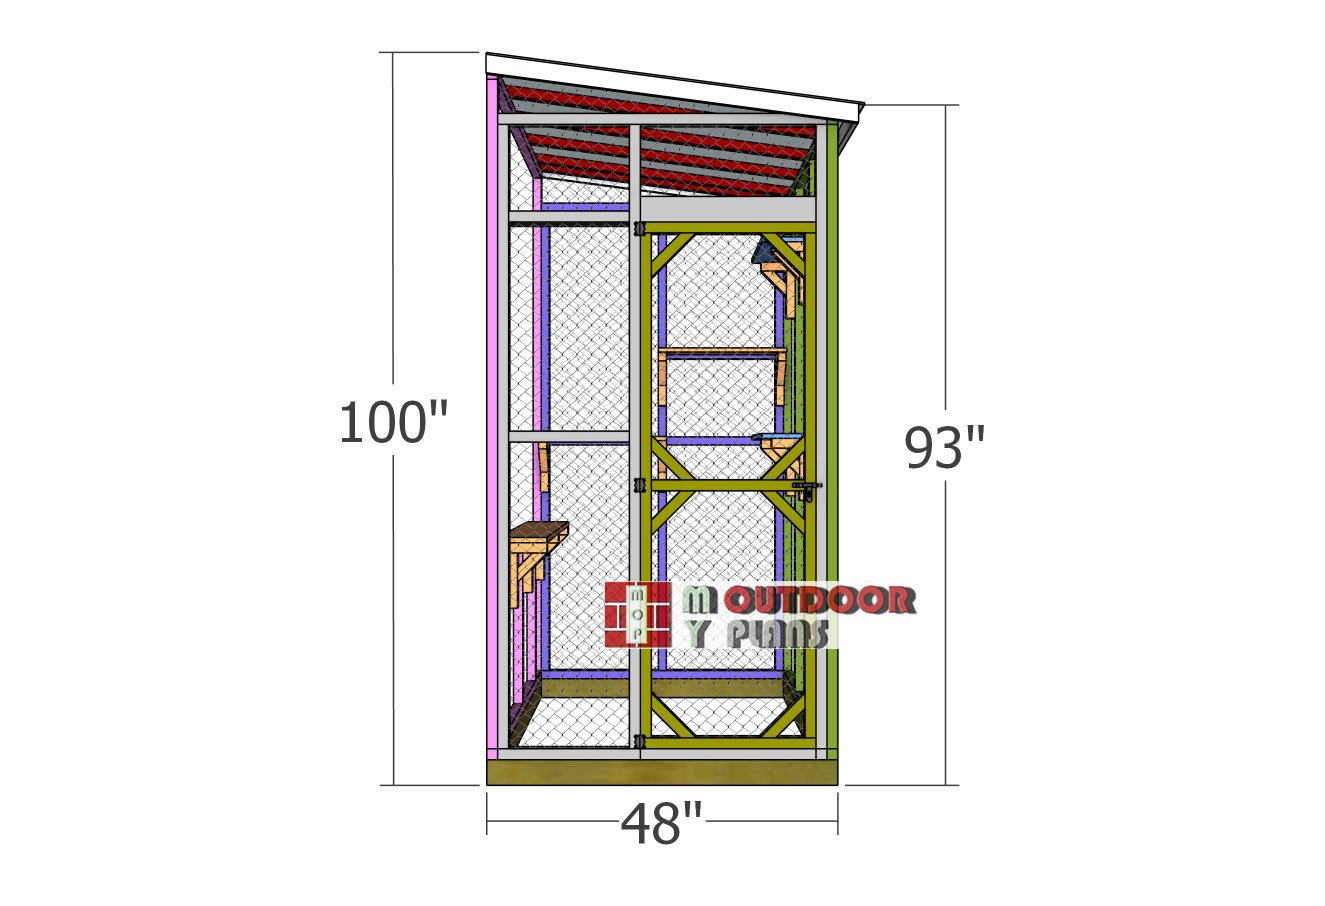
Side-view—4×6-cat-enclosure
Go around and tighten up any screws or staples that might’ve loosened up during the build—nothing fancy, just make sure everything’s locked in tight. Then throw on a solid coat of outdoor stain or paint to seal it against the elements. If your catio’s a standalone setup, don’t forget to anchor it down—wind has a way of turning things into kites. Now for the fun part: toss in some shelves, ramps, or a perch or two. Give your cats something to climb, explore, and nap on. And there you have it—a solid, safe, and adventure-ready catio your cats will love (and you’ll be proud of).
4×6 Catio Plans
4×6 Catio Plans. – front view
And there you have it—your very own 4×6 lean-to catio, complete with a sturdy polycarbonate roof, a front-access door, and plenty of room for your cats to climb and lounge. With its compact footprint and house-attached design, this build blends right into your outdoor space while giving your pets the freedom to safely enjoy the fresh air. It’s strong, secure, and built to last through the seasons—all while giving your cats a front-row seat to the outside world.
If you’re looking to take things up a notch, the premium plans include detailed shelf layouts to create a dynamic playground with multiple levels of fun. You can also customize the build with extras like ramps, rope perches, weatherproof bedding, or even a tunnel connecting it to another structure. Whether you keep it simple or go all out, this catio is a solid foundation for any feline adventure zone.
Top Tip: If you want to get PREMIUM PLANS for this project, in a PDF format, please press GET PDF PLANS button bellow. If you want the free version of the plans, please read the blog FAQs. Thank you for your support.

This woodworking project was about 4×6 attached catio plans. If you want to see more outdoor plans, we recommend you to check out the rest of our step by step projects.