This step by step woodworking project is about large dog house plans. In this guide we show you how to build a lean-to doghouse for large dogs, in just one weekend. If the dog house kits are too expensive for your budget, or if you want to make a construction with an unique design, you could undertake this project by yourself. Before starting the job, you should learn the basic woodworking techniques and buy proper materials from your lumberyard. Although the project is straight-forward, you still have to plan everything from the very beginning and use appropriate tools.
There are many designs and shapes you could choose from, when building the large dog house, therefore you should understand the options and select the one that fit perfectly the needs of you dog. Moreover, you could add character to the wooden construction with little effort. Use your creativity and install a front pergola, or attach 1×3 trims to hide the edges of the plywood sheets.
Projects made from these plans
Cut & Shopping Lists
- A – 4 pieces of 2×4 lumber 40” long, JOISTS
- B – 2 pieces of 2×4 lumber 36” long, RIM JOISTS
- C – 40 pieces of 3” galvanized screws SCREWS
- D – 3/4” plywood 36×43” FLOORING SHEETS
- E – 2×2 lumber SIDE WALLS
- F – 2×2 lumber FRONT WALL
- G – 2×2 lumber BACK WALL
- H – 2 pieces of 2×2 lumber, 41 1/2” long RAFTERS
- I – 90 sq ft of 5/8” plywood EXTERIOR SIDING
- J – 1/2” plywood 37 1/2”x50” ROOFING SHEETS
- K – 15 sq ft of asphalt shingles ASPHALT SHINGLES
- L – 2 pieces of 1×3, 38 1/2” long, 2 pieces of 1×3, 45” long – cut at 15º at both ends TRIMS
- M – 1×2 lumber and 1/2” plywood FRONT ARBOR
- 100 pieces of 2 1/2″ screws
- 100 pieces of 1 3/4″ screws
- 2″ brad nails
- wood glue, stain/paint
- wood filler
Tools
![]() Hammer, Tape measure, Framing square, Level
Hammer, Tape measure, Framing square, Level
![]() Miter saw, Drill machinery, Screwdriver, Sander
Miter saw, Drill machinery, Screwdriver, Sander
Time
![]() One weekend
One weekend
Outdoor Doghouse Components
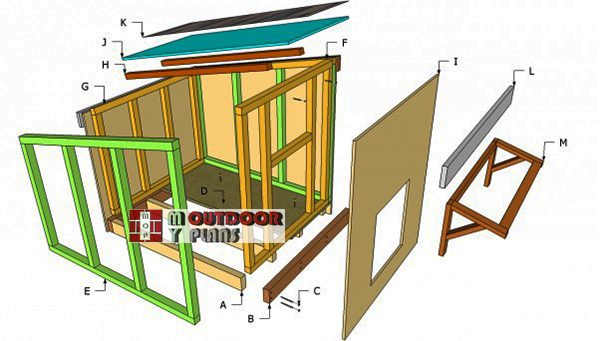
Large-dog-house-plans
Building a large dog house should be a quick woodworking project, if you choose the right plans for your needs and use proper materials. Work with great care and good judgement, paying attention to what carpentry techniques you use. Measure the lumber several times before cutting the components and use power tools to perform the cuts.
Top Tip: If you have a large dog, it is hard to find an appropriate doghouse, at a decent price and with a nice design. Follow the step by step instructions and assemble the components together, in a professional manner, if you want to save a significant amount of money.
Large Dog House Plans
Fitting-the-frame-plans-for-dog-house
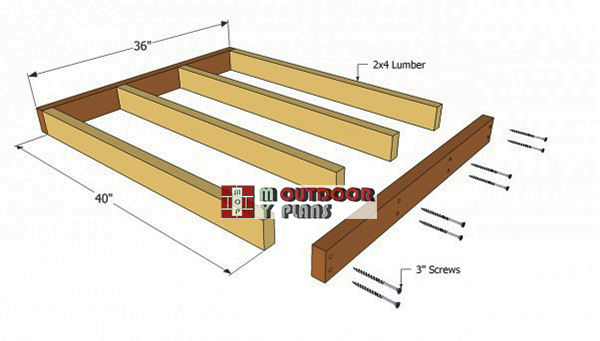
The first step of the project is to build the frame of the floor. Therefore, cut several 2×4 joists and join them together, as in the image. Use a framing square, to make sure the four corners of the frame are right angled.
Top Tip: Drill several pilot holes in the rim joists, to prevent the wood from splitting. In addition, don’t over-tighten the 3” screws, in order to secure the joists properly.
Installing the plywood flooring
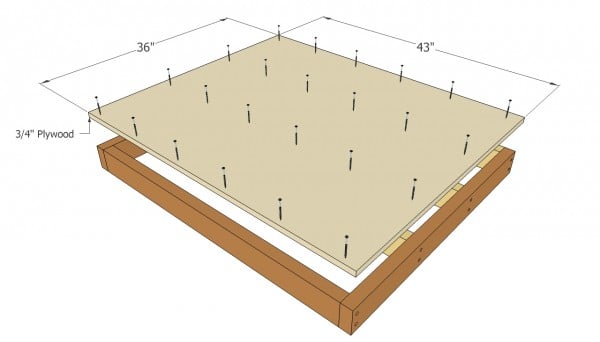
Afterwards, cut a sheet of 3/4” plywood to the right size and install it into place, by inserting 2” galvanized screws. Drive in the screws every 10”, along the joists, in order to secure the flooring properly.
If you have assembled the floor frame properly, the plywood sheet should overlap perfectly. It is essential to build the flooring properly, otherwise the issues would have a multiplicative effect.
Side-wall-frames
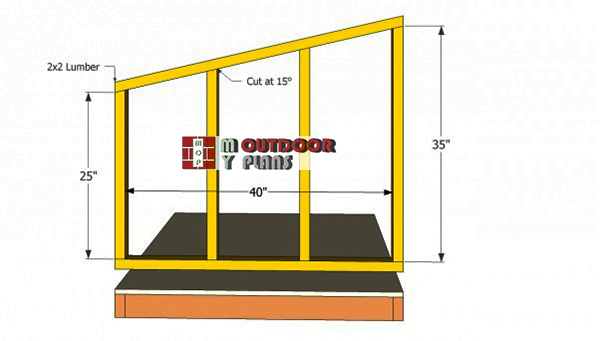
Assemble the walls of the dog house on the ground and install them to the floor. Therefore, you have to build the walls from 2×2 lumber and 3” screws/nails. As you can see in the image, the roof of the doghouse should have a 15º slope, in order to drain the water properly.
Top Tip: After you have assembled the walls, you have to plumb them with a spirit level and lock them into place with 3” screws, directly in the joists.
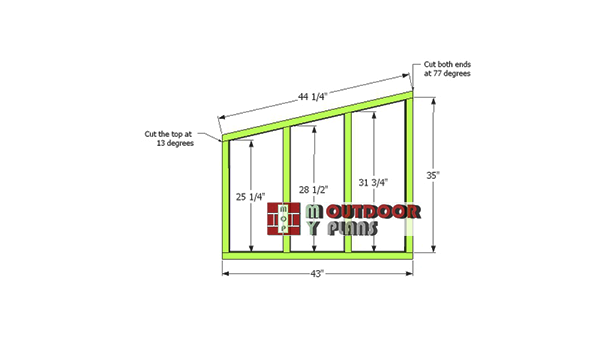
Side-wall-frame-2
More details for building the side walls.
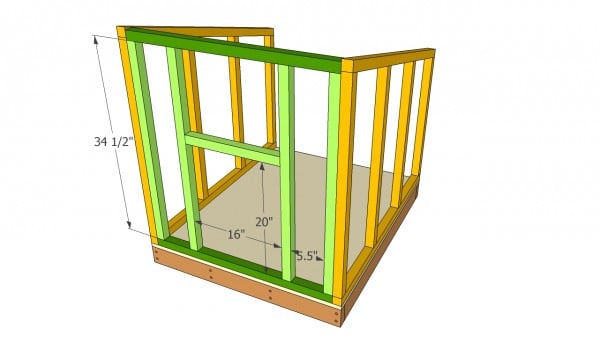
Doghouse front face plans
Next, you have to build the frame of the front end. Therefore, you should measure the distance between the two side walls, in order to cut the components of the front end. Assemble the frame on the ground, by driving in 3” screws in the 2×2 studs, trough the bottom at top plates.
Place the frame in location, plumb it with a spirit level and insert 3” screws trough the bottom plate, directly in the joists. Leave enough space for the door opening: 16” wide and about 18-20” high.
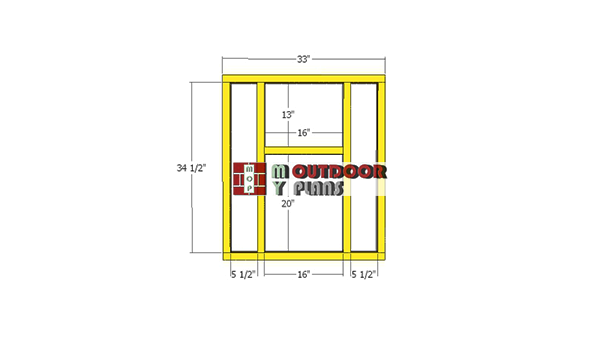
Building-the-front-wall-for-dog-house
More details for building the front wall.
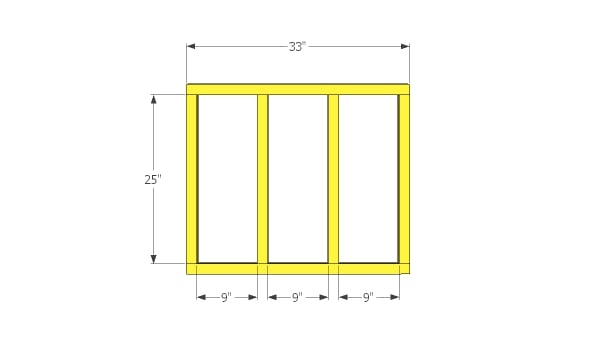
Back wall
Build the back walls by drilling pilot holes and inserting 2 1/2″ screws. Make sure the corners are square and add glue to the joints. Make sure the edges are flush before inserting the galvanized screws.
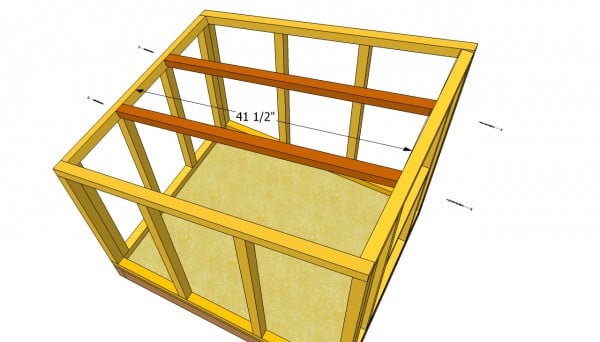
Installing the rafters
Build the frame of the back wall of the large dog house and install it into place, using the same techniques described above. Increase the rigidity of the construction, by securing the joints of the walls with 3” screws.
Install the 2×2 rafters into place and secure them with 3” screws trough the top plates of the front and back ends. Drill pilot holes before inserting the screws, to prevent the wood from splitting.
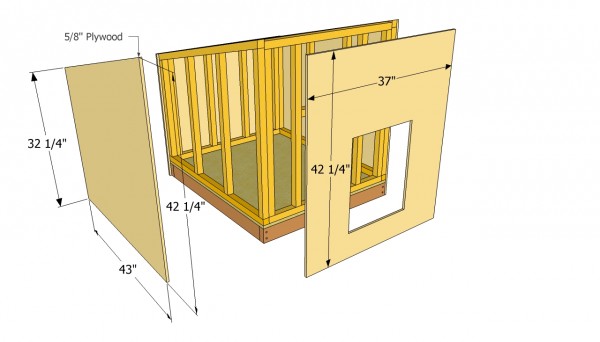
Attaching the sides of the dog house
The next step of the project is to attach the exterior 5/8” siding. Measure the walls of the large dog house and cuts plywood panels at the right size. Afterwards, install the siding into place with 1 1/4” nails.
Top Tip: Cut the siding with a handsaw having fine teeth, otherwise it might tear the edges. Work with great care and attention, if you want to obtain a professional result.
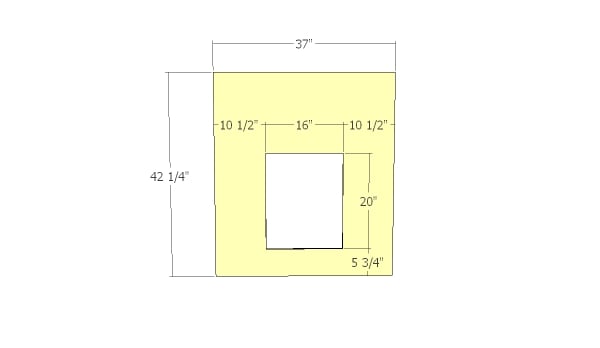
Front exterior wall
Pay attention to the diagram for building the front wall accurately. You can use 3/4″ plywood as well, for the exterior walls.
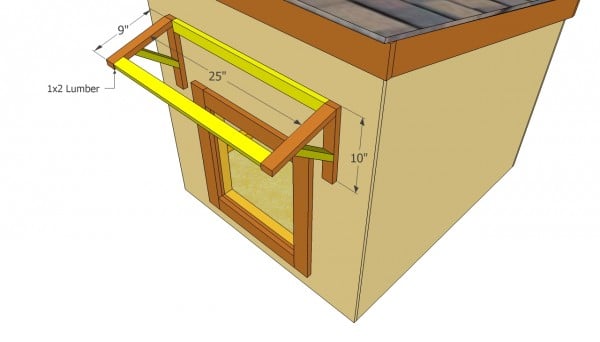
Installing the entrance roof
Attach 1×3 trims at the top of the dog house and secure them with 1 1/4 nails, before installing the 1/2” plywood roof. Afterwards, cover the roof with tar paper and install asphalt shingles starting with the bottom.
Top Tip: If you want to make your dog house stand out, you could build a simple arbor, as in the image (15º slope). Use 1×2 or 2×2 lumber and joint the components together with 1 1/2” nails.
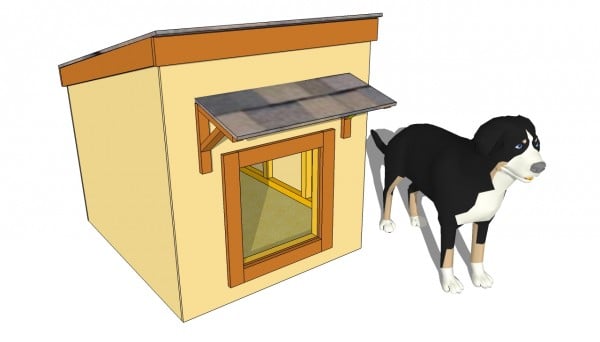
Large dog house plans
Fill the gaps with silicone and take care of the finishing touches. Protect the siding and the wooden components from water damage, by applying several coats of paint or varnish.
Top Tip: Cover the edges of the roof with metal drip caps in the following manner. Place the bottom drip edging under the tar paper, while the side and top drip caps should be installed over the asphalt shingles.
This woodworking project is about large dog house plans. If you want to see more outdoor plans free, we recommend you to check out the rest of our step by step projects.

10 comments
These are the best and easiest plans and instructions I’ve ever
seen. Thank you for making it so easy to follow. Your pictures are so appreciated because others fail to include them Thanks again.
cecilia
Thank you for the compliments. I would love to see how your dog house turns out!
Nice looking “hundhaus”. A few “extra” dimensions would have been nice. Such as the wall joists both sides and the rear. I was able to calculate what I think will do for the sides but the rear is going to be a SWAG. I had hoped to pre-cut everything but it doesn’t look like that will happen.
Thanks for the effort.
Jim, Tracy CA.
Till I update these plans, you can take a look over this project http://myoutdoorplans.com/animals/dog-house-plans-for-large-dog/ which comes with a complete cut list.
Hello,
I would like to draw a new plan for doghouse, which soft did you used for this one ?
Google Sketchup ?
Thanks a lot
Please read the FAQs at: http://myoutdoorplans.com/faq/
Do you have an estimate cost for building this dog house if you already had the tools?
About 300 $, if you use quality materials.
Thank you Ovidiu,I am using your plans for my Eagle Project to build large dog houses for an animal rescue organization. I am also adding you to the list of volunteers percious time spent helping.
Future Eagle Scout Kelly
What are the dimensions of this dog house? Trying to see if this will fit my dog.