This step by step diy project is about free 8×8 playhouse plans. I have designed this super simple gable playhouse with front porch, so you can surprise your kids with a wonderful gift. This playhouse is sturdy and easy to build. Read the local codes before starting the project, so you comply with the legal requirements. Take a look over the rest of my woodworking plans, if you want to get more building inspiration. Premium Plans for this project available in the Shop.
When buying the lumber, you should select the planks with great care, making sure they are straight and without any visible flaws (cracks, knots, twists, decay). Investing in cedar or other weather resistant lumber is a good idea, as it will pay off on the long run. Use a spirit level to plumb and align the components, before inserting the galvanized screws, otherwise the project won’t have a symmetrical look. If you have all the materials and tools required for the project, you could get the job done in about a day. See all my Premium Plans HERE.
Projects made from these plans
8×8 Playhouse Plans
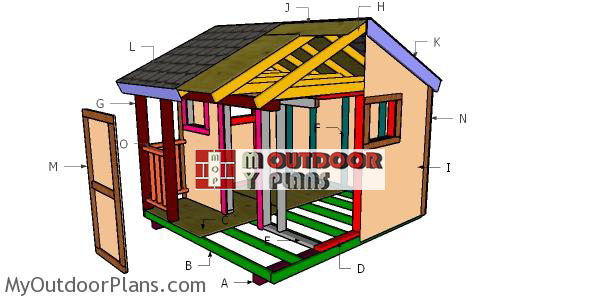
Building-a-8×8-playhouse
Cut & Shopping Lists
- A – 2 pieces of 4×4 lumber – 96″ long SKIDS
- B – 2 pieces of 2×4 lumber – 96″ long, 7 pieces – 93″ long 2xSIDE WALL
- C – 2 pieces of 3/4″ plywood – 48″x96″ long BACK WALL
- D – 2 pieces of 2×4 lumber – 72″ long, 4 piece – 57″ long, 2 pieces – 34″ long, 2 pieces – 16″ long, 4 pieces – 22 1/2″ long 2xSIDE WALL
- E – 2 pieces of 2×4 – 32 1/2″ long, 1 piece – 89″ long, 6 pieces – 57″ long, 8 pieces – 18 1/4″ long, 2 pieces – 53 1/2″ long, 2 pieces – 27″ long FRONT WALL
- F – 2 pieces of 2×4 lumber – 89″ long, 5 pieces – 57″ long BACK WALL
- G – 4 pieces of 4×4 lumber – 56 1/2″ long, 1 piece – 96″ long POSTS
- 3 pieces of 4×4 lumber – 8′
- 2 pieces of 4×4 lumber – 10′
- 13 pieces of 2×4 lumber – 8′
- 18 pieces of 2×4 lumber – 10′
- 2 1/2″ screws, 3 1/2″ screws, 1 5/8″ screws
- 4 1/2″ screws
- shed anchor
- wood filler , wood glue, stain/paint
Tools
![]() Hammer, Tape measure, Framing square, Level
Hammer, Tape measure, Framing square, Level
![]() Miter saw, Drill machinery, Screwdriver, Sander
Miter saw, Drill machinery, Screwdriver, Sander
Time
Related
- PART 1: 8×8 Playhouse Plans
- PART 2: 8×8 Playhouse Roof Plans
- PART 3: 8×8 Playhouse Trims and Railings Plans
It’s that simple to build a large playhouse!
Building a 8×8 playhouse
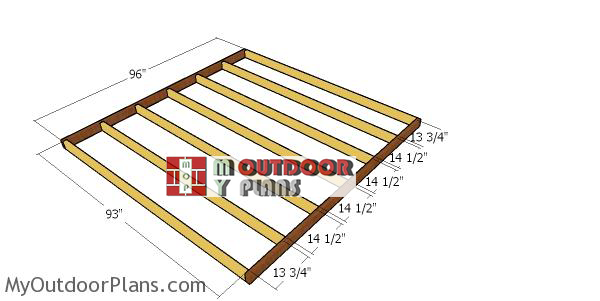
Building-floor-frame-8×8-playhouse
The first step of the project is to build the floor frame from 2×4 lumber. Cut the joists at the dimensions shown in the plans and then lay them on a level surface. Drill pilot holes through the perimeter joists and insert 3 1/2″ screws into the perpendicular joists. Make sure the edges are aligned and check if the corners are square. Place the joists every 16″ on center.
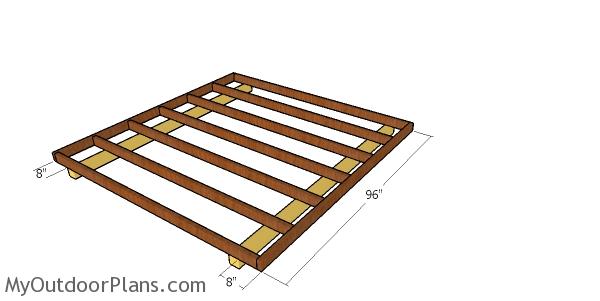
Fitting the skids
Fit the 4×4 skids under the floor frame and secure them into place with 5 1/2″ screws. The joists will lift the frame from the ground to protect it from the elements.

Fitting the floor sheets
Select the location for the playhouse and then remove the vegetation layer. Level the surface with a spirit level. Attach 3/4″ plywood sheets to the floor frame and align the edges with attention. Leave no gaps between the sheets and insert 1 5/8″ screws to lock them into place tightly.
Building the wall frames
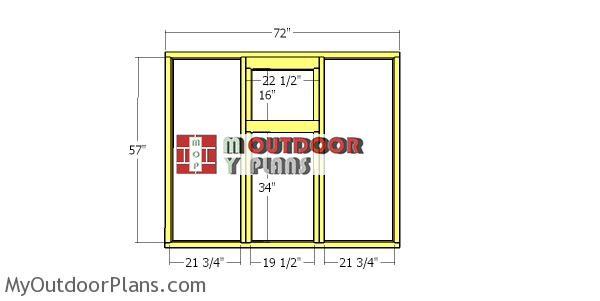
Side-wall-frame—playhouse
The next step of the project is to build the side walls from 2×4 lumber. Cut all the components at the right dimensions, after taking accurate measurements. Make sure the edges are flush and check if the corners are square. Drill pilot holes through the plates and insert 3 1/2″ screws into the studs. Fit the studs every 24″ on center. As you can see in the plans, you need to frame a small windows so you let the light in the playhouse.
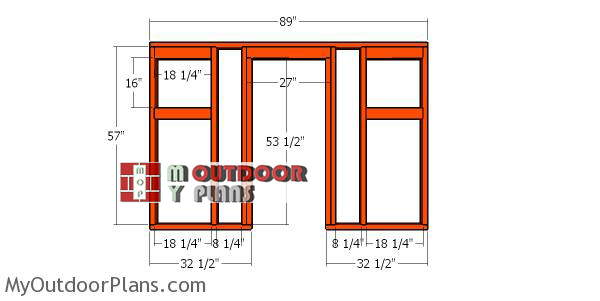
Front-wall-frame—wendyhouse
Build the front wall for the playhouse. Cut the components at the right dimensions and then assemble the frames using the same techniques described above. Frame the front door opening to suit your needs.
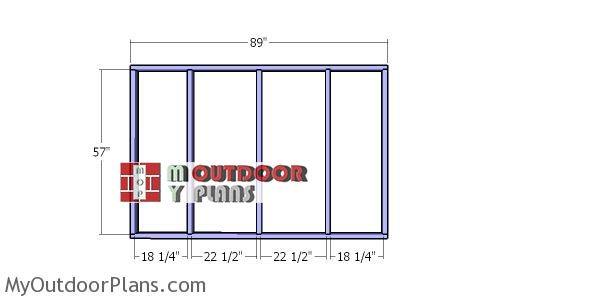
Back-wall-frame
Build the back wall frame using the same techniques described above.
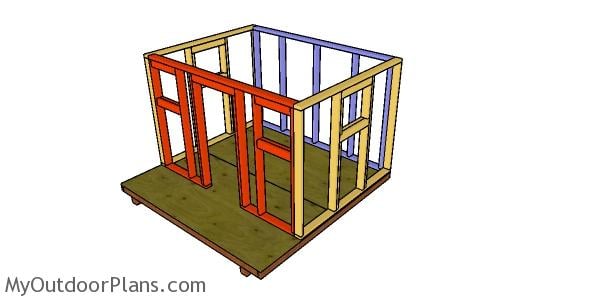
Assembling the shed frame
Lay the frames to the floor of the playhouse, as shown in the plans. Align the edges with attention and plumb them with a spirit level. Drill pilot holes through the bottom plates and insert 2 1/2″ screws into the floor. Make sure the corners are square and lock the adjacent walls together with 2 1/2″ screws.
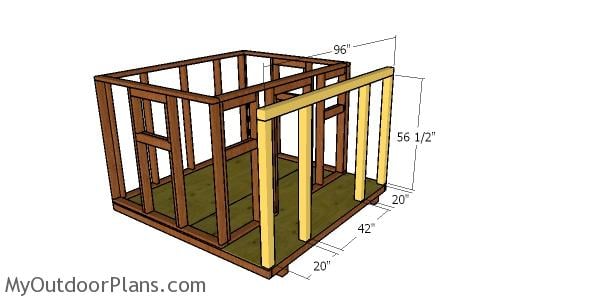
Front posts
Use 4×4 lumber for the porch posts. Cut the components at the right dimensions and then lock them into place with 5″ screws. Make sure the corners are square.
Finishing touches
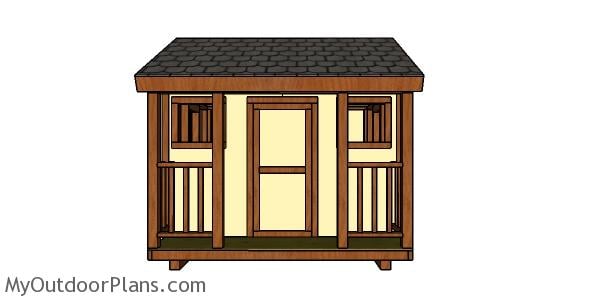
Large playhouse plans
Make sure you check PART 2 and PART 3 of the project so you learn how to build the roof and how to fit the decorative trims.
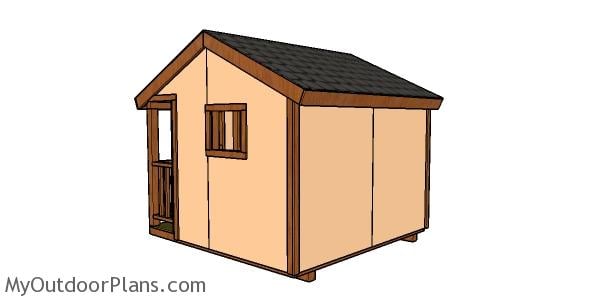
How to build a playhouse
This is a basic playhouse you can build in one weekend with common tools and materials.
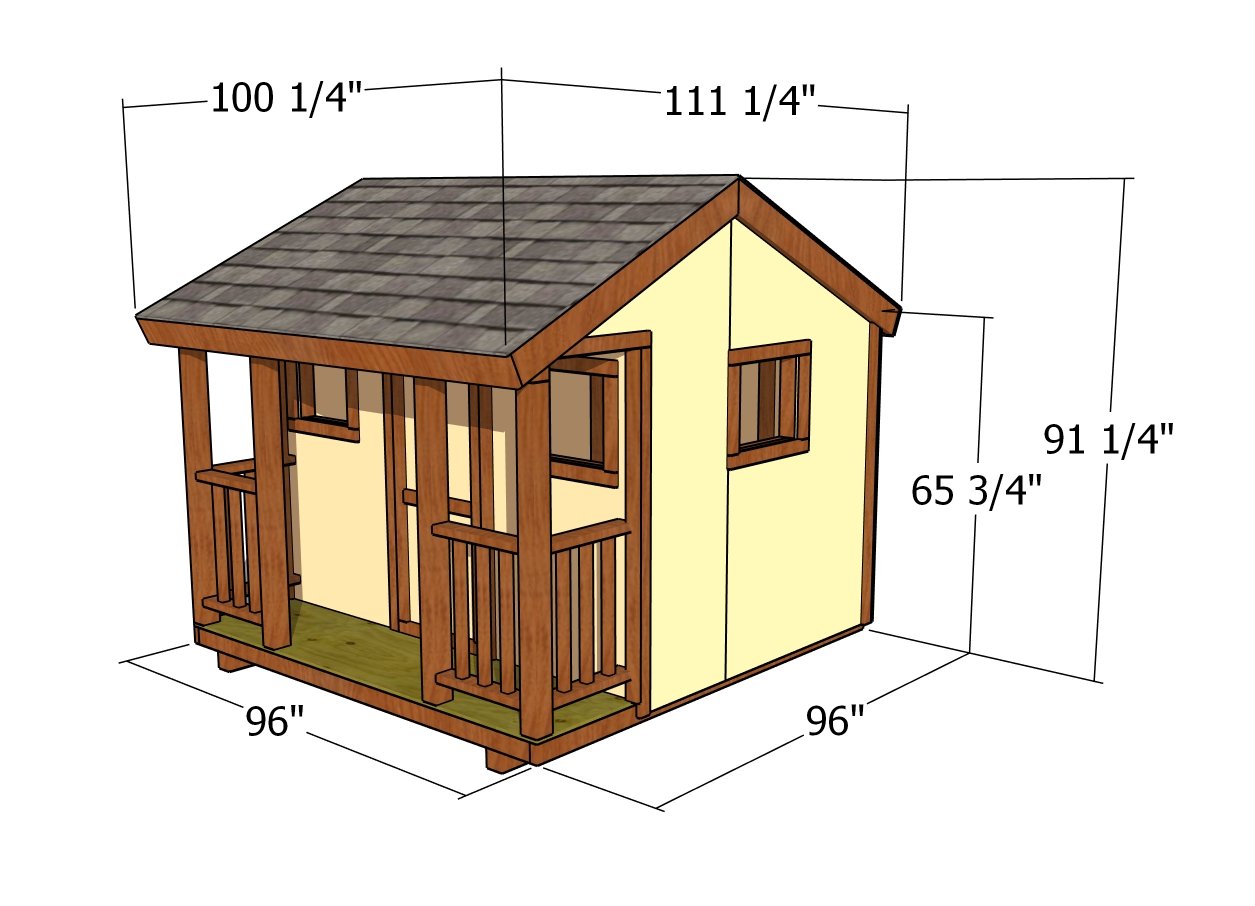
8×8 playhouse plans – dimensions
Crafting an 8×8 playhouse with a porch and door is an exciting project that can cost anywhere from $1,000 to $2,000, depending on the materials and finishes you choose. You’ll likely spend 1 to 2 weekends bringing this vision to life, from laying the foundation to adding the final touches that make it uniquely yours. Every hour you invest will be building not just a structure, but a special little world where stories are born and adventures begin.
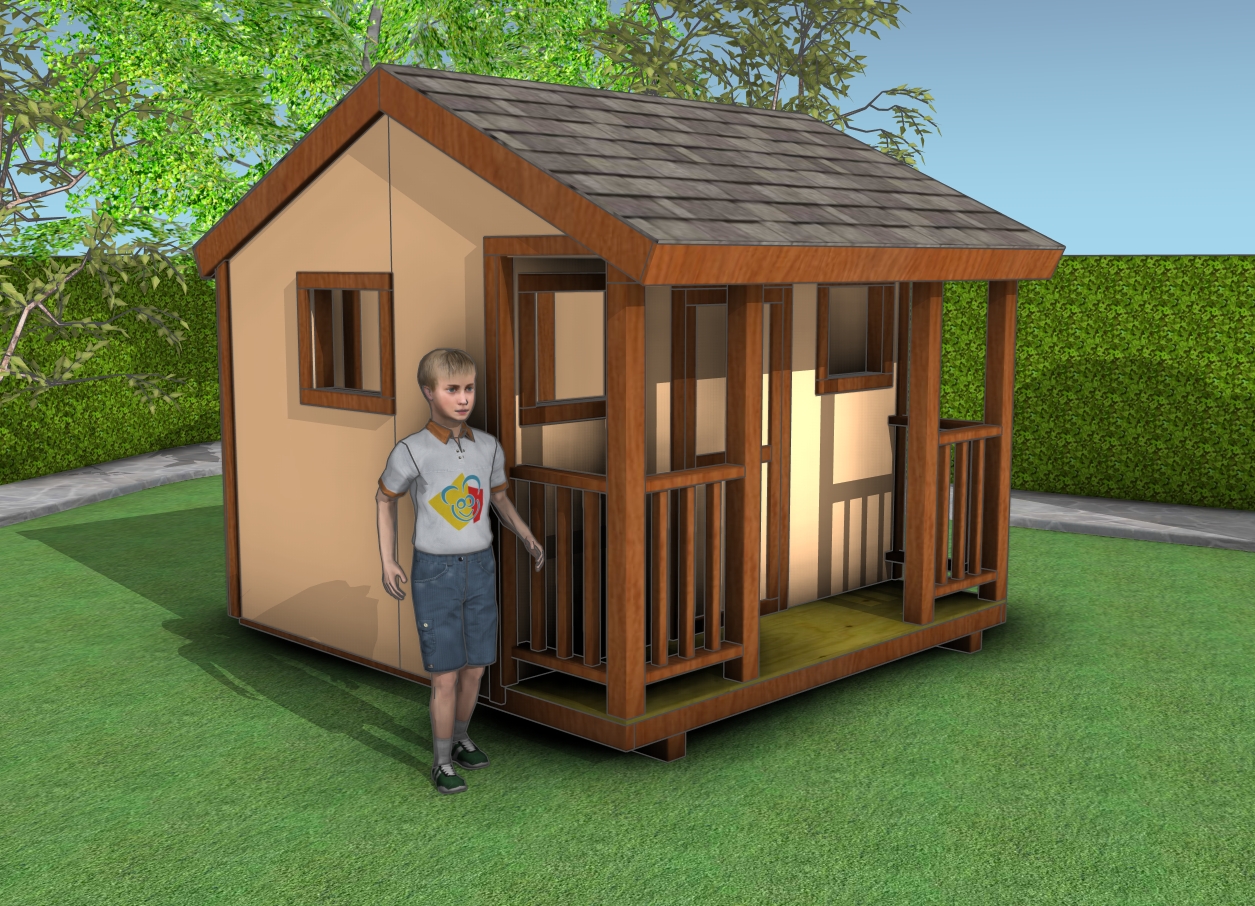
8×8 playhouse with porch – free plans
An 8×8 playhouse with a porch and door isn’t just a structure—it’s a tiny home bursting with possibilities, right in your own backyard. The gable roof gives it that classic, welcoming charm, while the porch becomes a stage for all kinds of imaginative play, from outdoor picnics to secret club meetings.
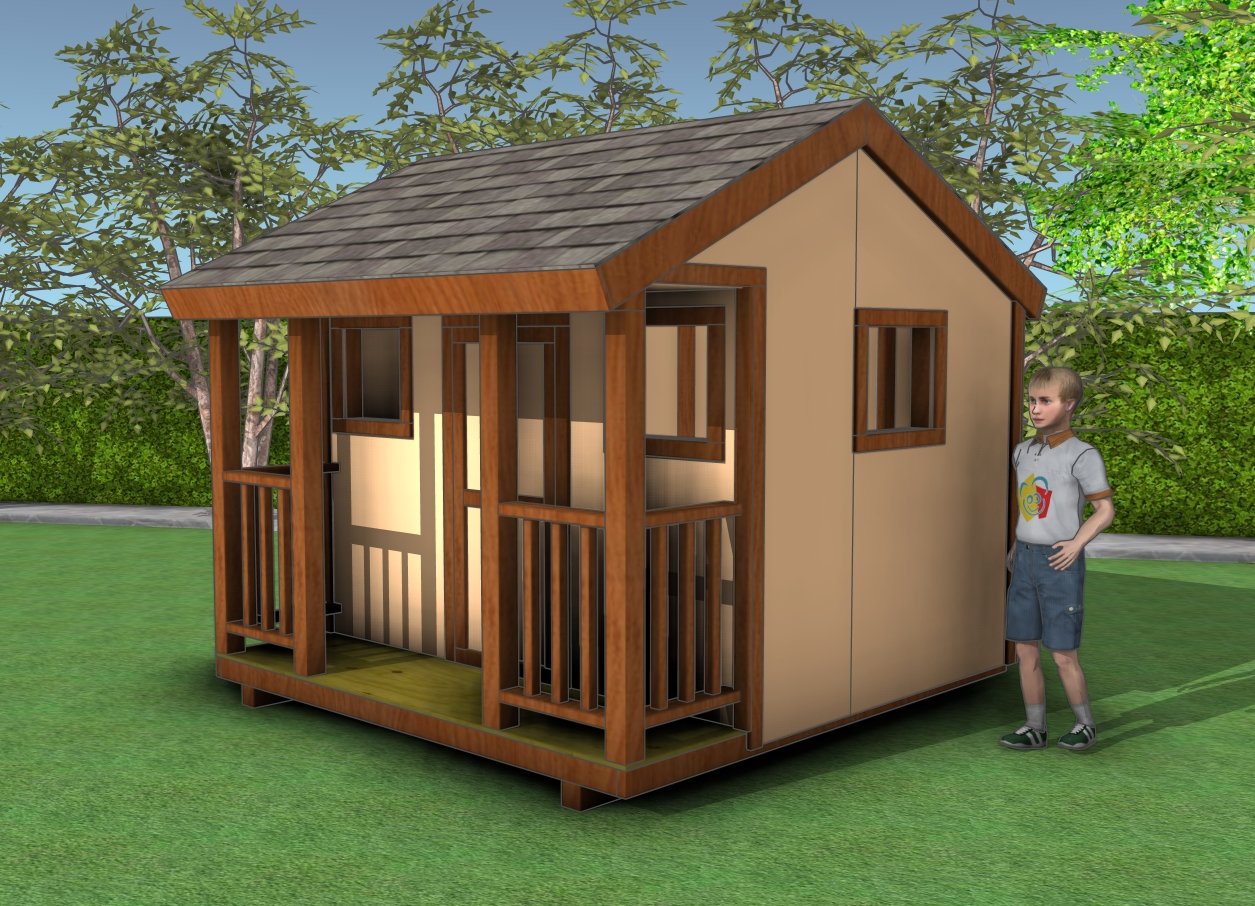
How to build a 8×8 playhouse
And let’s not forget the door—a simple feature that makes a world of difference, giving kids their own little entrance to a place where their creativity can soar. This playhouse will be a cherished part of your yard, sparking joy and imagination for years to come.
Check out PART 2 of the project to learn more on how to build the lean to roof for the playhouse. Premium Plans for this project available in the Shop.
This woodworking project was about 8×8 playhouse plans free. If you want to see more outdoor plans, check out the rest of our step by step projects and follow the instructions to obtain a professional result.


10 comments
good afternoon
can you email me the plans for this play house please I’m unable to download and print them
Please read the FAQs: http://myoutdoorplans.com/faq/ If it doesn’t work try to change the web browser and deactivate the adblockers.
I’m finding differences in lengths that seem to be wrong.
For example,the floor is 96″x96″ but the back wall length plus the two side walls ends up in 97″ (89+2×4). And still the two side walls T1-11 sidings will add an additional 1 1/2″ (2 x 3/4″) making it 2 1/2″ wider than the floor.
Also, the height of the walls is 61″ (59″+2×2″) while the height for the front porch is 1/2 inch shorter (56 1/2 + 4).
Are these dimensions correct and I’m missing something?
Thanks!!
Guillermo
Yes, you re missing something. You use the nominal size of lumber and not actual size of lumber. For example 2x4s are 1 1/2″ x 3 1/2″ You can see this table, as reference: https://myoutdoorplans.com/imperial-to-metric-conversion/
Just to Clarify, the items listed above from A to G PLUS the items below are all needed ??
I am unsure if its a summary underneath G or if those items are in addition to. Would like to clarify that, thanks
A to G is the Cut list (how to cut what you bought). The other list is the Shopping list (what you need to buy).
hi I will be trying to do this house on my own no experience or anything I will use the instructions just as explained. I will probably only do the framing of the house I’m not sure about the roof portion but I guess I will see if I’m up to trying to figure that out as well. Would you be able to tell me what might be the estimate of all the wood I will potentially be purchasing. I have a 7 year old and one that is about to turn 1 next week 🙂 I will love to be able to actually pull this off.
500 bucks maybe? You have the shopping lists. For spot on estimates you should use that and the local lumber costs.
What is the final height to peak of roof? My HOA has requirement of less than 8’.
Thanks,
Tyler
it’s 7 ft