This step by step diy project is about fence gate plans. Building a wooden gate for your garden fence is easy, provided you buy quality materials and use proper tools. Taking into account there are so many option to choose from when building the garden gate, you should study the alternatives and select the designs and shape that fits your needs. Always adjust the size of the gate before starting the building project.
Building a fence gate is not the most complex woodworking project, but there are a few things that you should take into account, if you want to prevent costly mistakes. First of all, we recommend you to invest in quality materials, such as pine, pressure-treated lumber, redwood or cedar, as the garden gate will be exposed to moisture and sunlight. In addition, you need to take accurate measurements and align the components, before inserting the screws.
Projects made from these plans
Cut & Shopping Lists
- A – 2 pieces of 4×4 lumber – 8 ft’ long POSTS
- B – 2 pieces of 2×6 lumber – 67″ long BEAMS
- C – 2 pieces of 2×3 – 35 1/2” long, 1 piece of 2×3 – 47 1/2” long, 1 piece – 42 1/2″ long, 1 piece – 51 3/4″ long FRAME
- D – 8 piece of 1×6 – 45-50” long SLATS
- E – 2 pieces of metal hinges, 1 piece of latch HINGES & LATCH
- 2 pieces of 4×4 lumber – 8 ft
- 1 piece of 2×6 lumber – 12 ft
- 3 pieces of 2×3 lumber – 8 ft
- 4 pieces of 1×6 lumber – 8 ft
- hinges + latch
- 2 1/2″ screws
- 1 1/4″ screws
- wood stain
- wood filler
- wood glue
Tools
![]() Hammer, Tape measure, Framing square
Hammer, Tape measure, Framing square
![]() Miter saw, Drill machinery, Screwdriver, Sander, Post-hole digger
Miter saw, Drill machinery, Screwdriver, Sander, Post-hole digger
Time
![]() One weekend
One weekend
Related
Building a wooden gate

Building a gate fence
Top Tip: Building a basic wooden gate is a simple project, if you follow the basic guidelines and invest in quality materials. As you will see throughout the project, you need to align and plumb all the components before inserting the galvanized screws.
Fence Gate Plans
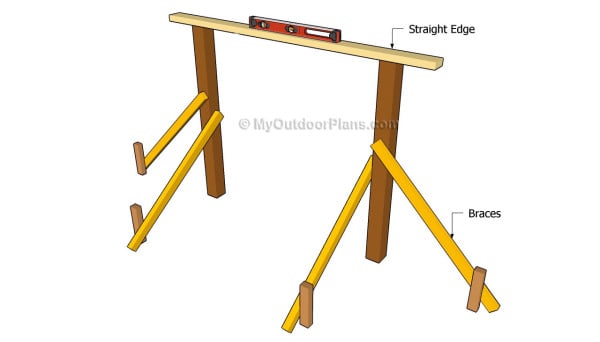
Installing the posts
The first step of the woodworking project is to set the posts of the gate into concrete. Therefore, we recommend you to dig 2-3′ deep holes, about 12” in diameter and to set the posts with temporary braces. Use a spirit level to plumb the posts and to make sure their top is perfectly horizontal.
Top Tip: Fill the holes with concrete and let it dry out for a couple of days before attaching the gate to the posts.
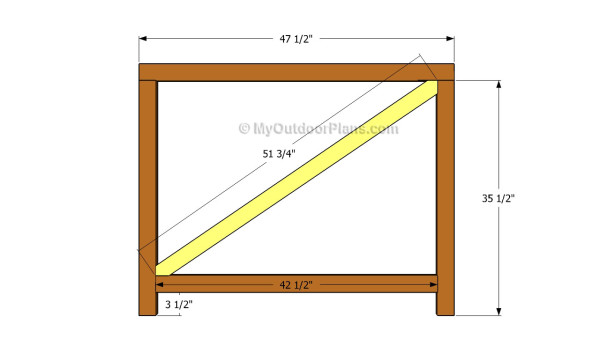
Building the frame of the gate
Next, you have to build the frame of the wooden gate. As you can notice in the free plans, you need to build a basic frame and to reinforce it with a diagonal brace. Align everything at both ends and cut the components at the right size, before inserting the galvanized screws.
In order to get a professional result, we recommend you to build the frame from 2×3 lumber and using 3″ wood screws. Add waterproof glue to create rigid joints.

Attaching the slats to the frame
The next step of the woodworking project is to attach the 1×6 slats to the frame. Make sure you place the frame of a level surface and attach the slats into place, one by one. Leave about 1/4 – 1/2″ between the slats and place a piece of plywood between them, in order to get consistent gaps.
We strongly recommend you to adjust the size of the fence gate to your needs, but still use the instructions described in the article.
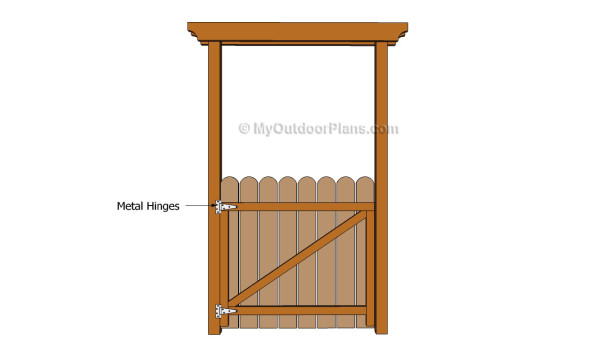
Attaching the gate to the posts
After building the wooden gate and removing the temporary braces, we recommend you to fit the wooden gate between the posts, as in the plans. Place the wooden gate on several pieces of lumber, as to create a small clearance gap between the ground and the bottom of the slats.
Ask a friend to assist you while you install the metal hinges. As a tip, you should attach the hinges to the frame of the gate and then to the wooden posts.
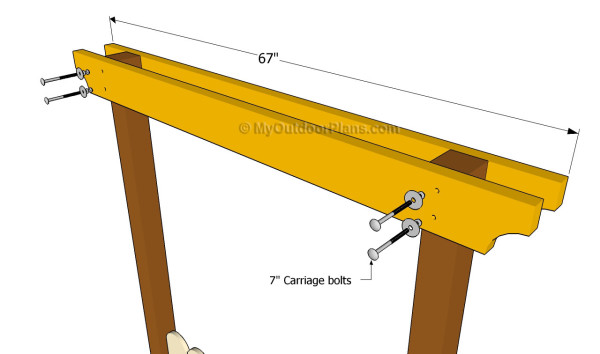
Attaching the beams
If you want to build a wooden fence gate with a nice design, we recommend you to attach 2×6 beams to the top of the posts. As you can notice in the image, we recommend you to attach the beams to the posts with several C-clamps, after leveling and aligning them properly.
Drill pilot holes trough the components and insert 7″ carriage bolts. Don not overtighten the nuts, to prevent the wooden from splitting.
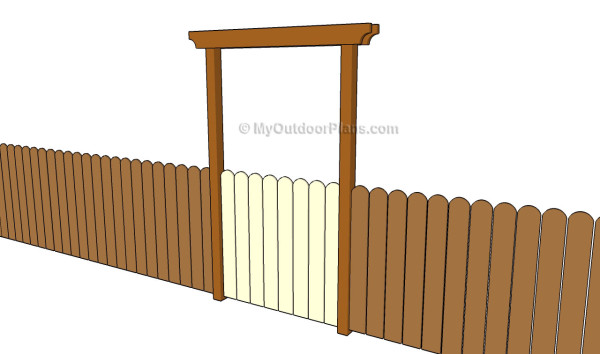
Fence gate plans
Last but not least, you have to take care of the finishing touches. Therefore, fill the holes and the cracks with wood filler and let it dry out for several hours, before sanding the surface with 120-grit sandpaper.
Top Tip: Protect the wooden components from rot by applying several coats of paint. Choose colors that match the design of the rest of your property, as to enhance the look of the garden gate.
This woodworking project was about fence gate plans. If you want to see more outdoor plans, we recommend you to check out the rest of our step by step projects.

4 comments
How do I know when to use a cross brace for a wooden gate?
For larger gates you have to install the cross braces.
This plan states that the post should be 72″. Not too bad if you are only 4ft tall.
You are such a funny funny person 🤣