This step by step woodworking project is about woodshed plans free. Building a woodshed in your backyard is ideal for storing firewood in a professional manner. In addition, if you follow our tips and instructions, you could even build a rustic shed that will add character to your backyard. A woodshed can take many shapes and designs, so you should decide from the very beginning what you want from such a construction.
A good compromise between costs and benefits would be to build a basic lean-to structure. In this manner, just by using regular materials such as 4×4 or 2×6 lumber you can create an unique storage shed in your backyard. Building a back wall is not necessary but it would most certainly help, as it will protect the firewood against heavy snow or rain. Nevertheless, if you want to save money and time you could build just the structure and add the side panels. See all my Premium Plans HERE.
Projects made from these plans
Cut & Shopping Lists
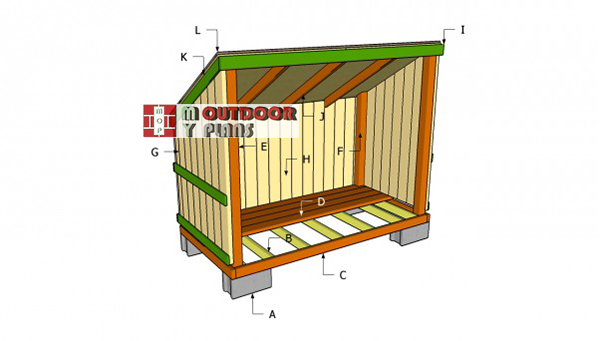
- A – 4 pieces of 16x8x8” concrete blocks FOOTINGS
- B – 7 pieces of 2×4 lumber 45” long JOISTS
- C – 2 pieces of 2×4 lumber 93” long, 2 pieces of 2×4 lumber 48” RIM JOISTS
- D – 12 pieces of 2×6 lumber 96” long DECKING
- E – 2 pieces of 4×4 lumber 76”, one end cut at 30º FRONT POSTS
- F – 2 pieces of 4×4 lumber 52”, one end cut at 30º BACK POSTS
- G – 16 pieces of 2×6 lumber 71” long – cut at 30º, 4 pieces of 1×4 lumber 46 1/2” SIDE WALLS
- H – 16 pieces of 2×6 lumber 44” long, 2 pieces of 1×4 lumber 97 1/2” long BACK WALL
- I – 2 pieces of 2×4 lumber 53 3/4” – ends cut at 30º, 2 pieces of 2×4 lumber 46 1/2” RIM RAFTERS
- J – 3 pieces of 2×4 lumber 52” long, both ends cut at 30º RAFTERS
- K – 40 sq ft of 3/4” tongue and groove plywood ROOFING SHEETS
- L – 40 sq ft of tar paper, 40 sq ft of shingles ROOFING
Tools
![]() Hammer, Tape measure, Framing square
Hammer, Tape measure, Framing square
![]() Miter saw, Drill machinery, Screwdriver, Sander
Miter saw, Drill machinery, Screwdriver, Sander
Time
![]() One day
One day
Building a wood shed
Woodshed-plans-free
Building a woodshed is a stylish method to store your firewood during the cold season. In addition, this will also ease the drying out process, as the air will circulate properly and keep the firewood is a good condition.
Top Tip: Place the decking boards on the joists and leave about 1/2” between them. In addition, notch the end of the slats to fit around the corner posts.
Woodshed Plans
Building-the-floor-frame
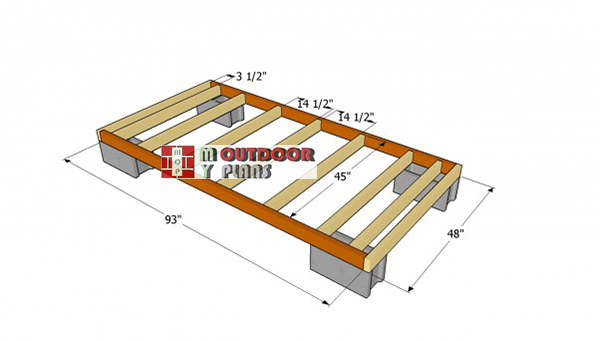
The first step of the project is to build the frame of the flooring. In order to get a professional result and to protect the wooden structure from rot, you should place the joists on several concrete blocks, as in the free plans. Cut the components at the right size and start assembling the components.
Top Tip: Drill pilot holes trough the rim joists and drive in the 3” screws into the intermediate joists. Make sure the diagonals are equal.
Installing-the-posts-for-woodshed
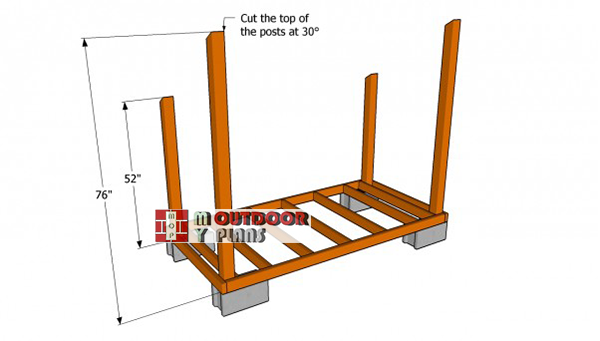
Make sure the corners of the frame are right angled, using a carpentry square. Afterwards, cut the corner posts at the right size, making sure the top of them are cut at 30º. Drill pilot holes trough the rim joists, to prevent the wood from splitting, and insert 3” screws into the posts.
Top Tip: Check if the posts are plumb, using a spirit level, before inserting the 3” long lag screws. Pre-drill holes, to prevent the wood from splitting.

Attaching the floor slats
The next step of the project is to cover the floor of the woodshed with 2×6 or 2×4 slats. Cut the wooden boards at the right size and secure them to the joists, using decking screws. Make sure you countersink the head of the screws, otherwise the shed won’t have a nice appearance.
Top Tip: Place the slats equally spaced, leaving about 1/2” between them. Work with great care and attention, as to get a symmetrical look.

Attaching the side walls
Building the walls of the shed is a straight forward procedure, provided you use the right plans and techniques. As you can see in the image, you need to build the panels on the ground, using 1×4 braces and 2×6 slats. Afterwards, place the panels into place, align them at both ends and anchor them to the posts with 3” screws.
Top Tip: Pre-drill the lumber before inserting the screws, otherwise the slats might split.

Attaching the back wall
Installing the back wall is simple, if you follow the instructions described above. As you might imagine, you need to lock all the boards together with 1×4 braces, wich will also enhance the look of the wood shed.
Top Tip: Make sure the panel is properly aligned, before driving in the screws. Getting a neat look is possible, even you are not a professional builder, but you should pay attention to details.

Installing-the-rafters-for-woodshed
Continue the woodworking project by installing the rim rafters, as well as the intermediate rafters. As you can easily notice in the image, you need to place the rafters equally spaced, as to support the weight of the roof properly.
Top Tip: Align the rafters at both ends and lock then into place, by driving in 3” screws trough the rim rafters into the components. Work with great care and attention.

Installing the roofing sheets
Next, you should attach the roofing sheets. In order to get an accurate result and to build a durable woodshed, buy 3/4” tongue and groove plywood and secure it to the rafters with 2” steel wire nails, every 15”. Connect the boards properly, before inserting the screws, as to build a rigid structure.
The sheets should cover the trims. Use a handsaw with sharp teeth to cut the plywood. Using the wrong blade would tear the edges.

Woodshed plans
After installing the roofing sheets, you should cover the roof with tar paper (make sure the strips overlap at least 2”) and fit the roofing sheets. Read here more about build a shed roof.
Top Tip: Fill the hols with wood filler and sand the surface thoroughly. Afterwards, cover the wooden components with protective paint or stain. Make sure the roof is sealed, otherwise fill the holes with silicone.
This woodworking project was about woodshed plans. If you want to see more outdoor plans, check out the rest of our step by step projects and follow the instructions to obtain a professional result.