This step by step diy woodworking project is about diy shed plans. If you want to learn more about how to build a shed in your backyard, we recommend you to pay attention to the instructions described in the article. Work with attention and invest in high quality materials, as to use the shed for many years in a row. Plan everything from the very beginning, including the building permit that is required in some cases.
There are a lot of plans and designs to choose from when building the shed, so make sure you take a look over several alternatives before starting the actual construction. Invest in weather-resistant lumber (pressure-treated lumber), making sure all the components are in a good condition and perfectly straight. Drill pilot holes before inserting the screws, to prevent the wood from splitting. See all my Premium Plans HERE.
Projects made from these plans
Cut & Shopping Lists
- A – 2 pieces of 2×4” lumber 96” long, 7 pieces of 2×4 lumber 117” long JOISTS
- B – 2 pieces of 3/4″ plywood – 24″x48″ long, 2 pieces – 48″x96″ long FLOORING
- C – 41 pieces of 2×4 lumber 90”, 4 pieces of 2×4 lumber 120”, 2 pieces of 2×4 lumber 113” STUDS
- C – 2 pieces of 1×3 lumber – 19″ long, 2 pieces of 1×1 lumber – 19″ long PLATES
- D – 11 pieces of T1-11 5/8″ siding WALLS
Tools
![]() Hammer, Tape measure, Framing square, Level
Hammer, Tape measure, Framing square, Level
![]() Miter saw, Drill machinery, Screwdriver, Sander
Miter saw, Drill machinery, Screwdriver, Sander
Time
![]() One day
One day
Related
- Part 1: DIY shed plans
- Part 2: DIY shed roof plans
- Part 3: DIY shed door plans
Diy Shed Plans
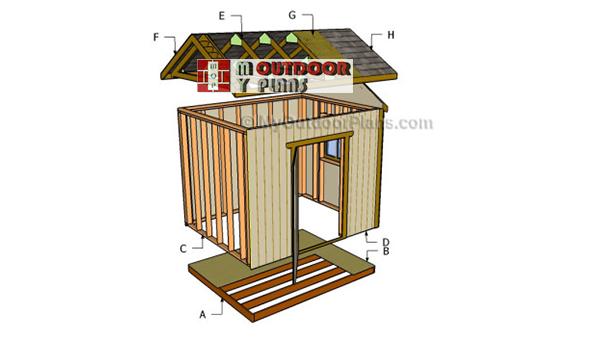
Building-a-shed
Top Tip: There are many plans and designs to choose from when building the shed, so make sure you take a look over the rest of the projects.
Building a shed
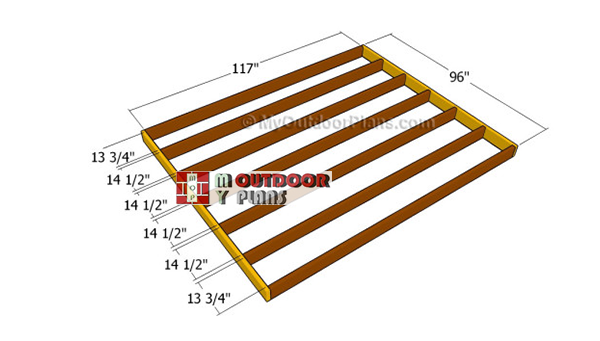
Building-the-floor-frame
The first step of the woodworking project is to build the frame of the floor. As you can easily notice in the plans, we recommend you to cut the joists at the right size and to lock them together with galvanized screws. You can use 2×4 or 2×6 lumber.
Drill pilot holes through the rim joists before inserting the 2 1/2″ screws into the regular joists, to prevent the wood from splitting. Make sure the corners are right-angled before inserting the screws into place.

Attaching the plywood floor
Continue the project by attaching the 3/4″ plywood sheets over the framing. Align the components at both ends and secure them into place with 1 1/4″ galvanized screws. Make sure there are no gaps between the sheets before inserting the galvanized screws. Insert the screws every 8″ along the joists.
Top Tip: Check if the plywood sheets are aligned at both ends and they are flush with the frame of the floor.
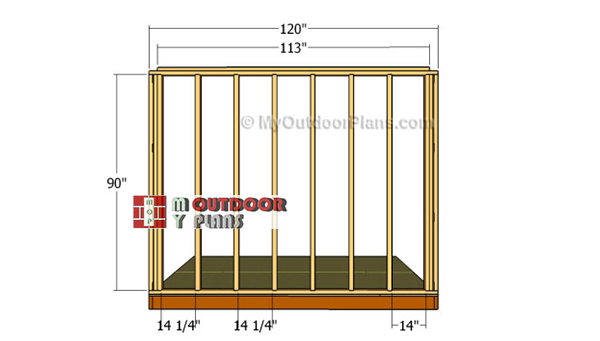
Building-the-back-wall-frame
The next step of the woodworking project is to build the back wall frame of the shed. As you can easily notice in the plans, we recommend you to cut the 2×4 components at the right size and assemble them on a level surface.
Take accurate measurements and drill pilot holes through the plates before inserting the 2 1/2″ screws into the studs. Check if the corners are right-angled before setting them into place.Drill pilot holes through the bottom plates and insert 2 1/2″ screws into the floor.
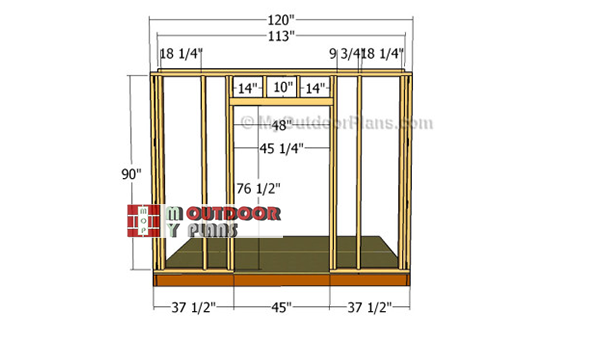
Building-the-wall-frame-with-door
Building the front wall is a straight-forward process, but there are certain things that you should pay attention to, in order to get the job done as a professional. Therefore, lock the components together using the information shown in the plans.
Frame the door of the shed in a professional manner, making sure the corners are square. Build the header and the trimmer studs as shown in the diagram. Adjust the size of the door opening to suit your needs.

Building the side wall
Build the side wall in the same manner described above. Cut the studs at the right size and attach them to the bottom and top plates with 2 1/2″ galvanized screws, in order to get the job done in a professional manner.
Top Tip: Assemble the side wall on a level surface and check if the corners are right-angled before inserting the screws. Place the studs equally-spaced, as shown in the image. Lock the bottom plates to the floor using 2 1/2″ screws.

Building-the-window-wall-frame
On the opposite side wall you can frame a nice window, if you want to let more light get inside the construction. Framing the side wall is a straight-forward process, but you need to take several aspects into account.
Plumb the studs and make sure the plates are perfectly horizontal. Drill pilot holes before inserting the screws, in order to get the job done in a professional manner. Leave enough space for the window so make sure you buy it before framing the wall.

Fitting the walls
After assembling the four wall frames of the shed, we suggest you to secure them to the floor. Ask a friend to help you when lifting them and laying into place. Use a spirit level to check if the walls are plumb and secure them into place with temporarily braces.
Work with attention and take your time when fitting the wall frames into place. Drill pilot holes and insert screws into the joists of the floor.

Building the frame of the shed
Attach the rest of the wall frames and secure them together as shown in the plans. It is essential to make sure the corners are right-angled before inserting the screws, to get a professional result. Lock the adjacent walls together by inserting 2 1/2″ screws.

Attaching siding to the back wall
The next step of the project is to attach the 5/8″ siding to the wall frame. Start with the back wall and attach the siding sheets to the frames, as shown in the diagram. Secure the sheets to the frame with 1 5/8″ finishing nails, every 8″ along the framing.

Attaching the siding to the door wall
Attaching the sheets to the front face of the shed is the next step of the project. Drill a starting hole and cut out the door opening by using a saw. Make sure you don’t damage the material, as we will be needing it when making the door of the shed.

Attaching the siding to the side walls
Attaching the sheets to the sides is a more complex process, as you need to make the gable ends and attach them to the wooden trusses. Take accurate measurements and adjust the size of the sheets at the right size by using a circular saw.

Diy shed plans
One of the last steps of the woodworking project is to take care of the finishing touches. Therefore, fill the pilot holes with wood putty and smooth the surface with 120-grit sandpaper.
Top Tip: If you want to enhance the look of the woodworking project, we recommend you to cover the components with carpet. Place the doll bed in a proper location and move it whenever necessary.
This woodworking project was about diy shed plans. If you want to see more outdoor plans, we recommend you to check out the rest of our step by step projects. LIKE us on Facebook and Google + to be the first that gets out latest projects.

EXPLORE MORE IDEAS FOR:
 |
 |
 |
 |