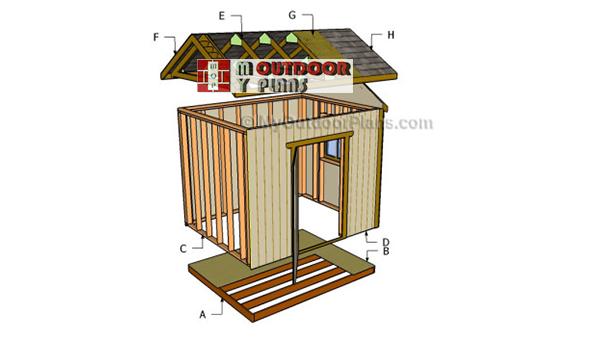
This step by step diy woodworking project is about diy shed roof plans. After building the frame of the shed, we recommend you to attach the trusses and to make the roof of the shed. There are many plans and shapes to choose from when building the shed roof, so make sure you select the one that suits your needs best. A gable roof is a nice choice, as it provides a compromise between a nice look and efficiency.
Always adjust the size and the shape of the roof to suit your needs. Work with attention and invest in high-quality materials if you want to get a professional result. Take accurate measurements before adjusting the size of the components , as they might not fit together easily. Always drill pilot holes before inserting the screws, to prevent the wood from splitting and to create rigid joints. See all my Premium Plans HERE.
Projects made from these plans
Cut & Shopping Lists
- E – 12 pieces of 2×4 62” – cut at 30º at both ends, 6 pieces of 97” – cut at 60º at both ends TRUSSES
- F– 8 pieces of 2×4 lumber – 62″ long, 14 pieces – 6 1/2″ long OVERHANG
- G – 4 pieces of 3/4 plywood – 48″x60″, 4 pieces – 9 1/4″x60″, 2 pieces – 25 1/4″x60″ ROOFING
- H – 120 sq ft of tar paper and asphalt shingle ROOFING
- I – 8 pieces of 1×4 lumber – 96″ long, 2 pieces of 1×4 lumber – 140″ TRIMS
Tools
![]() Hammer, Tape measure, Framing square
Hammer, Tape measure, Framing square
![]() Miter saw, Drill machinery, Screwdriver, Sander
Miter saw, Drill machinery, Screwdriver, Sander
Time
![]() One weekend
One weekend
Related
- Part 1: Diy shed plans
- Part 2: Diy shed roof plans
- Part 3: Diy shed door plans
Diy Shed Roof Plans
Building-a-shed
Top Tip: A gable roof is a good choice, as it represents the perfect compromise between a nice appearance and efficiency. Adjust the slope of the roof to suit your needs.
Building a shed roof
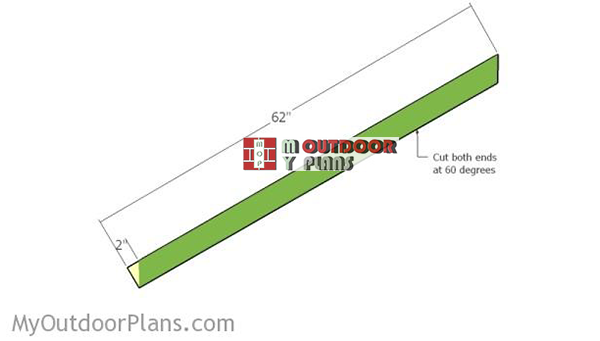
Building-the-rafters
Build the rafters from 2×4 lumber. Cut both ends of the rafters at 60 degrees.

Building the trusses
The first step of the woodworking project is to build the trusses. As you can easily notice in the diagram, we recommend you to cut the components at the right size and to assemble them together with galvanized screws. Add waterproof glue to the joints, in order to create a rigid structure.
Use a miter saw to make all the angle cuts accurately. Assemble the trusses and check if they all have the same shape and size.

Fitting the gussets
In order to enhance the rigidity of the trusses, we recommend you to install 1/2″ plywood gussets to the joints. Cut the gussets at the right size and shape before attaching them to the joints. Use 1 5/8″ nails to secure the gussets to the rafters.
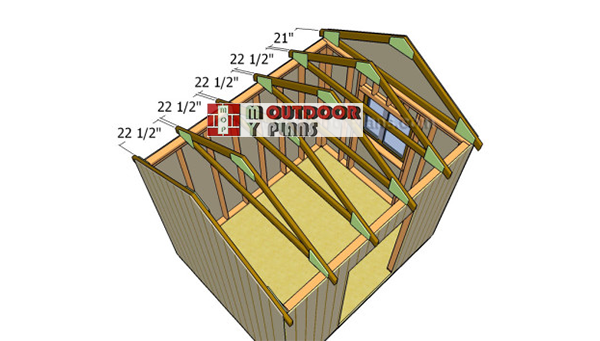
Fitting-the-trusses
Set the trusses to the top plates and secure them into place with galvanized screws, after making sure they are equally-spaced. Use a spirit level to plumb the trusses before securing them into place with screws. Space the trusses 24″ on center.

Building the overhangs
If you really want to enhance the look of the shed and to protect the components from bad weather, we recommend you to build front and back overhangs, using the information from the above diagram. You can adjust the width of the overhangs to suit your needs. Drill pilot holes through the rafters and insert 2 1/2″ screws into the supports.
Cut the components at the right size and lock them tightly with galvanized screws before fitting the overhangs into place. Leave no gaps between the overhangs and the siding, as to get a professional result.

Fitting the corner trims
In order to enhance the look of the backyard shed, we recommend you to fit 1×4 trims to the four corners of the wooden shed. Cut the trims at the right size and secure them into place with finishing nails.
Add waterproof glue to the joints in order to create strong joints. Make sure you leave no gaps between the components, in order to get a professional result.

Attaching the plywood sheets
Continue the woodworking project by attaching the plywood sheets to the rafters. Cut the sheets at the right size and align them at both ends before securing them into place with 1 5/8″ galvanized screws, every 8″ along the rafters.
Leave no gaps between the sheets before inserting the screws and make sure you use tongue and groove plywood boards. It is essential to cut the sheets at the right size before fitting them into place.

Fitting the roofing sheets
The next step of the project is to cover the whole surface of the roof with roofing felt. In order to get the job done properly, we recommend you to overlap the strips at least 2”. In addition, fit a 12” strip over the top ridge.
Top Tip: Install the shingles starting with the left- bottom of the roof, after fitting the starting course. See more about fitting the shingles here. Use roofing tacks to secure the shingles into place.

Fitting the trims
One of the last steps of the woodworking project is to attach the 1×4 trims to the ends of the rafters. Cut the trims at the right size and secure them into place with finishing nails.

Diy shed plans
Last but not least, we recommend you to pay attention to the finishing touches. Therefore, we recommend you to fill the holes with wood putty and the smooth the surface with sandpaper before applying a few coats of paint.
Top Tip: Work with attention and don’t forget to check out the rest of the project, if you want to learn how to build the frame of the shed and the wooden door.
This woodworking project is about diy shed roof plans free. If you want to see more outdoor plans, we recommend you to check out the rest of our step by step projects.
 |
 |
EXPLORE MORE IDEAS FOR:
 |
 |
 |
 |