Step by step woodworking article about free wooden playhouse plans. Building a simple playhouse for your kids is a great way to show them your love, as they would have an entertaining way to develop their creativity. If all the playhouse kits on the market exceed your budget, you could get the job done by yourself in just a weekend, using our instructions and paying attention to our tips. Before starting the job, ask your kids to come up with their own creative ideas, and adjust the design of the playhouse to match their needs.
There are many designs and shapes you could choose from, therefore you have to study carefully the options and take a decision, according to your needs and budget. In this article we show you how to build a simple playhouse, in just a weekend, using common materials and tools. An amateur handyman could get the job done by himself, without having to hire a professional contractor. If you budget is permissive, you could also install interior siding, in order to get a superior appearance. See all my Premium Plans HERE.
Projects made from these plans
Cut & Shopping Lists
- A – 2 pieces of 2×4 lumber 60” long RIM JOISTS
- B– 4 pieces of 2×4” lumber 81” long JOISTS
- C – 40 sq ft of 3/4″ tongue and groove plywood FLOORING
- D – 10 pieces of 2×4 lumber 51 1/2” long, 2 pieces of 2×4 lumber 68” WALL STUDS
- E – 150 sq ft 3/8” grooved plywood EXTERIOR SIDING
- F– 2 pieces of 2×4 lumber 81” long, 1 pieces of 2×4 lumber 78” RAFTERS
- G – 4 pieces of 2×4 lumber 33” – cut at 15º at both ends RIM RAFTERS
- H – 50 sq ft of 1/2” tongue and groove plywood ROOFING SHEETS
- I – 50 sq ft of tar paper ROOFING UNDERLAYMENT
- J – 50 sq ft of asphalt shingles SHINGLES
- K – 2 pieces of 1×3 lumber 76 1/2”, 2 pieces of 1×3 lumber 40 1/2” – cut at 15º at both ends TRIMS
Tools
![]() Hammer, Tape measure, Framing square
Hammer, Tape measure, Framing square
![]() Miter saw, Drill machinery, Screwdriver, Sander
Miter saw, Drill machinery, Screwdriver, Sander
Time
Simple Wooden Playhouse Components
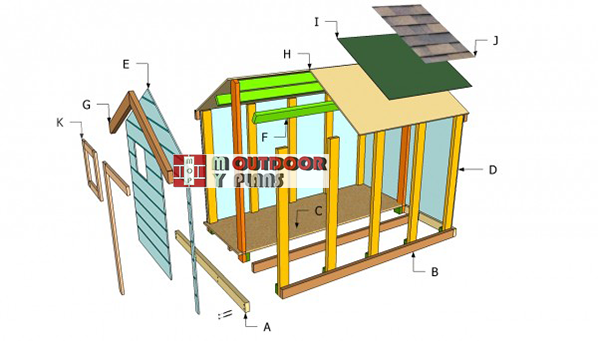
Playhouse-componnets—diy-project
Building a wooden playhouse in your backyard is a great way to encourage the creativity of your kids, but also an opportunity to rehearse your woodworking carpentry. If you want to keep the expenditures under control, build a simple playhouse with a regular materials, in order to save time and materials.
Top Tip: The safety of the kids should be your number one priority, therefore you have to take care of a few aspects, before letting them play in the small house. Smooth all the exposed edges with a sander or a router and countersink the head of all the screws.
Wooden Playhouse Plans Free
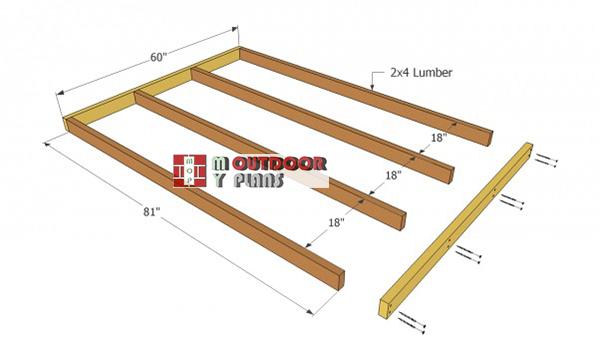
Playhouse-floor-frame-plans
The first step of the project is to build the floor of the playhouse. Therefore, you have to build the wooden components and to lock them together with 2 1/2” screws. Check the corners for squareness, using a framing square.
Top Tip: As you can see in the plans, you should drill pilot holes trough the rim joists and insert the screws in the 2×4 beams. Align the components properly before driving in the screws.
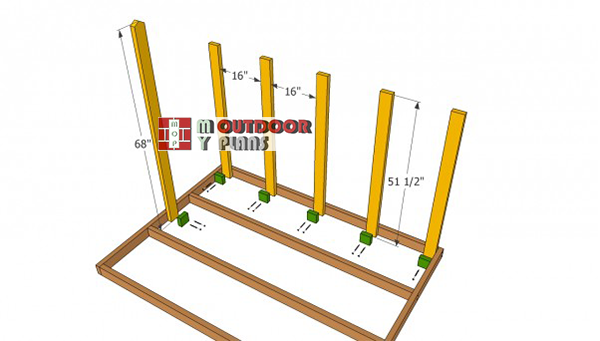
Installing-the-wall-studs-for-playhouse
Afterwards, you have to install the wall studs into place. Build the wall studs from 2×4 lumber and lock them into place, equally spaced. Plumb the 2×4 walls studs with a spirit, lock them into place with several C-clamps and drive in the 3” screws, trough the floor joists.
Top Tip: Attach small pieces of 2×4 lumber to the bottom of the studs, to support the decking properly.
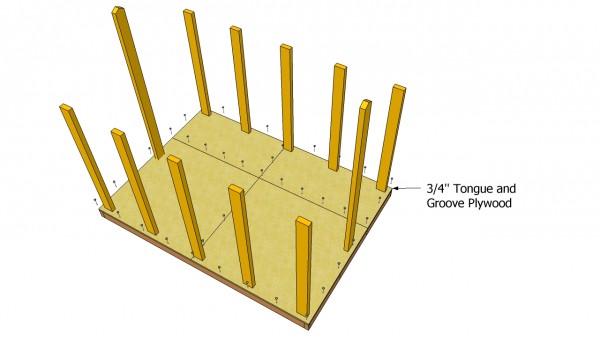
Installing the plywood flooring
Installing the flooring of the playhouse can be done in several ways, therefore you should choose the option that fits your needs best. On one hand, you could install 3/4” tongue and groove plywood sheets, as in the image. Make sure you notch the sides of the sheets, to fit around the wall studs.
On the other hand, you could install 2×4 slats into place, as they are more durable and have a traditional look. Pre-drill holes and insert screws.
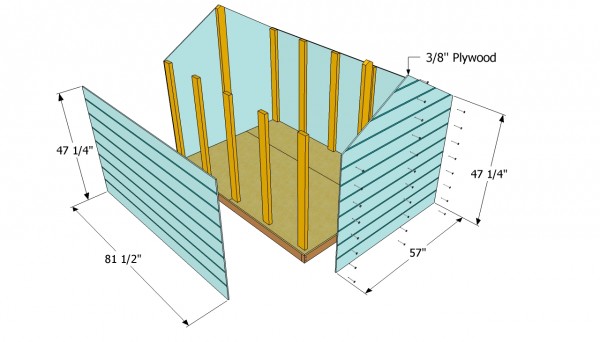
Next, you have to attach the sides of the playhouse, using 3/8” grooved siding. First, cut the panels to the right size and then lock it into place with 1” nails. Insert the nails at least 1/2” from the edges, to prevent the plywood from splitting.
Top Tip: Work with great care and attention, if you want to obtain a professional result. Mark the cut line on the siding and cut the panels with a circular saw with a sharp blade.
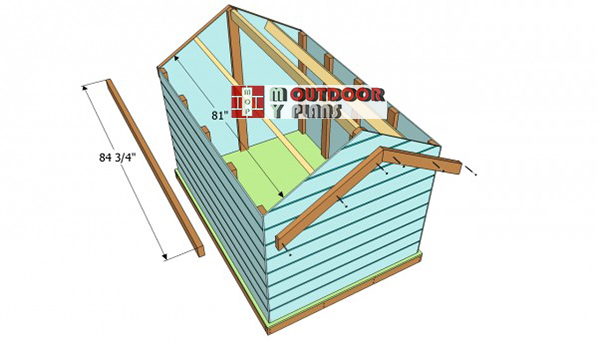
Installing-the-rafters—wood-playhouse
Continue the woodworking project, by installing the 2×4 rafters into place, as in the image. As you should easily notice, you should first attach 2×4 end rafters to the exterior front and back ends of the playhouse.
Top Tip: Drill several pilot holes in the end rafters and insert 3” galvanized screws. Align the 2×4 wooden rafters at both ends, before locking them into place.
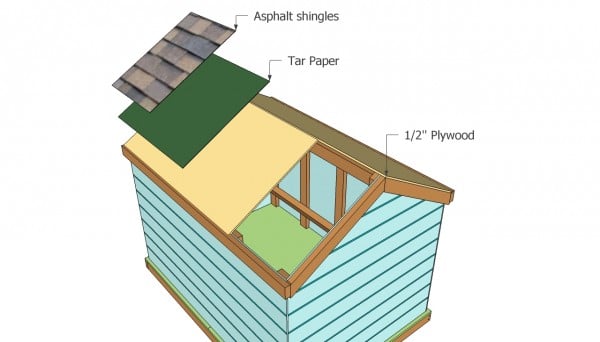
Installing the roofing
Next, attach the 1/2” plywood sheets into place and secure them with 2” nails, along the rafters. Work with good judgement, making sure the sheets are perfectly aligned on all sides. Buy tongue and groove plywood, as they connect easily.
Top Tip: Cover the roof with tar paper and lock it it into place with staples, every 10”. Next, install the asphalt shingles starting with the bottom part of the roof. Secure the shingle tabs with a nail gun, using 1 1/4 roofing nails.
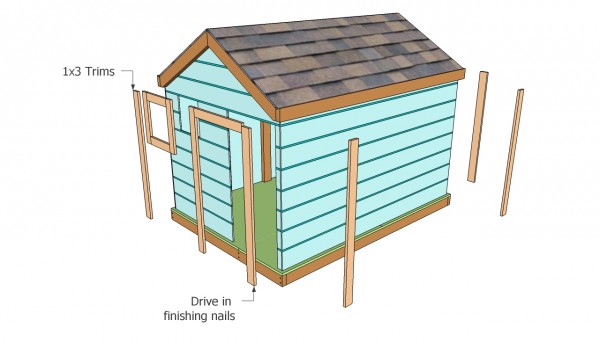
Installing the trims
Cut the door and the window openings, along the wooden studs, using a reciprocating saw. Don’t forget that you can adjust the size of the openings, as to fit your needs and tastes, as long they are bordered by wall studs.
Attach 1×3 trims into place, around the door and window openings, as well as around the corners. Smooth the exposed edges with a sander, otherwise the kids might easily injure themselves.
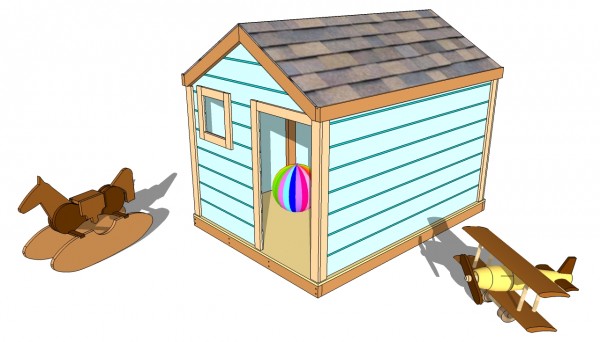
Wooden playhouse plans
Fill the holes, the head of the screws and the gaps with a good filler and let the compound to dry out for several hours. Next, sand the surface with medium grit sandpaper and clean the surface with a dry cloth.
Top Tip: In order to protect the lumber from water damage or wood decay, apply several coats of protective paint or wood stain. Wear a respiratory mask wile applying the paint.
This woodworking project is about kids wooden playhouse plans. If you want to see more outdoor plans, check out the rest of our step by step projects and follow the instructions to obtain a professional result.

2 comments
On installing the floor it seems like a lot to cut around each stud but I do not understand what ur other solution can be without a picture
The solution is to check out my other playhouse plans here: http://myoutdoorplans.com/category/playhouse-plans/ I have tons of other designs, easier to build than this.