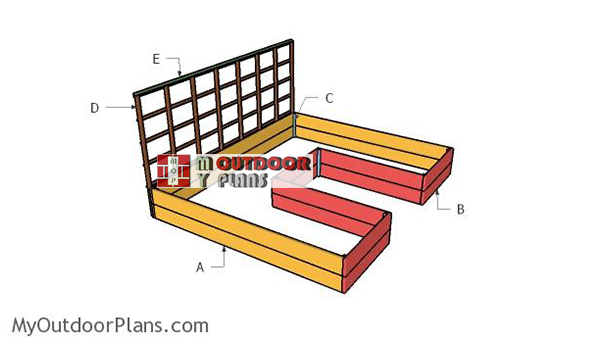
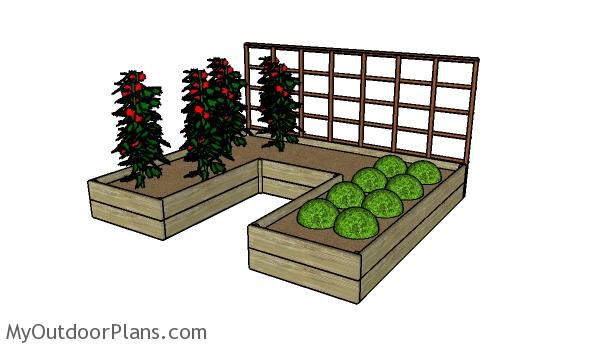
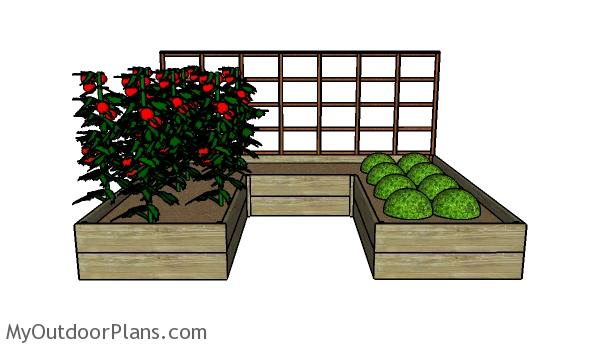
This step by step diy project is about diy raised garden bed plans. I designed this large U-shaped raised garden bed so you can grow vegetables and flowers in your own backyard. The garden bed is built using 2×10 beams and 2×2 posts. Make sure you don’t buy treated lumber and don’t apply toxic treatments to the lumber, as it will contaminate the soil on the long run. Take a look over the rest of my woodworking plans, if you want to get more building inspiration.
When buying the lumber, you should select the planks with great care, making sure they are straight and without any visible flaws (cracks, knots, twists, decay). Investing in cedar or other weather resistant lumber is a good idea, as it will pay off on the long run. Use a spirit level to plumb and align the components, before inserting the galvanized screws, otherwise the project won’t have a symmetrical look. If you have all the materials and tools required for the project, you could get the job done in about a day. See all my Premium Plans HERE.
Projects made from these plans
DIY Raised Garden Bed Plans
Building-a-large-raised-garden-bed
Cut & Shopping Lists
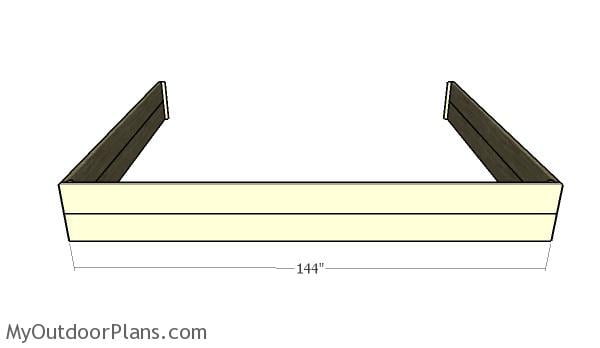
- A – 4 pieces of 2×10 lumber – 120″ long, 2 pieces – 144″ long SIDES
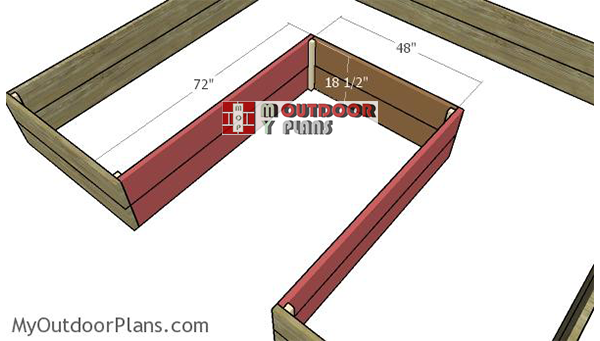
- B – 6 pieces of 2×10 lumber – 48″ long, 4 pieces – 72″ long FRONT
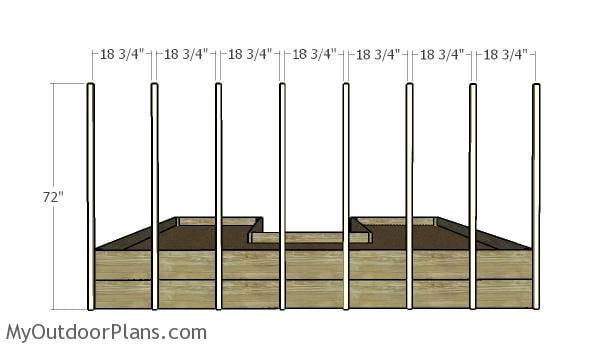
- C – 8 pieces of 2×2 lumber – 18 1/2″ long SUPPORTS
- D – 8 pieces of 2×2 lumber – 72″ long, 5 pieces of 1×2 lumber – 144″ long TRELLIS
- E – 1 piece of 1×3 lumber – 144″ long TRIMS
- 4 pieces of 2×10 lumber – 10′
- 4 pieces of 2×10 lumber – 12′
- 3 pieces of 2×10 lumber – 10′
- 11 pieces of 2×2 lumber – 6′
- 5 piece of of 1×2 lumber – 12′
- 1 piece of 1×3 lumber – 12′
- 500 pieces of 2 1/2″ screws
- soil, landscape fabric
- 2″ brad nails
- wood filler
Tools
![]() Hammer, Tape measure, Framing square, Level
Hammer, Tape measure, Framing square, Level
![]() Miter saw, Drill machinery, Screwdriver, Sander
Miter saw, Drill machinery, Screwdriver, Sander
Time
![]() One day
One day
Related
How to build a large raised garden bed

Building-the-side-panels
The first step of the project is to assemble the sides of the raised garden bed. Use 2×10 lumber for the walls and 2×2 lumber for the vertical supports. Align all the components with attention, making sure you leave no gaps between the slats. Drill pilot holes through the slats and insert 2 1/2″ screws into the supports.
Make sure the corners are square and invest in weather resistant lumber, such as redwood or cedar.
Fitting the bottom slats
Continue the project by attaching the 2×10 beams to the back of the garden bed. Align the edges with attention and leave no gaps between the components for a professional result. Drill pilot holes at both ends of the slats and insert 2 1/2″ screws into the vertical supports.

Fitting the front slats
Fit the 2×10 slats to the front of the raised garden bed. You can easily adjust the size of the project so it suits your needs best. Drill pilot holes and secure the slats to the support, as shown in the free plans.
Fitting-the-inside-slats
Next, you need to frame the inside of the garden bed. Cut the components from 2×10 lumber and lock everything together with 2 1/2″ screws. Make sure the corners are square and align the edges flush, before inserting the screws. The u-shape of the garden bed will making taking care of the plants a lot easier. It is a truly efficient shape, especially that it adds an unique appeal to your property.
Fitting the back supports
If you want to diversify the array of plants you are going to grow in your backyard, I really recommend you to build trellis to the back of the raised garden bed. Cut the components from 2×2 lumber. Use a spirit level to plumb the supports. Drill pilot holes through the supports and insert 2 1/2″ screws into the frame of the garden bed.

Fitting-the-horizontal-trellis-slats
Next, attach the horizontal supports to the posts. Use 1 1/4″ screws to secure the 1×2 slats to the vertical supports, making sure the gaps are even. You can easily adjust the distance between the supports for a professional result.
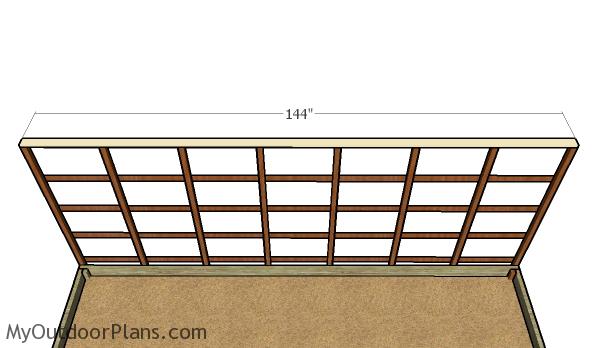
Fitting the top trim
In order to enhance the look of the project, you could fit a 1×3 trim to the top of the trellis. Use 2″ brad nails to secure the slat into place.
DIY Raised Garden Bed Plans
This raised garden bed would be perfect in any backyard, as it will help you harvest fresh vegetables regularly, but it also features and interesting design. More over if you have enough space, you can build a couple of these so you have your own garden, full of flowers and vegetables. The back trellis is ideal for growing climbing vegetables and make the most of the space. The future is all about vertical gardening, so this project should come handy.
Free raised Garden Bed Plans
This large raised garden bed is sturdy and very inexpensive to build and all you need are a few tools and some cuts. You can cover the interior of the bed with landscape fabric, if you want to make sure the wooden components won’t be affected by rot. Irrespective of your choice, just make sure you don’t use treated lumber and don’t apply chemical products to seal the components. If you build these, I would love to see your project.
This woodworking project was about free large raised garden bed plans free. If you want to see more outdoor plans, check out the rest of our step by step projects and follow the instructions to obtain a professional result.