Step by step woodworking project about potting bench plans free. If you want to build simple bench for your greenhouse or for your garden projects, you should pay attention to our free instructions.There are many designs to choose from, so make sure you take a look over the rest of the plans. In this article we show you the basic stages required for the job, as well as the tools and materials needed for this outdoor project.
In order to build a durable wooden potting bench, we recommend you to buy lumber designed for outdoor use, such as: pine, cedar or redwood. Make sure the slats are in a good condition, paying attention to cracks, twists or knots. Drill pilot holes in the wooden components, before inserting the screws, otherwise the wood might split. Moreover, don’t forget to leave at least 1/2” from the edges, when drilling the pilot holes, from the same considerations.
Projects made from these plans
How to build a potting bench
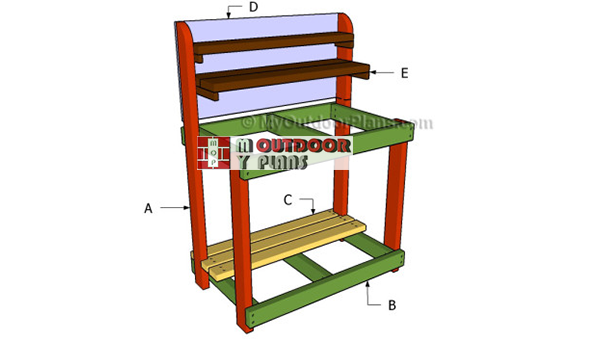
Building-a-potting-bench
[tabs tab1=”Materials” tab2=”Tools” tab3=”Time”]
[tab id=1]
- A – 2 pieces of 2×4 lumber – 35” long, 2 pieces – 55 1/2″ long LEGS
- B – 2 pieces of 2×4 lumber – 22” long, 2 pieces – 40″ long 2xFRAME
- C – 12 pieces of 2×4 lumber – 40″ long SHELVES
- D – 1 piece of 3/4″ plywood – 19″x40″ long PANEL
- E – 2 pieces of 1×2 lumber – 11” long, 2 pieces – 5 1/2″ long, 3 pieces of 2×6 lumber – 37″ long SHELVES
- 10 pieces of 2×4 lumber – 8 ft
- 1 piece of 3/4″ plywood – 2’x4′
- 1 piece of 2×6 lumber – 10 ft
- 1 piece of 1×2 lumber – 6 ft
- 2 1/2″ screws
- 1 5/8″ screws
- 1 1/4″ screws
- wood filler
- wood glue
- stain/paint
[/tab]
[tab id=2]
![]() Hammer, Tape measure, Framing square
Hammer, Tape measure, Framing square
![]() Miter saw, Drill machinery, Screwdriver, Sander
Miter saw, Drill machinery, Screwdriver, Sander
[/tab]
[tab id=3]
[/tab]
[/tabs]
Building a potting bench
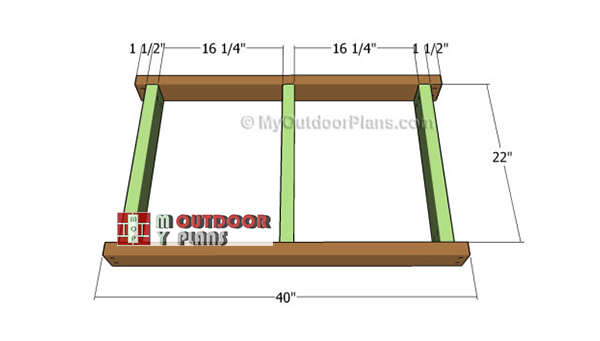
Building-the-frame-of-the-garden-table
The first step of the woodworking project is to build the frames for the potting bench. In order to get the job done in a professional manner, we recommend you to build the components out of 2×4 lumber. Select quality slats, if you want a proper result.
Drill pilot holes through rim components and insert 2 1/2″ screws into the perpendicular components. Make sure the corners are right-angled and add glue to the joints.
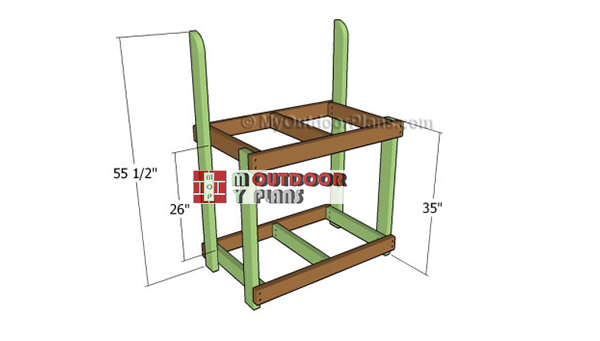
Attaching-the-legs-to-the-table
Continue the woodworking project by attaching the legs to the wooden frames. Drill pilot holes through the legs before inserting the screws, to prevent the wood from splitting.
Plumb the legs with a spirit level and make sure the frames are perfectly horizontal. In addition check if the corners are right-angled before inserting the screws into place. Round the top of the back legs, as described in the diagram.
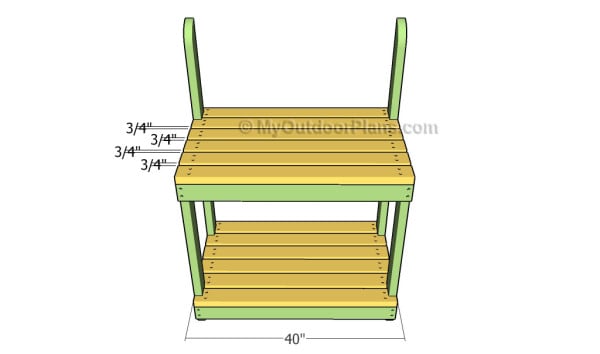
Fitting the slats
Attach the 2×4 slats to the frame of the potting bench, as described in the image. Drill pilot holes and place the slats equally-spaced before locking them into place. You need to make a few notches to the slats in order to fit them around the legs. Smooth the edges with sandpaper and countersink the head of the screws for a neat appearance.
Attaching the back to the potting bench
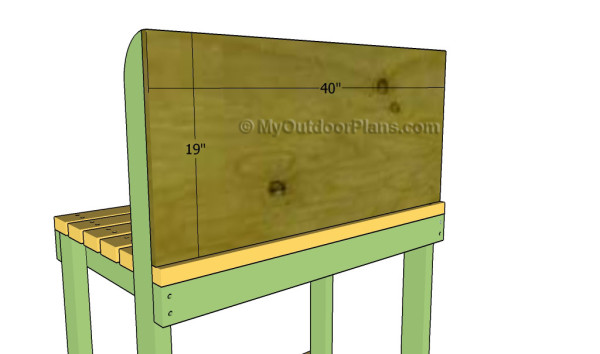
Cut a piece of 3/4″ plywood and attach it to the back of the potting bench, as described in the plans. Make sure you align the piece of plywood at both ends and you smooth the cut edges before locking it into place, in order to get a professional result.
Fitting the shelf supports
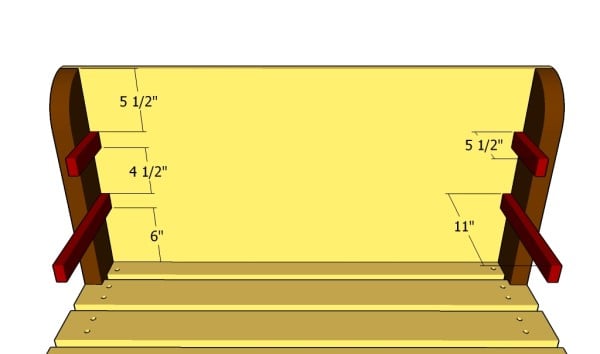
If you want to enhance the storage space for the potting bench, we recommend you to attach the 1×2 braces to the back legs, as described in the diagram. Use a spirit level to lock the braces to the legs.
Attaching the shelves
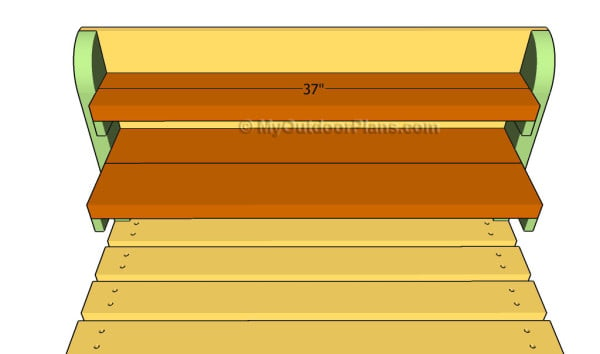
One of the last steps of the project is to attach the slats to the shelf supports. As you can easily notice in the diagram, we recommend you to fit the slats into place and to leave no gaps between the components. Drill pilot holes and secure the slats to the supports using 2 1/2″ screws.
How to build a potting bench
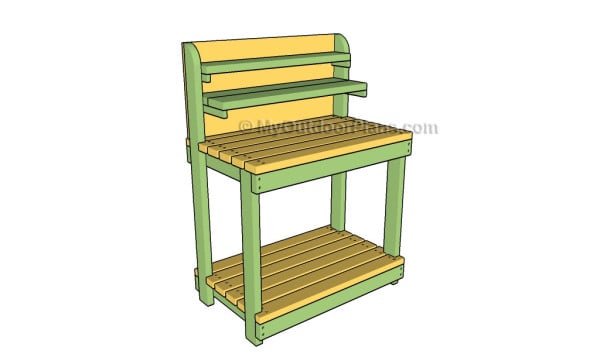
After you have built the outdoor potting bench, you should take care of the finishing touches. Therefore, you have to fill the head of the screws and the holes with a good wood putty. Let the compound to dry out for several hours, before sanding the surface with medium-grit sandpaper.
Top Tip: Apply several coats of wood stain, in order to protect the components against water damage and decay.
This woodworking project is about outdoor potting bench plans. If you want to see more outdoor plans, check out the rest of our step by step projects and follow the instructions to obtain a professional result.


5 comments
I’m a bit confused as to where to drill the holes and where each different length of screw should be used.
The diagrams provide a fair amount of help but, there are some issues with it. It looks like there should be pocket holes in some areas and again, I’m not sure where each length of screws should go.
I am an absolute beginner and pretty much, am very slow.
Thank you in advance!
This project does not use pocket hole joinery.
Trying to print plans but there is no choice for printing.
Your Frame picture shows 3 pieces of 2×4 at 22” and it looks like the center support may have been left out of the quantities listing.
Can you add the diagram to show the 1 x 2 braces for the back of the legs? Where the narrative describes this part, the diagram is showing how to install the shelves.
Are the braces to add sturdiness only when installing the shelves or should they be installed regardless?