This step by step diy project is about Leopold bench plans. I have designed this simple Leopold bench so you can build this well known project in a few hours with minimal effort and money. Make sure you invest in weather resistant lumber, such as pressure treated lumber, cedar or redwood, as the bench will be most likely exposed to the elements. Take a look over the rest of my woodworking plans, if you want to get more building inspiration.
When buying the lumber, you should select the planks with great care, making sure they are straight and without any visible flaws (cracks, knots, twists, decay). Investing in cedar or other weather resistant lumber is a good idea, as it will pay off on the long run. Use a spirit level to plumb and align the components, before inserting the galvanized screws, otherwise the project won’t have a symmetrical look. If you have all the materials and tools required for the project, you could get the job done in about a day. See all my Premium Plans HERE.
Projects made from these plans
Leopold Bench Plans

Building a Leopold bench
Cut & Shopping Lists
- A – 2 pieces of 2×8 lumber – 37 1/8″ long LEGS
- B – 2 pieces of 2×8 lumber – 22 1/8″ long BACK LEGS
- C – 1 piece of 2×10 lumber – 30″ long SEAT
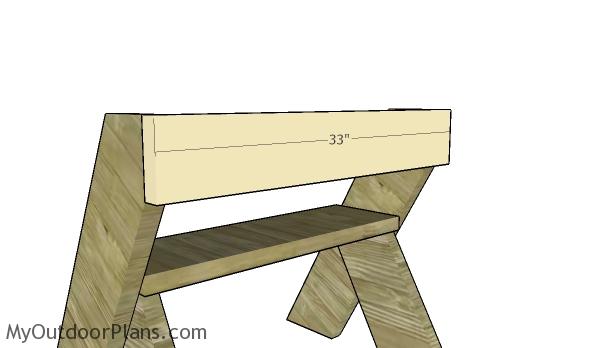
- D – 1 piece of 2×6 lumber – 33″ long BACKREST
- 1 piece of 2×8 lumber – 10′
- 1 piece of 2×6 lumber – 3′
- 1 piece of 2×10 lumber – 3′
- 50 pieces of 2 1/2″ screws
- wood glue, stain/paint
- wood filler
Tools
![]() Hammer, Tape measure, Framing square, Level
Hammer, Tape measure, Framing square, Level
![]() Miter saw, Drill machinery, Screwdriver, Sander
Miter saw, Drill machinery, Screwdriver, Sander
Time
![]() One day
One day
Related
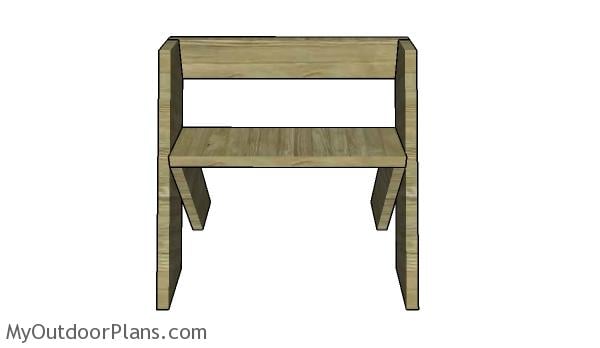
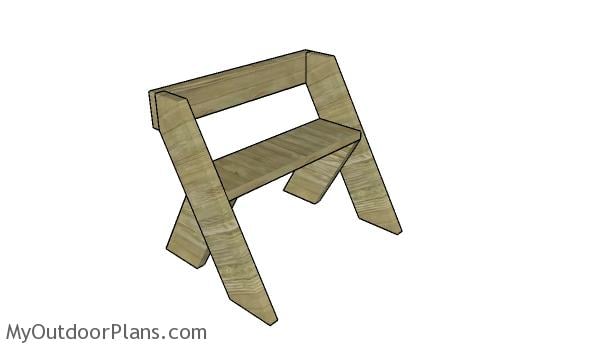
Building a Leopold bench
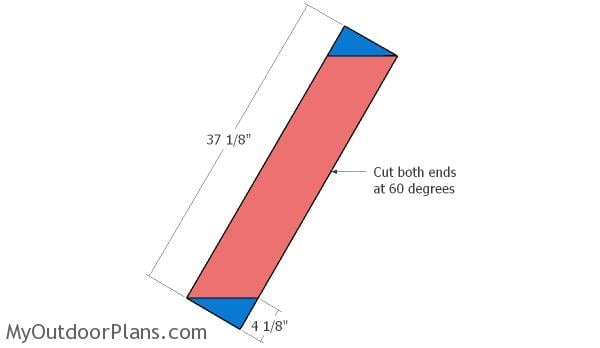
Building the front legs
The first step of the project is to build the front legs. Cut both ends of the 2×8 beams at 60 degrees by using a miter saw. Smooth both ends of the legs with sandpaper, so you can clean edges.
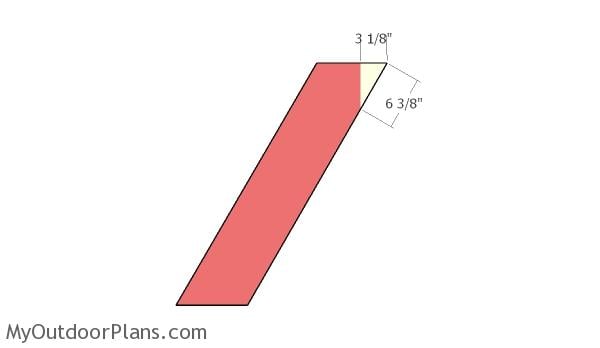
Back leg
Continue the woodworking project by making another cut at the top of the legs. This cut will help you attach the backrest easily. Take accurate measurements and smooth the edges with sandpaper.
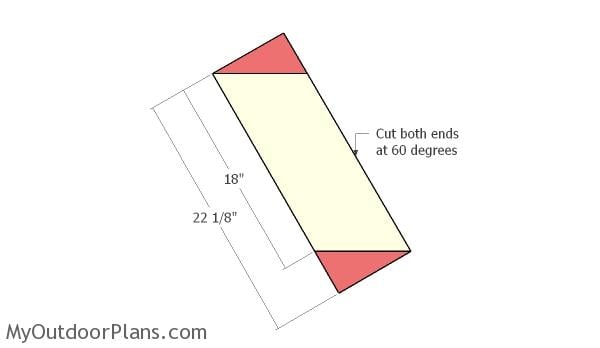
Building the back legs
Next, you need to build the back legs for the Leopold bench from 2×8 lumber. Cut both ends at 60 degrees, as in the case of the front legs.
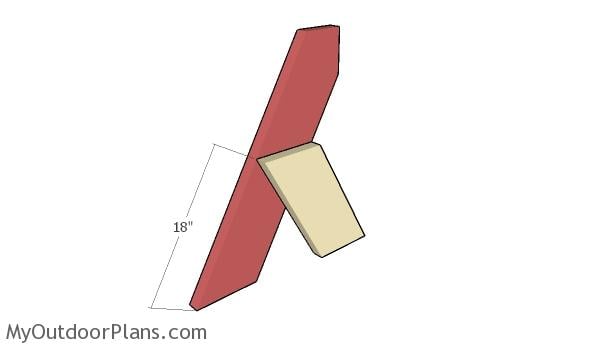
Assembling the sides
Continue the project by assembling the two sides of the Leopold bench. Lay the legs on a level surface so you can align the components in a professional manner. Add waterproof glue to the joints, drill pilot holes and insert 2 1/2″ screws to lock everything together tightly.

Fitting the seat
Build the seat from a piece of 2×10 lumber. Center the seat to the back legs, drill pilot holes at both ends and secure it into place with 2 1/2″ screws. In addition, drill pilot holes through the sides and insert 2 1/2″ screws into the seat.
Fitting the backrest
Build the backrest from 2×6 lumber. Align both ends with attention, drill pilot holes at both ends and insert 2 1/2″ screws into the legs.
Free leopold bench plans
After assembling the Leopold bench you need to take care of the finishing touches. Fill the holes with wood putty and smooth the surface with 120-220 grit sandpaper. Apply a few coats of stain and then spar varnish, so you can protect the components from the elements.
Leopold bench plans
This is an unique project, so if you are looking for a woodworking project with a distinctive look this should be on your list. This Leopold bench can be built in a few hours, but it will shortly become a conversation piece due to the unconventional design. If you build this, I would love to see your project.
This woodworking project was about free Leopold bench plans. If you want to see more outdoor plans, check out the rest of our step by step projects and follow the instructions to obtain a professional result.
EXPLORE MORE IDEAS FOR:
 |
 |
 |
 |
12 comments
I may be wrong because I’m just an amateur with woodworking although I’ve been working with wood of some sort all my life, having been raised on a farm in Ky. However, there appears to be an ERROR in your plans for the Leopold Bench. Surely the feet need not be cut at 60 degrees! That would make the bottom of the cut go a third of the way down the leg (12″). None of the pictures show that this might be the case. If I am in error, I apologize and I can definitely do the 60 degree cut, but it has me buffaloed :). That angle would put a feller on his back, almost……or more like an adirondack chair. Many thanks for your plans and site. Regards, Jim
Hi Jim. In the instructions I say to cut both ends at 60 degrees. This means you need to set the miter saw at 30 degrees, and once you make the cuts, the board will have 60 degree ends. I hope this is more clear now.
Hi. I’m a bit confused now. I don’t have a mitre saw so am doing it all by hand. Does each end have to be 60 degrees, or 30 on the top, and the 30 on the bottom? Apologies for sounding a bit daft, just really confused. Thanks.
You need to make 30 degree cuts. After you make the cuts the ends will have 60 degrees (90 degrees – 60 degrees).
thanks for all plans
You’re welcome. Looking forward to seeing your projects!
What is the widest you would recommend? I would like to build one 60″ seat. TIA
That will work.
I really enjoyed making this bench. It looks good and feels good. I think I am going to paint it though. Any suggestions for a color?
Blue. Looking forward to seeing your final choice.
Re the Aldo Leopold Bench, I don’t quite understand why you need 8 pieces of the lumber for the supports and 6 for the trellis. Am I misunderstanding something? Regards, Inge
Yes, I updated the list. Thanks for letting me know.