Step by step woodworking a project about attached carport plans. Building a carport attached to the house is a straight forward project for any homeowner with basic woodworking skills. In this article we show you how to secure the posts and the ledger into place, as well as how to build the structure of the roof. Chose the lumber with great care, making sure it is perfectly straight and doesn’t have any kind of visible flaws. Ask a friend to assist you, when installing the ledger, the support beams or the rafters into place, as a person has to hold them, while the other one drives the screws in.
There are many carport design, shapes and sizes, therefore you should thoroughly assess your option before taking the final decision. A free standing carport is a more complex and expensive project, therefore building a carport attached to your house is a great solution to your needs, especially if you have enough space in the yard. Lay out the pergola in a professional manner, using batter boards and string, making sure the corners are right angled. See all my Premium Plans HERE.
Projects made from these plans
Cut & Shopping Lists
- A – 3 pieces of 4×4 lumber 84” long POSTS
- B – 2 pieces of 2×6 lumber 216” SUPPORT BEAMS
- C – 6 pieces of 7” carriage bolts BOLTS
- D – 4 pieces of 4×4 lumber 34” long, cut at 45º at both ends BRACES
- E – 1 piece of 2×6 lumber, 216” long LEDGER
- F – 13 pieces of metal hangers, 13 pieces of twister fastener METAL HARDWARE
- G – 13 pieces of 2×6 lumber 130” long, cut at 15º at both hands RAFTERS
- H – 200 sq ft of 3/4″ plywood ROOFING SHEETS
- I – 500 pieces of galvanized screws DECKING SCREWS
- J – 250 sq ft of tar paper ROOFING UNDERLAYMENT
- K – 250 sq ft of asphalt shingles ASPHALT SHINGLES
- L – 1 piece of 1×3 lumber 216” long, 2 pieces of 1×3 lumber 130” long TRIMS
- M – 1×1 lumber panels LATTICE
- 3 pieces of 4×4 lumber – 8′
- 2 pieces of 4×4 lumber – 8′
- 3 pieces of 2×6 lumber – 20′
- 13 pieces of 2×6 lumber – 12′
- 7 pieces of 3/4″ plywood – 4’x8′
- 2 pieces tube form
- 3 pieces of post anchor
- 6 pieces of 6″ carriage bolt
- 13 pieces of roof hanger
- 500 pieces of 2 1/2″ screws
- 500 pieces of 1 1/4″ screws
- wood glue, stain/paint
- 250 sq ft of tar paper
- 250 ft of asphalt shingles
Tools
![]() Hammer, Tape measure, Framing square
Hammer, Tape measure, Framing square
![]() Miter saw, Drill machinery, Screwdriver, Sander
Miter saw, Drill machinery, Screwdriver, Sander
Time
![]() One day
One day
Carport attached to a house components
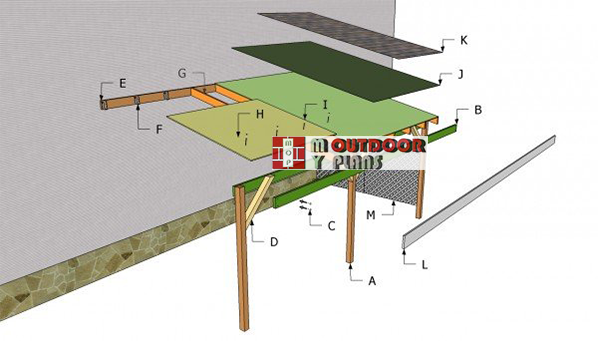
Attached-carport—diy-building-plans
Building a carport attached to the house is a straight-forward project, as you have to fit several posts and anchor a ledger to your house. Afterwards, you have to install several rafters, attach the roofing sheets and fit the asphalt shingles.
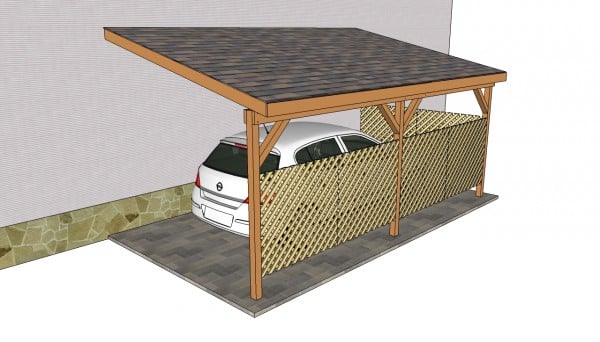
Top Tip: If you want to get the job done in a professional manner and build an unique attached carport, you could attach lattice panels to the sides. In addition, cover the ends of the rafters by placing wooden trims.
Attached carport plans
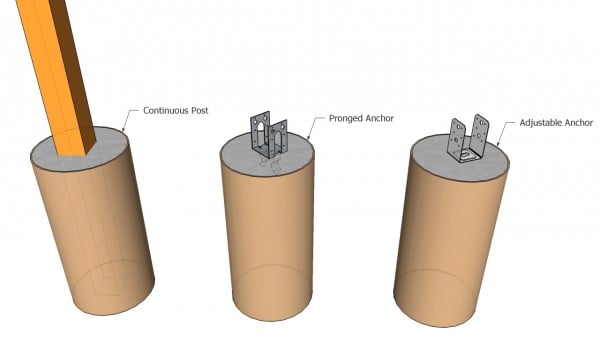
Anchoring the post into concrete
In order to secure the posts into position, you have several options. On one hand, you can dig 2-3′ deep holes, compact 4” of gravel and fit the posts into concrete. On the other hand, you could get the job done by pouring footings, using tube forms and a metal post anchor.
Top Tip: If you have to build the carport on a concrete slab, you should anchor the metal hardware, using the appropriate screws.
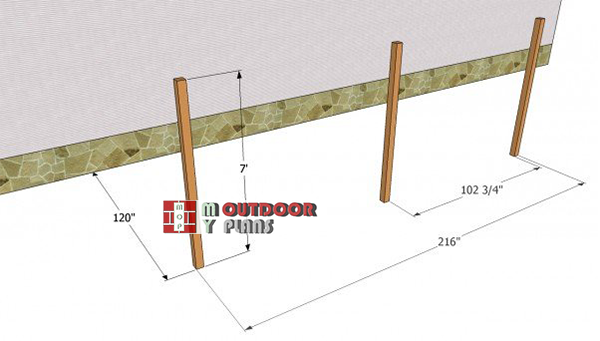
Laying-out-the-posts
Let the concrete to dry out properly, before fitting the posts into the metal anchors. Cut the wooden posts at the right size and fit them into place. Use a spirit level to plumb the posts and lock them into position with two braces.
Top Tip: Drill several pilot holes and drive in the lag screws, to secure the posts tightly. Use string to align the posts one with another, before inserting the 3” lag screws.
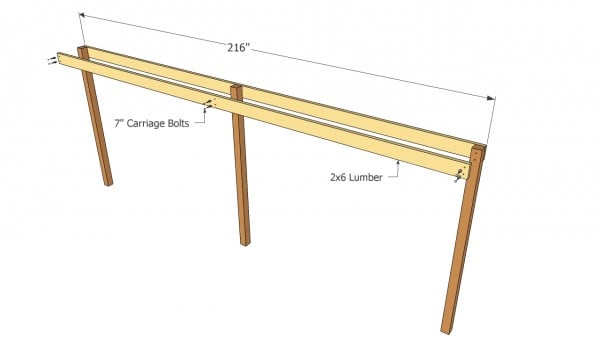
Installing the support beams
Next, you have to cut the support beams at the right size and install them into place with 7” carriage bolts. Pre-drill the lumber, in order to avoid the wood from splitting. Ask a friend to assist you, when installing the 2×6 beams.
Top Tip: Align the beams at both ends and level them properly, using a spirit level. Lock the beams into place with several C-clamps, before driving in the pilot holes.
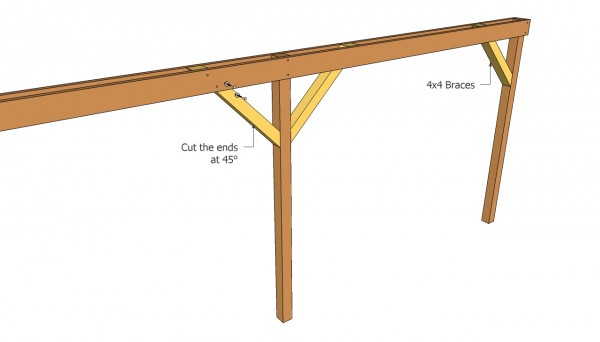
If you live in a windy area, you should increase the rigidity of the structure, by installing 4×4 braces, as in the plans. Cut the ends of the braces at 45° and smooth the edges wit a sand block and 120-grit sandpaper.
Top Tip: Work with great care attention and good judgement, if you want to obtain a professional result. Drill pilot holes trough the components and drive in the wood screws.
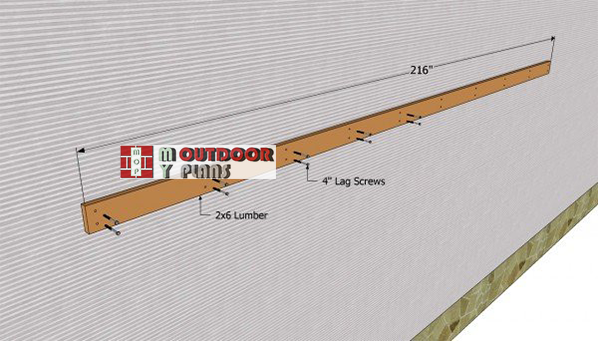
Installing-the-legder-boards
After you have built one side of the carport, you should install the 2×6 ledger to the house and secure it with lag screws. The connection between the ledger and the house is essential for this project. Locate the framing of the house and drive in bolts that reach into or trough the studs.
Check the ledger for level and for flatness against the wall. Tie a string at both hands of the ledger and see if the gap is uniform all over its length.
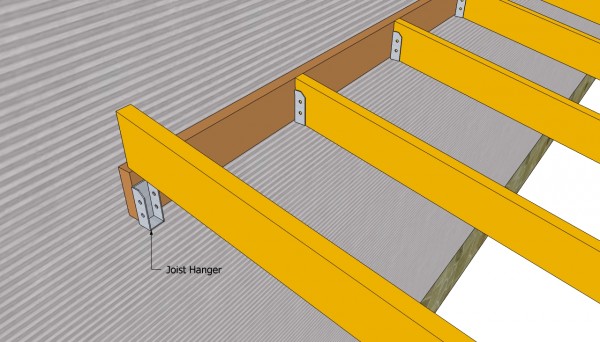
Afterwards, you should fit the 2×6 rafters into place (you could use 2×4 beams, as well). In order to lock the rafters properly, we strongly recommend you to use metal hangers. Nevertheless, don’t forget to align the rafters at both ends before locking them into place with wood screws.
Top Tip: The slope of the roof should be at least 15°, in order to drain the water properly. Place the rafters every 24” OC, or even closer (16”), in order to increase the rigidity of the whole structure.
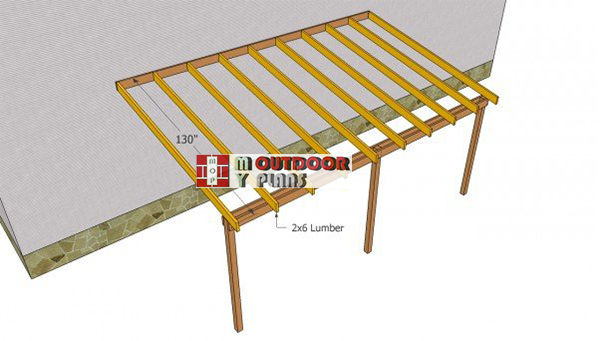
Installing-the-attached-carport-rafters
As we have already said, an attached carport is a straight-forward project, if you use the right plans and carpentry techniques. Continue the job in the same manner described above, until you install the rest of the rafters.
In order to provide added strength, nail a twist fastener at the intersection of the rafters with the support beams. You could also get the job done by toe-nailing the rafters to the 2×6 beams.
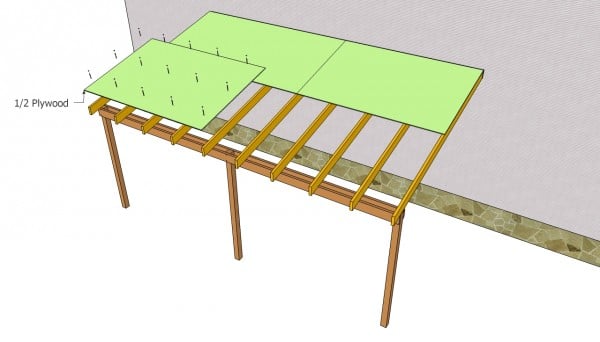
Afterwards, attach the 3/4” tongue and groove plywood to the rafters, as in the image. Fit the sheets into place and secure them with decking screws. Work with great care and attention, as the roofing sheets should flash the rafters.
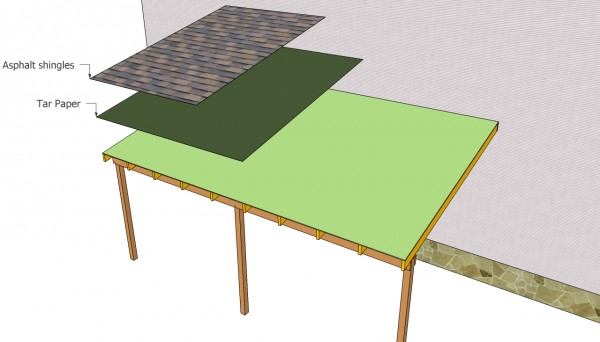
Top Tip: Install the drip caps properly, as well as the roofing felt. The bottom drip caps should be installed under the roofing felt, while the side drips caps should be placed over the tar paper.
Next, cover the whole surface of the roof with tar paper, starting with the bottom of the roof, and lock it into place with staples. Afterwards, install the asphalt shingles, from the bottom to the top. Secure the shingle tabs with 1/2” nails and chalk lines, to guide you when installing the rows.
Top Tip: Pay attention to the joint between the roof and the wall, as it is essential to get the job done in a professional manner.
Last but not least, you have to attach lattice panels to the sides of the carport, is you want to protect the car better, and to enhance the look of your backyard. Fill the gaps with wood putty and let the compound dry out for several hours, before sanding the surface with medium-grit sandpaper.
Top Tip: Clean the surface with a cloth and apply several coats of wood stain, to protect the wood from water damage and decay.
This woodworking project is about attached carport plans. If you want to see more outdoor plans, we recommend you to check out the rest of our step by step projects. SHARE our projects and follow us on the social networks to help us keep adding free woodworking plans. LIKE us on Facebook to be the first that gets our latest updates and submit pictures with your DIY projects.

28 comments
What good is it to find the plans your looking for if you can’t download the damn things????????
The plans are printable or downloadable. Please read the FAQ at http://myoutdoorplans.com/faq/
Thanks Johnny for detailing the materials and instructions!
How are the braces attached to the uprights please? I can imagine there might be some
complex wood working there possibly?
Thanks
D
Drill pilot holes and then insert 3″-3 1/2″ outdoor screws to secure the braces to the posts.
Ahh thanks, I can see now looking at some other images. There’s a screw going in from the outer edge, at the bottom of the cross brace, through it and into the upright. Makes sense now.
You need to insert the screws through the bottom of the braces into the posts.
Just a quick question but is it ok/allowed to attach one side to the house as is intended in this plan, but instead of concreting the posts into the floor attaching them to side of my breezeblock garage?
I have a gap between the house and garage and my plan is to have the 4×4 bolted/screwed to the garage and roof overhanging onto the garage which then drains off already to the far side.
Would give me slightly more room as no posts would be stuck in the ground etc.
Thanks in advance.
I don’t know if it is allowed. For this you should check out your local building codes. I wouldn’t recommend that, because all the weight is on the garage wall, but it should work, if you don’t have other option. Lock the posts to the garage wall and then fit the support beams to their top. In this manner the roof weight is evenly distributed to all the support posts.
Excellent! Thank you! Will try to do it this month, might have questions though.
Awesome! I’m here to assist you.
Can 2 x 4 be used instead of 2 x 6 in an area with a snow load of 22 psf?
I don’t know. You need to read the local codes. Personally, I would go for at least 2x6s.
Can I adapt these plans to make a lean-to-shed, if I make this structure more rigid by adding timber connecting the posts and posts to the house wall. Walls would plywood. Thanks.
Yes, you can do that. But I have lots of free lean to shed plans on my blog: http://myoutdoorplans.com/?s=lean+to+shed&x=0&y=0
Is it possible to use these plans but build the carport wider and longer? I’m thinking 22′ x 12′.
Thanks for these great plans.
Yes, It will work.
Should all of this be pressure treated wood
Yes, that would be a good choice.
Hoe does this structure hole up to reasonably strong winds say 30 mph
It holds up good. Make sure you use rafter hangers and ties for extra support.
Hello, thank you so much for these amazing plans that are free. One question. When installing the hoist hangers. Are those supposed to go into the same holes that you install the support piece with.
How can I attach the carport to a house with a four foot overhang and no space underneath for a ledger board?
Are nails or screws recommended for this attached carport?
Screws are better
Thankyou for your time & skills!
How high on the house does the ledger go?
How high do I mount ledger?