This step by step woodworking project is about free bird feeder plans. Building a simple bird feeder for your kids is a straight forward project, as you just have to make a few cuts and joint the wooden components together. Pre-drill the lumber before inserting the screws, otherwise the wood might split. Moreover, you could enhance the bond of the joints, by applying wood glue to the edges of the components.
Choose the lumber with great attention, making sure all the slats are straight and in a good condition. Check if the components are aligned at both ends, before driving in the screws. After the construction is ready, you should drive in pilot holes at both ends of the top ridge and install small eye screws. In this manner, you will be able to hang the feeder in any tree and wait for the birds to come to your garden See all my Premium Plans HERE.
Projects made from these plans
Cut & Shopping Lists
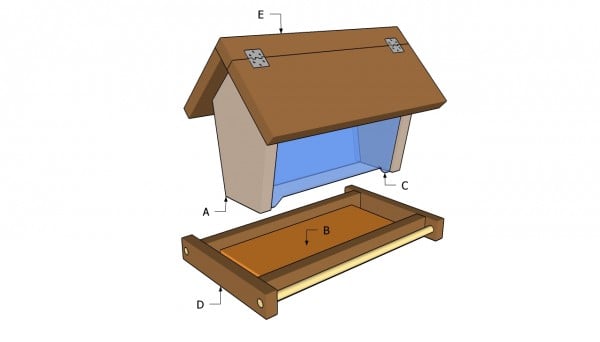
- A – 2 pieces of 1×6 lumber 8 1/2” long GABLE ENDS
- B – 1 pieces of 1×6 lumber 12” long BOTTOM
- C – 2 pieces of 1/8” plexiglas, 11” x 6” SIDE WALLS
- D – 2 pieces of 1×2 lumber 9” long, 2 pieces of 1×2 lumber 14” long TRIMS
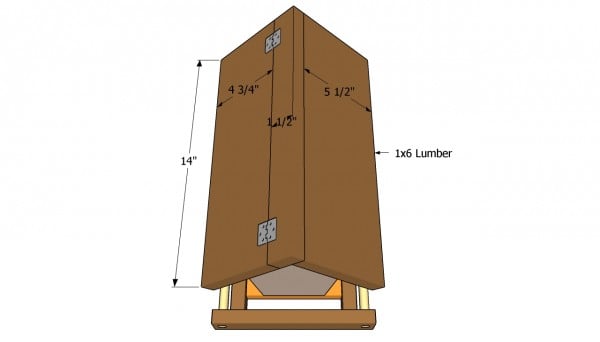
- E – 1 piece of 1×6 lumber – 14” long, 1 piece – 1 1/2” x 14”, 1 piece of 4 3/4” x 14” ROOFING
Tools
![]() Hammer, Tape measure, Framing square, Level
Hammer, Tape measure, Framing square, Level
![]() Miter saw, Drill machinery, Screwdriver, Sander
Miter saw, Drill machinery, Screwdriver, Sander
![]() Post hole digger, Concrete mixer
Post hole digger, Concrete mixer
Time
Bird feeder Plans Free
Building a basic bird feeder is a straight forward project and a great opportunity to spend quality time with your kids. In order to get the job done quickly, you could even use scrap wood, it is in a good condition.
Top Tip: Check if the slats are perfectly straight before cutting the components. Use durable lumber, designed for outdoor use, such as cedar, pine or redwood.
Free Bird Feeder Plans
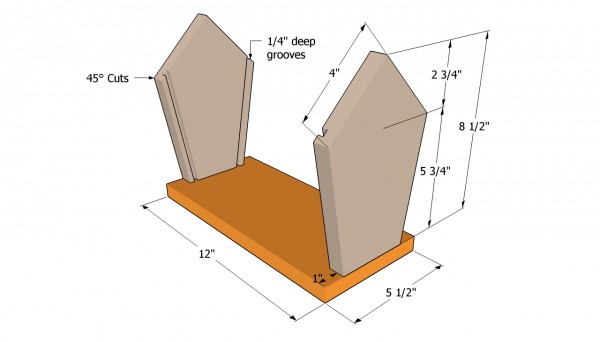
Installing the front and back ends
First, attach the front and the back ends to the floor of the bird feeder. As you can see in the image, you have to build all the components from 1×6 lumber, using a sharp circular saw. Cut 1×4 deep groves in the gable ends, as later on we will slide the side walls into place.
Drill pilot holes trough the base of the feeder, before driving in the 1 1/4 nails into place. Add glue to the bottom edges of the faces, to enhance the bond.
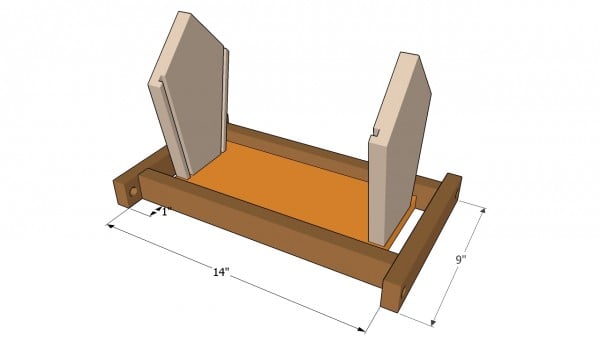
Installing the trims
Next, you need to fit the trims into place, as in the free plans. Cut the components from 1×6 lumber, as to get 1 1/2” wide strips of wood. As you should notice in the image, you need to drill 1/4” holes at both ends of the front and back trims, before fitting them into place.
Pre-drill the trims before securing them to the bottom of the bird feeder, with 1 1/4′ nails. Work with great care and attention, if you want to get a neat result.
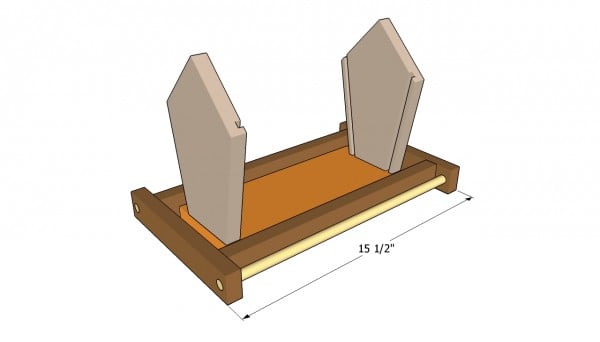
Installing the dowels
Next, install the dowels trough the round holes and lock them into place with wood glue. The birds will seat on the dowels, while eating the seeds coming out the small hole placed at the bottom of the plexiglas walls.
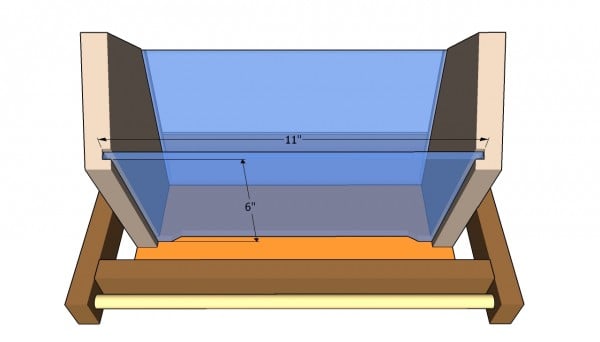
Fitting the plexiglas walls
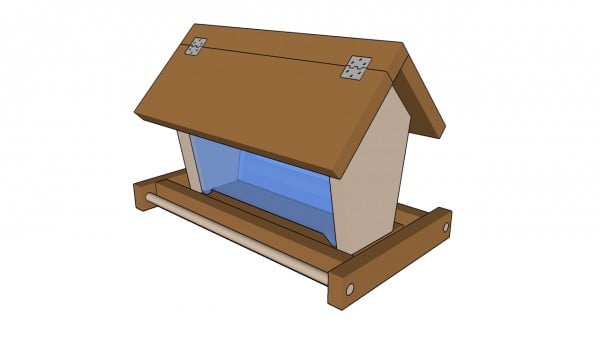
Installing the side wall of the small feeder is a straight forward task, especially if you have carved the grooved in the gable ends properly. As you can see in the image, we recommend you to make the wall of plexiglas, as to give character to your project.
Top Tip: Just cut the plexiglas walls at the right size and slide them inside the gtooves, making sure you don’t apply too much force, otherwise the panels might break.
Installing the roof
As you can notice, the roof has to section. On one side of the roof, you should install a 1×6 slat cut at 14”. On the opposite side, you should install two pieces: a 1 1/2” strip and a 4 3/4” piece of wood, both 14” long. While the narrow piece should be locked into place with nails, the longer one will be attached with hinges to the rest of the roof.
In this manner, you clean the inside of the bird feeder easily, as well as fill it with bird food.
Free birdhouse plans
Last but not least, you should take care of the final touches. Therefore, you need to check if all the components are secured into place tightly and to fix any potential issue. Moreover, check if the roof open properly, without having to apply too much force.
Top Tip: Sand the cut edges with fine-grit sandpaper and apply several coats of paint, to protect the lumber against rot.
This article was about free bird feeder plans. If you want to see more plans for your backyard, we recommend you to check out the rest of our projects.



2 comments
Grat plans and will look at in the near future
Thank you. I’m sure you will do a great job. Let me know how the bird feeder comes out! I love seeing projects!