This step by step diy project is about chicken coop door plans. Building a wooden door for the small chicken coop is the last step of the complex backyard project. Growing chickens in your backyard has many advantages, as you will supply your family with fresh and organic meat. Nevertheless, the first step is to build a durable coop and move it to a proper location in your garden.
Before building the door for the chicken coop, we recommend you to take a close look over the rest of the steps required to get the job done in a professional manner. After building the frame of the chicken coop, you have to take care of the finishing touches and install the trims. Moreover, building a small door and fitting it inside the opening is also required, as it will complete the project. See all my Premium Plans HERE.
Projects made from these plans
Cut & Shopping Lists
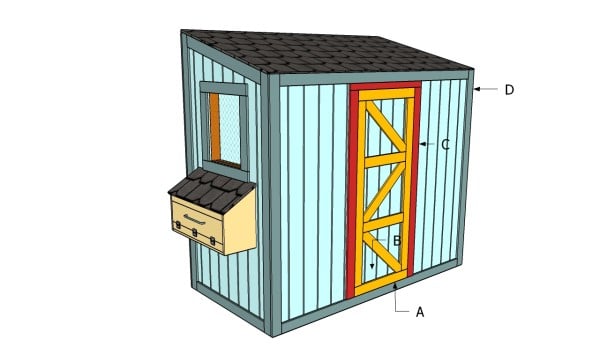
- A – 2 pieces of 1×3 lumber – 64″, 2 pieces – 28″, 3 pieces – 28″, 2 pieces – 21″ TRIMS
- B – 1 pieces of 5/8″ siding – 71″x28″ long DOOR
- C – 2 pieces of 1×3 lumber – 71” long, 1 piece – 35″ JAMBS
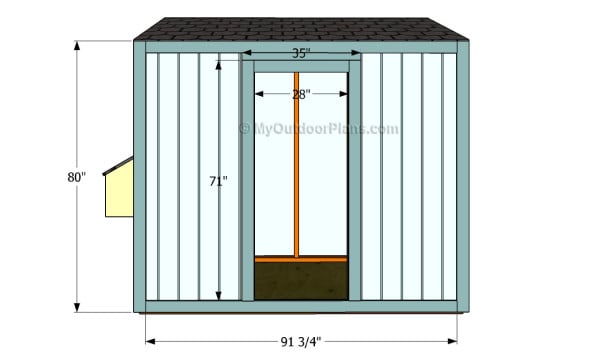
- D – 4 pieces of 1×3 lumber – 80″, 4 pieces – 92 3/4″, 4 pieces – 91 3/4″ TRIMS
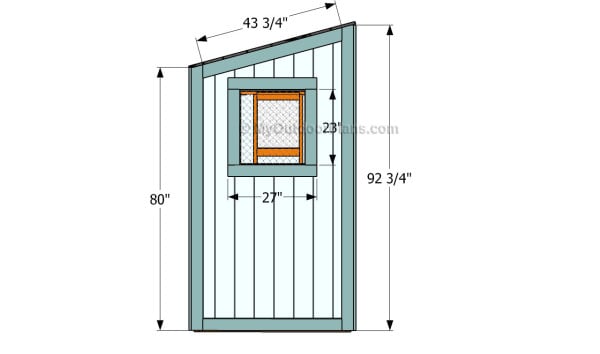
- D – 2 pieces of 1×3 lumber – 42 1/4″, 2 pieces – 43 3/4″, 4 pieces – 27″, 4 pieces – 23″ TRIMS
Tools
![]() Hammer, Tape measure, Framing square, Level
Hammer, Tape measure, Framing square, Level
![]() Miter saw, Drill machinery, Screwdriver, Sander
Miter saw, Drill machinery, Screwdriver, Sander
Time
Related
- Part 1: Small Chicken Coop Plans
- Part 2: Chicken Coop Nest Plans
- Part 3: Building a chicken coop door
Building a chicken coop door

Building a door for a chicken coop
Top Tip: Building a small chicken coop is a complex project that requires a lot of work and a significant investment. Therefore, we recommend you to pay attention to all the parts of the woodworking project.
Chicken coop door

Trims – Front face
The first step of the project is to attach the trims to the edges of the chicken coop, in order to enhance the look of the small construction. As you can easily notice in the image, we recommend you to use 1×3 lumber, as the trims will add value to your chicken coop.
Plumb the trims with a spirit level before locking them to the walls with 1 1/4″ finishing nails. Add waterproof glue, if you want to get a better bond between the components.

Trims – Back face
Continue installing the 1×3 trims to the edges of the back of the chicken coop, especially if you want to get the job done in a professional manner. Align all the components with great care, otherwise the end result might not raise to your expectations.

Trims – Sides
Similarly, you need to install the wooden trims to the sides of the chicken coop. As you can easily notice in the image, we recommend you to attach the trims around the edges, as well around the windows.
Use a miter saw to cut the components at the right size, if you want to get the job done properly. Insert the finishing nails through the trims into the walls of the coop.

Building the door
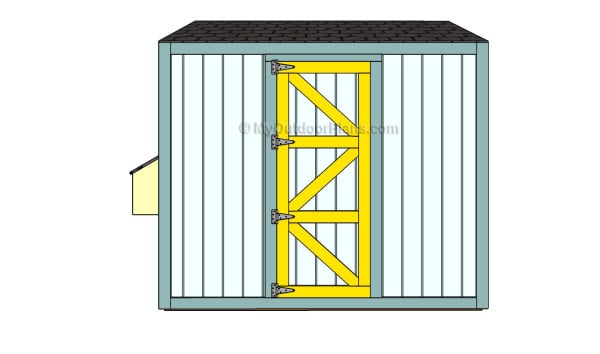
Use the piece that has been cut out when attaching the siding to the front face, in order to build the door for the chicken coop. Reinforce the door by using 1×3 trims, as shown in the plans.
Work with attention and with great care when building the trims for the door. Align the trims at both ends and enhance the bond of the components with waterproof glue and finishing nails.

Fitting the door into place
One of the last steps of the project is to fit the door inside the opening and to lock it to the jambs with several metal hinges. Make sure the door opens properly before inserting the screws into the jambs.
Top Tip: Moreover, we recommend you to install a latch, as to lock the door into place tightly. Sand the edges of the door with a planner, if the door doesn’t close properly.

Small chicken coop plans
After installing the chicken nest to the coop, we recommend you to take care of the finishing details. Therefore, you should make sure all the components are locked together easily.
Top Tip: Don’t forget to take a look over the rest of the project, if you want to learn how to build the frame and how to build the nest for the chickens. In addition, in the next parts of the project we show you how to fit the roofing.
This woodworking project was about chicken coop door plans. If you want to see more outdoor plans, we recommend you to check out the rest of our step by step projects. LIKE us on Facebook to be the first that gets our latest updates and submit pictures with your DIY projects.


