This step by step article is about wood workbench plans. If you need a multipurpose bench for your workshop, building a simple but sturdy workbench would fit your needs. If you want to get the job done by yourself, in just a weekend, our free plans will provide you all the needed aspects you have to know for this project. First of all, build a simple frame from 2×4 lumber and lock the components together with 3” wood screws. Plumb the elements with a spirit level and lock the wooden components with C-clamps, before driving in the wood screws.
In order to build a sturdy wood bench, we recommend you to buy the appropriate lumber for your needs. Therefore, 2×4 pressure-treated lumber is a good choice, provided the beams are in good condition. On the other hand, you could build the bottom shelf and the top of the bench from thick plywood or OSB, as the sheets are easy to cut and support a significant weight. Nevertheless, there are many variations on the theme, as you could even install a laminate counter-top or attach several electrical outlets. See all my Premium Plans HERE.
Projects made from these plans
Cut & Shopping Lists
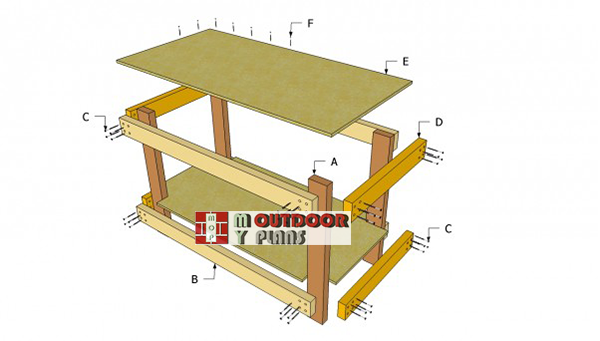
- A – 4 pieces of 2×4 lumber 30” long LEGS
- B – 4 pieces of 2×4 lumber 45” long SIDE STRETCHERS
- C – 40 pieces of 3” wood screws SCREWS
- D – 1 pieces of 2×4 lumber, 24” long FRONT STRETCHER
- E – 2 pieces of 2×4′ plywood or OSB, 7/16” thick TOP AND BOTTOM SHELF
- F – 40 pieces of 1 1/2 wood screws SCREWS
Tools
![]() Hammer, Tape measure, Framing square
Hammer, Tape measure, Framing square
![]() Miter saw, Drill machinery, Screwdriver, Sander
Miter saw, Drill machinery, Screwdriver, Sander
![]() Safety Gloves, Safety Glasses
Safety Gloves, Safety Glasses
Time
![]() One day
One day
Wood Workbench Plans
Building-a-workshop-bench
Building a sturdy workbench doesn’t have to be a complicated process, as you can use straight forward techniques and simple plans to get the job done by yourself. You just need to use proper materials and build a rigid structure made from 2×4 pressure-treated lumber. Afterwards, attach the bottom shelf and the top of the workbench, made of thick plywood or OSB.
Top Tip: If you follow our step by step instructions, you will build a rigid and durable structure. These plans are optimized for 4×8′ OSB or plywood sheets, as you can build two workbenches from one sheet.
Workbench Plans Free

Work-bench-dimensions
First of all, we recommend you to build the wooden components of the workbench. Therefore, use 10′ long 2×4 lumber, in order to build the legs of the bench. Make sure you measure the lumber properly, before performing the cuts.
Top Tip: After you cut the lumber with a miter saw, don’t forget to sand the edges with 120-grit sandpaper. Ensure the four legs of the workbench are equal, as well as the side and front stretchers.

Installing-the-side-braces
Next, you have to begin the assembly process. First of all, you need to choose a level and sturdy surface, in order to obtain a professional result. Before attaching the side stretchers to the legs, you need to align them properly. Use a carpentry square to check the corners for squareness.
Top Tip: Pre-drill several holes before inserting the 3” wood screws, to prevent the wood from splitting. Leave at least 1/2” from the edges of the components.

Installing the workbench stretchers
Plumb the sides of the workbench and lock them with several C-clamps to a couple of saw horses. Use a spirit level to align the front and the back stretchers, before drilling the pilot holes and inserting the 3” screws.
Drive screws trough the stretcher in the posts and in the side stretchers. In this manner, the frame of the workbench will be rigid enough to support a significant weight.

Attaching the bottom shelf
Afterwards, you need to build the bottom shelf and the top of the workbench, from a 4×8′ OSB or plywood sheet. In order to obtain a professional result, we recommend you to use 7/16” plywood, as 1/2” plywood is too thin to support a significant weight.
Top Tip: As you can see in the image, you have to notch the corners of the bottom shelf, as to fit properly inside the frame of wood workbench.

Diy workbench plans
Align the plywood sheets into place, making sure it overlaps perfectly the frame of the bench, before driving in the 1 1/2” screws. Insert the screws at least 1/2” from the edges, without drilling pilot holes in the plywood sheets.
Top Tip: Insert the screws every 8” along the edges of the plywood sheets. Work with great care and with good judgement, if you want to obtain a professional result.

Workbench plans free
Don’t forget that you could adjust the size of the diy workbench according to your needs. If you follow our step by step instructions, the bench will be rigid enough to support your own weight.
Top Tip: Apply several coats of wood stain in order to protect the lumber from wood decay or water damage. Fill the head of the screws with wood putty, before sanding the surface with 120-grit sandpaper.
This woodworking project is about wood workbench plans free. If you want to see more outdoor plans, check out the rest of our step by step projects and follow the instructions to obtain a professional result.
EXPLORE MORE IDEAS FOR:
 |
 |
 |
 |
2 comments
Do you sell paper plans for woodworking projects
No, just digital plans