This step by step diy woodworking project is about folding sawhorse plans. If you want to build a folding sawhorse, so you can save space in your workshop, this is the project to follow. You can adjust the size of the wood sawhorse to suit your needs. If you build a couple of these, you can transport them easily and have an outdoor workshop virtually anywhere. Make sure you check the rest of plans to see alternatives and more projects for your garden.
Work with attention and don’t forget that a good planning will save you from many issues and it will keep the costs withing the total budget. Invest in high quality materials, such as pine, redwood or cedar. Drill pocket holes before inserting the galvanized screws, to prevent the wood from splitting. Add waterproof glue to the joints, in order to enhance the rigidity of the structure. See all my Premium Plans HERE.
Projects made from these plans
Folding Sawhorse Plans
Building a folding sawhorse
Cut & Shopping Lists
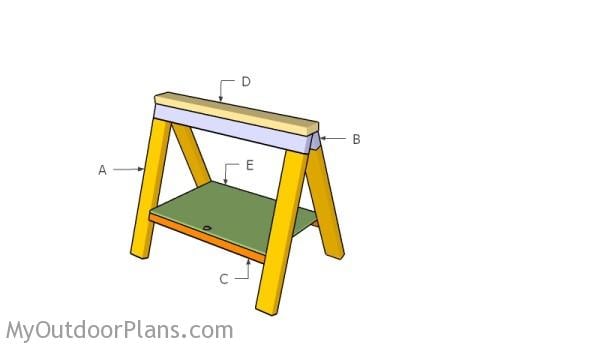
- A – 4 pieces of 2×4 lumber – 28″ long LEGS
- B – 2 pieces of 2×4 lumber – 36″ long SUPPORTS
- C – 2 piece of 2×2 lumber – 29″ long SUPPORTS
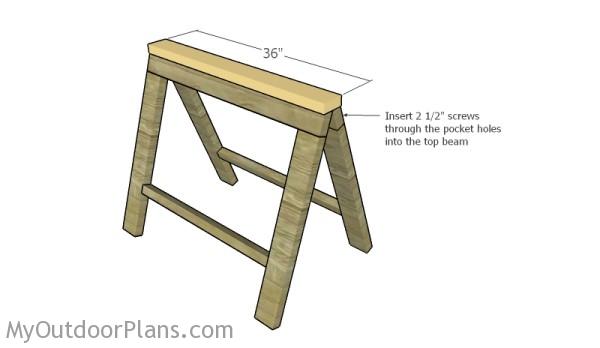
- D – 1 piece of 2×4 lumber – 36″ long TOP BEAM
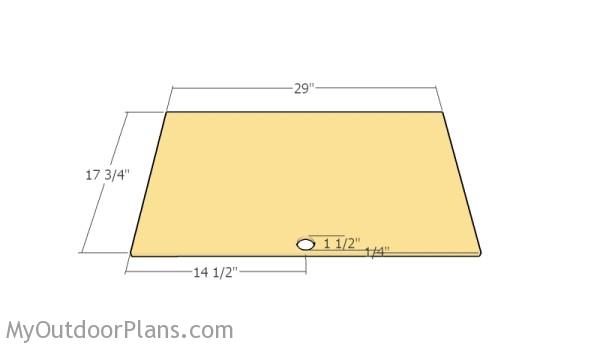
- I – 1 piece of 1/2″ plywood – 17 3/4″x29″ long SHELF
- 4 pieces of 2×4 lumber – 8′
- 1 pieces of 2×2 lumber – 8′
- 50 pieces of 2 1/2″ screws
- 1 piece of 1/2″ plywood – 2’x3′
Tools
![]() Hammer, Tape measure, Framing square, Level
Hammer, Tape measure, Framing square, Level
![]() Miter saw, Drill machinery, Screwdriver, Sander
Miter saw, Drill machinery, Screwdriver, Sander
Time
![]() One day
One day
Related
Build a Folding Sawhorse
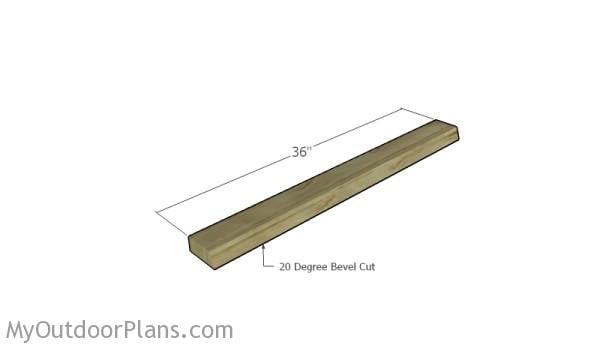
Top supports
The first step of the project is to build the sides for the sawhorse. Therefore, you should start with the top support. Use a 2×4 beams and make a 20 degree bevel cut along one side.
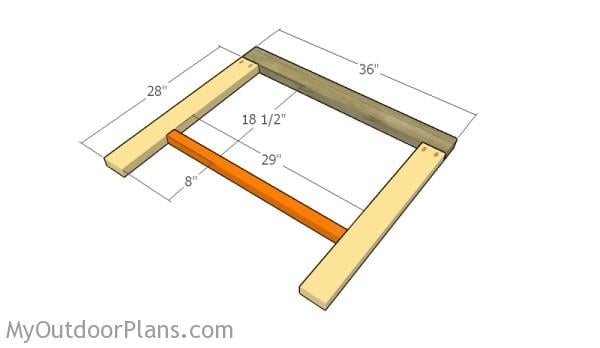
Building the legs for the sawhorse
Build the legs from 2×4 lumber and the bottom supports from 2×2 lumber. Drill pocket holes at one end of the legs and at both ends of the supports. Align the edges and make sure the corners are square. Insert 2 1/2″ screws to lock everything together with 2 1/2″ screws. Add glue to the joints.
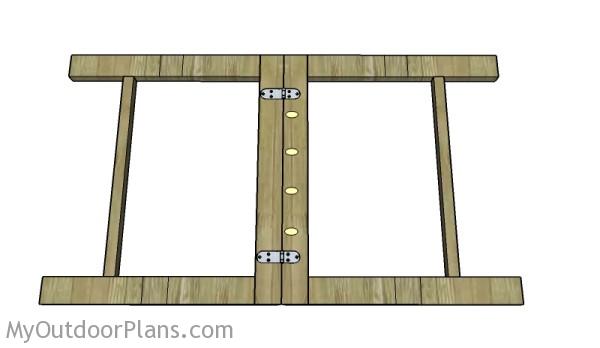
Assembling the legs
As you notice in the plans you need to drill pocket holes along the top support. Lay the frames on a level surface and lock them together with hinges, as in the diagram.
Assembling the sawhorse
Build the top beam of the sawhorse from 2×4 lumber. Center the legs to the beam and drive 2 1/2″ screws through the support into the beam.
Fitting the dowel latch
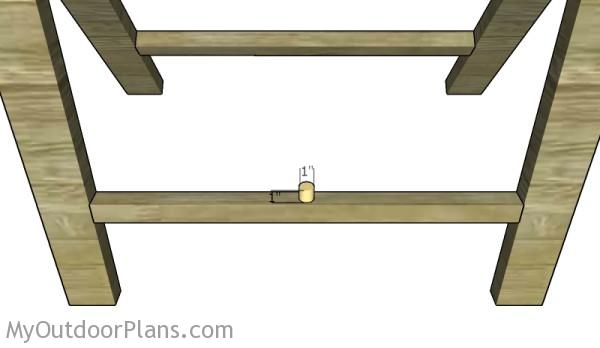
Drill a pilot hole through the middle of the bottom support (folding side). You can use 3/4″ or 1″ dowel. Set the dowel into the pilot hole with glue.
Building the shelf
Build the shelf from 1/2″ plywood. Use a hole saw drill bit to cut out a hole in the shelf.
Fitting the shelf
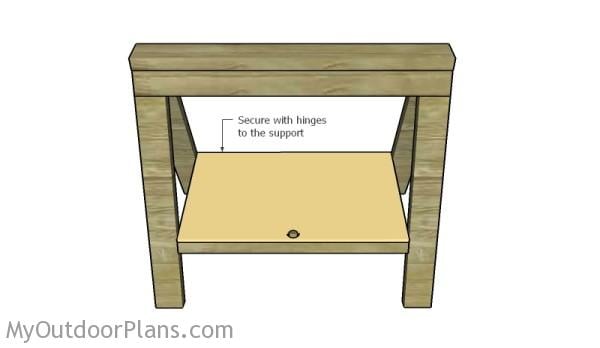
Fit the shelf to the bottom supports, as shown in the plans. Use two hinges to lock the shelf to the bottom support (the fixed side). This shelf will not only create some storage space, but it will also add support to the sawhorse.

Folding Sawhorse Plans
This sturdy sawhorse is ideal for any workshop, as you can save a lot of space when not using them. You can easily adjust the size of the sawhorse, to suit your needs.
DIY folding sawhorse
Fill the holes with wood putty and let them dry out for a few hours. Smooth the surface with 100-220 grit sandpaper and remove the residues with a damp cloth.
Top Tip: Apply a few coats of paint or stain to the components, to enhance the look of the project.
This woodworking project was about folding sawhorse plans free. If you want to see more outdoor plans, check out the rest of our step by step projects and follow the instructions to obtain a professional result.
EXPLORE MORE IDEAS FOR:
 |
 |
 |
 |
6 comments
B is incorrect on cut list and E is not existent.
Thank you. I’ve updated the list.
Part “B” should only be 2 pieces. Ended up with two extra 36″ supports.
Sorry for the error. I’ve updated the list. Thanks for letting me know. I would love to see your project. You can send a few pics of the sawhorse here: https://myoutdoorplans.com/contact/
Could the bottoms of the legs be cut at a 20 degree angle (just like the top supports) so that the leg bottoms will lay flat on the floor?
Yes, you can do that and it will work.