Step by step woodworking project about tool shed plans free. Building a small lean-to shed in your backyard is a great way to organize your tools and to gain an useful storage space. In addition, the best part of this project is that you only need a small amount of materials and work, to get the job done in a professional manner. Moreover, as compared to other complex woodworking projects, you could get the job done by yourself, if you master the basic woodworking techniques and pay attention to our tips and instructions.
Even if there are many designs, shapes and sizes you can choose from, we recommend you to select straight-forward plans, that would keep the total costs under control. Therefore, we consider that a small lean-to shed is the best choice, if you have several tools to store and you want to undertake the project by yourself. Buy pressure treated lumber, making sure the wood is perfectly straight, without any kind of visible flaws. See all my Premium Plans HERE.
Projects made from these plans
Cut Lists
- A – 2 pieces of 2×4 lumber 24” long RIM JOISTS
- B – 2 pieces of 2×4” lumber 45” long JOISTS
- C– 10 sq ft of 3/4” plywood DECKING
- D – 2 pieces of 2×4 lumber 48” long BOTTOM PLATE
- E– 3 pieces of 2×4 lumber 58 1/2” – cut at 30º, 2 pieces of 2×4 lumber 70 1/4” – cut at 30º WALL STUDS
- F – 3 pieces of 2×4 lumber 19 3/4” long RAFTERS
- G – 6 pieces of 2×4 lumber 17” long BRACES
- H – 4 pieces of 2×4 lumber 21 3/4” long BLOCKING
- I – 80 sq ft of 3/4” grooved plywood EXTERIOR SIDING
- J – 15 pieces of 1×4 tongue and groove lumber 32” long ROOFING
- K – 3/8” grooved plywood and 1×3 lumber DOORS
Tools
![]() Hammer, Tape measure, Framing square
Hammer, Tape measure, Framing square
![]() Miter saw, Drill machinery, Screwdriver, Sander
Miter saw, Drill machinery, Screwdriver, Sander
Time
![]() One day
One day
Simple Tool Shed Components
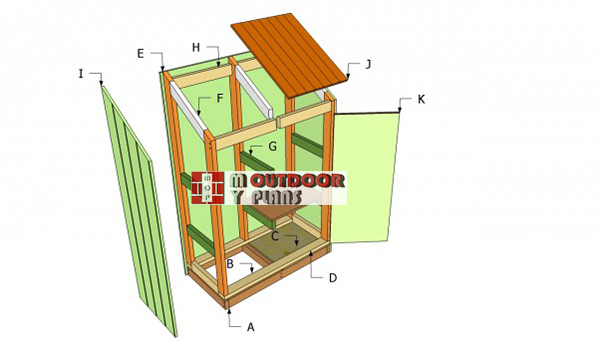
Building-a-lean-to-tool-shed
If you have many tools and need a space to store them, you should consider building a small shed in your garden. As compared to other complex constructions, a tool shed is easy to build, even if you are an amateur handyman and you don’t have expertise in the field.
Top Tip: Work with good judgement, making sure you use the right free plans and buy the best materials you could afford. On one hand you could attached plywood siding to the sides of the shed, while on the other hand you use tongue and groove wooden boards.
Tool Shed Plans
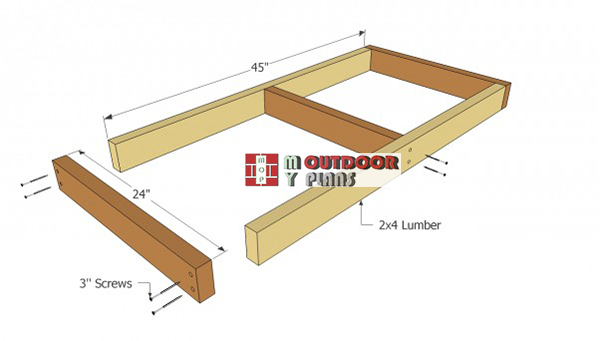
Tool-shed-floor-frame-plans
The first step of the project is to build the frame of the floor, using 2×4 boards. Therefore, you should cut the components to the right size and join them together with 3” galvanized screws.
Top Tip: Drill pilot holes trough the rim joists, before inserting the screws. Check the corners for squareness and insert screws, at least 1/2” from the edges, to prevent the wooden beams from splitting.

Installing the flooring
The next step is to attache the 3/4” plywood flooring (2×4′). Buy a sheet of plywood, mark the guidance line and use a circular saw to cut the needed components. Afterwards, lock the piece of plywood into place, using 2” screws or decking nails.
Top Tip: In order to secure the floor properly, drive in the screws every 10” along the joists. Make sure the plywood sheet overlaps perfectly over the joists.
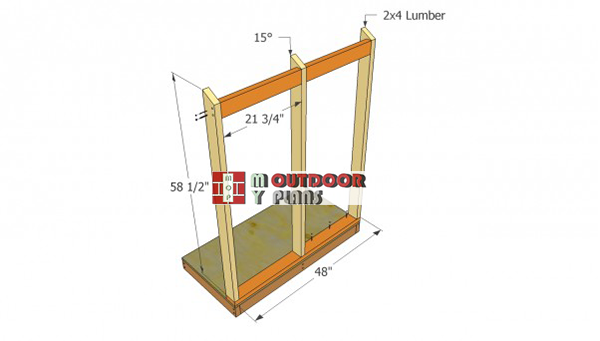
Front-wall-frame
Next, you have to build the front wall and secure it into place. Use 2×4 lumber to build the wall studs and the bottom plate, as well as the blockings. Pre-drill the lumber and insert 3” galvanized screws, trough the wooden components, in order to lock them together accurately.
Build the wall frame on the ground and then secure it into place, by driving 3” stainless steel screws in the floor joists.
Tool-shed-plans-free
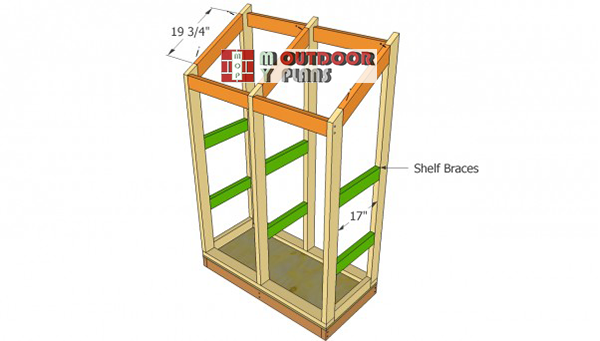
Afterwards, build the backs wall of the tool shed plans, in the same manner described above. As you can see in the free plans, you should cut the top of the wall studs at 30º, to drain the water properly.
Top Tip: Build the rafters from 2×4 lumber and install them into place with 3” screws. Drill pilot holes and drive in the screws at angle. Install 2×4 braces on the sides of the tool shed, to support the shelves.

Attaching the sides of the shed
After building the frame of the tool shed, it’s time to install the exterior siding. Therefore, use either 3/8” grooved plywood or 1×4 tongue and groove wooden boards. Draw the guidance lines with a straight edge and a pencil, before cutting the panels with a circular saw.
Top Tip: The siding should also cover the frame of the floor. Attach the siding to the wall frames and secure it with 1 1/4” nails.

Installing the roof of the shed
Next, you have to install the roof of the small tool shed, as you can notice in the plans free. In order to get the job done quickly, you could use 1×4 tongue and groove boards and 1 1/2” nails
In addition, you should also install a 2×4 lumber board at the top of the front wall. Work with great attention and good judgement, if you want to obtain a professional result. Use a spirit level to align the components properly, before inserting the screws.
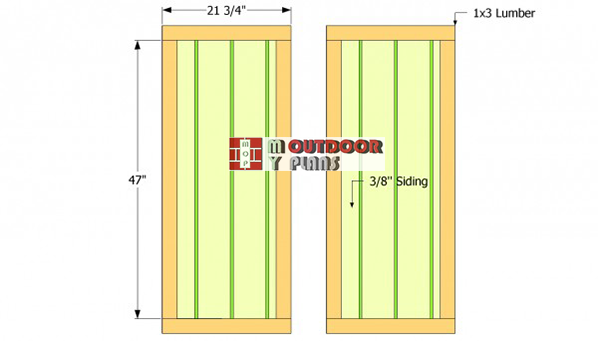
Tool-shed-doors-plans
Building the doors of the free tool shed is a straight forward job, if you use the right material and techniques. Therefore, you should cut two pieces of 3/8” siding and install 1×3 trims around the edges, as in the plans.
Top Tip: After you build the doors, you should attach them to the shed, by using a couple of hinges. In addition, install an appropriate latch to lock the tools inside the small shed.

Tool shed plans
In order to make the tool shed practical, install several plywood shelves, using the side braces. In addition, you should also buy several accessories, to hang a shovel or other tools to the door. In this manner, you could save a lot of space.
Top Tip: Fill the gaps with a good sealer, before applying several coats of paint to the exterior siding. In this manner the wood would resist against water damage and decay.
This woodworking project is about free tool shed plans. If you are looking for more outdoor plans, check out the rest of our step by step projects and follow the instructions to obtain a professional result.
EXPLORE MORE IDEAS FOR:
 |
 |
 |
 |