This step by step woodworking project is about small shed plans free. In this article we should you how to build a basic shed, along with all the techniques, materials and tools required for the job. A small garden shed is ideal for any backyard, as it creates storage space for tools and outdoor furniture. If you want to keep the costs under control, you could get the job done by yourself, even if you don’t have much expertise in the field. Just choose the right plans for your needs and follow the step by step instructions to obtain a professional result.
The location of the shed is essential for your project, therefore you have to consult the local building codes, before starting the project. In most of the cases, there are many legal requirements you have to comply with, including the depth of the foundation, the materials used or the location of the small shed. On the other hand, you should make sure there is a smooth transition between the design of your shed and the rest of your garden. See all my Premium Plans HERE.
Projects made from these plans
Cut & Shopping Lists
- A – cement, sand, gave and 6 pieces of 4×4 lumber 25-30” long FOOTINGS
- B – 2 pieces of 2×4” lumber 45” long JOISTS
- C – 40 sq ft of 3/4” tongue and groove plywood FLOORING
- D – 20 pieces of 2×4 lumber 86” (studs)WALL STUDS
- D – 6 pieces of 2×4 lumber 75” long, 6 pieces of 2×4 lumber 68” long PLATES
- E – 200 sq ft of 5/8” grooved plywood SIDING
Tools
![]() Hammer, Tape measure, Framing square
Hammer, Tape measure, Framing square
![]() Miter saw, Drill machinery, Screwdriver, Sander
Miter saw, Drill machinery, Screwdriver, Sander
Time
![]() One weekend
One weekend
Related:
- Part 1: Small Shed Plans
- Part 2: Gable Shed Roof Plans
- Part 3: Shed Door Plans
Small garden shed components
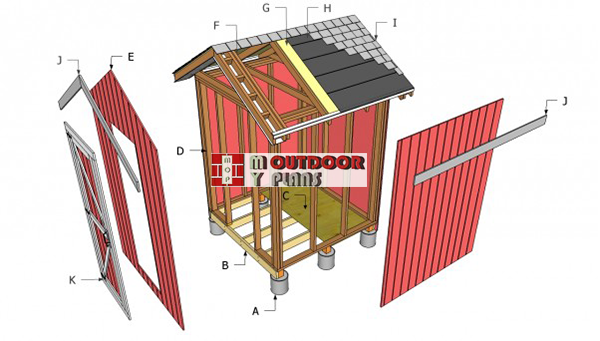
Small-shed-components—diy-plans
Building a small shed in your backyard would not only add an useful storage space to your property, but it also comes at a low cost. In order to reduce the expenditures even further, you could undertake the project by yourself. Therefore, choose the plans that fit your needs and tastes, before buying all the materials required for the job.
Top Tip: If you want to obtain a nice design, we recommend you to cover all the exposed edges with wooden trims. In this manner, the trims would enhance the natural elegance of the small shed and protect the edges from possible impacts.
Small Shed Plans Free

Small shed layout
First of all, you should lay out the small shed in a professional manner, using several batter boards and string. In order to build the batter boards, we recommend you to use 2×4 slats and decking nails. Secure them at least 4” in the ground, before adjusting the string.
Top Tip: Check the corners for squareness, using a carpentry square. In addition, make sure the diagonals are equal, otherwise adjust their position.

Small shed footings plans
Next, you have to pour the concrete footing that will support the shed into place. If you don’t want a permanent construction, you should consider placing the shed on several 4×4 skids or several concrete blocks.
If you want to anchor the shed into place, you have to dig 2-3′ dip holes (6-10” in diameter), install tube forms and the fit the posts. Mix concrete in a wheelbarrow and fill the form, using a trowel. Align the posts properly, making sure they are all level.
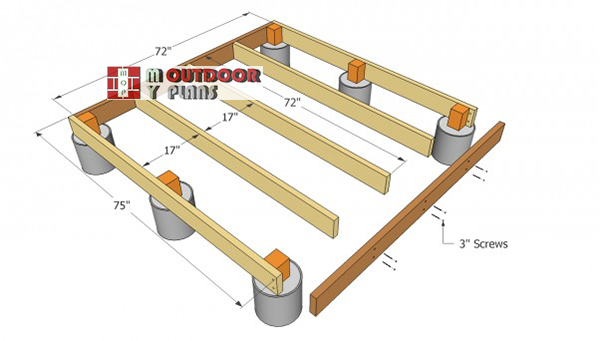
Small-shed-floor-plans
The next step of the project is to build the frame of the floor, from 2×6 beams. As you can see in the image, you have to cut the rim joists at the right size and lock them into position with 3” screws. Make sure the joists are equally spaced, in order to support the weight properly.
Top Tip: Drill pilot holes in the rim joists, before inserting the galvanized screws, in order to prevent the wood from splitting.

Installing the flooring
Afterwards, you should install the flooring on top of the joists, as in the free plans. From our experience, we recommend you to use 3/4” tongue and groove plywood, as the sheets connect together easily.
Top Tip: Align the plywood sheets properly along every corner and edges, before driving in the decking screws. Insert the screws/nails every 10” along the joists.
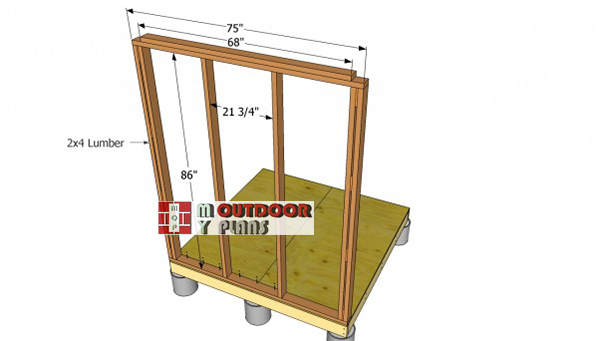
Small-shed-side-wall-frames
Next, you have to build the side walls and to install them along the edges of the small shed, as you should notice the image. Cut the studs and the wall plates at the right size and assemble the frame on the ground.
Next, place it on along the edge of the floor, plumb it with a spirit level and lock it into place with 2×4 braces. Afterwards, insert 4” screws trough the bottom plate in the joists.
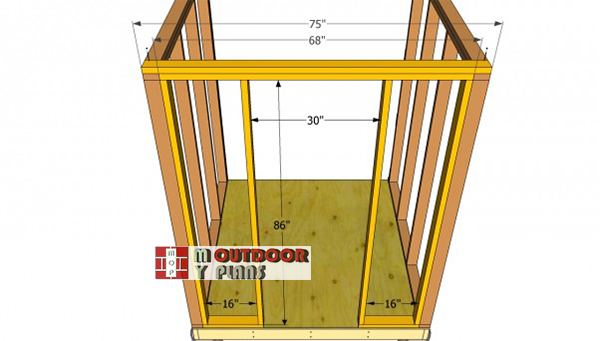
Front-wall-frame—small-shed
After you have installed the sides of the shed, you have to build the front and the back faces and fit them into place. Therefore, you should measure attentively the distance between the side walls and cut the components accordingly.
Top Tip: We recommend you to cut the bottom plate jut under the door opening. In addition, make the whole structure rigid, by inserting screws trough the walls studs in the adjacent walls, along every corner.

Back wall plans
Fitting the back wall is a straigh-forward job, if you have reached this stage of the project. Build the frame on the ground and place it into place. Use a spirit level to plumb the frame properly and lock it properly, using 4” screws, trough the bottom plate in the wooden joists.
Top Tip: Lock the wall frame together, by inserting 3” screws, along every corner. The top plate should stick out 3 1/2” on both sides.

Attaching the exterior
After you have build the frame of the small shed, you have to attach the exterior siding, as you can see in the image. Work with great care and attention, if you want to get the job done in a professional manner.
Top Tip: Cut the 5/8” grooved plywood with a saw and secure it into place with 1 1/4” nails. The siding has to be flush with the bottom plate and should cover the rim joists.
This woodworking project is about small shed plans free. If you want to see more outdoor plans, we recommend you to check out the rest of our step by step projects.

EXPLORE MORE IDEAS FOR:
 |
 |
 |
 |
2 comments
Instead betnnyh columns, put used tires (wheels), column desired height. Just not on the ground burrowing deep, longer enough just to remove the layer of grass.
If the wheels need two or more to a single column, twist them inside each other with screws for fastening drywall (gypsum).
Fill them clay diluted in water with sand in proportions of one part of five parts of clay and sand. Give a little to dry and harden.
Put on top of a wooden formwork rails and fill it with concrete (masonry mortar) to set the zero level. Further, all as a description of the article.
that was some world class gobliguk.