This step by step woodworking project is about saltbox shed plans. You can add valuable storage space to your garden by building any kind of shed, but if you want a construction with an unique design, a shed with a saltbox roof might fit your needs. Even if you don’t have expertise in this field, you can still get the job done by yourself, by paying attention to our tips and detailed instructions.
We strongly recommend you to check out the local building codes before starting the project on your own. There are many legal requirements that vary extensively according to your residence, so you should inform yourself. Place the shed on a concrete foundation, on concrete blocks or pour several footings. Irrespective of you option, we recommend you to toe-nail the frame to several 4×4 skids. See all my Premium Plans HERE.
Projects made from these plans
Cut & Shopping Lists
- A – 2 pieces of 2×6” lumber 96” long, 7 pieces of 2×6 lumber 117” long JOISTS
- B – 2 sheet of 3/4” tongue and groove plywood 4×8′ FLOORING
- C – 19 pieces of 2×4 80”, 12 pieces of 2×4 lumber 90”, 3 pieces 10”, 2 pieces of 2×4 45” STUDS
- C – 4 pieces of 2×4 120”, 1 pieces of 113”, 2 pieces of 12”, 4 pieces of 87 1/2”, 2 pieces of 92 1/2” PLATES
- D – 6 pieces of 2×4 – 81 1/4” cut at 20º, 6 pieces of 2×4 – 36 3/4” cut at 30º RAFTERS
- E – 300 sq ft of 5/8” grooved plywood SIDING
- F – 120 sq ft of 3/4” tongue and groove plywood ROOFING
- G – 120 sq ft of roofing felt ROOFING FELT
- H – 120 sq ft of asphalt shingles ASPHALT SHINGLES
Tools
![]() Hammer, Tape measure, Framing square
Hammer, Tape measure, Framing square
![]() Miter saw, Drill machinery, Screwdriver, Sander
Miter saw, Drill machinery, Screwdriver, Sander
Time
![]() One weekend
One weekend
Free saltbox storage shed plans
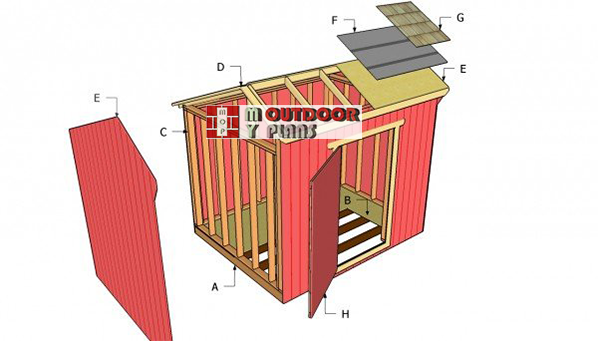
Free-saltbox-shed-plans
If you want to add storage space to your garden, but you would also like to do it with style, building a shed with a saltbox roof is a great idea. If you know the basic carpentry techniques, you can get the job done by yourself in just a weekend.
Top Tip: Choose the plans with great care, as to fit both your needs and to comply with the local building codes. Adjust the size of the shed, but use the same woodworking technique described in this project.
Saltbox shed plans
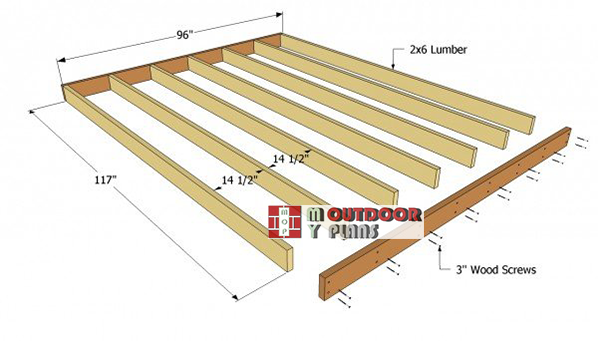
Shed-floor-frame
In order to frame the floor of the shed, you have to cut the 2×6 rims joists to 96”. Afterwards, build the rest of the joists from 2×6 lumber at 117”. Drill pilot holes trough the rim joists and insert 10d nails or 3” screws into the joists. Place the frame on several 4×4 skids and to nail it with 3 1/2” nails.
Make sure the diagonals of the frame are equal and check the corners for squareness, using a carpentry square.
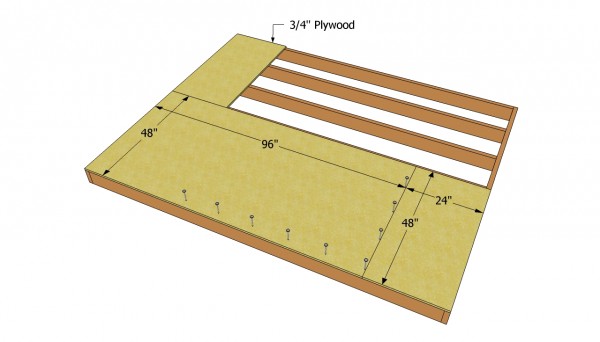
Attaching the plywood floor
Cover the floor frame with 3/4” tongue and groove plywood and secure the sheets into place with 2” nails or wood screws, every 12”. Check if the edges of the sheets are flush with the frame, before driving in the screws.
Top Tip: We recommend you to buy tongue and groove plywood sheets, as they connect together easily. Cut the sheets to the right size with a circular saw having a sharp blade with fine teeth.
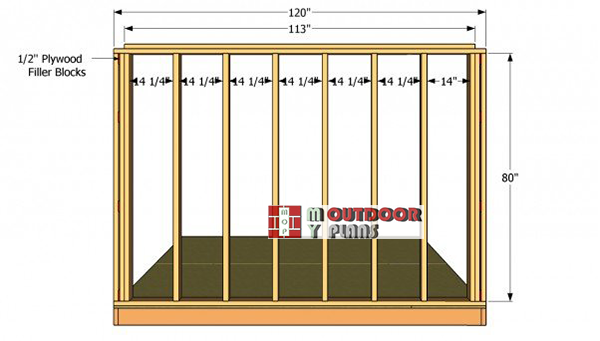
Back-wall-frame
The next step of the project is to build the wall frames. First of all, you need to cut the plates and the studs to the right size, using the free diagrams. Afterwards, align the components at both ends, making sure the corners are square, drill pilot holes and insert the 3” wood screws.
Work on a level surface, if you want to get the job done as a professional. Fit 1/2” plywood blocks between the studs placed at the ends of the frame.
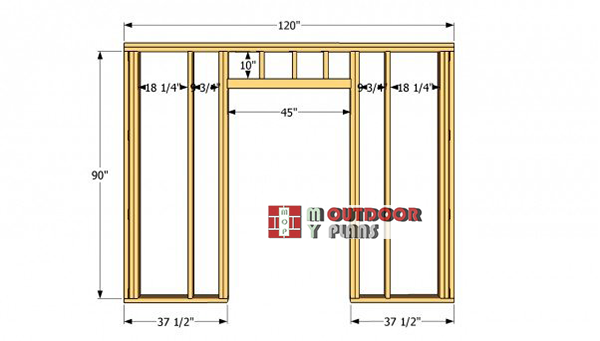
Front-wall-frame
As you can notice in the free plans, you should let a large door opening, as to have a good access to the shed. Place the studs in the same manner as describe above and secure them to the plates with screws or nails.
Install the cripple studs, the header and the door studs. If you pay attention to these aspects, the frame of the shed will be rigid. Measure everything twice, before making the cuts, otherwise the components might not fit together.
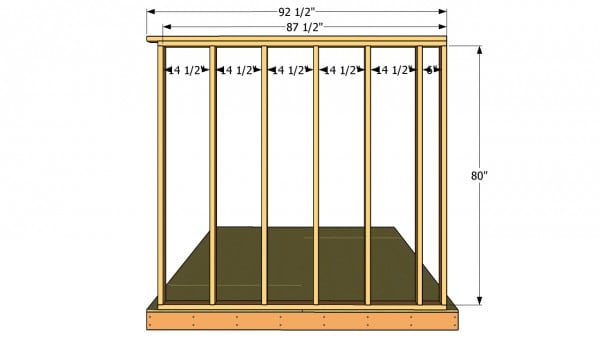
Side wall plans
On the other hand, you also have to build the sides of the saltbox shed, using the dimensions seen in the plans. Place the studs as in the image and lock them into place with wood screws.
As you can see in the image, the top plate has to overhang 3 1/2” on one side of the frame, to connect with the back wall properly. Check if the diagonals of the frames are equal and make adjustments, if needed.
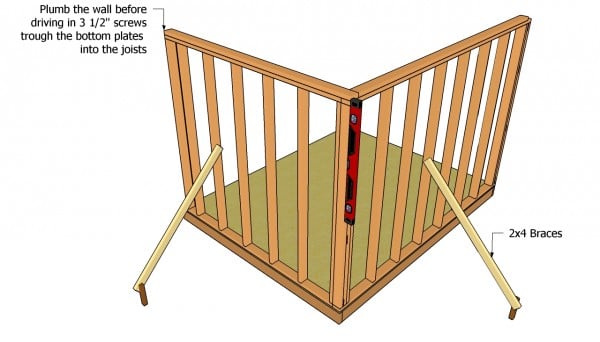
Fitting the walls into place
After building the frames of the shed, you should place them into place. Fit the back and a side wall, plumb them with a spirit level and drive in 3 1/2” screws trough the bottom plates into the joists. Secure the frames with 2×4 braces.
Top Tip: Next, fit the rest of the walls and secure them to the joists with screws. Lock the frames together with screws, after checking if they are plumb and level.
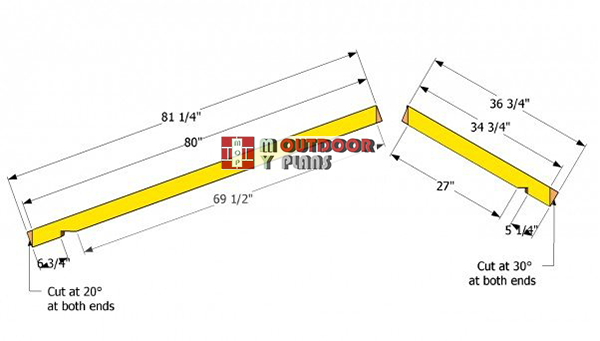
Roof-rafters-plans
As you can see in the image, you have to build the rafters out of 2×4 lumber. Use a good miter saw to get the job done quickly and to obtain accurate cuts. Cut out a notch in each rafter, using the diagram, in order to fit them into place easily.
Top Tip: In order to obtain consistent results, draw the marks on the rafters and cut them out with a circular saw. Make sure the blade is sharp and has fine teeth.
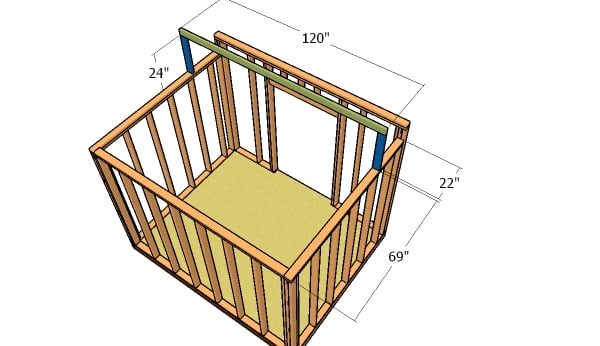
Fitting the top ridge
Fit the supports and the ridge beam, as shown in the diagram. You can drill pocket holes at both ends of the supports and insert 2 1/2″ screws to lock them into place tightly. Make sure the corners are square and use a spirit level to make sure the supports are plumb and the beam is perfectly horizontal.
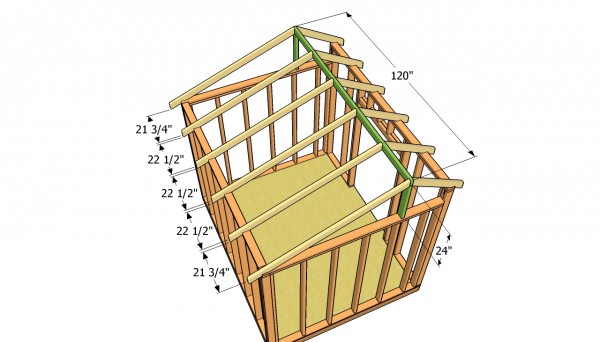
Installing the trusses
Fit the ridge board on top of 2×4 supports placed at both ends. Use a spirit level to make sure the ridge board is perfectly horizontal and plumb. Afterwards, fit the rafters one by one and secure them at both ends with 3” screws. Drill pilot holes in the rafters, to prevent the wood from splitting.
You could also close the gaps between the rafters with 1×2 blocking. Make sure the surface of the roof is even, otherwise you won’t be able to fit the roofing sheets.
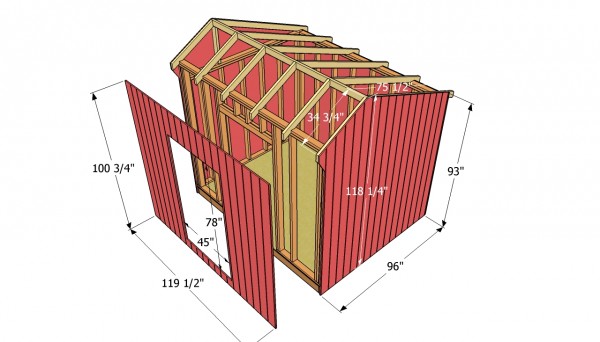
Installing the exterior siding
Build the exterior walls from 5/8” plywood and secure them to the studs with 1 1/2” nails, every 10”. In order to obtain a professional result, we recommend you to use a circular saw with a sharp blade.
Top Tip: Mark the cut lines with chalk and check if the blade of the saw goes exactly over the marks. In addition, use a good jigsaw to cut out the door opening.
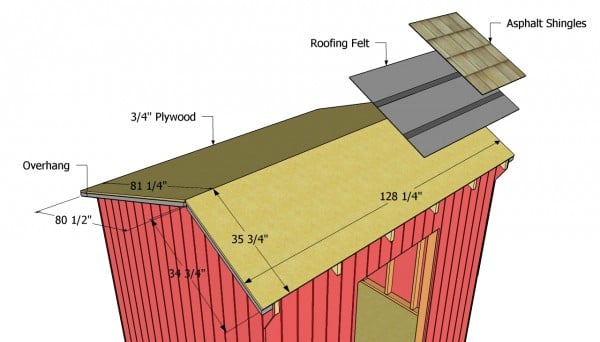
Installing the roofing
After installing 2×4 overhang boards on both sides of the roof, you should fit the 3/4” plywood sheets to the rafters. Buy tongue and groove 3/4” plywood, as the sheets would connect together a lot easier. The sheets should be flush with the frame of the roof, before driving in the 2” nails, every 12”.
Place the side drip edges at the bottom of the roof over the tar paper. Oppositely, fit the front and the back drip edges under the felt. Install the roofing felt and the shingles, starting with the bottom of the roof.
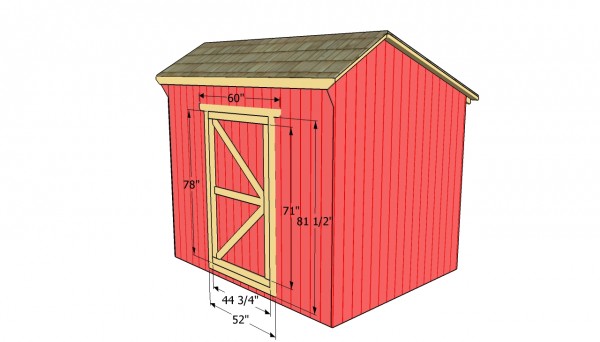
Installing the front door
Building the door of the shed is a straight forward project, if you use the right plans. In order to obtain a neat result, we recommend you to cut a piece of 5/8” siding and to attach it to several 1×4 trims. Make sure the door is about 1/2” narrower than the opening, otherwise it won’t open properly.
Attach 1×4 trims around the door and secure the door with a couple of hinges. Don’t forget to install a latch to lock the door into place.
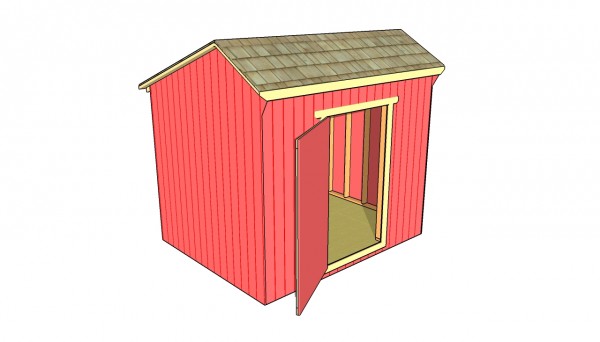
Saltbox shed plans
Last but not least, you should take care of the finishing touches. Therefore, you should fill the holes with wood putty and let it dry out for several days. Afterwards, sand the surface with 120-grit sandpaper, vacuum it thoroughly and apply the primer and paint coats.
Top Tip: Attach 1×4 trims around the corners to hide the edges of the siding. Cut the trims at angle, using a good miter saw.
This article was about saltbox shed plans free. If you want to see more plans for your garden, we recommend you to check out the rest of our step by step projects.

10 comments
Do you have plans for a salt box style shed 10′ long (gable end) x 8′ wide?
No, I do not have. My other saltbox shed is 6×8: http://myoutdoorplans.com/shed/portable-6×8-saltbox-shed-plans/
Quickly- the 24″ measurement listed in the roofing section…is that just the length of the 2×4 upright or the upright and the ridgeboard?
ie- the height from the top of the wall to the peak of the roof is 24″ or 27.5″ (24″ + 3.5″)???
It is just for the support. The total height is 24″ + 3 1/2″
What is the location of that upright…did a dry fit and doesn’t appear to be directly over that 3rd stud on the short wall but rather about 1.5-2″ closer to the short end???
I’ve updated the plans with one more diagram. If you have problems building this I apologize, as this is an older plan, which is not as detailed as the newer ones.
Your plan calls for 2×4 but your diagram shows 2×6 when building the floor. I am curious if that is a mistake in the diagram or the plans and throw other measurements off
Thanks for letting me know. I recommend at least 2x6s for the floor joists.
Do you have a rough estimate of the cost of material not counting the pad?
No.