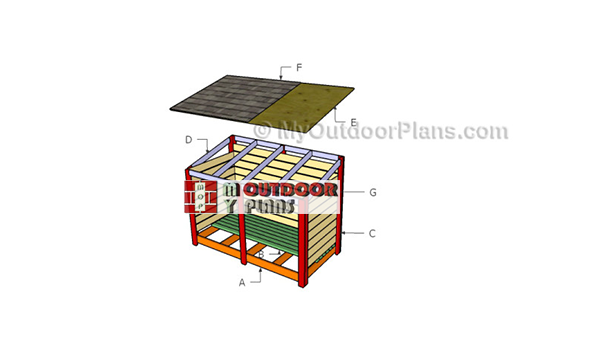
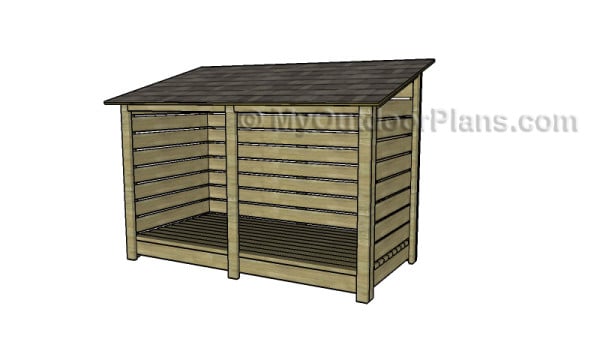
This step by step diy woodworking project is about firewood storage shed shed plans. The project features instructions for building a simple a storage shed that is large enough to keep one cord of wood. The slope of the shed is oriented towards front, so that the water is directed away from the wall of your house or garage. Work with attention and make adjustments to the design and overall dimensions if you want to get the job done in a professional manner.
When buying the lumber, you should select the planks with great care, making sure they are straight and without any visible flaws (cracks, knots, twists, decay). Investing in cedar or other weather resistant lumber is a good idea, as it will pay off on the long run. Use a spirit level to plumb and align the components, before inserting the galvanized screws, otherwise the project won’t have a symmetrical look. If you have all the materials and tools required for the project, you could get the job done in about a day. See all my Premium Plans HERE.
Projects made from these plans
It’s that simple to build a firewood storage shed!
Firewood Storage Shed Plans
Building-a-large-firewood-shed
Cut & Shopping Lists
- A – 2 pieces of 2×6 lumber – 96″ long, 5 pieces – 45″ long FRAME
- B – 11 pieces of 2×4 lumber – 96″ long FLOOR
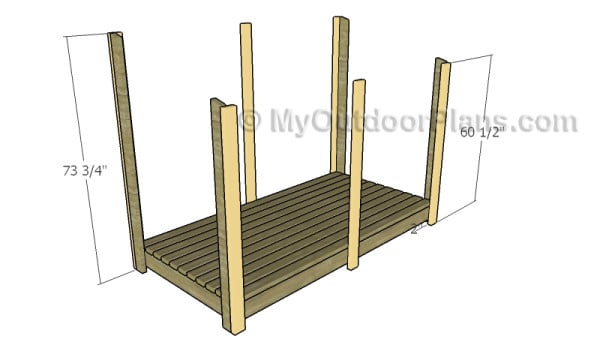
- C – 3 pieces of 2×4 lumber – 60 1/2″ long, 3 piece – 73 3/4″ long, 2 pieces – 73 3/4″ long, 2 pieces – 61 3/4″ long POSTS
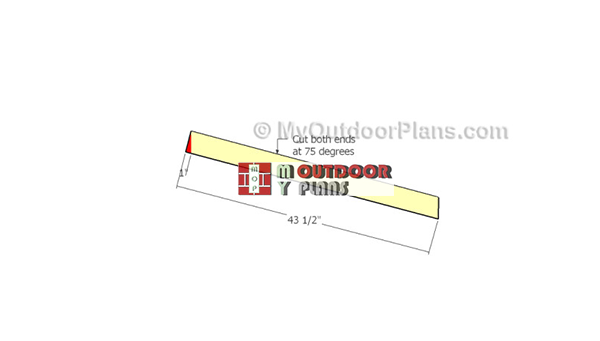
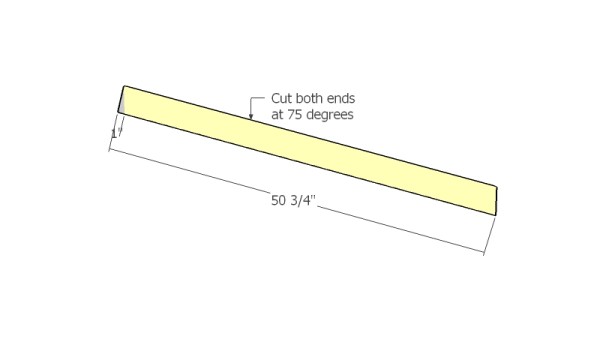
- D – 2 pieces of 2×4 lumber – 43 1/2″ long, 3 pieces – 50 3/4″ long, 4 pieces – 44 1/4″ long RAFTERS
- E – 2 pieces of 3/4″ plywood – 29 1/4″x59 1/2 long, 2 pieces – 24 1/2″x59 1/2 long ROOF
- F – 50 sq ft of underlayment, 50 sq ft of asphalt shingles ROOFING
- G – 16 pieces of 1×6 lumber – 48″ long, 9 pieces – 94 1/2″ long WALLS
- 26 pieces of 2×4 lumber – 8 ft
- 5 pieces of 2×6 lumber – 8 ft
- 17 pieces of 1×6 lumber – 8 ft
- 50 sq ft of underlayment, 50 sq ft of asphalt shingle
- 2 pieces of 3/4″ plywood – 4’x8′
- 2 1/2″ screws
- 1 5/8″ screws
- 3″ lag bolts
Tools
![]() Hammer, Tape measure, Framing square, Level
Hammer, Tape measure, Framing square, Level
![]() Miter saw, Drill machinery, Screwdriver, Sander
Miter saw, Drill machinery, Screwdriver, Sander
Time
![]() One day
One day
How to build a firewood shed
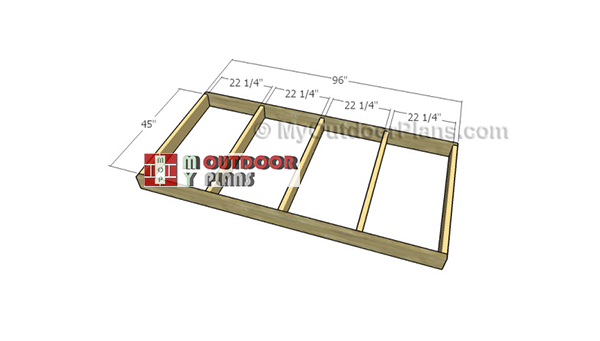
Building-the-floor-frame-for-shed
First of all, you need to build the frame of the firewood shed. Cut the components at the right size and smooth the ends with sandpaper. Drill pilot holes through the rim joists and insert 2 1/2″ screws into the perpendicular components. Make sure the corners are square and align the edges with attention.
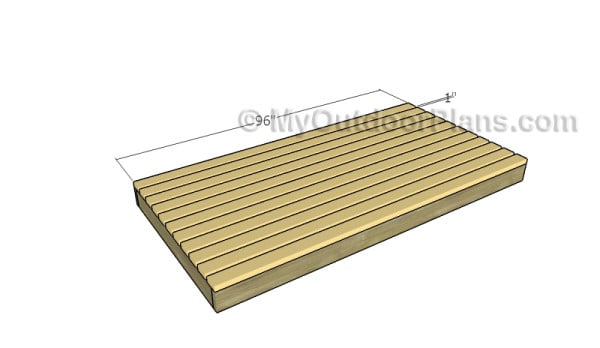
Fitting the slats
Attach the 2×4 slats to the floor frame, as shown in the diagram. Place a piece of 1″ wood between the slats to create consistent gaps. Pre-drill the slats to prevent the wood from splitting.
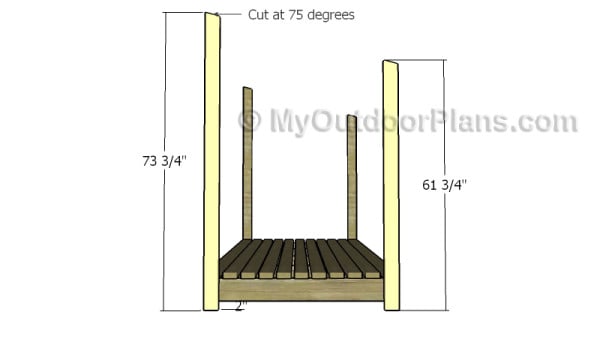
Build the side studs
Attach the 2×4 posts to the sides of the firewood shed. Cut the top of the posts at 75 degrees and attach the to the frame. Drill pilot holes through the posts and through the frame and insert 3″ carriage bolts or 2 1/2″ screws. Use a spirit level to make sure the posts are plumb.
Fitting the front and back studs
Attach the posts to the front and to the back of the firewood shed. Drill pilot holes through the bottom of the posts and through the frame, before inserting 3″ bolts. Insert 2 1/2″ screws to lock the adjacent posts together tightly.
Building-the-rim-rafters
Build the rim rafters from 2×4 lumber. Cut both ends of the components at 75 degrees, by using a miter saw.
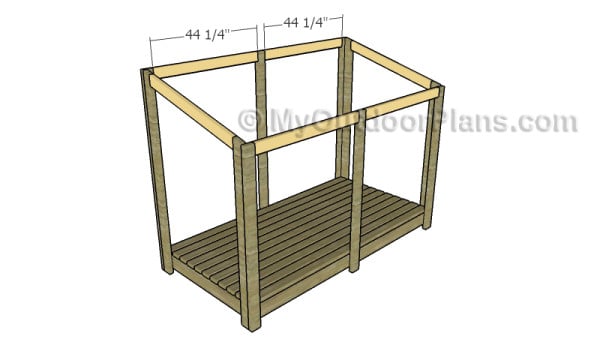
Fitting the rim rafters
Drill pocket holes at both ends of the components and secure them to the top of the structure using 2 1/2″ screws. Make sure the edges are aligned before inserting the screws,
Building the rafters
Cut the rafters for the firewood shed. Use a miter saw to cut both ends of the rafters at 75 degrees.
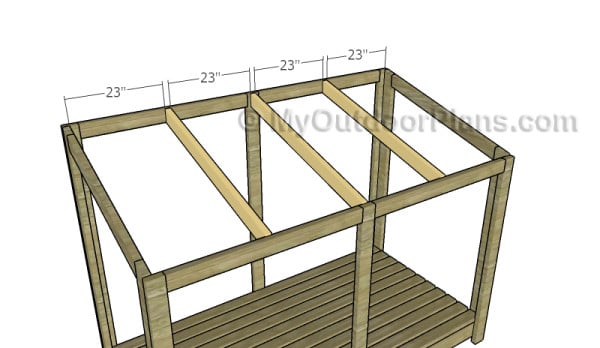
Fitting the rafters
Fit the rafters to the roof of the firewood shed. Place the rafters equally-spaced, as shown in the diagram. Drill pilot hole through the front and back components and insert 2 1/2″ screws into the rafters.
Fitting the side slats
Fit 1×6 slats to the sides of the firewood shed. Place the slats equally-spaced and secure them into place with 1 1/4″ screws.

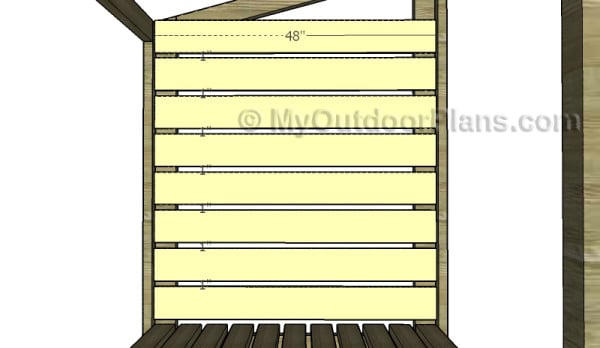
Fitting the back wall slats
Attach slats to the back of the firewood shed too, as shown in the plans. Make sure you place the slats equally-spaced for a professional result.
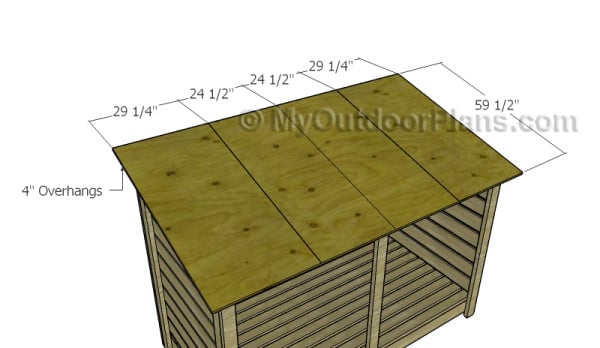
Attaching the plywood roof
Cut the components for the roofing from 3/4″ plywood. Center the components to the rafters, making sure there is a 4″ front, back and side overhang. Use 1 1/4″ screws to secure the sheets to the rafters, every 8″.
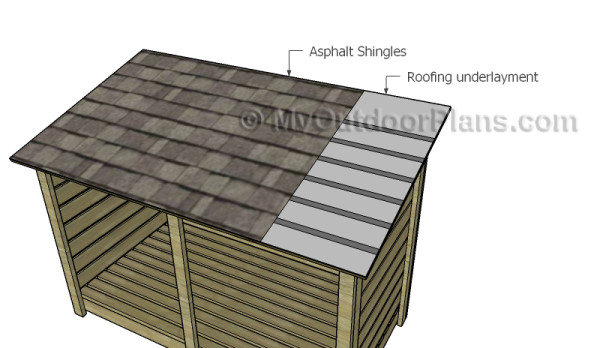
Fitting the roofing to the shed
Firewood Storage Shed Plans
Fill the holes and dents with wood putty and let it dry out for several hours. Use 120-200 grit sandpaper to smooth the surface. The best part of the project is that you can adjust the size of the shed to suit your need. You can place the shed against a wall and the water will be directed towards the front and thus not damaging it.
Top Tip: If you want to enhance the look of the project and to protect the wooden couch, we recommend you to cover the components with paint or stain.
This woodworking project was about firewood storage shed plans. If you want to see more outdoor plans, we recommend you to check out the rest of our step by step projects. LIKE us on Facebook and Google + to be the first that gets out latest projects and to hep us keep adding free woodworking plans for you.
EXPLORE MORE IDEAS FOR:
 |
 |
 |
 |
25 comments
on the materials list under
D. 2 x 4 lumber for rafters, 3 pieces of 50 3/2″ long
What is 50 3/2″? Do you mean 50 1/2″ or ?
Actually it’s 50 3/4″. Thanks for pointing it out.
Are there any door plans available that would fit this? Looking for a flat front door (need frame on inside of shed) that could easily be added.
No plans for a door. But if you need to close the shed with a door, you can easily assemble a 2×4 frame with pocket holes and then add tongue and groove slats, plywood etc.
It says this is a large shed.is it 12×12, 10×8 .What is the dimensions?
It is a 4×8 shed.
For the life of me, I can’t figure out how to get a 75 degree angle drawn on the 2×4. I have a speed square that I’m trying to use and then hope to handsaw as I don’t have a miter saw of any sort. Any tricks? it seems like marking the board at 15 degrees with the speed square gets a similar angle if you pivot to 75 degrees it looks completely incorrect? thanks, ken
Draw a 15 degree mark on the slats. Once you make the cuts, the ends will have 75 degrees. Hope this helps.
hellow could you please help me with the demesions. there are all in inches? for example 2×6 you mean 2inchesx6inches?
Please read this: http://myoutdoorplans.com/imperial-to-metric-conversion/ Th
One question how did you get the 4 cuts out of 2 pieces of ply wood for the roof?
Great plans. Thanks!
The only thing is that the pick list does not include 3 inch lag bolts, but the plans do
Hey. Thanks. Added that to the shopping list.
Where is the actual plan on the website?
Please read the FAQs to learn how to download the plans: https://myoutdoorplans.com/faq/
These plans are perfect. I am going to use these but with slight modifications. I’m going to pitch the roof to the back, add a shelf for kindling, and use galvanized roofing. Also thinking about using 2-2x8s for the front and back supports, undecided about that yet.
One thing to note, the instructions do not mention how many carriage bolts to use. I’m assuming two carriage bolts for “build the side studs” and 1 when attaching the front and back studs (since the screw will lock in place).
You need lag bolts, not carriage bolts. 2 for each joint will do the trick.
Do you have a plan for a 8′ by 3′? Same height or close to the same height as this plan.
Any idea of cost?
300-400 usd
These look great and I plan to build, with adjustments for base pallets I will use for foundation. One question is if the plans or the materials list is right, since instructions kick off with 2×6 boards for the base, but no 2x6s listed in the materials list, only 1×6. Presuming that 2×6 is right from the illustration’s proportions. Any chance to confirm?
Yes, 2×6 for the floor frame. I updated the shopping list
No way can it only take 2 sheets of plywood for the roof as stated, what is your trick?
How many Cords can this shed hold?
1 cord