This step by step woodworking project is about diy wood shed plans. Storing firewood during winter doesn’t have to be a problem anymore, if you build a basic wooden structure. Generally speaking, if the wood is not in contact with the ground, then it will be in a good condition. Nevertheless, if these plans don’t fit your needs, we recommend you to check out the rest of our shed plans, as we will most certainly find something that fits your needs.
Before starting the actual project, you need to assess your needs, otherwise you might end up with a small shed that isn’t large enough to store all the firewood. Afterwards, you should buy the materials for the job and gather the required tools. If you want to build this shed, then you have to buy 2×4 pressure-treated slats, otherwise you can get the job done with several pallets and screws. See all my Premium Plans HERE.
Projects made from these plans
It’s that simple to build a wood shed!
Cut & Shopping Lists
- A – 7 pieces of 2×4 lumber – 24” long SUPPORTS
- B – 6 pieces of 2×4” lumber – 96” long SLATS
- C – 5 pieces of 2×4 lumber – 40” long POSTS
- D – 6 pieces of 2×4 lumber – 24” long SIDE WALLS
- E – 3 pieces of 2×4 lumber – 99” long BACK WALL
Tools
![]() Hammer, Tape measure, Framing square
Hammer, Tape measure, Framing square
![]() Miter saw, Drill machinery, Screwdriver, Sander
Miter saw, Drill machinery, Screwdriver, Sander
Time
![]() One weekend
One weekend
Related
Small Pallet Shed Plans

Pallet-wood-shed-plans
Building a shed for the firewood doesn’t have to be a complex and expensive project. On the contrary, from our own experience, we consider that you can get the job done in just a few hours, by using recycled pallets and other common materials.
Top Tip: Cover the basic wood shed with a tarpaulin and you will protect it from rain and heavy snow. In addition, the air will ventilate the firewood and keep then in a good condition.
Diy Wood Shed Plans

Building-the-base-of-the-shed
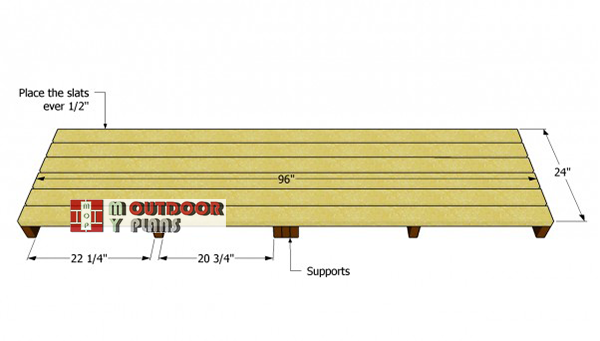
The first step of the project is to build the floor of the wooden construction. Therefore, instead of building a regular frame, you should attach the floor slats directly to several 2x4s. Make sure you align the slats at both ends and check the corners for squareness.
Place the slats equally spaced and drive in 3” galvanized screws. Pre-drill the slats, to prevent the wood from spitting.

Attaching-the-posts
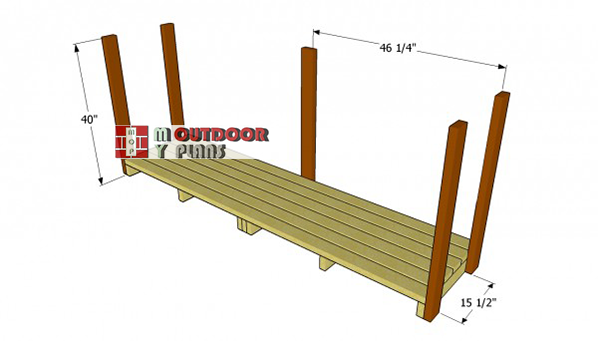
The next step of the woodworking project is to attach the studs to the floor frame. As you can easily notice in the image, you can get the job done by yourself, as you just need to place the 2×4 components to the frame, drill pilot holes and insert 3” wood screws.
Top Tip: Use a spirit level to plumb the supports, otherwise the small wood shed won’t have a neat look. In addition, check if the top of the studs are horizontal.

Fitting the side walls
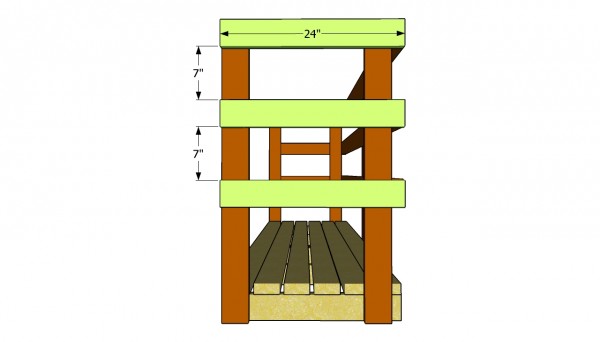
The side walls shouldn’t be made out of plywood siding, as just a few rails are enough to provide enough support to the shed. Cut the slats at the right size with a miter saw and pre-drill the components at both ends, before driving in the 2 1/2” galvanized screws.
Use a tape measure when installing the side walls, otherwise the construction won’t have a proper look. Sand the exposed edges with sandpaper.

Installing the back slats
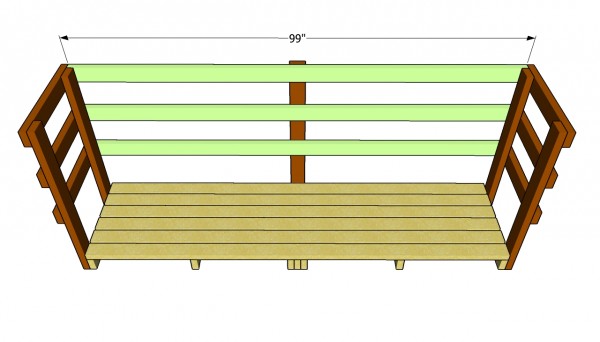
One of the last steps of this diy project is to install the back slats. In order to get a professional and a durable result, we recommend you to use the same carpentry techniques described above. Drive in nails trough the side slats in the back supports, after drilling pilot holes.
After inserting screws trough all the adjacent slats, the simple wood shed should be rigid and support a significant weight. Using quality pressure-treated components will pay off on the long run.

Diy wood shed plans
Last but not least, you should take care of the finishing touches. Although this shed has a rather functional role than aesthetic, there are still a few things you could do to enhance its look. Therefore, fill the holes with wood putty ans sand the surface with medium grit sandpaper.
Top Tip: Apply a few coats of paint to protect the wood from rot. In addition, cover the firewood with a tarpaulin, when it rains.
This woodworking project was about diy wood shed plans. If you want to see more outdoor plans, check out the rest of our step by step projects and follow the instructions to obtain a professional result.
