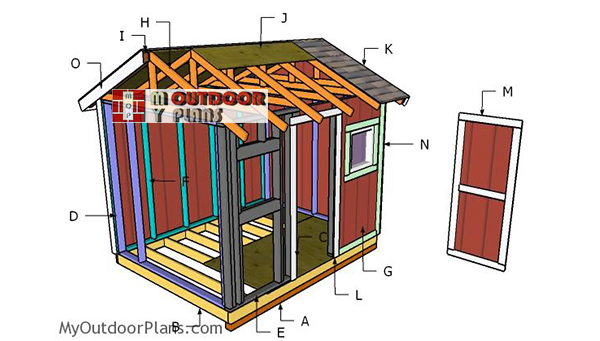
This step by step diy project is about 8×10 gable shed plans. I have designed this small shed, as it was one of the most requested projects ever by people who read this blog. Therefore, I have come up with this gable shed design, which features a front door and two small windows. Take a look over the rest of my woodworking plans, if you want to get more building inspiration.
All my woodworking plans come with 3D diagrams and step by step instructions. In addition, the plans include full Cut and Shopping lists. Remember that you need to read the local codes before starting the project. It is your responsibility to make adjustments and suit the legal requirements.
When buying the lumber, you should select the planks with great care, making sure they are straight and without any visible flaws (cracks, knots, twists, decay). Investing in cedar or other weather resistant lumber is a good idea, as it will pay off on the long run. Use a spirit level to plumb and align the components, before inserting the galvanized screws, otherwise the project won’t have a symmetrical look. If you have all the materials and tools required for the project, you could get the job done in about a day. See all my Premium Plans HERE.
Projects made from these plans
8×10 Shed Plans – Free PDF Download
Building-a-8×10-shed
Cut + Shopping Lists
- A – 4 pieces of 4×4 lumber – 10″ long SKIDS
- B – 2 pieces of 2×6 lumber – 120″ long, 9 pieces – 93″long FLOOR
- C – 2 pieces of 3/4″ plywood – 48″x96″ long, 2 pieces – 24″x48″ long FLOORING
- D – 2 pieces of 2×4 lumber – 89″ long, 5 pieces – 84″ long, 1 piece – 96″ long 2xSIDE WALL
- E – 2 pieces of 2×4 lumber – 120″ long, 2 pieces – 44″ long, 10 pieces – 84″ long, 6 pieces – 38 1/2″ long, 4 pieces – 24″ long, 6 pieces – 10 1/2″ long, 2 pieces – 78 1/2″ long, 1 piece – 113″ long, 8 pieces of 2×6 lumber – 27″ long, 2 pieces – 35″ long FRONT WALL
- F – 2 pieces of 2×4 lumber – 120″ long, 8 pieces – 84″ long, 1 piece – 113″ long BACK WALL
- G – 9 pieces of T1-11 – 48″x88 1/2″ long, 2 pieces – 24″x88 1/2″ long, 1 piece – 24″x40″ long, 1 piece – 8 1/2″x24″ long SIDING
- 2 pieces of 2×6 lumber – 10′
- 12 pieces of 2×6 lumber – 8′
- 4 pieces of 4×4 lumber – 8′
- 5 pieces of 2×4 lumber – 10′
- 42 pieces of 2×4 lumber – 8′
- 1/2″ plywood
- 3 pieces of 3/4″ plywood – 48″x96″
- 9 pieces of T1-11 – 48″x96″
- 8d nails, 2 1/2″ screws, 3 1/2″ screws
- wood filler , wood glue, stain/paint
Tools
![]() Hammer, Tape measure, Framing square, Level
Hammer, Tape measure, Framing square, Level
![]() Miter saw, Drill machinery, Screwdriver, Sander
Miter saw, Drill machinery, Screwdriver, Sander
Time
![]() One week
One week
Related
- PART 1: 8×10 Shed Plans
- PART 2: 8×10 Shed Roof Plans
- PART 3: 8×10 Shed Door and Trims Plans
- 10×12 shed plans
- 12×16 shed plans
How to build a 8×10 garden shed floor
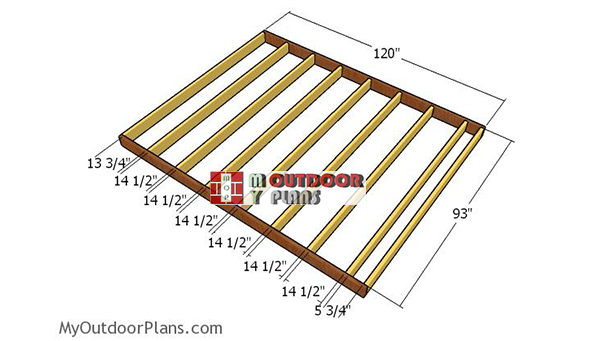
Floor-shed-frame
The first step of the project is to build the floor frame for the 8×10 shed. Cut the joists at the right dimensions and then lay them on a level surface.
Drill pilot holes through the rim joists and insert 3 1/2″ screws into the perpendicular components. Place the joists every 16″ on center for a professional result.
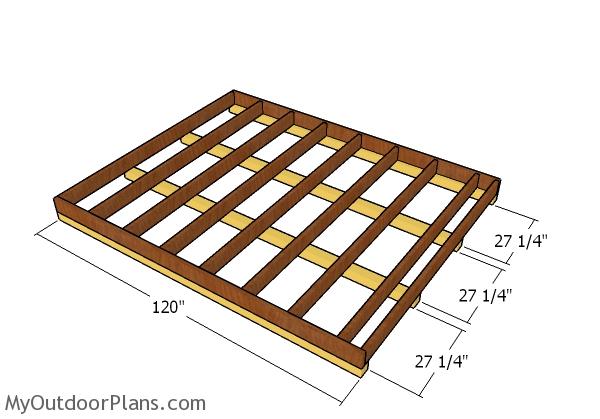
Fitting the skids
Next, select the location for the shed, so it suit your needs and complies with the local building codes. Lay the 4×4 beams on the surface and then secure the frame to the skids with 3 1/2″ screws or using rafter ties.
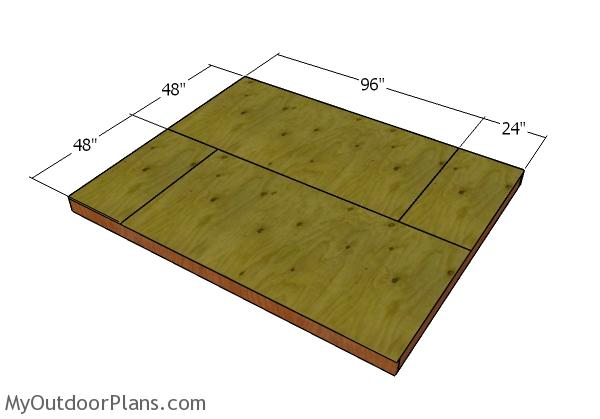
Fitting the floor sheets
Fit 3/4″ plywood sheets to the floor frame and align the edges flush. Leave no gaps between the plywood sheets and insert 1 5/8″ screws, every 8″ along the joists.
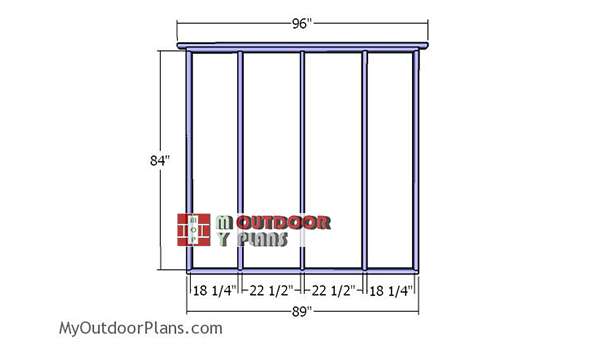
Building the shed wall frames
Front-and-back-wall-frame
Build the side walls from 2×4 lumber. After cutting the plates and the studs lay them on a level surface. Drill pilot holes through the plates and insert 3 1/2″ screws into the studs. Place the studs every 24″ on center, for a neat result. Make sure the corners are square and align the edges flush. Center the double top plate and lock it into place with 2 1/2″ screws.
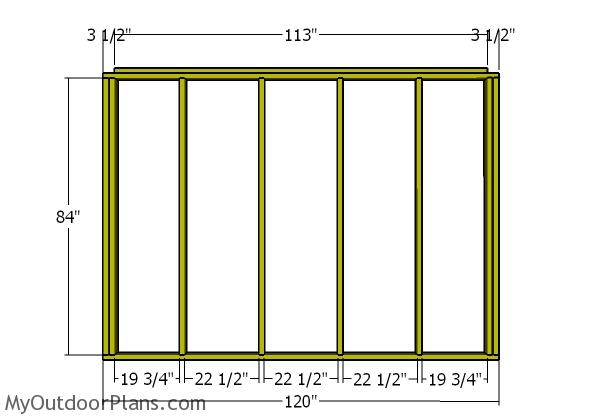
Back wall – Frame
Furthermore, build the back wall from 2×4 lumber. Drill pilot holes through the plates and insert 3 1/2″ screws into the studs. Place the studs every 24″ on center.
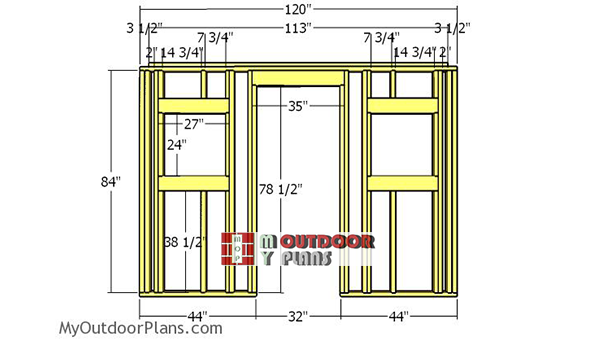
Side-wall-with-window-and-door-openings
Framing the front wall is a little bit more complex, as you need to frame the door and the you can adjust the size of the windows and the size of the door to suit your needs. Also, you should use 2×6 lumber for the double header. Sandwich a piece of 1/2″ plywood between the 2×6 beams and lock them together with 2 1/2″ screws, driven from both sides. Add glue to the joints for a professional result.
Assembling the shed frame

Assembling the shed frame
Next, lift the wall frames and then attach them to the floor of the shed. Align the edges flush, drill pilot holes through the bottom plates and insert 3 1/2″ screws into the floor.
Moreover, you need to lock the adjacent walls together tightly, by drilling pilot holes and insert 3 1/2″ screws to lock them together tightly.
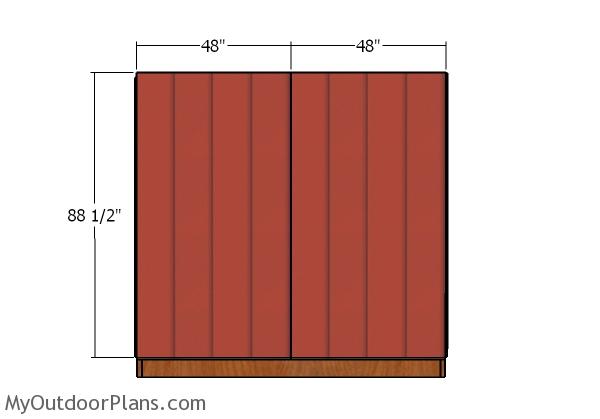
Fitting the siding sheets
Sides and back wall – Siding
Moreover, fit T1-11 siding sheets to the side and to the back walls of the shed. Align the edges flush with the top and with the sides of the shed. Insert 6-8d nails every 8″ along the framing. Leave no gaps between the sheets for a professional result.

Side wall with window – Siding
Also, fit the sheets to the front of the shed. Make the cuts so you can fit the sheets around the door and window openings.
Finishing touches
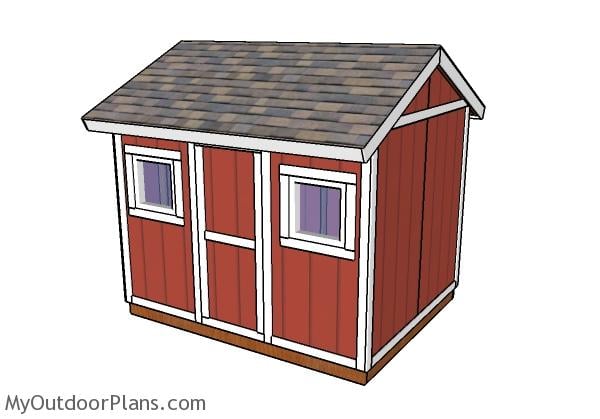
8×10 Shed Plans
If you like this design, you should check out PART 2 of the project for complete plans on how to build the roof. In PART 3 of the project, I show you how to build the door and how to fit the decorative trims.
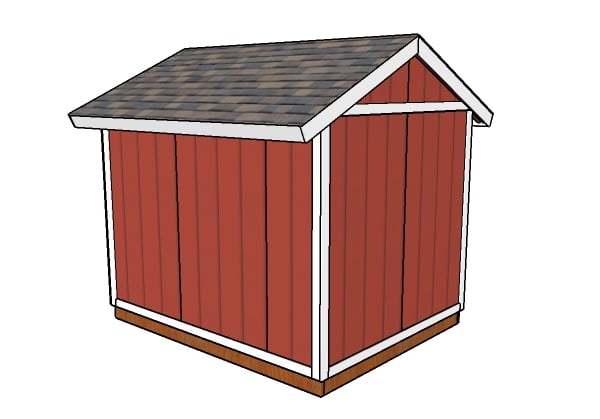
8×10 Shed Plans – Back view
This is a really nice storage shed to have, as it features a nice design and a matching storage space. If you want to keep all your garden tools organized, this is the project to tackle, as it is budget friendly and can be built by anyone with basic woodworking tools. If you want something only slightly bigger, these 8×12 gable shed plans might be what you really need.
If you want to get PREMIUM PLANS for this project (different design with re-engineered strcuture), in a PDF format, please press GET PDF PLANS button bellow. Thank you for the support.

This woodworking project was about 8×10 garden shed plans free. If you want to see more outdoor plans, check out the rest of our step by step projects and follow the instructions to obtain a professional result.

EXPLORE MORE IDEAS FOR:
 |
 |
 |
 |
21 comments
Thank you very much. The way you have it detailed is exactly what I was lookinh for. Im sorry I dont have anything to send you but I will pray for your continued prosperity.
Respectfully, Denis.
Thank you. Good luck with the project!
follow your dreams
Hello,
I am wanting to build my own shed and looking at the 8X10 plans you have on your website. I am wondering If I will need to buy the materials listed in all three of the 8X10 plans ( roof, door) or just buy the materials in the 8X10 shed plans model and then use to other plans to finish the project. Any advice you could give would be of great help.
I used your plans to build the 2X4 bench and they worked great and we really like the bench.
Thank you,
Dewayne Clinkinberad
Each Part of the project comes with its own Cut and Shopping lists.
I think there’s a typo in the list of lumber. you list 1/2″ plywood, but I don’t see it used.
The 1/2″ plywood is used for the double headers.
Ah. I see that now. Thanks
hello, this is going to be my first time to build a shed and I was wanting to know exactly where will the 1/2″ plywood header are located at and do i need it?thank you
The 1/2″ plywood is sandwhiched between the 2×6 double header. Yes you need that because you want the header to be 3 1/2″ thick (1 1/2″ + 1 1/2″ + 1/2″)
Hey i want to use these plans to make a custom chicken coop i was curious how much i could minimize the use of studs without taking away from the structural integrity of the building. Like 4 skids seems like overkill for an 8×10. On a budget unfortunately so i have to minimize cost without it being unsafe. Look forward to your response. Thank you.
I am needing to build a 8×10 but don’t need the windows….so I am asking can you send me the measurements without any windows please.
I am no carpenter so all the help is greatly appreciated
I don’t do custom plans, since I get tons of requests like yours. You have to do the mods by yourself, and it’s not that complicated.
Hi…is there any way I can purchase printed plans for an 8×10 storage shed? Like the one with 2 windows. Let me know please.
Hi, see the START HERE button.
Tout simplement un gros MERCI.
do you happen to have a version of the plan with a 4′ double door on the 8′ wall
Hello,
I want to build an 8′ x 10′ shed with one door just on the 8′ side. Do you haver a plan for this? Also I need to fit this under a 10′ overhang. Do you have a height of the shed?
No, sorry
How do I download the PDF version of this 8 X 10 Gable Shed?
You read the blog Faqs