This step by step diy woodworking project is about 12×20 shed plans. The project features instructions for building a large shed with one large window and one access door. If you want to create backyard storage space or even a small studio, building this large shed is a great idea. Make sure you take a look over the rest of plans to see alternatives and more projects for your garden.
When buying the lumber, you should select the planks with great care, making sure they are straight and without any visible flaws (cracks, knots, twists, decay). Investing in cedar or other weather resistant lumber is a good idea, as it will pay off on the long run. Use a spirit level to plumb and align the components, before inserting the galvanized screws, otherwise the project won’t have a symmetrical look. If you have all the materials and tools required for the project, you could get the job done in about a day.
Projects made from these plans
12×20 Gable Shed Plans
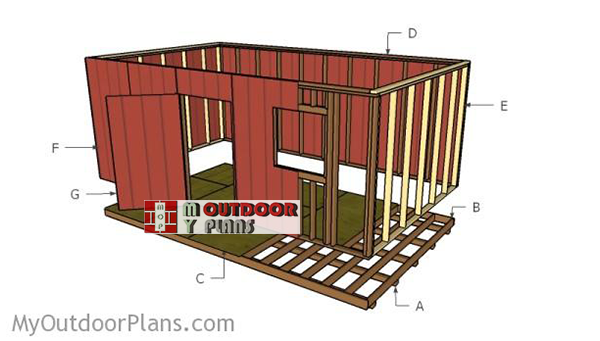
Building-a-12×20-shed
Cut List
- A – 5 pieces of 4×4 lumber – 240″ long SKIDS
- B – 16 pieces of 2×6 lumber – 141″ long, 2 pieces – 240″ long JOISTS
- C – 5 pieces of 3/4″ plywood – 48″x96 long, 5 pieces – 48″x48″ long FLOOR
- D – 13 pieces of 2×4 lumber – 90″ long, 1 piece – 240″ long, 1 piece – 233″ long, 2 pieces – 97 1/2″ long, 2 pieces – 48″ long, 4 pieces – 39″ long, 4 pieces – 10″ long, 2 pieces – 76 1/2″ long, 5 pieces – 9 1/2″ long, 2 pieces – 36″ long, 5 pieces – 37 1/2″ long FRONT WALL
- D – 13 pieces of 2×4 lumber – 90″ long, 2 pieces – 240″ long, 1 piece 233 ” long BACK WALL
- E – 2 pieces of 2×4 lumber – 137″ long, 1 piece – 140″ long, 7 pieces – 90″ long 2xSIDE WALL
- F – 16 pieces of T1-11 siding – 48″x94 1/2″ long SIDING
- G – 2 pieces of 1×4 lumber – 78″ long, 1 piece – 55″ long, 2 pieces – 45″ long, 2 pieces – 71″ long, 1 piece – 38″ long DOOR
Materials List
- 5 pieces of 4×4 lumber – 20′
- 2 pieces of 2×6 lumber – 20′
- 16 pieces of 2×6 lumber – 12′
- 6 pieces of 2×4 lumber – 20′
- 6 pieces of 2×4 lumber – 12′
- 50 pieces of 2×4 lumber – 8′
- 6 pieces of 1×4 lumber – 8′
- 16 pieces of T1-11 – 4’x8′
- 8 pieces of 3/4″ plywood – 4’x8′
- 1000 pieces of 1 5/8″ screws
- 1000 pieces of 2 1/2″ screws
- 16d nails
Tools
![]() Hammer, Tape measure, Framing square, Level
Hammer, Tape measure, Framing square, Level
![]() Miter saw, Drill machinery, Screwdriver, Sander
Miter saw, Drill machinery, Screwdriver, Sander
Time
![]() One week
One week
It’s that simple to build a 12×20 shed – Video!
How to build a large 12×20 gable shed
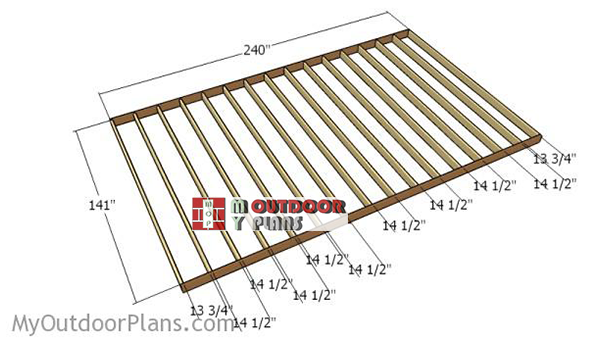
Building-the-floor-frame
The first step of the project if to assemble the floor frame. Cut the components from 2×6 lumber at the right size. Drill pilot holes through the rim joists and insert 2 1/2″ screws into the regular joists. Place the joists equally-spaced, as shown in the plans. Make sure the edges are flush and check if the corners are right-angled.
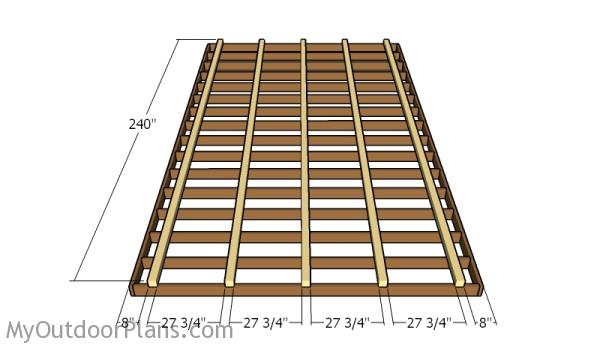
Fitting the skids
Fit 4×4 skids under the floor frame, in order to protect the components from moisture. Drill pilot holes through the skids and insert 3 1/2″ screws into the frame.
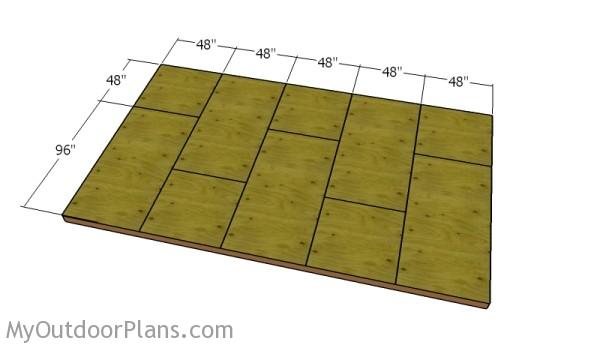
Fitting the floor sheets
Attach the 3/4″ plywood sheets to the floor frame, making sure you follow the patterns described in the diagram. Leave no gaps between the sheets and secure them to the joists using 1 5/8″ screws, every 8″. Use tongue and groove plywood sheets, for a professional result.
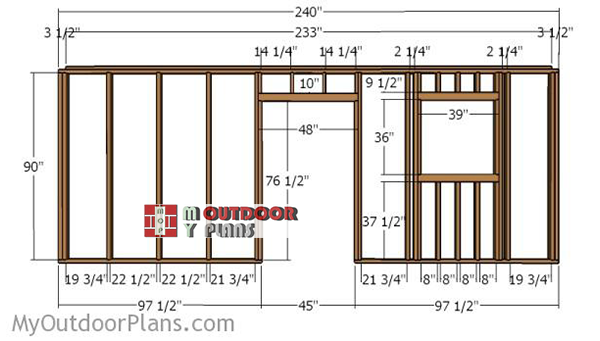
Building-the-front-wall-frame
Build the front wall from 2×4 lumber. Cut the components at the right dimensions, making sure you follow the information from the plans. Drill pilot holes through the plates and insert 2 1/2″ screws into the studs or 16d nails.
Make sure the corners are right-angled and check if the edges are flush. As you can easily notice, you need to frame the door opening and the window opening. You can adjust the dimensions for the walls to suit your needs. Notice the double headers for the door and window.
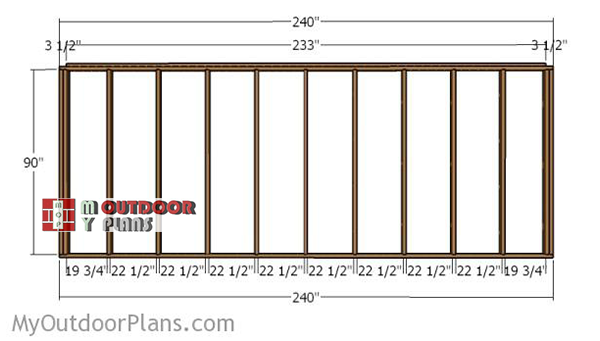
Building-the-back-wall-frame
Building the back wall is an easier job, as it doesn’t require intricate measurements and cuts. Drill pilot holes through the top and bottom plates and insert 2 1/2″ screws into the studs. Place the studs equally-spaced and make sure the corners are right-angled.
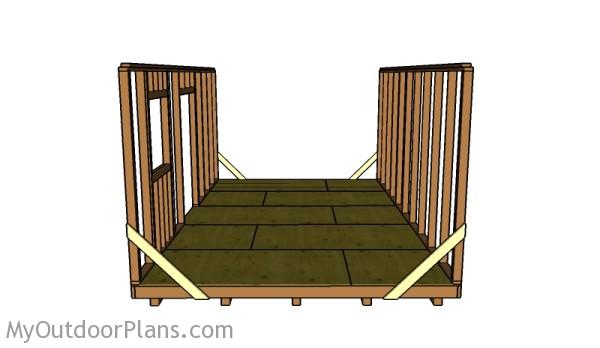
Attaching the front and back walls
Fit the front and the back walls to the floor and use temporary braces to lock them into place. Plumb the walls with a spirit level and align the edges with attention. Drill pilot holes through the bottom plates and insert 2 1/2″ screws into the floor of the shed.
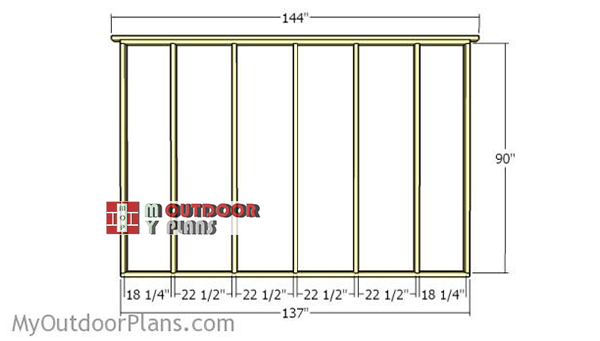
Building-the-side-wall-frames
Build the side walls from 2×4 lumber. Drill pilot holes through the plates and insert 2 1/2″ screws into the studs. Place the studs equally spaced, but make sure you align the edges. The top plate should overhang 3 1/2″ on both sides of the wall.
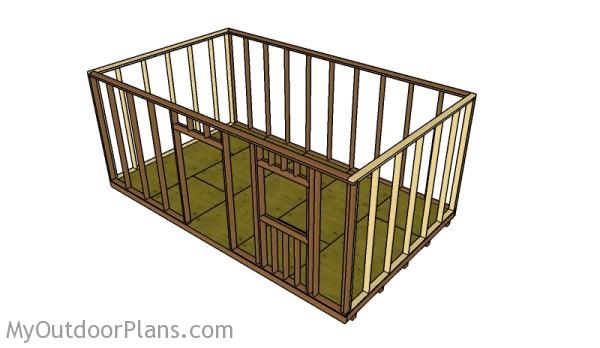
Assembling the frame of the shed
Fit the side walls to the floor of the shed, as shown in the diagram. Drill pilot holes through the bottom plates and insert 2 1/2″ screws into the floor. In addition, lock the adjacent walls together by inserting 2 1/2″ screws through the studs. Make sure the corners are square and check if the edges are flush one with another.
Fitting the siding sheets
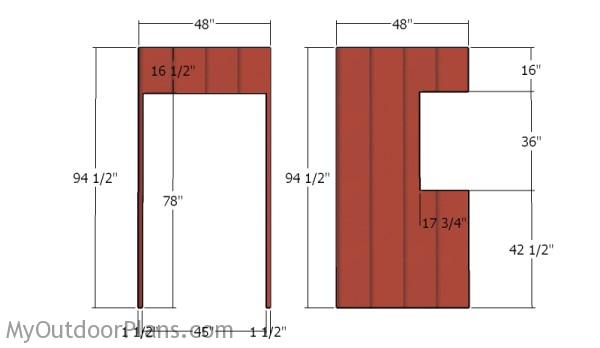
Siding sheets for front wall
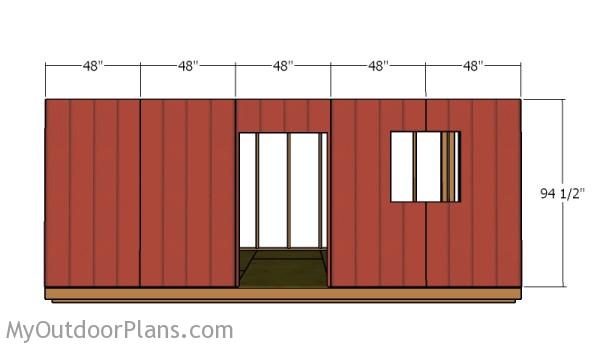
Attaching the siding – Front wall
Fit the T1-11 sheets to the front wall frame, as shown in the plans. Align everything with attention and lock them into place with 1 5/8″ screws or nails, every 8″ along the framing. Leave no gaps between the siding and the wall frame. In addition, make sure the top edge of the sheets is aligned with the top plates.
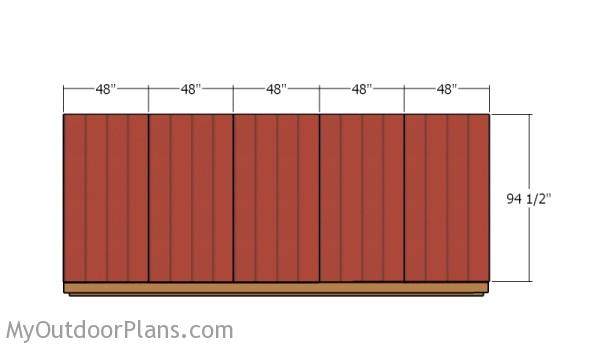
Attaching the siding – Back Wall
Fit the siding to the back wall, in the same manner described above.
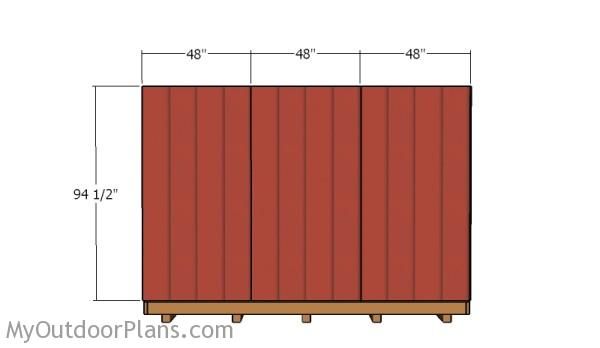
Fitting the side walls
Fit the siding to the side walls, making sure you align the sheets properly.
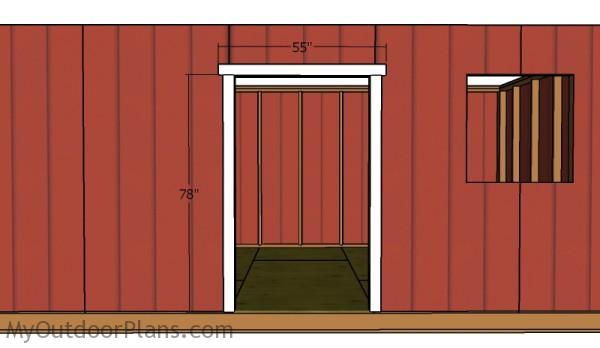
Fitting the door trims
Fit the 1×4 trims around the door opening, as shown in the diagram. Use 2 1/2″ screws or nails to lock the trims to the framing.
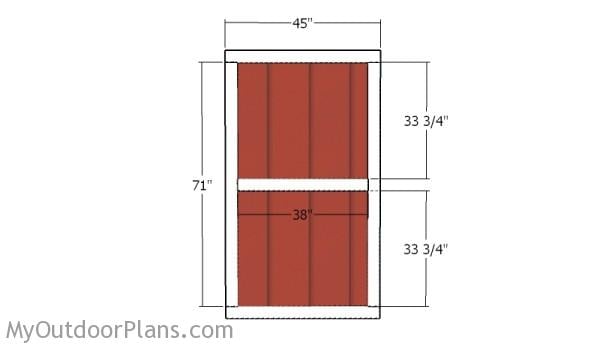
Building the shed door
The next step is to build the door for the 12×20 shed. Use the piece that you cut out in the previous step for the door panel. Attach 1×4 trims to the door panel, as shown in the diagram. Align the edges with attention and use 1 5/8″ nails to lock the trims into place.
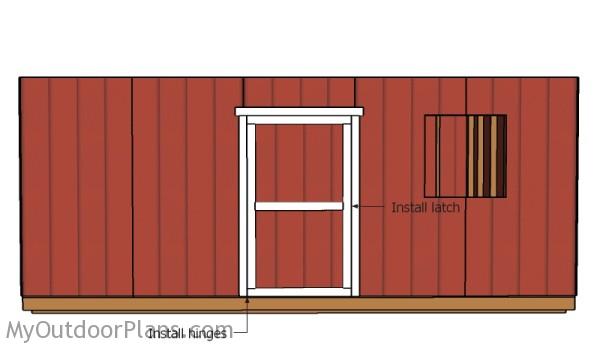
Fitting the shed door
Fit the door to the opening, as shown in the plans. Use hinges and a latch to secure the door into place. In addition, you could install a 1×2 door stop under the door header.
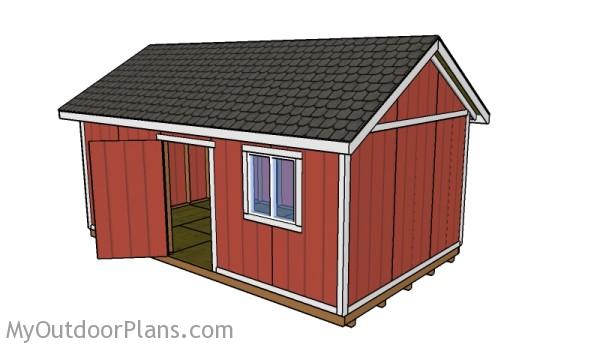
12×20 Shed Plans
Last but not least, you should take care of the finishing touches, as to be able to continue the process with the rest of the steps. Fill the holes with wood putty and smooth the surface with fine-grit sandpaper.
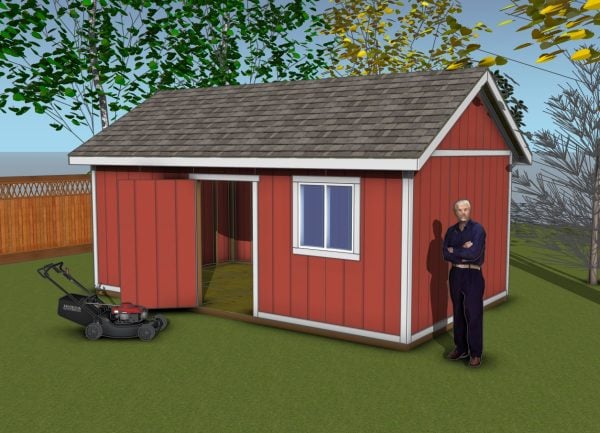
12×20 gable Shed Plans
Building a 12×20 gable shed will set you back around $2,500 to $4,000, depending on the quality of materials you choose. Don’t skimp on the lumber, roofing, and siding if you want it to last. And if you’re adding extras like windows or insulation, expect to toss in another $500 to $1,000. Get it right, and you’ll have a top-notch shed worth every penny!
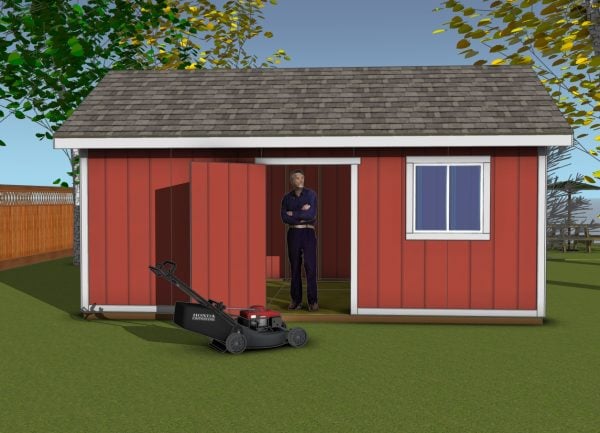
12×20 Gable Shed Plans – side view
A 12×20 gable shed is perfect for creating a dedicated workspace, whether for DIY projects, gardening, or even a small workshop. It provides a secure, weather-resistant environment to keep your valuable equipment safe and in great condition. Plus, building this shed hones your construction skills and gives you a deep sense of accomplishment.
Top Tip: Check out the rest of the project, if you want to learn more about building a roof for the 12×20 shed. Premium Plans available for this shed size, in the Shop. If you want to get PREMIUM PLANS for this project, in a PDF format, please press GET PDF PLANS button bellow. Thank you for the support.
This woodworking project was about 12×20 shed plans. If you want to see more outdoor plans, check out the rest of our step by step projects and follow the instructions to obtain a professional result.
EXPLORE MORE IDEAS FOR:
 |
 |
 |
 |


32 comments
Hey. I was wondering if for the plans if you could post the cost of materials for each. Assuming you build each of them. Thank you
The prices of the materials vary, so I think it’s easier for everyone to print the materials list and compute the total cost. Thank you for the feedback.
Could you do 16 o/c and still be code or is it different per size shed and what not
I don’t know your local building codes so I can’t answer the question.
It cost me about 1,776 for lumber only here in Washington state
Hi there, Brian. Have you built this shed? Do you mind sharing more information on how did the project go?
Yes I have built it . It took about 4 1/2 days …for the exterior I’m still working on the inside such as wiring and insulation. I did a few things differently like my truss and my trim is different plus I added soffit under the overhangs .
That sounds great. Will it be your workshop? I would love to see how your project turned out with all the modifications you made to the plans.
Is there any easy way to print this? Also which boards should be pressure treated?
The joists should be pressure treated, as they are exposed to moisture. To print the plans, please read the FAQs: http://myoutdoorplans.com/faq/
Any ideas as to where to get 20′ 4×4’s in OKC. I’ve tried a few places but the longest they have is 16′.
You can use 2 pieces of 4×4 at 10′ for the skids, if you don’t manage to find them at 20′.
Great plans in great detail, but looks like the rafters and roof are missing? Maybe that is a different page if you could point me at it…
never mind–just saw the next button–doh!
I’m thinking of building an 12′ x 16′ do you have anything in a barn roof design other than a Gabriel roof ?? thanks,
Yes, I have. Check them out here: http://myoutdoorplans.com/shed/12×16-storage-shed-plans/
Great plan, started the floor this weekend, I have a question regarding the 20′ walls, in the plans you have 2, 2×4 at the start is there a spacing in between those? Because when I add up all the spacing and the 2×4’s thickness it doesn’t line up exactly to 48″ and it even comes up 1″ short at the end of 20′ span.
You didn’t add the 1/2″ gap between the double studs placed at both ends of the wall.
The studs don’t seem to align with the T1-11 edges (48″). How do you nail them where they meet?
The sheets meet on the middle of a stud.
Are the materials listed all you need or do you end up needing more to make the whole build
There are 3 parts of this project. Each part has its own list of materials.
I’m researching materials cost online. None of the big box stores have lumber longer than 16 feet. What do I do?
If you can’t find 20′ long lumber, then your only option is to build the long walls in two sections 10′ long.
Just curious, how many people did you have on site, how many sets of tools, and how many construction engineers to make this a “one day” project? I made a shed based on these plans, and based on myself, with the three friends I have available, it took me almost three full months of weekends.
Also, please note that (in my market at least) dimensional lumber longer than 20′ is a “special order’ that requires overhead and fees. That made the roof line (not this plan, but the next one linked) a bit of a headache.
Thank you for the feedback and congrats for the project. The “one day” is a typing mistake and that’s why I always value comments, because they are based on real experience.
Are these plans stamped by engineer? Florida requires submission of stamped, engineered plans in order to obtain a permit.
No, they are not.
I was wondering if it matters which direction you lay the plywood floor, I thought that it should go the other way across the floor joist, not the way in the diagram.
Hi,
I live up in La Plata County, CO at nearly 8000 ft. We get significant snow loads, has anyone got any calculations on the roof strength of this shed?
Hi – do you by chance have plans for a 12×20 shed with a dormer roof? If not, I’m thinking I could use these plans and they try to edit the “12×16 Shed with Dormer Plans” to get what I’m looking for. Thanks in advance for all of these great resources and plans.
Not for this size. Only for the 12×16 shed: https://myoutdoorplans.com/shed/12×16-shed-with-dormer-plans/