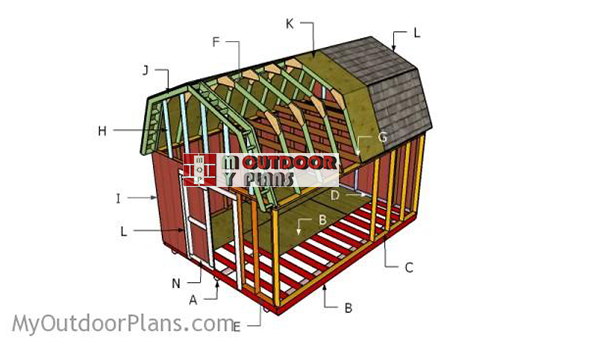
This step by step diy woodworking project is about 12×16 barn shed roof plans. The project features instructions for building a gambrel roof for a 12×16 barn shed. This barn comes with supports for a basic loft, so all you are left to do is attach the loft floor. Check out PART 3 of the article to see how to frame the double shed doors. See the rest of plans for more outdoor projects.
When buying the lumber, you should select the planks with great care, making sure they are straight and without any visible flaws (cracks, knots, twists, decay). Investing in cedar or other weather resistant lumber is a good idea, as it will pay off on the long run. Read the local building codes before starting the project, as you might need a building permit. In addition, level the area and remove the vegetation layer.
Projects made from these plans
12×16 Gambrel Shed Roof Plans
Building-a-12×16-barn-shed
Cut & Shopping Lists
- F – 36 pieces of 2×4 lumber – 55″ long TRUSSES
- G – 7 pieces of 2×4 lumber – 144″ long LOFT SUPPORTS
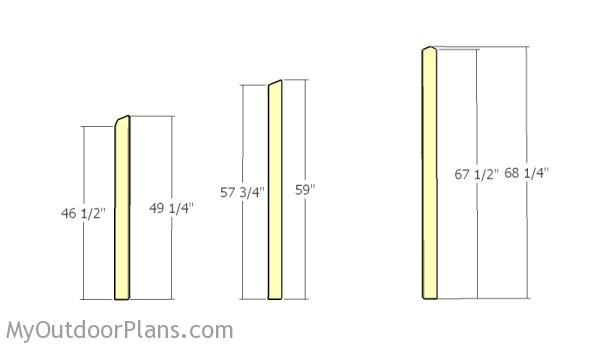
- H – 2 pieces of 2×4 lumber – 49 1/4″ long, 2 pieces – 59″ long, 1 piece – 68 1/4″ long GAMBREL ENDS SUPPORTS
- I – 4 pieces of T1-11 – 48″x62″ long, 2 pieces – 48″x72″ long SIDING
- J – 8 pieces of 2×4 lumber – 55″ long, 24 pieces – 7″ long 2xOVERHANGS
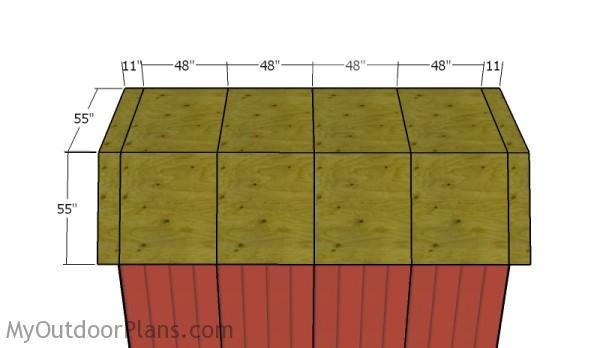
- K – 16 pieces of 3/4″ plywood – 48″x55″ long, 8 pieces – 11″x55″ long ROOF
- L – 350 sq ft of tar paper, 350 sq ft of asphalt shingles ROOFING
- 40 pieces of 2×4 lumber – 12′
- 16 pieces of 3/4″ plywood – 4’x8′
- 6 pieces of T1-11 siding – 4’x8′
- 350 sq ft of tar paper, 350 sq ft of asphalt shingles
- 500 pieces of 3″ screws
- 500 pieces of 2 1/2″ screws
- 500 pieces of 1 5/8″ screws/brad nails
Tools
![]() Hammer, Tape measure, Framing square, Level
Hammer, Tape measure, Framing square, Level
![]() Miter saw, Drill machinery, Screwdriver, Sander
Miter saw, Drill machinery, Screwdriver, Sander
Time
![]() One day
One day
Building a gambrel roof
Building-the-rafters
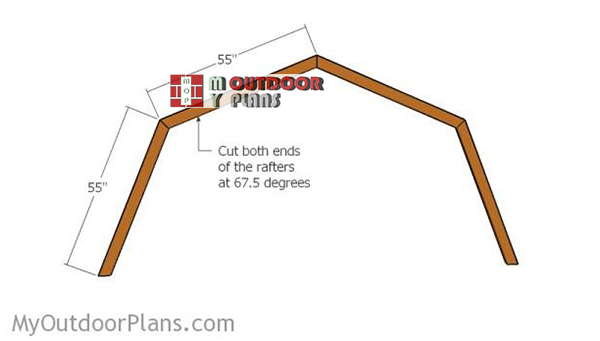
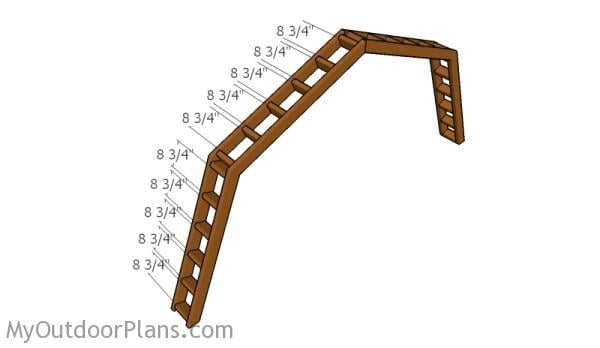
The first step of the project is to build the rafters for the barn shed. Cut both ends of the rafters at 67.5 degrees. Take accurate measurements and get the job done with a miter saw.

Attaching the gussets
Build the gussets for the trusses from 3/4″ plywood. Mark the cut lines on the plywood and get the job done with a circular saw. Attach the gussets to the rafters and lock them into place with 1 5/8″ screws.

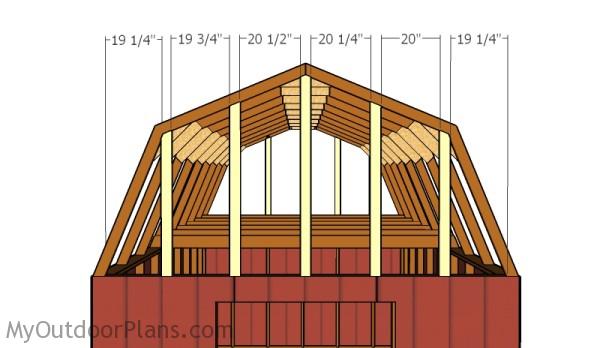
Fitting the trusses
Fit the trusses to the top of the barn shed, making sure they are placed equally-spaced. Plumb the trusses with a spirit level, drill pilot holes and insert 3 1/2″ screws into the plates.

Loft supports
Build the loft supports from 2×4 lumber. Cut both ends of the beams at 67.5 degrees.
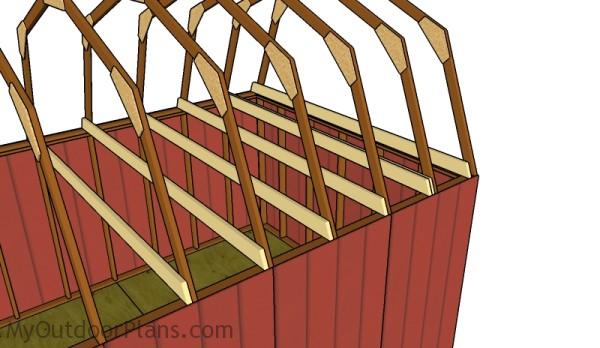
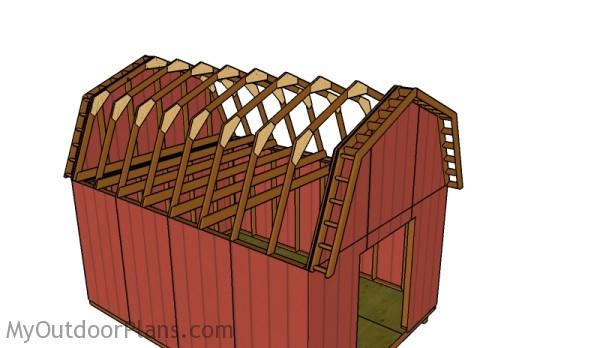
Fitting the loft supports
Fit the supports to the top plates and secure them to the trusses, as shown in the diagram. Drill pilot holes at both ends of the supports and insert 2 1/2″ screws into the trusses.
Gambrel ends supports
Build the gambrel ends support from 2×4 lumber. Make the angle cuts to the top of the supports, as shown in the plans.
Fitting the gamrel end supports
Fit the supports to the front and back faces of the shed, as shown in the plans. Toe-nail the supports to the frame of the shed.
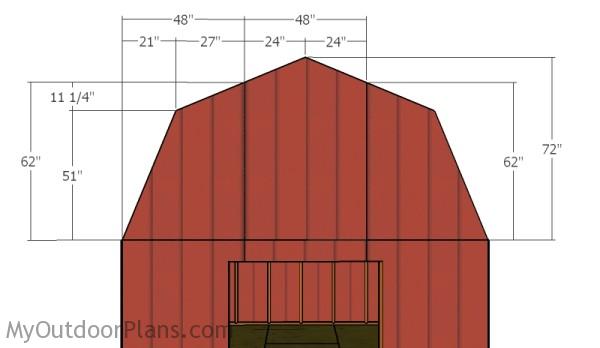
Attaching the gambrel ends
Build the gambrel ends from T1-11 siding. Cut the sheets at the right shape and dimensions. Attach the sheets to the frame and lock them into place with 1 5/8″ nails, every 8″ along the framing.
Assembling the overhangs
Build the overhangs for the barn shed. Adjust the width of the overhangs to suit your needs. Drill pilot holes through the rafters and insert 2 1/2″ screws into the blocking.
Fitting the overhangs
Fit the overhangs to the front and to the back of the shed. Align the edges with attention, drill pilot holes and insert 3″ screws into the rafters.
Attaching the roofing sheets
Attach 3/4″ plywood sheets to the rafters, using the pattern shown in the diagram. Drill pilot holes and insert 1 5/8″ screws, every 8″ along the rafters. Leave no gaps between the tongue and groove sheets.
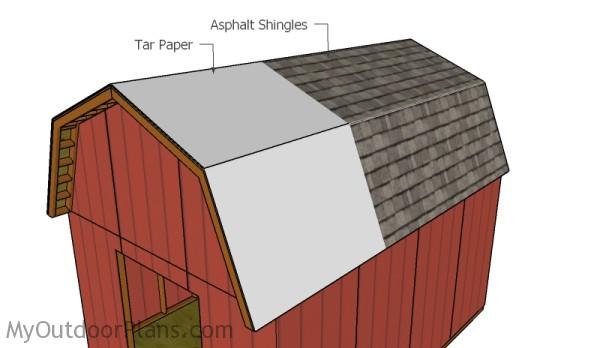
Fitting the roofing
Cover the roof of the shed with roofing felt, making sure the strips overlap at least 2″. Secure the tar paper to the plywood sheets with roofing staples. In addition, cut a 12″ piece for the top ridge. Fit the side drip edges over the roofing felt, while the bottom drip edges should be fit under.
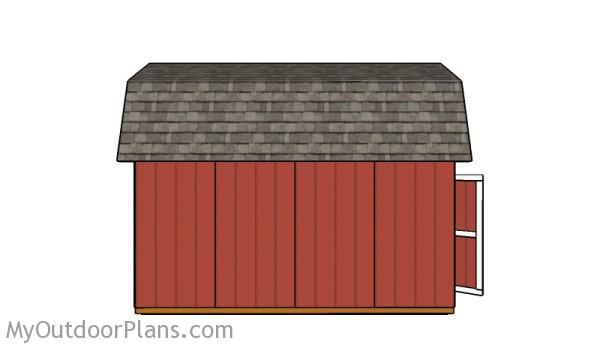
Barn shed – 12×16
Make sure you take a look over the PART 3 of the project, to learn how to build the double doors.
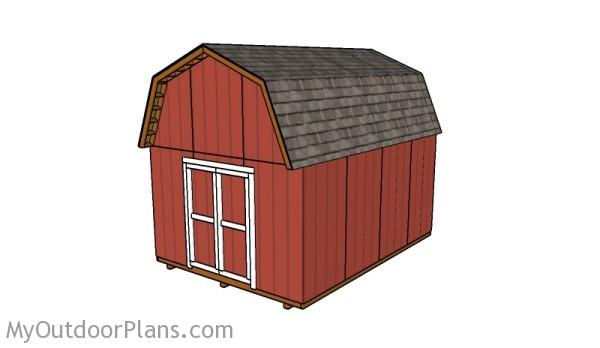
12×16 Barn Shed Plans
Fill the holes with wood putty and let them dry out for a few hours. Smooth the surface with 100-200 grit sandpaper and remove the residues with a damp cloth.
Top Tip: Check out the rest of the project, to learn how to frame of the shed, as well as the double doors.
This woodworking project was about 12×16 gambrel shed roof plans. If you want to see more outdoor plans, check out the rest of our step by step projects and follow the instructions to obtain a professional result.
 |
 |
EXPLORE MORE IDEAS FOR:
 |
 |
 |
 |
49 comments
Great site!!
Thank you for the appreciation. I’m looking forward to seeing some of your projects!
These plans served as an excellent starting point for a 12×16 barn I’m building. I’ve made several modifications:
1) Loft supports are made from 2×6 lumber rather than 2×4
2) A post and beam is being added 8 feet from one side (dividing the barn into a 4 foot “hallway” and an 8 foot pen for sheep. The main reason for adding the post and beam is to provide support under the 2×6 loft floor joists. With 2x4s 16″ o/c, a 12 foot span won’t support 30 lbs/square foot…in fact it will only support 30 psf to a maximum span of 6’10”. I wanted more support, so I switched to 2×6 hem-fir joists 16″ o/c with an 8 foot beam – to support up to 50 psf…ridiculous overkill perhaps, but it will support lots of hay in the loft
3) I added a 5-foot wide door on one end with a small electric hoist to lift hay to the loft.
4) I added a 3×3 window to one side
5) I added a standard 30″ metal door to one end (opposite the barn doors
6) Made the barn doors double doors, total of 6 feet wide
7) The whole structure is anchored to a thickened wall monolithic pour slab with a 3″ curb on one end and a 5″ curb on the other (to give a sloped floor)
8) All of the gambrel trusses are anchored with hurricane ties in addition to being toe-nailed
9) I’m hoping to put on a metal roof – in the Northwest, we have lots of moss and a metal roof is far easier to clean
…adding to my comment above-
The “8 foot beam” is supported by 2 4×6 posts and a single 4×4 post, with a 4×6 beam spanning about 11 feet – 5 1/2 feet between posts (the 4x6s on each end, the 4×4 in the middle).
The floor is 4″ 3500 psi concrete with a thickened edge of about 8″ for 1 foot from all sides (the thickened part of the slab is 1 foot wide around the perimeter.
There is a thickened area of the slab under the 4×6 post that stands in the floor area of the barn. The “curbs” (that rise above the slab” are concrete – all poured at the same time as the slab just as one would pour a curb – and are 6″ wide around the perimeter – the main “foundation” is therefore about 11 1/2″ from the top of the curb to the bottom of the foundation, and 6″ wide. Anchor bolts were cast into the curb so that the sill plate is anchored to the concrete with anchor bolts.
how did your rafters go with the 67.5 degree cuts? not so good I bet!
That s what is left after making the cut. The miter is set to 22.5 degrees
I would like to get a plan for a 12X20 Gambrel Shed Plans unit, with double door in front an two window on the side ( 20′ side) and roof plans.
Thanks Mike…
Hi there. I don’t create custom plans with specific sizes and features.
Great site ! I am using 1/2 in. ply for roof and walls if I butt them together no drip edge. Any ideas ? T1-11 is $65.00 a sheet up north. Thanks Tim
You still need to create some drip edges for the bottom edge of the roof, otherwise the water will go down the walls.
I would like the roof truss plans for a baby barn measuring 10ft by 12ft with a 5inch eve thank-you
I don’t make plans for custom sizes. However, O already have plans for a 10×12 barn shed on the site at: http://myoutdoorplans.com/shed/10×12-barn-shed-plans/ You can adjust the plans to suit your needs.
Can you send me the plans for this 12×16 shed. Thanks
Read hoe you can save the plans at: http://myoutdoorplans.com/faq/
With these plans can we add our own doors and add windows?
Of course you can. You can adjust my plans however you want.
The complete material list is not visible.
If I want to put this shed on a concrete foundation do I still need to build the floor?
No, you don’t need to.
Great site!!
Easy to follow detailed instructions and cut list, (well done!)
Thank you very much for sharing your knowledge.
You’re very welcome. Looking forward to seeing your projects!
Under the “fitting the trusses” section the directions state “insert 3 1/2″ screws into the plates” — is this supposed to say 2 1/2″ screws? The parts list doesn’t include anything longer than 3″ screws and I’m trying to plan my build. Thank you.
I would go for the 3 1/2″ screws.
I only have 9 bundles of shingles that are in a discontinued color. If I cut the eaves from the design and use 1 additional bundle of a different color for the starter strips. Will I have enough?
How many sq ft do you have in total?
Can i use a rigid board at the peak of the rafters ?
Yes, you can do that.
This is a great site. Please keep up the nice work. Thank You.
is your trusses measurements O.C. ? Do they start on the outside of the siding or inside the 1st truss? the lines of measurement are hard to see on the picture.
No, they are the measurements between the rafters. OC would be every 24″.
Quick question about these . Plans. Do you know how much if any modifications will need to be done to this to . Get the whole shed insulated?
“Fit the side drip edges over the roofing felt, while the bottom drip edges should be fit under”.
Don’t quite understand the last half of this sentence. Drip edges fitting under what. Other than that, fantastic descriptive presentation. It makes you want to rush out the door and get started.right away.
The bottom drip edges should be placed under the tar paper and asphalt shingles.
How could I make the roof taller, so I could have more height in the loft area?
You should take a look over this: http://myoutdoorplans.com/shed/12×16-lean-to-shed-with-loft-free-diy-plans/
If a guy wanted to use 2×6 lumber would all the angles and measurements be the same? Looking to use more insulation need thicker walls.
Thanks
Yes, for the truss components. No for the gambrel end supports.
Is there a variation to these plans for a 12′ high shed? I purchased these plans, however my town will not let me build over 12′ and this is almost 15′.
No.
I would suggest reorienting your sheeting for the roof 90° and dropping down to 1/2” plywood/OSB. 1/2” is plenty thick unless you are in an area with significant snow load requirements, like the Upper Peninsula of Michigan or Vermont/Maine, etc. 90° shift will give the roof much more structural integrity.
Why 55 inches?
Because that’s math
Are the gussets on both sides of the trusses or just one side?
Ideally, yes, on both sides
I can’t find plans for walls or floor
See part 1.
Do you cut rafters 22.5 or 67
You set the miter at 22.5
can i get a total count on how many 2×4’s i need total please i been reading to much and my eyes are crossing on me and from what i come up with that cant be the right price after adding it all up