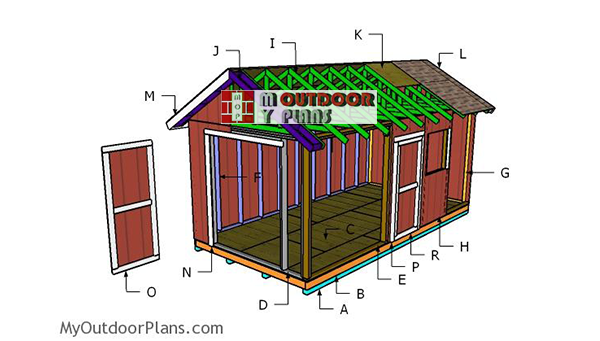
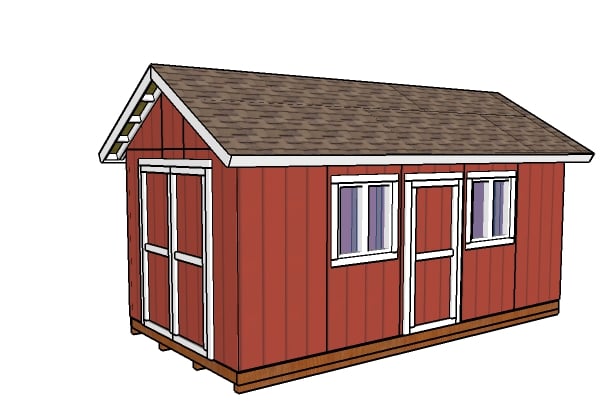
This step by step diy project is about 10×20 gable shed plans. This shed has a beautiful designs, so it is not only for storage but also for enhancing the look of your garden. The access is easy due to the double doors on one end, and a simple door on one side. The double doors will let plenty of light inside the shed. Take a look over the rest of my woodworking plans, if you want to get more building inspiration. Remember that you need to select the site for the shed with attention and that you have to comply with a few legal regulations. Premium Plans for this project available in the SHOP.
Now, let’s talk about the cost of building a 10×20 gable shed. You’re looking at around $2,000 to $3,000 for all the materials, depending on the quality of lumber, roofing, and siding you go with. If you decide to add extras like windows, a ramp, or insulation, you might want to budget an additional $500 to $800. This estimate should give you a solid idea to plan your budget and get started on your shed!
When buying the lumber, you should select the planks with great care, making sure they are straight and without any visible flaws (cracks, knots, twists, decay). Investing in cedar or other weather resistant lumber is a good idea, as it will pay off on the long run. Use a spirit level to plumb and align the components, before inserting the galvanized screws, otherwise the project won’t have a symmetrical look. If you have all the materials and tools required for the project, you could get the job done in about a day. See all my Premium Plans HERE.
Projects made from these plans
10×20 Shed Plans
Building-a-10×20-shed
Cut & Shopping Lists
- A – 8 pieces of 4×4 lumber – 120″ long SKIDS
- B – 2 pieces of 2×6 lumber – 240″ long, 16 pieces – 117″ long FLOOR FRAME
- C – 4 pieces of 3/4″ plywood – 48″x96″ long, 2 pieces – 48″x48″ long, 2 pieces – 24″x96″ long, 1 piece – 24″x48″ long FLOOR
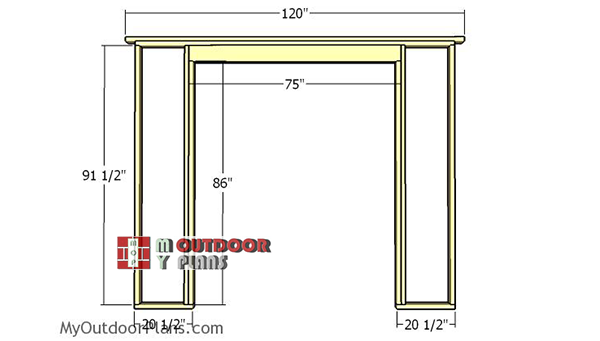
- D – 1 piece of 2×4 lumber – 120″ long, 1 piece – 113″ long, 2 pieces – 20 1/2″ long, 4 pieces – 91 1/2″ long, 2 pieces – 86″ long, 2 pieces of 2×6 lumber – 75″ long FRONT WALL
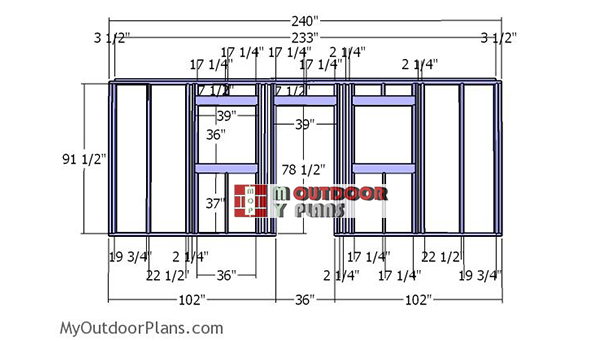
- E – 2 pieces of 2×4 lumber – 240″ long, 1 piece – 233″ long, 2 pieces – 102″ long, 16 pieces – 91 1/2″ long, 2 pieces – 78 1/2″ long, 6 pieces – 7 1/2″ long, 4 pieces – 36″ long, 6 pieces – 37″ long, 10 pieces – 39″ long SIDE WALL
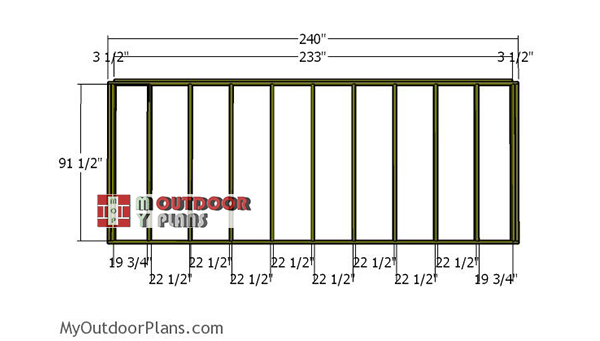
- F – 2 piece of 2×4 lumber -240″ long, 1 piece – 233″ long, 13 pieces – 91 1/2″ long SIDE WALL
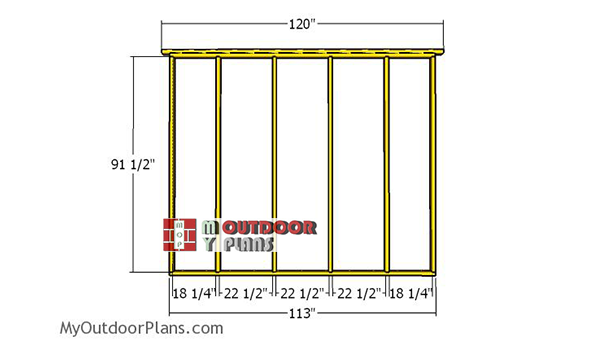
- G – 2 pieces of 2×4 lumber – 113″ long, 1 piece – 240″ long, 6 pieces – 91 1/2″ long BACK WALL
- H – 14 pieces of T1-11 5/8″ siding – 48″x96″ long, 1 piece – 24″x96″ long, 1 piece – 8 1/2″x24″ long SIDING
- 8 pieces of 4×4 lumber – 10′
- 2 pieces of 2×6 lumber – 20′
- 16 pieces of 2×6 lumber – 10′
- 7 pieces of 3/4″ plywood – 48″x96″
- 6 pieces of 2×4 lumber – 20′
- 6 pieces of 2×4 lumber – 10′
- 47 pieces of 2×4 lumber – 8′
- 7 pieces of 2×6 lumber – 8′
- 16 pieces of T1-11 5/8″ siding – 4’x8′
- 2 1/2″ screws, 3 1/2″ screws, 1 5/8″ screws
- 4d nails, 16d nails
- skid ties
- wood filler , wood glue, stain/paint
Tools
![]() Hammer, Tape measure, Framing square, Level
Hammer, Tape measure, Framing square, Level
![]() Miter saw, Drill machinery, Screwdriver, Sander
Miter saw, Drill machinery, Screwdriver, Sander
Time
![]() One weekend
One weekend
Related
- PART 1: 10×20 Shed Plans
- PART 2: 10×20 Gable Shed Plans
- PART 3: Double Shed Doors Plans
It’s that easy to build a 10×20 shed – Video!
How to build a 10×20 shed
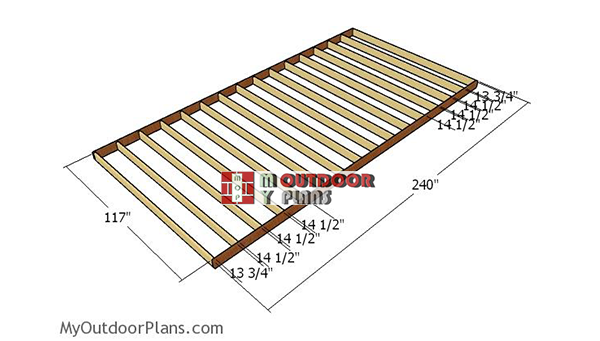
Building-the-floor-frame-10×20-shed
First, build the floor frame for the 10×20 shed. Cut the joists from 2×6 lumber at the right dimensions. Align the edges flush, drill pilot holes through the rim joists and insert 3 1/2″ screws into the perpendicular components. Place the joists every 16″ on center.
Select the right location for the large gable shed and then level it Compact a layer of gravel and then lay the 4×4 skids. Fit the floor frame to the skids and align the edges flush. Use rafter ties to secure the frame to the skids. Leave no gaps between the components for a professional result.
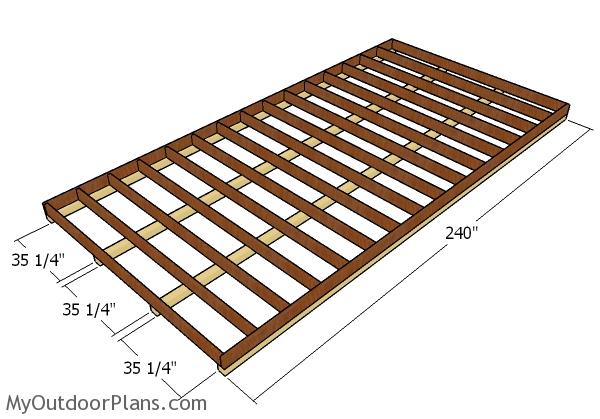
Fitting the skids
Select the right location for the large gable shed and then level it Compact a layer of gravel and then lay the 4×4 skids. Fit the floor frame to the skids and align the edges flush. Use rafter ties to secure the frame to the skids. Leave no gaps between the components for a professional result.
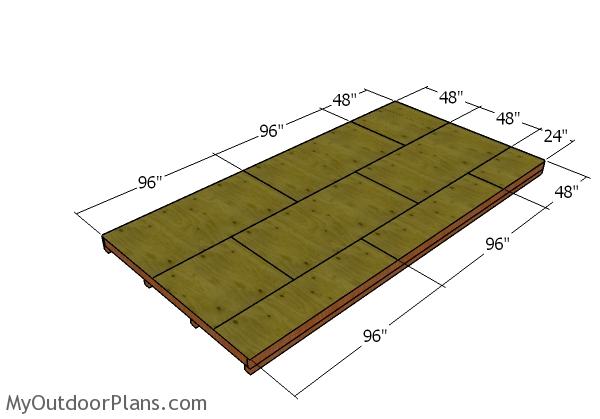
Fitting the floor sheets
Fit the 3/4″ plywood sheets to the floor frame. Align the edges flush and leave no gaps between the components. Drill pilot holes through the sheets and insert 1 5/8″ screws, every 8″, so you lock them into place tightly.
Side-wall-frame
Next, you have to assemble the side wall for the 10×20 shed. Cut the components from 2×4 lumber and 3 1/2″ screws. Place the studs every 24″, so you can get a professional result. Center the double top plate and lock it into place with 3 1/2″ screws. You can adjust the height of the side walls by cutting the studs shorter.
Side-wall-with-window-and-door-frame
Build the side wall with windows from 2×4 lumber. Use 2×6 lumber for the double headers. You can adjust the size of the windows, so you get enough light inside the shed for your needs. Fit 1/2″ plywood between the double 2×6 headers. Use 2 1/2″ screws and glue to sandwich the double headers in a professional manner.
Back-wall-frame
Build the back wall from 2×4 lumber, as well. Center the double top plate to the top of the wall frame and lock it into place with 2 1/2″ screws. Place the studs every 24″ on center for a professional result.
Front-wall-frame
Frame the front wall, making sure you leave enough space for the double doors. Cut the components from 2×4 lumber and the headers from 2×6 lumber. You can adjust the size of the double door to suit your needs.
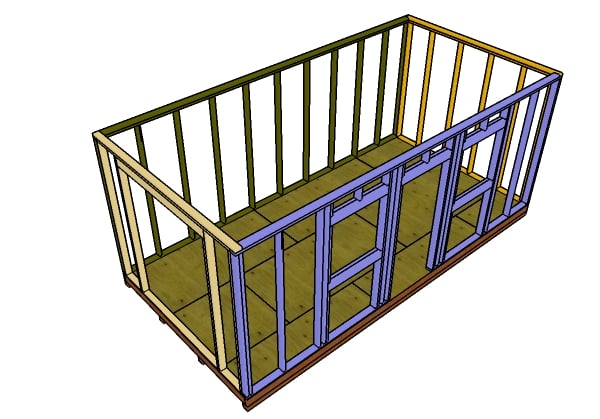
Assembling the shed frame
Fit the wall frames to the top of the floor. Align the edges with attention and plumb the walls vertically. Drill pilot holes through the bottom plates and insert 3 1/2″ screws into the floor of the shed. Lock the adjacent walls together with 2 1/2 screws for a professional result.
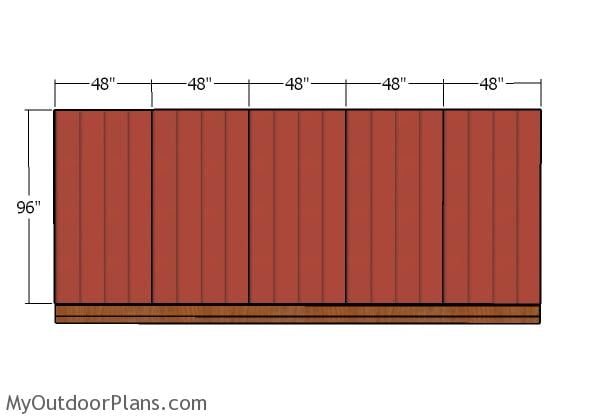
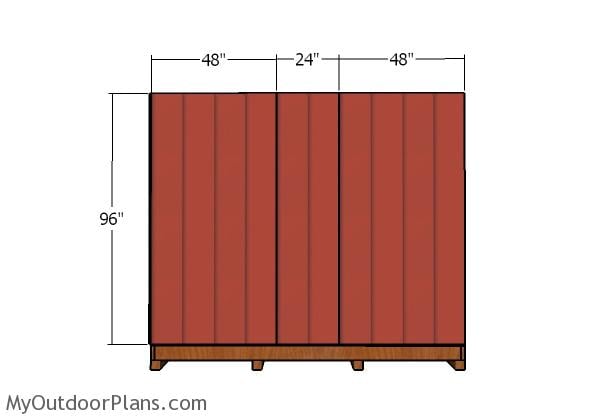
Side wall – Siding
Fit the T1-11 siding sheets to the sides of the 10×20 shed. Align the sheet to the wall frame and lock it into place with 6-8d nails. Leave no gaps between the sheets and lock to the framing, every 6-8d nails.
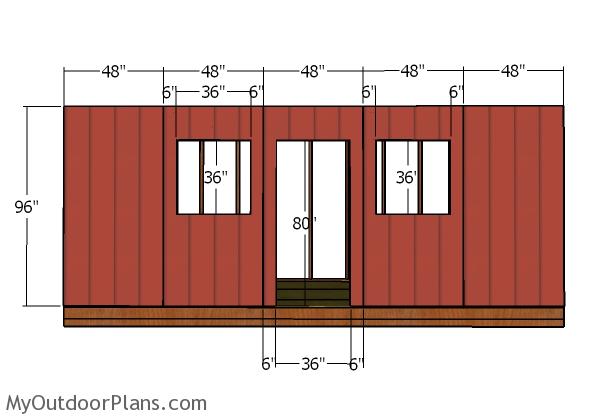
Side wall with window – Siding
Fit T1-11 siding sheets to the opposite side wall, for a professional result. Make sure you make cuts so the sheets can fit around the door opening and around the window openings. Use 6-8d nails and insert them every 8″ along the framing.
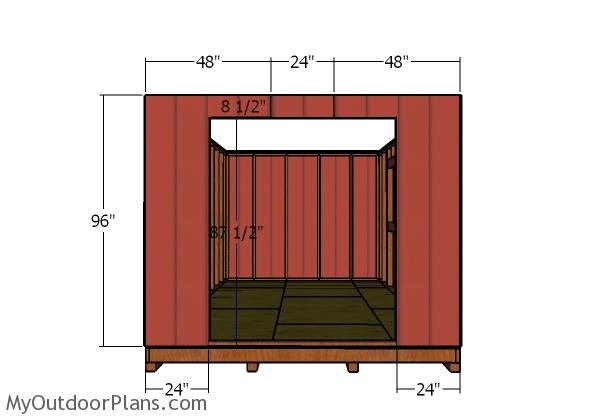
Front wall – siding
Fit the T1-11 siding sheets to the front of the shed. Make the necessarily cuts so the sheets can fit around the wall framing. Align the edges with attention and use 6-8d nails to lock the sheets into place tightly.
Back wall – Siding
Fit the T1-11 siding sheets to the back of the shed, as well. Leave no gaps between the sheets and align them for a professional result.
once your 10×20 gable shed is built, there are some fantastic add-ons to consider. You can add a loft for extra storage space. Adding a workbench, shelves, and hooks inside can transform your shed into a versatile workspace, making it even more functional and organized.
10×20 Shed Plans
This 10×20 shed project is the ideal shed if you want to build a small workshop or to shelter your bikes in a stylish manner. Don’t forget to take a look over PART 2 and PART 3 to learn how to build the roof for the shed, as well as how to frame the double front doors. Premium Plans for this project available in the SHOP.
I want to dive into the benefits of building a 10×20 gable shed. First off, it provides a ton of storage space for all your tools, equipment, and outdoor gear, keeping everything organized and easily accessible. Plus, it’s a great way to add value to your property while giving you a functional and stylish addition to your backyard. And, of course, there’s the satisfaction of building something sturdy and useful with your own two hands!
If you want to get PREMIUM PLANS for this project (different design with re-engineered structure), in a PDF format, please press GET PDF PLANS button bellow. Thank you for the support.

This woodworking project was about 10×20 gable shed plans free. If you want to see more outdoor plans, check out the rest of our step by step projects and follow the instructions to obtain a professional result.

EXPLORE MORE IDEAS FOR:
 |
 |
 |
 |
16 comments
Angles wrong on 10×20 sheds 30degree’s and 60 degrees 30 on top 60 on 10″
Can I download these instructions in a pdf file?
Yes. See the FAQs: http://myoutdoorplans.com/faq/
I am interested in building this shed as a place to store boats in the winter in NH. The roof framing seems really close, and I am wondering if I can get away with something a little less close. .
Ideally I could space the ceiling joists further apart in order to be able to stick paddles and stand up paddle boards up there. Do you have any thoughts on how much I would have to go up in stock in order to have the joists spaced further apart? Do you have or know of plans for this size that has ceiling joists that are heavier stock and further spaced apart?
You can use engineered trusses and space them up to 4′ oc. Something like in this plans: https://myoutdoorplans.com/shed/16×24-pole-barn-plans/
I really like these plans and the step by step. Do you have plans design and material list for a 10 x 24 shed?
No plans for a 10×24 yet.
Looking for plans for a 10 x 20 shed on a concrete floor.
I like this plan but I don’t see any information on the truss and how to build it.
Please take a look over Part 2 of the project, for details on the roof structure.
I like the plans for the 10’x20′ shed. I want to put a loft in on both ends. How would I modify the plans to allow for a loft and still maintain roof integrity?
You need a ridge beam. 2x8s for the bottom chords.
I bought the PDF for the 10×20 shed, after looking over this version online. I noticed several differences in the online and PDF versions, and wondered if there were practical reasons.
1. The online version uses the full 96″ lengths for the siding, while the PDF trims several inches from the lengths. Was there a reason for that? Seems like less cutting required for full sheets.
2. The roof pitch is slightly different. Trusses cut at 30 degree for online, and 26.5 for the PDF. Is one better?
Thanks!
The Premium Plans are re-engineered versions of the free plans. The 26.5 is a standard 6:12 roof pitch. The difference regarding the siding sheets is determined by different wall heights.
Are there more professional plans available for this shed that I can submit to the county so I can get a permit, Can the pitch be made a 5/12?? I have already bought these plans last year and have built the shed. Looks good but I did not know I needed a permit.
What was the total cost you paid for all the supplies? And in what year? Tyvm