This step by step woodworking article is about wooden sandbox plans free. This project is a great opportunity to bring the whole family together and pass down several woodworking skills to your kids. Basically, you need to build a wooden box and add a couple of elements, to make an unique sandbox with seats. You could design the construction as to fit your needs and tastes, making sure you involve your kids in the planning process. The kids will play for hours in the boat, having in mind the beautiful landscape of the blue sea and of the golden sand.
Buy quality materials if you want to build a durable sandbox, staring with the 2×12 beams and up to the 1×6 slats. Make sure the lumber is perfectly straight and in a good condition, otherwise the end result might not raise up to your expectations. Pre-drill all the wooden components before inserting the screws, to prevent the wood from splitting. In addition, check the corners for squareness, after every step. See all my Premium Plans HERE.
Projects made from these plans
Cut & Shopping Lists
- CA – 2 pieces of 2×12 lumber 93” long SIDES
- B – 2 pieces of 2×12 lumber 48” long FRONT AND BACK
- C – 4 pieces of 4×4 lumber 11 1/2” long LEGS
- D – 50 sq ft of landscaping fabric LANDSCAPE FABRIC
- E – 1 piece of 1×10 lumber 48” long BACK SEAT
- F – 4 pieces of 1×6 lumber 48” long FRONT SEAT
- G – 1 piece of 1×6 lumber 48” long, 2 pieces of 1×3 lumber 17” long BACKREST
Tools
![]() Hammer, Tape measure, Framing square
Hammer, Tape measure, Framing square
![]() Miter saw, Drill machinery, Screwdriver, Sander, Router
Miter saw, Drill machinery, Screwdriver, Sander, Router
Time
Free Sandbox Plans
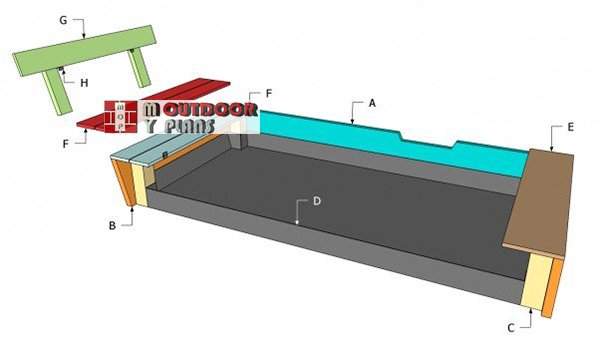
Kids-sandbox-plans
Building a sandbox is one of those projects that don’t require a large investment, but would put a big smile on the face of your kids. In this project we show you how to build a sandbox with an unique design. The four sides are made out of 2×12 lumber, while the front and the back seats are built from 1×6 lumber.
Top Tip: Cover the bottom of the wooden sandbox with landscaping fabric, to prevent the weeds from growing up. The front retractable seat is a great feature, but it requires several hinges and thorough planning.
Wooden Sandbox Plans
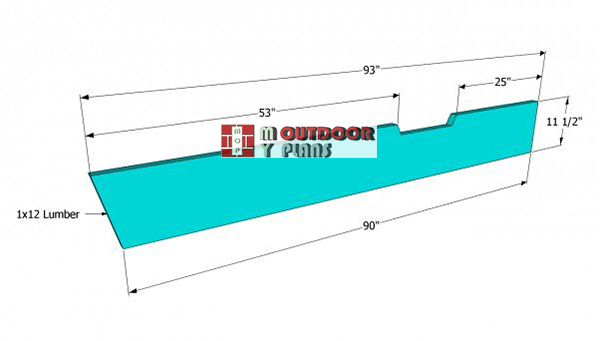
Building-the-sides-of-the-sand-box
The first step of the project is to build the sides of the sandbox. As you can see in the free plans, you should build the components from 2×12 lumber, as you need thick slats to increase the rigidity of the construction. Cut one end of the boards at 15º, in order to enhance the look of the boat sandbox.
Sand the exposed edges of the slats with a sand-block and 120 git sandpaper, or make them round with a router and a 1/4” bit.
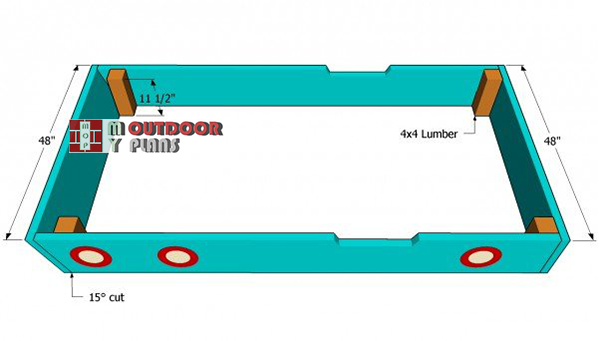
Assembling-the-sandbox-for-kids
Afterwards, build the front and the back components of the wooden sandbox and install them into place, as in the image. You need you drill pilot holes trough the 2×12 slats and insert several carriage bolts in the corner posts.
Top Tip: Work with great attention and good judgement, making sure the front and back components are flush with the side boards. Check if the corners are square and the sides plumb.
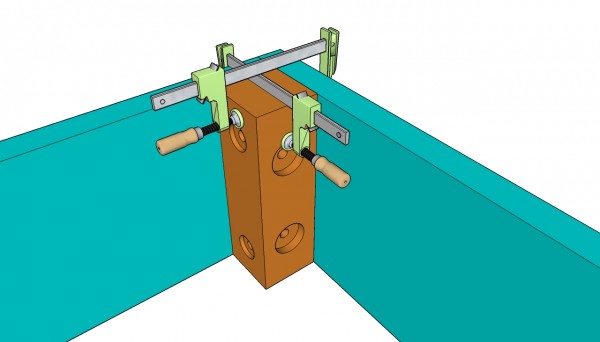
Sandbox corner joints
As you should notice in the free plans, you should lock the components together with several C-clamps, before drilling the pilot holes and inserting the 5” carriage bolts. Check if the parts are aligned properly, before drilling pilot holes.
Top Tip: We recommend you to countersink the bolts, in order to obtain a neat appearance. Use a carpentry square, to make sure the corners are right angled.
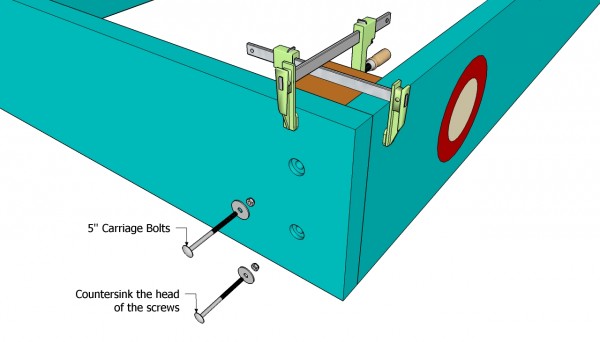
Inserting the bolts
Afterwards, install the bolts, with the heads and a washer on the outside, while the nuts and the other washers should be on the inside. The bolts have to be flush with the lumber, so make sure you countersink them.
Top Tip: Measure the diagonals of the wooden frame and adjust the components until they are equal. Don’t over-tighten the bolts, to prevent the wood from splitting.
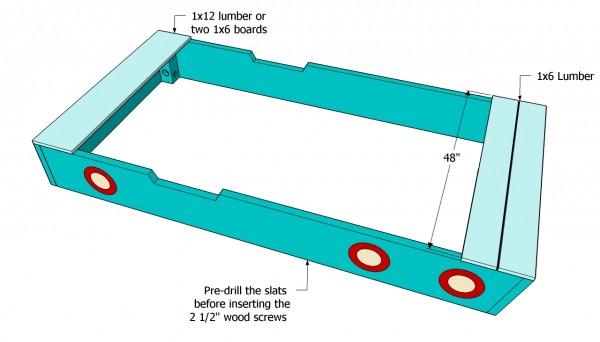
Installing the top slats
After building the frame of the sandbox, you should install the front and the back seats, using 1×6 lumber. Cut the components at the right size and align them into place properly. Drill pilot holes and insert decking screws (2 1/2” screws). Don’t forget the countersink the head of the screws.
Top Tip: Leave about 1/4” between the slats, in order to obtain consistent results. Round the edges with sandpaper or using a router.

Sandbox-seat-plans
If you really want to build a great sandbox with unique features, you should take into account building a custom made seat with retractable back rest. As you should notice in the image, you should use several hinges, as to lock the components together.
Build the intermediate components from two 1×6 slats and secure them together with two 1×3 supports. Align component and install two hinges, as in the image.
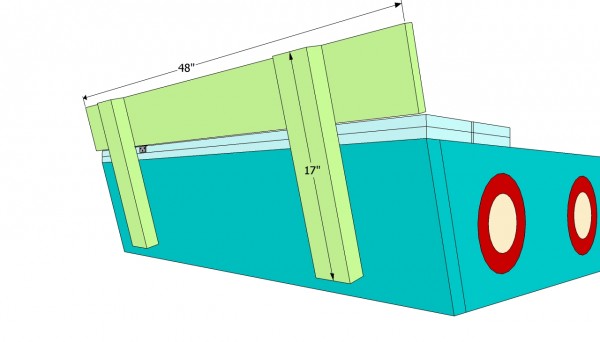
Installing the backrest
Building the back rest is a straight forward task, if you use the right plans. Therefore, use one 1×6 slat and two 1×3 supports, in order to get the job done. Secure the braces to the slat, using several 2” wood screws, working on a level surface.
Smart Tip: Place the back support on top of the intermediate component and align it at both ends. Afterwards, install the two hinges, to lock the parts together tightly.
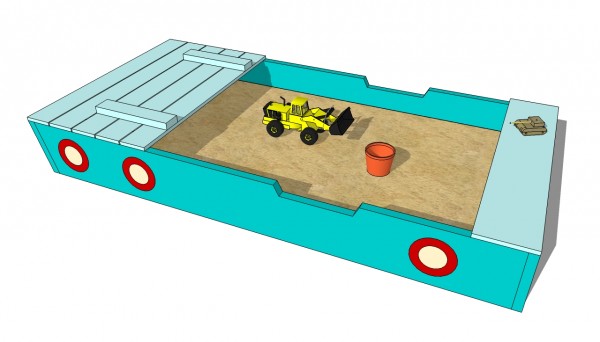
Wooden sandbox plans
Last but not least, you have to fill the holes, the head of the screws and the gaps with a good filler. Let the compound to dry out for several hours, before sanding the surface with medium-grit sandpaper.Vacuum the surface thoroughly, to remove the debris, before applying the paint coats.
Top Tip: Apply several coats of primer and water-resistant paint, to protect the playhouse from rot. Don’t forget to wear a respiratory mask wile applying the paint.
This article was about wooden sandbox plans free. If you want to see more outdoor plans, check out the rest of our step by step projects and follow the instructions to obtain a professional result.


