This step by step woodworking project is about kids playhouse plans. If you want to make your kids happy and create a cozy place where they can play for hours in a row and create their own universe, you should consider building a wooden playhouse. There are many plans to choose from when building the playhouse for your kids, so make sure you take a look over several alternatives.
Buy quality materials if you want to build a durable playhouse, starting with the 2×4 beams up to the 3/4” plywood. Make sure the lumber is perfectly straight and in a good condition, otherwise the end result might not raise up to your expectations. Pre-drill all the wooden components before inserting the screws, to prevent the wood from splitting. In addition, check the corners for squareness, after every step. See all my Premium Plans HERE.
Projects made from these plans
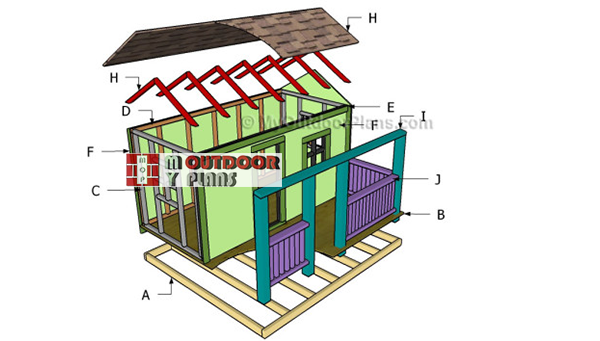
Building a kids playhouse
Building-a-kids-playhouse
Cut & Shopping Lists
- A – 2 pieces of 2×4 lumber 96” long, 7 pieces of 2×4 lumber 81” long JOISTS
- B – 1 sheet of 3/4″ tongue and groove plywood 48″x96″, 1 piece – 36″x96″ FLOORING
- C – 2 pieces of 2×2 lumber – 43 1/2” long, 4 pieces – 45”, 3 pieces – 16″, 2 pieces – 7 1/4″ 2xSIDE WALLS
- D – 2 pieces of 2×2 lumber – 94 1/2” long, 7 pieces – 45” BACK WALL
- E – 2 pieces of 2×2 lumber – 94 1/2” long, 7 pieces – 45”, 3 pieces – 14 1/2″, 1 piece – 3 1/2″, 2 pieces – 6 1/2″ FRONT WALL
- F – 2 pieces of 3/4″ plywood – 48″x94 1/2″, 2 pieces – 48″x94 1/2″ WALLS
- F – 100 ft of 1×3 lumber TRIMS
- 9 pieces of 2×4 lumber – 8′
- 6 pieces of 3/4″ plywood – 4’x8′
- 18 pieces of 2×2 lumber – 8′
- 10 pieces of 1×3 lumber – 8′
- 3 pieces of 1×4 lumber – 8′
- 2 pieces of 1×2 lumber – 8′
- 1 5/8″ screws, 2 1/2″ screws
- 6d nails
Tools
![]() Hammer, Tape measure, Framing square
Hammer, Tape measure, Framing square
![]() Miter saw, Drill machinery, Screwdriver, Sander
Miter saw, Drill machinery, Screwdriver, Sander
Time
Related
- Part 1: Kids Playhouse Plans
- Part 2: Playhouse Roof Plans
Kids Playhouse Plans
Building-the-floor-frame
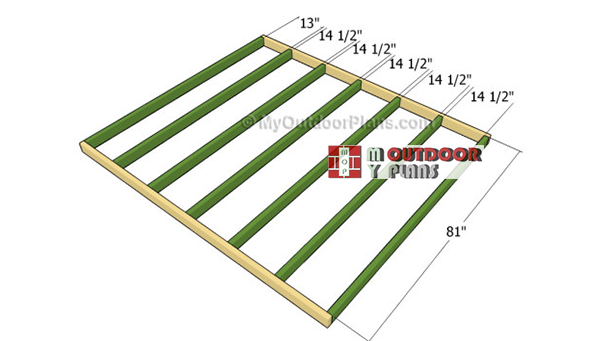
The first step of the woodworking project is to build the frame of the floor. In order to get a professional result, we recommend you to assemble the frame as described in the diagram. Drill pilot holes through the perimeter joists and insert 2 1/2″ screws into the perpendicular joists.
Leave no gaps between the components and make sure the corners are square. Place the frame on several 4×4 skids or on concrete piers.
Attaching the floor
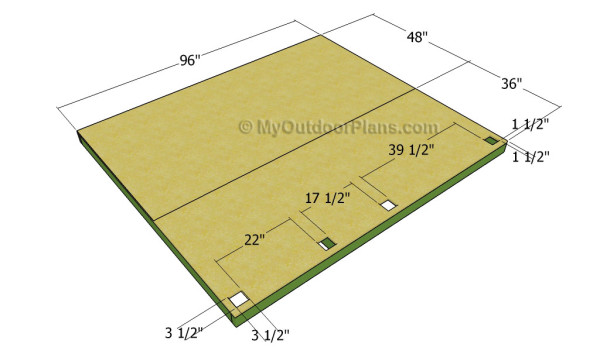
The next step of the outdoor project is to attach the 3/4″ plywood sheets over the joists. Smooth the cut edges with sandpaper and make several notches inside the front sheet of plywood. Drill a starting hole and make the rectangular holes to fit the posts.
Top Tip: Leave no gaps between the components and make sure the edges are flush. Drill pocket holes along the joists and insert 1 1/4″ screws.
Building-front-wall-frame
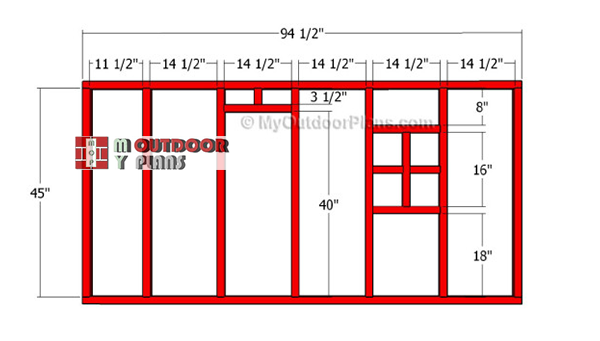
Continue the woodworking project by building the front face of the playhouse. As you can easily notice in the plans, we recommend you to build the plates and the studs out of 2×2 lumber.
Top Tip: Drill pilot holes through the wooden plates and insert 2 1/2″ galvanized screws into the perpendicular studs. Make sure the corners are right-angled. Frame the door and the windows as described in the diagram.
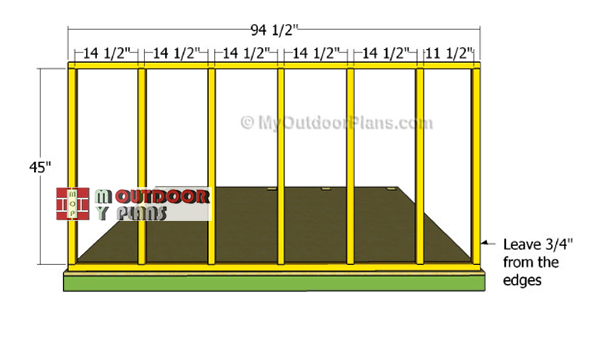
Building-the-back-wall-frame-playhouse
On the other hand, building the back wall is a straight-forward process, but you need to take everything step by step and to invest in high quality materials. Drill pilot holes through the plates and insert screws into the studs. Make sure the corners are square and leave no gaps between the components.
Plumb the wall with a spirit level and lock it to the floor by using 3 1/2″ screws. Make sure you place the studs equally spaced, in order to get a professional result.
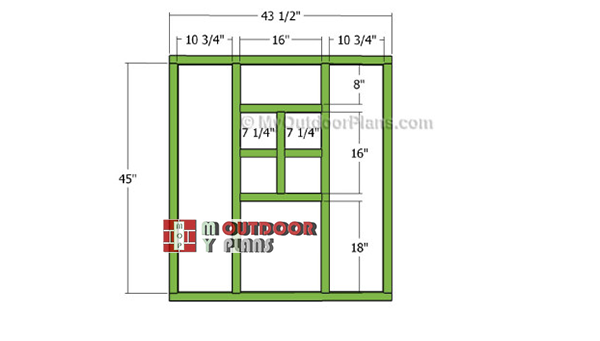
Building-the-side-wall-playhouse
In order to get the job done in a professional manner, we recommend pay attention to the instructions described in the diagram. Cut the components at the right size and lock them together using 2 1/2″ screws.
In order to enhance the look of the playhouse, we recommend you to frame windows on both sides of the playhouse. Cut the components out of 2×2 lumber and lock everything together tightly.
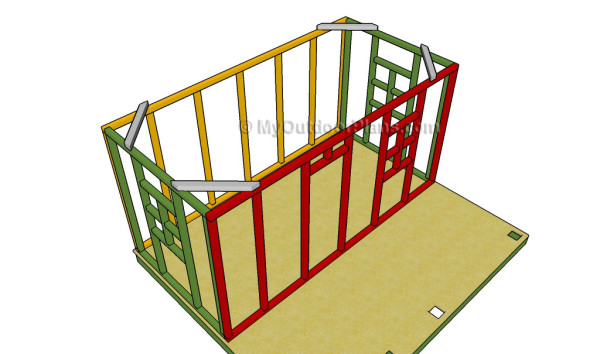
Assembling the frame of the playhouse
The next step of outdoor project is to assemble the frame of the playhouse and to assemble the walls to the floor. As you can easily notice in the plans, we recommend you to secure the walls temporarily together by using braces.
Drill pilot holes through the bottom plates and secure them to the joists using 3 1/2″ screws. Plumb the walls with spirit level and lock the adjacent walls together with 2 1/2″ screws.
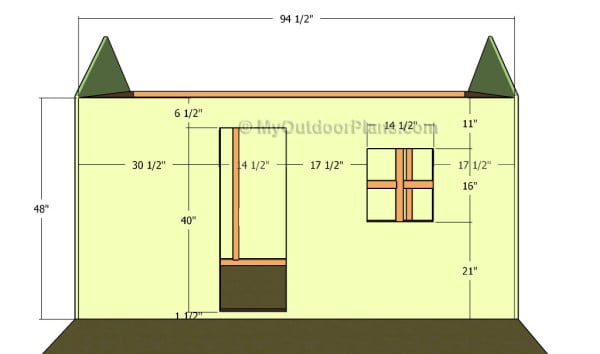
Fitting the front face
After assembling the frame of the playhouse, we recommend you to attach the 3/4″ plywood panels to the exterior of the playhouse. Therefore, mark the cut lines over the plywood sheet and get the job done with a circular saw.
Top Tip: Drill starting holes and create the notches by using a circular saw. Smooth the cut edges and make sure the corners are right-angled. Drill pilot holes through the panel and secure to the frame by using 1 1/4″ screws.
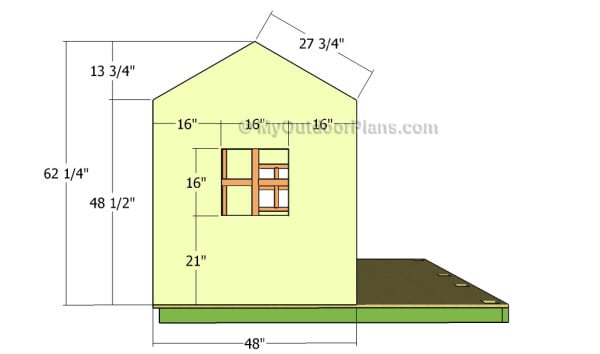
Fitting the side components
The next step of the project is to build the side panels for the kids playhouse and to secure them to the walls, as shown in the diagram. In order to get a professional result, we recommend you to mark the cut lines on the 3/4″ plywood sheets and to get the job done with a circular saw.
Drill a starting holes and create the notch by using a jigsaw. Smooth the cut edges with sandpaper and remove the residues by using a vacuum cleaner. Secure the panels to the frame by using 1 1/4″ screws.
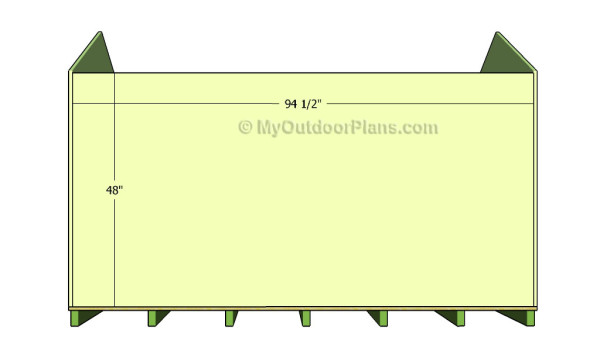
Fitting the back wall
The next step of the woodworking project is to attach the back wall to the playhouse structure. Make sure the edges are flush and leave no gaps between the components. Secure the plywood wall to the frames by using 1 1/4″ screws.
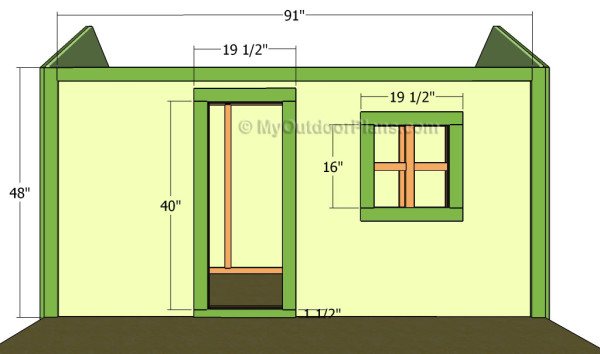
Fitting the front trims
In order to enhance the look of the kids playhouse, we recommend you to attach 1×3 trims to the corners of the playhouse and around the doors and windows. Cut the slats at the right size and secure them to the walls by using finishing nails and waterproof glue.
Align all the trims with attention and leave no gaps between the components. Lock the components into place by using finishing nails and glue. Make sure the edges are flush.
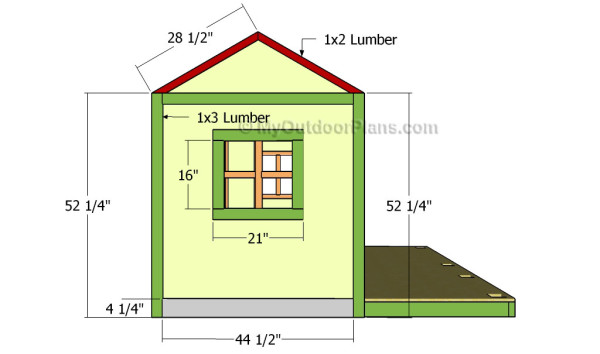
Fitting the side trims
Attach the trims in the same manner described above to the side walls. In order to get a professional result, we recommend you to take accurate measurements and adjust the size of the trims at the right size. Attach 1×2 trims to the gable ends.
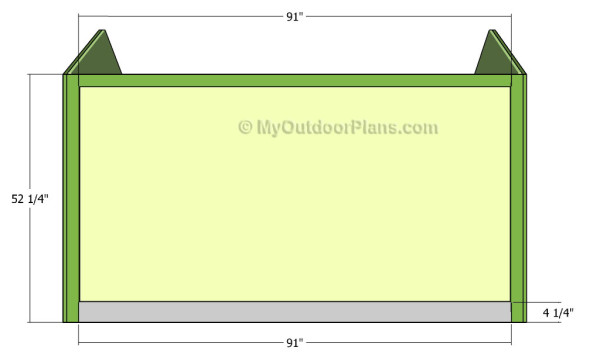
Fitting the back trims
One of the last steps of the project is to attach the trims to the back of the playhouse. Therefore, we recommend you to use 1×3 lumber and to secure them into place by using 1 1/4″ finishing nails. Add waterproof glue to the joints and remove the excess with a damp cloth. Leave no gaps between the components and lock everything together tightly.
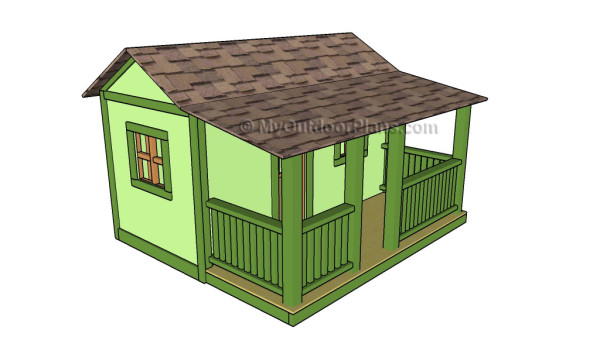
Kids playhouse plans
Last but not least, you have to fill the holes, the head of the screws and the gaps with a good filler or a bead of silicone. Let the compound to dry out for several hours, before sanding the surface with 120-grit sandpaper.Vacuum the surface thoroughly, to remove the residues.
Top Tip: Apply several coats of primer and water-resistant paint, to protect the playhouse from rot . Don’t forget to check out the rest of the project about building the roof.
This article was about kids playhouse plans free. If you want to see more outdoor plans, check out the rest of our step by step projects and follow the instructions to obtain a professional result.


7 comments
Trying these get the material together for this project but it’s a little confusing on what I need to get before cutting it all to size. Could I get a little clarification on what the whole pieces are I need to get?
Check out the materials list. I’ve just updated it.
I see the materials list and I am confused. Is the first part the cut list and the second part underneath it the shopping list?
Yes. That’s correct.
Hi there. Looking to build a playhouse very similar to this one so think I’ll go off these plans and modify to my ideas a little. Two questions:
Any benefit to framing walls with 2×4 instead of 2×2? Want to put in working double hung windows if I can find small enough ones.
Also, doesn’t show foundation instructions. Have any to offer? You can email me if yes.
Thanks!
Hi. The 2x4s make the frame of the playhouse more rigid and thus appropriate for use in any climate. I don’t have instructions for foundation, and personally, I don’t see the need for that as it’s a playhouse.
Do you have a pdf we can download for this DIY playhouse