This step by step diy project is about wall planter plans. If you want to add character to you backyard, you should consider building a delicate wall planter. After assembling the structure, you need to secure it to a wall or to your privacy fence. Drill a pilot holes through the back support and insert several screws into the wall, in order to create a rigid structure. Make sure you insert the screws into concrete or into a wooden beam.
Align the wooden components at both hand before driving in the screws. Don’t forget to pre-drill holes in the components, as to prevent the wood from splitting. Moreover, don’t forget to countersink the head of the screws, before inserting the wooden screws. Last but not least, apply a good wood filler in the holes, let it dry out properly and sand the surface thoroughly with 120-grit sandpaper, before applying the final coats of stain. See all my Premium Plans HERE.
Projects made from these plans
Wall Planter Plans
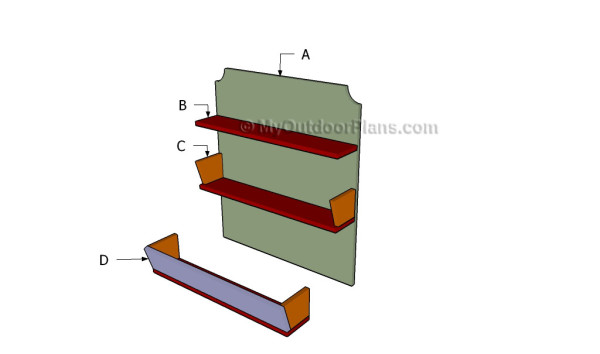
Building a wall planter
Cut & Shopping Lists
- A – 1 pieces of 3/4″ plywood – 33 1/2”x30″ long BACK
- B – 3 pieces of 1×6 lumber – 30” long BOTTOM
- C – 2 pieces of 1×6 lumber – 6″ long SIDES
- D – 3 pieces of 1×6 lumber – 30″ long FACE
- 2 pieces of 1×6 lumber – 8 ft
- 1 piece of 3/4″ plywood – 3’x3′
- 1 5/8″ screws
- 2 1/2″ screws
- wood glue
- wood filler
- wood stain
Tools
![]() Hammer, Tape measure, Framing square
Hammer, Tape measure, Framing square
![]() Miter saw, Drill machinery, Screwdriver, Sander
Miter saw, Drill machinery, Screwdriver, Sander
Time
Related
Building a wall planter
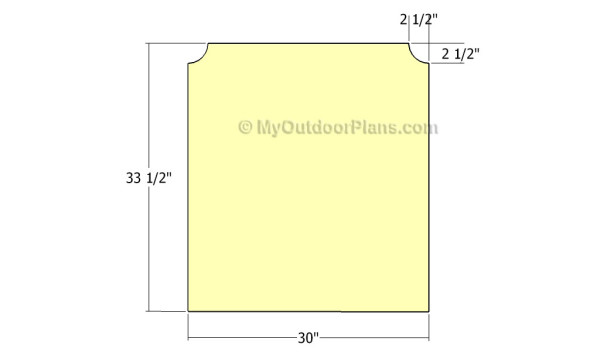
Building the wall support
The first step of the woodworking project is to build the back of the wall planter. as you can see in the diagram, you need you mark the cut lines on a 3/4″ piece of plywood. Use a good jigsaw to make the cuts and smooth the edges with sandpaper.
Use a round object to make the decorative notches to the top of the back component. You could add a personal touch to the component, by using your imagination.

Building the sides of the planter
The next step of the garden project is to build the sides for the planters. Mark the cut lines on a piece of 1×6 lumber and get the job done with a circular saw, making sure the blade of the tool goes exactly over the cut lines. Smooth the edges with sandpaper and remove the residues with a vacuum.
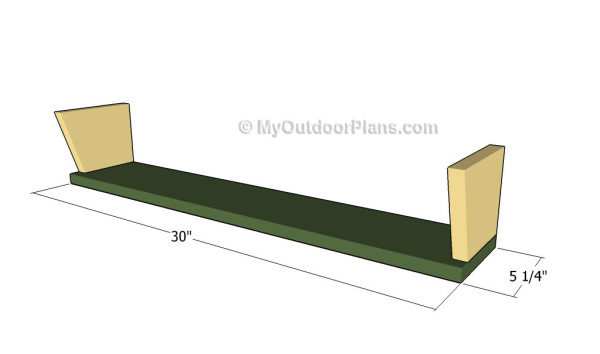
Building the frame of the planters
Next, you need to attach the sides to the bottom components. the quickest way to get the job done in a professional manner is to drill pilot holes through the bottom and to insert 1 1/4″ screws into the side components. Add glue to the components in order to create rigid joints.
In addition, we recommend you to make sure the corners are square, otherwise the end result won’t suit your needs. Align everything with attention, as the edges should be flush one with another.
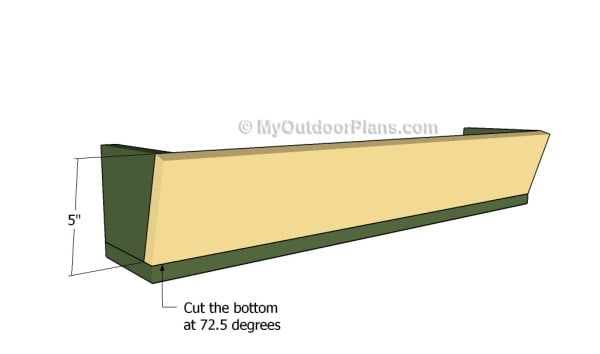
Fitting the face of the planters
Build the face components for the planters out of 1×6 lumber. Adjust the size of the slat at a width of 5″ and use a circular saw to get the job done in a professional manner. In addition, we recommend you to cut the bottom edge at 72.5 degrees, in order to fit into place properly.
Drill pilot holes along the sides of the face component and insert 1 1/4″ finishing nails to get a professional result. Add glue to the joints to create a rigid structure.

Fitting the planters to the support
One of the last steps of the woodworking project is to attach the planters to the back support. In order to get a professional result, you could drill pilot holes along the sides of the back support and insert 1 1/4″ screws into the planters.
Alternatively, you could drill pocket holes along the back edges of the planters sides and insert 1 1/4″ screws into the back wall. Don’t forget to add glue to the joints and to remove the excess.
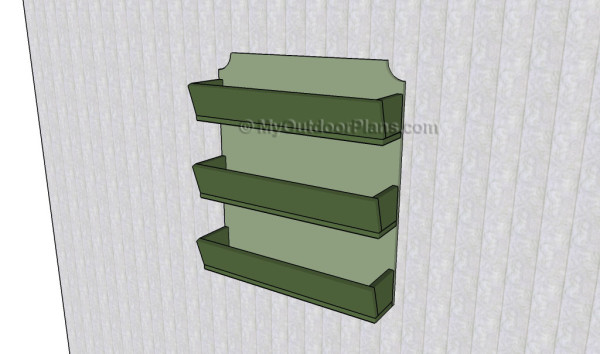
Wall planter plans
Last but not least, you should take care of the finishing touches. Therefore, you need to fill the cracks with wood putty and let it dry out for several hours. Afterwards, sand the wooden surfaces with 120-grit sandpaper and vacuum the residues thoroughly.
Top Tip: Protect the wooden components from wood decay by applying several coats of stain or paint.
This article was about wall planter plans. If you want to see more outdoor plans, we recommend you to check out the rest of our projects. LIKE us on Facebook to the the first that gets our latest projects and send us pictures with your DIY projects.


