Step by step woodworking project about raised bed plans. If you want to grow your own vegetables in the backyard, without affecting its design, you could build a simple raised garden bed, from 2×6 wooden boards and 4×4 posts. There are many sizes and designs you could choose from, therefore you have to know the plans you are going to grow, from the very beginning. A cedar raised bed would make gardening a relaxing activity, but they are usually pretty expensive for any budget, therefore you could try to build the planters by yourself.
Select the lumber with great care, making sure the wooden boards (cedar, pine, redwood) are perfectly straight and don’t have any kind of visible flaws. In addition, the lumber has to be resistant to water and decay, otherwise you would have to build one every spring. Work with attention and with good judgement, making sure the sides of the bed are plumb and perfectly aligned one with another. See all my Premium Plans HERE.
Projects made from these plans
[tabs tab1=”Materials” tab2=”Tools” tab3=”Time”]
[tab id=1]
- A – 4 pieces of 4×4 lumber 30” long POSTS
- B – 4 pieces of 2×6 lumber 96” long SIDES
- C – 50 pieces of 3” galvanized screws SCREWS
- D – 4 pieces of 2×6 lumber 51” long FRONT AND BACK FACES
- E – 2 pieces of 1×4 lumber 101” long, cut at 45º at both ends SIDE TRIM
- F – 2 pieces of 1×4 lumber 54 1/2” long, cut at 45º at both ends FRONT TRIM
- G – 30 pieces of 2” nails NAILS
[/tab]
[tab id=2]
- Hammer, Tape measure, Framing square
- Miter saw, Drill machinery, Screwdriver, Sander
- Safety Gloves, Safety Glasses
[/tab]
[tab id=3]
- 4 Hours
[/tab]
[/tabs]
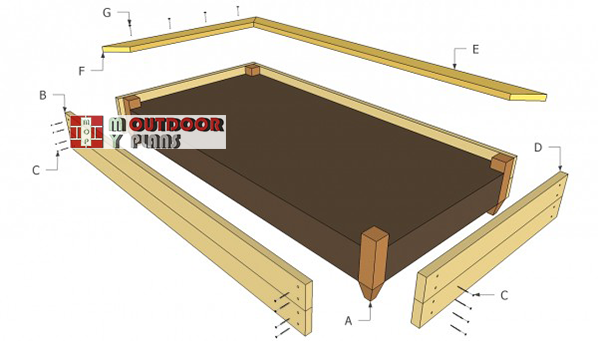
Outdoor raised bed components
Building-a-raised-garden-bed
If you want to grow organic vegetables in your own garden, you should consider building a rectangular raised bed and fill it with soil. In order to get the job done in a professional manner, you should use 2×6 beams, 4×4 posts and several 1×4 trims.
Top Tip: In order to get a nice appearance, we recommend you to sand the cut edges of the boards with a sand block, and to hide them by placing 1×4 trims. Fill the head of the screws with wood putty and sand the surface with average-grit sandpaper.
Raised bed plans

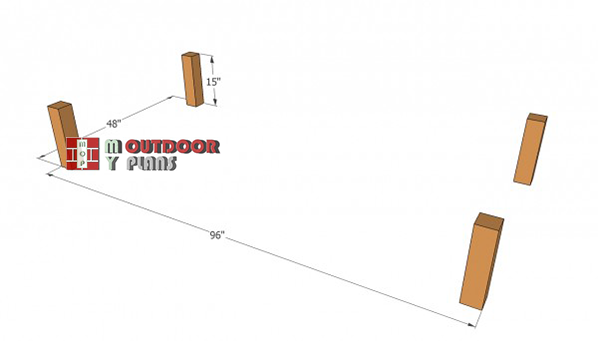
Raised bed post plans
First of all, you have to build the four corner posts of the raised bed, as in the free plans. Work with good judgement and cut the ends of the posts, as in the image, using a circular saw.
In order to get the job done in a professional manner, we recommend you to build the four identical posts. The bottom section of the 4×4 posts will be stuck in the ground, therefore it should have a sharp shape.
Installing-the-posts-for-garden-bed
You could adjust the size of the raised bed according to your needs, therefore you should know the plants you are going to grow, from the very beginning. Our free plans are about a 4×8′ mid-sized planter.
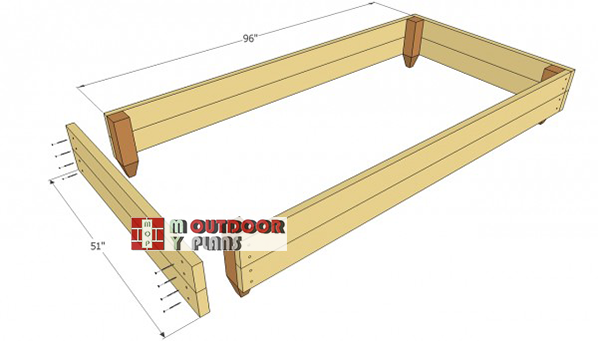
Top Tip: If you want to get a professional result, we recommend you to build the sides of the bed and afterwards attach the front and the back sides. In addition, work on a level surface, otherwise the corners won’t be square.

Attaching the side slats
Cut the 2×6 wooden boards at 96” at attach them to the 4×4 posts. As you can see in the image, you have to drill pilot holes at the end of the slats and drive in 3” screws. Don’t leave any gap between the 2×6 boards.
Plumb the boards with a spirit level and align them at both ends, before inserting galvanized screws. In addition, leave at least 1” from the edges of the boards, to prevent the wood from splitting.
Installing-the-wall-slats
After you have built both sides of the raised bed, you should attach the front and back ends. Lock the whole structure together with C-clamps, before driving in the screws.
Top Tip: Work with great attention when installing the front and back faces of the bed. Plumb the fame with a spirit level, check the corners for squareness with a framing square and lock the boards into place with several C-clamps.

Raised bed plans
Place 1×4 trims at the top of the raised bed, in order to hide the edges. Lock the trims into place with finishing nails, and hide their heads with wood putty. Let the compound to dry out properly, before sanding the surface with medium-grit sandpaper.
Top Tip: Fill the planter with soil and plant vegetables in the raised bed. Apply several coats of non-toxic paint over the exterior faces, to protect the wood from water damage.
This woodworking project is about raised bed plans. If you want to see more outdoor plans, we recommend you to check out the rest of our step by step projects.
EXPLORE MORE IDEAS FOR:
 |
 |
 |
 |