Looking for a practical yet stylish addition to your garden? My latest project is a 3-tier planter box stand plans with a built-in storage shelf, combining the best of function and aesthetics. Whether you’re a seasoned DIYer or just starting out, this build will be a perfect way to display your plants while keeping your gardening tools neatly organized! Take a look over the rest of my woodworking plans, if you want to get more building inspiration. Premium Plans for this project available in the Shop.
This 1 side 3-tier planter stand with a storage shelf is an affordable and straightforward project, perfect for a weekend build. You can expect to spend around $50-$75 on materials, depending on the type of wood and finish you choose. With basic tools and a little bit of elbow grease, you should be able to complete this project in about 4-6 hours. It’s a budget-friendly and time-efficient way to add some charm and functionality to your outdoor space!
For this project, I recommend using cedar or hardwood for their durability and natural resistance to the elements. Cedar is a fantastic option because it’s lightweight, rot-resistant, and has a beautiful, rustic look. Hardwood, on the other hand, provides superior strength and longevity, making your mailbox stand a sturdy and stylish addition to your home.
Projects made from these plans
3 Planter Box Stand – Free PDF Download
Building-a-tiered-planter
Cut and Shopping Lists
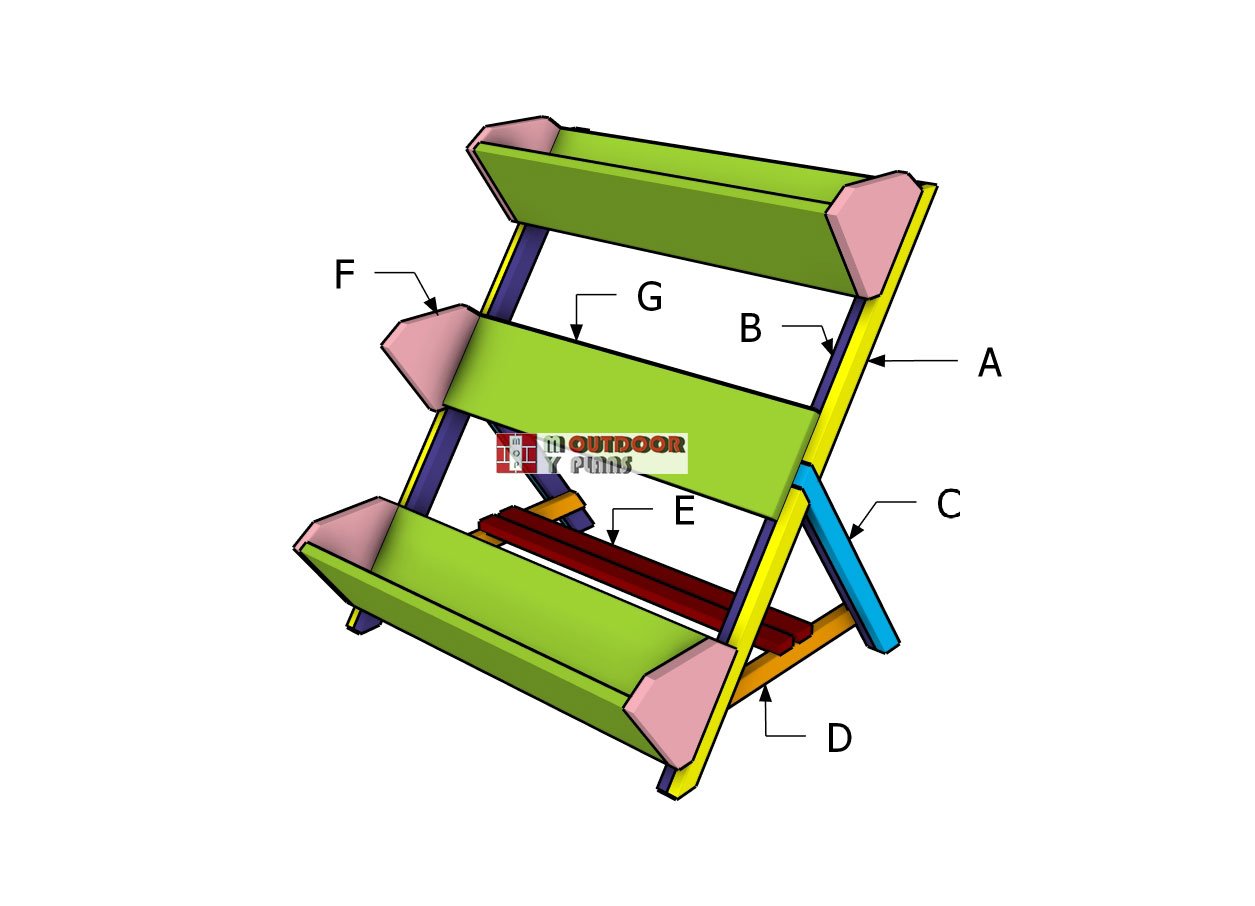
A – Double Legs – 1×2 lumber 20 1/2″ long – 4 pieces
B – Legs – 1×2 lumber 42″ long – 2 pieces
C – Double Legs – 1×2 lumber 22 1/8″ long – 2 pieces
D – Supports – 1×2 lumber 21 5/8″ long – 2 pieces
E – Shelf – 1×2 lumber 29″ long – 5 pieces
F – Planter Sides- 1×8 lumber 30 1/2″ long – 6 pieces
G – End Boards – 1×8 lumber 9 1/2″ long – 6 pieces
- 1×2 lumber 8 ft – 4 pieces
- 1×2 lumber 10 ft – 1 piece
- 1×8 lumber 8 ft – 3 pieces
- 1 5/8″ screws – 80 pieces
- 1 1/4″ screws – 30 pieces
- Wood glue – 1 can
- Stain – 1 can
Tools
![]() Hammer, Tape measure, Framing square, Level
Hammer, Tape measure, Framing square, Level
![]() Miter saw, Drill machinery, Screwdriver, Sander
Miter saw, Drill machinery, Screwdriver, Sander
Time
![]() One weekend
One weekend
Related
Pin for Later!

Building the stand frame
Side-legs-for-planter-stand
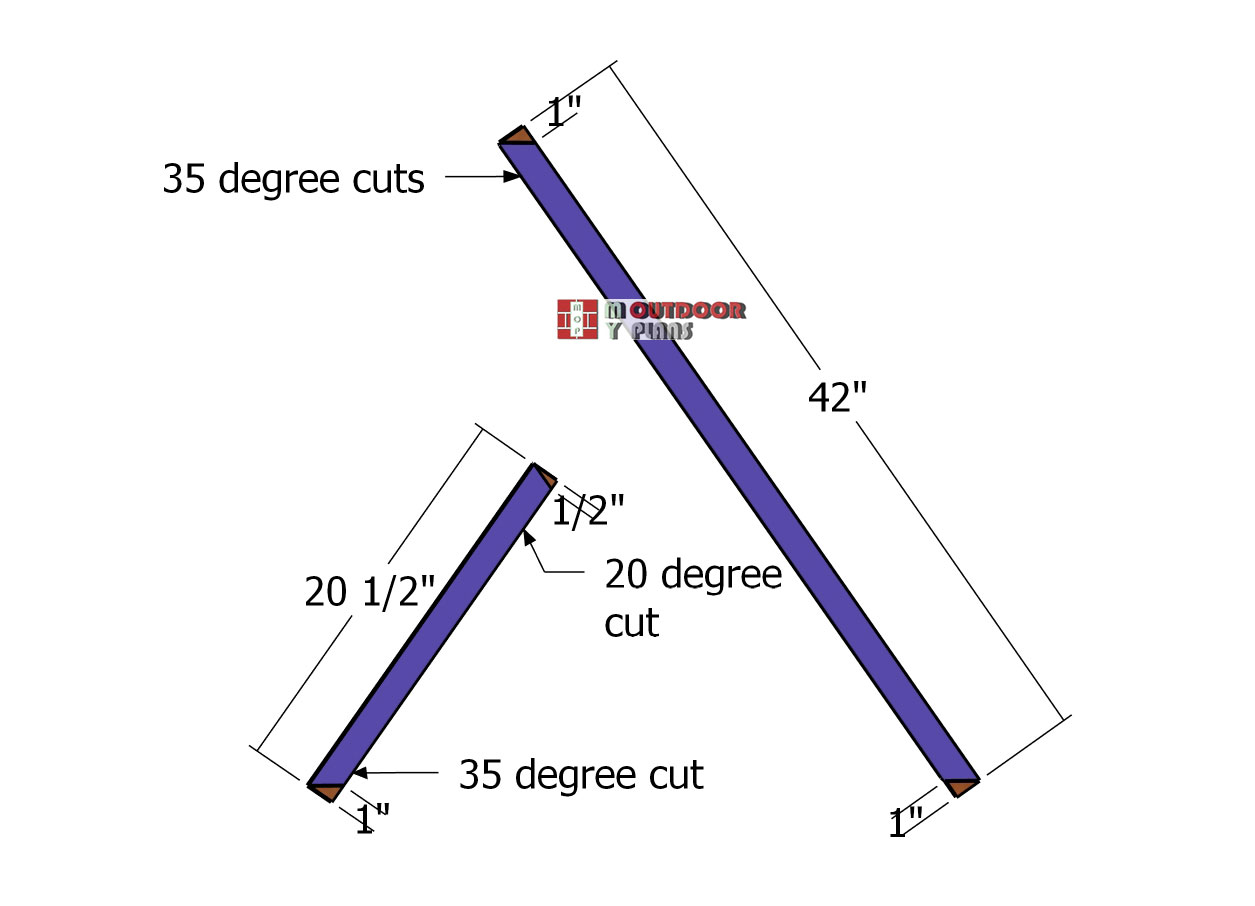
Alright, let’s kick things off by cutting the pieces for the side legs. Take some 1×2 lumber and cut the front legs with a 35-degree angle on both ends.
For the back legs, you’ll want to make 20-degree cuts on each end. Don’t forget to sand those edges down for a nice, smooth finish; this step adds a professional touch and helps avoid any pesky splinters!
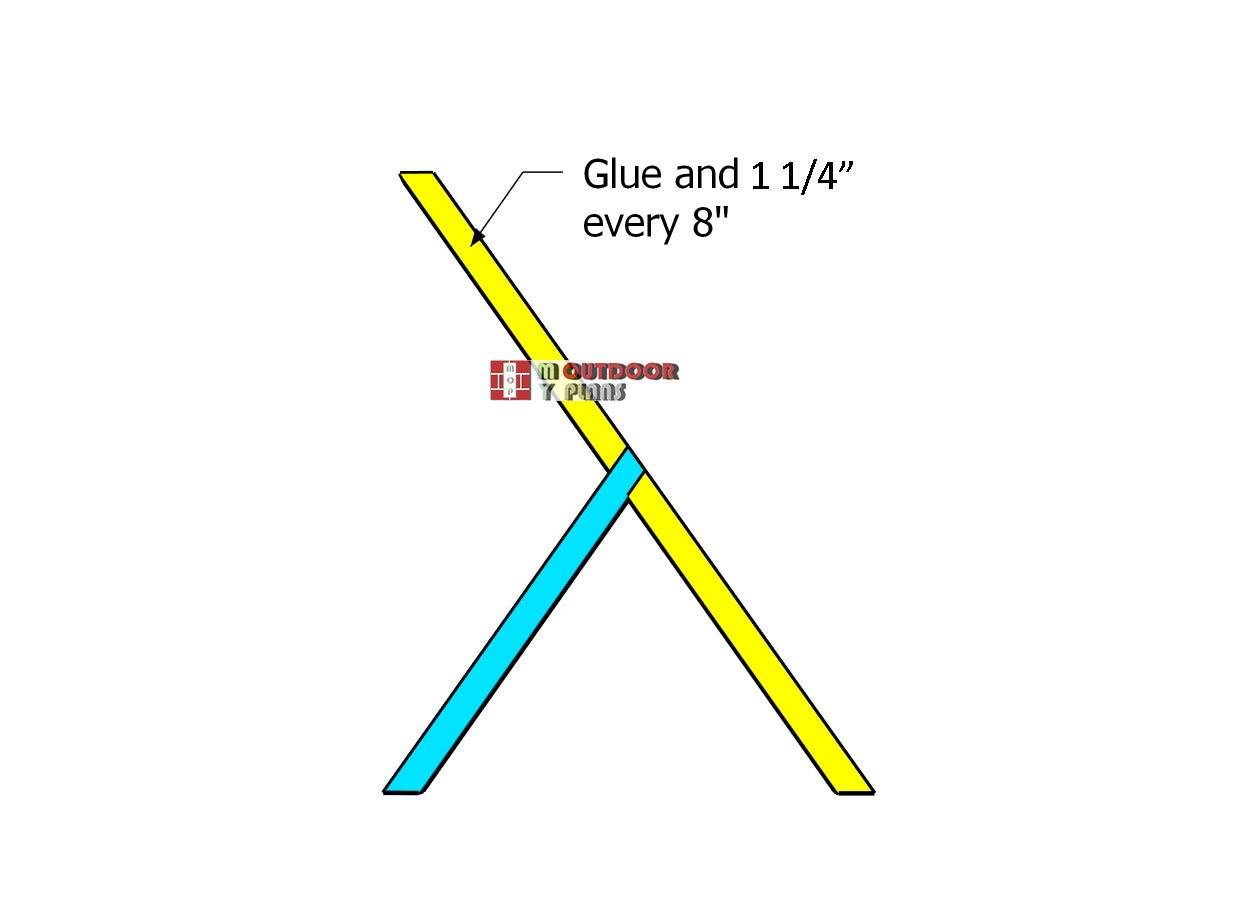
Assembling-the-side-legs
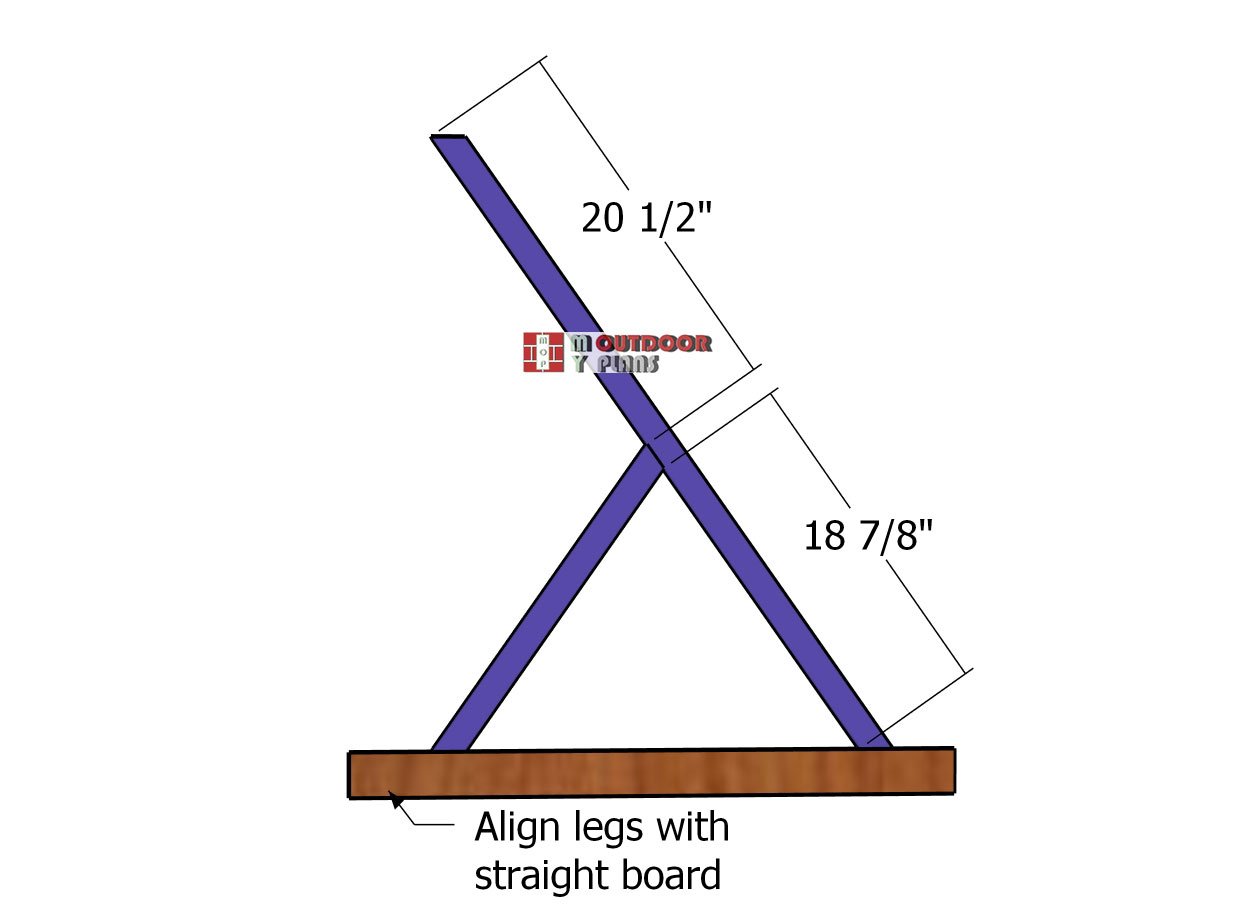
Next, we’re going to put together the two side frames. Lay all the pieces out on a flat surface, making sure everything lines up just right. Use a straight edge to double-check that the bottoms of the legs are perfectly in line. Once that’s done, align the legs with each other just like shown in the diagram.
Double-legs
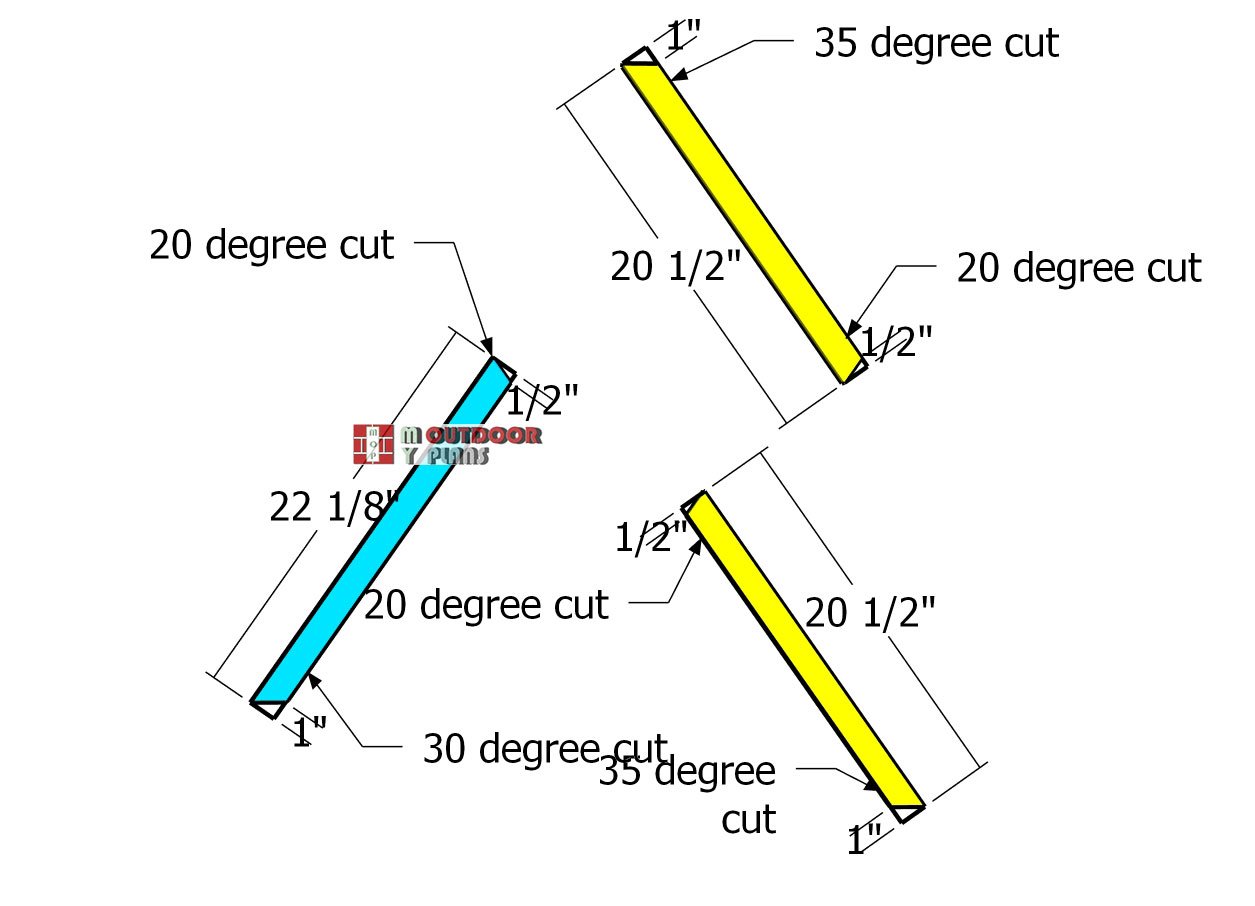
Now, let’s move on to cutting the double legs. Grab your miter saw and make angled cuts on both ends of each piece for a perfect fit. After cutting, be sure to smooth out the edges so everything is nice and flush, making it ready for assembly.
Fitting-the-double-legs
Now, it’s time to attach the double legs to the frames. Ensure the edges are flush, and apply some wood glue to the joints for added strength. Next, drill pilot holes and secure the supports with 1 1/4″ screws, spacing them about 8 inches apart. This will give your project a rock-solid and sturdy build!
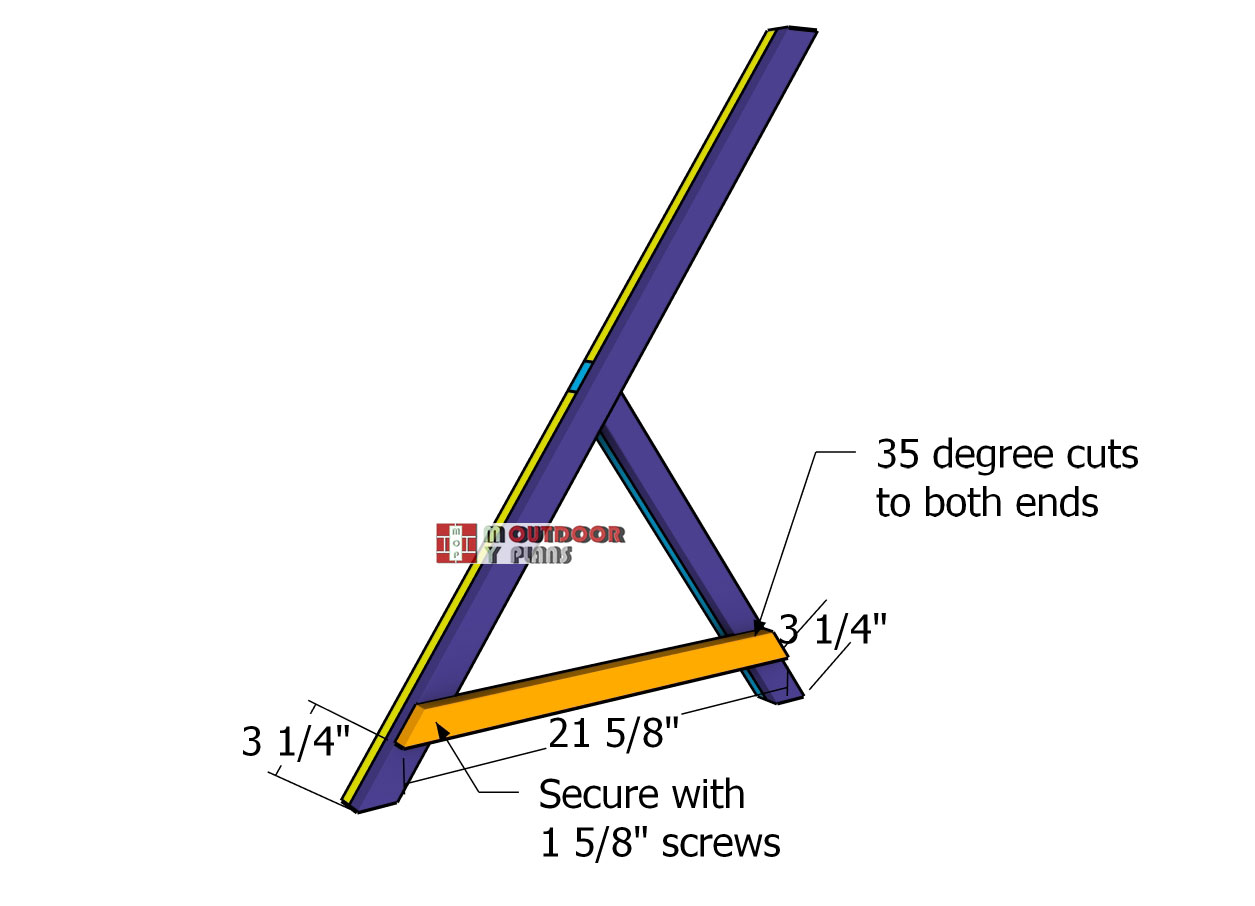
Base-supports
Once your frames are put together, it’s time to finish up the side frame for the stand. Grab some 1×2 lumber to create the bottom support. Make 35-degree cuts on both ends of the supports. Align the edges so they’re flush, then drill pilot holes and secure them with 1 5/8″ screws. Use two screws per joint to make sure everything is locked in tight.
Building the planter boxes

End boards
Next up, we’ll build the planter for the garden herb stand. Take your 1×8 boards and mark the cut lines based on the diagram. Use a saw to make the cuts, and then smooth out the edges to ensure a clean, flush finish.
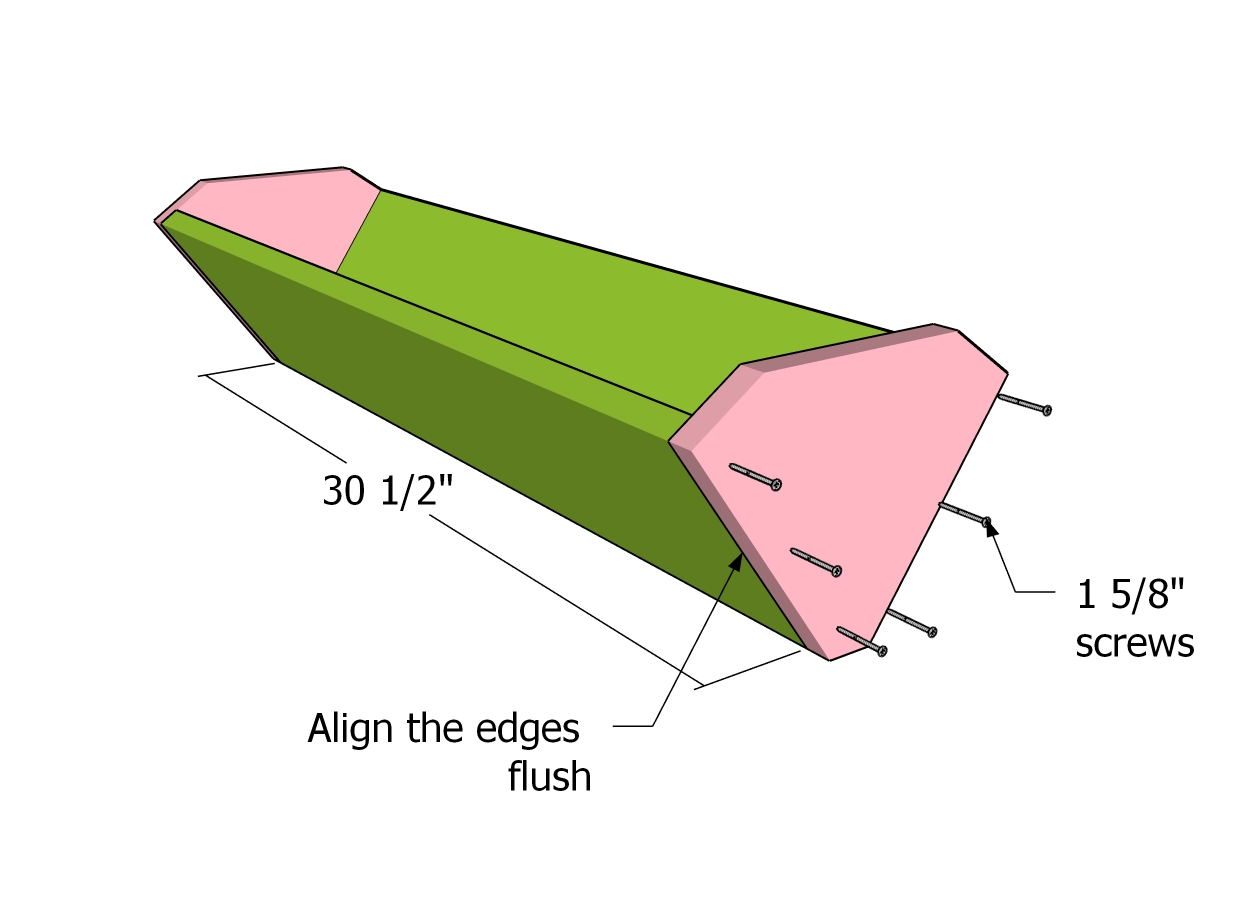
Assembling the planters
Assemble the planters by attaching the side boards, making sure the edges are perfectly flush with no gaps between the pieces. Start by drilling pilot holes, then secure everything with 1 5/8″ screws, just like in the diagram. This will ensure your planters have a neat and sturdy finish!
Fitting-the-planters
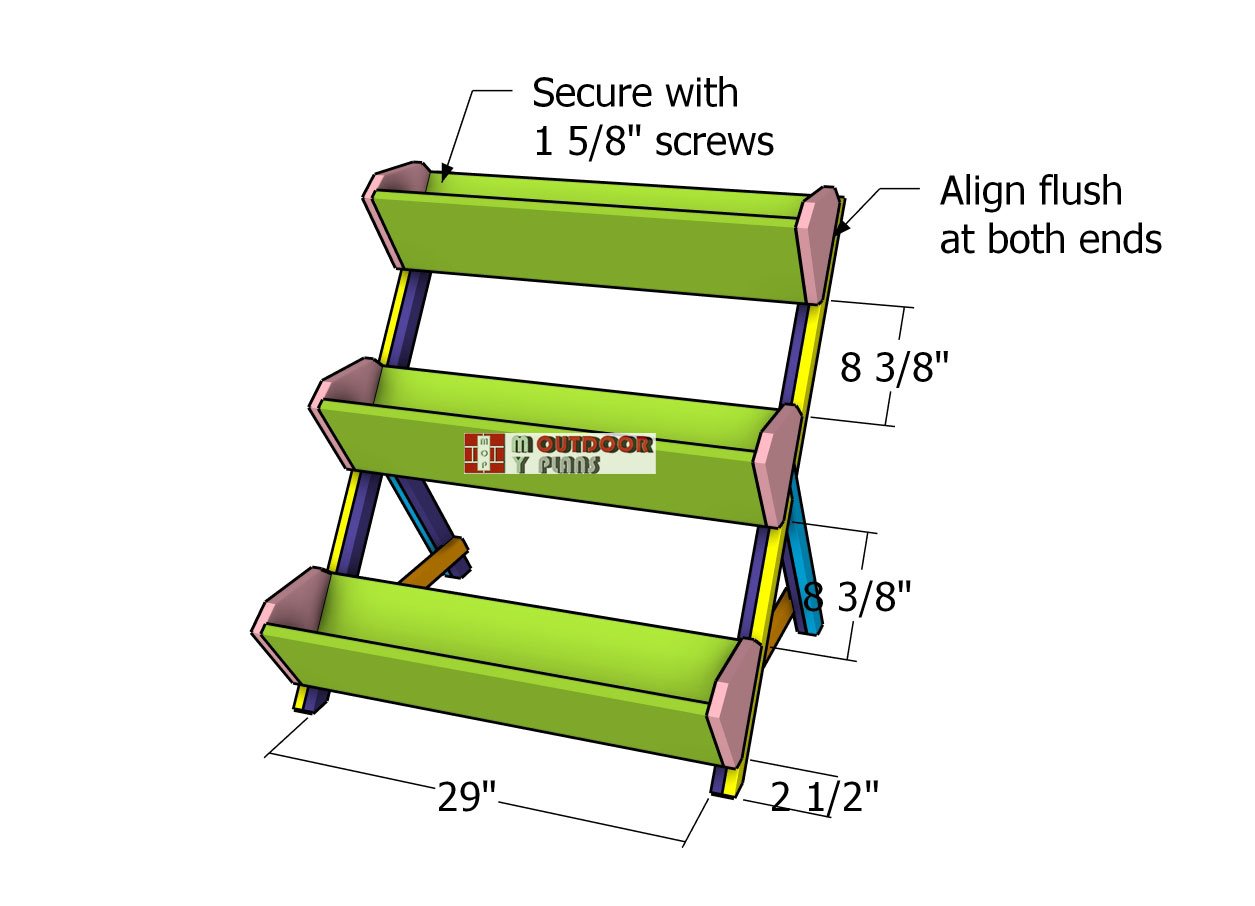
Attach the planter boxes to the stand using 1 5/8″ screws. Make sure the frames are aligned flush with the planter boxes, just like in the diagram. Drill pilot holes first, then insert the 1 5/8″ screws to secure everything tightly in place.
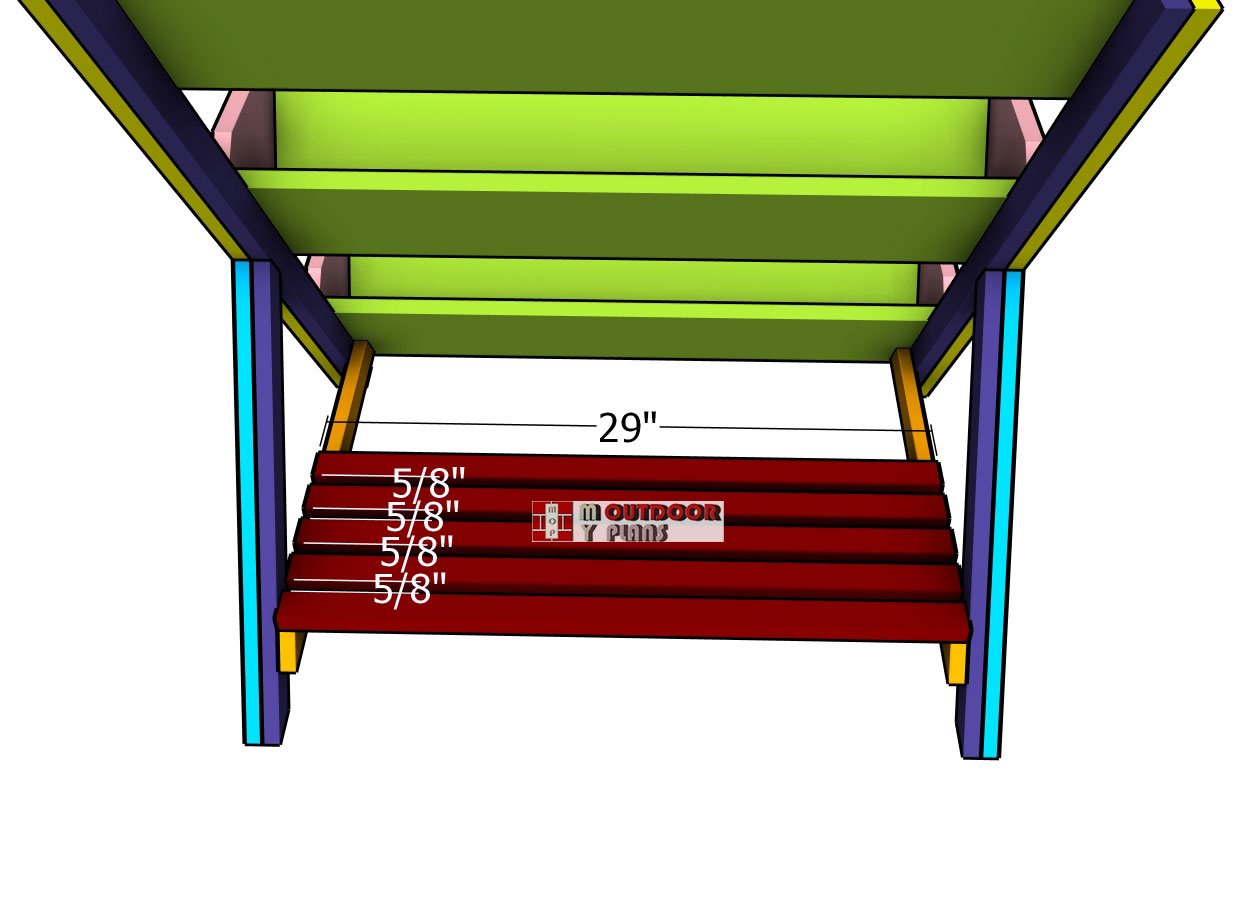
Shelf-slats
Fit the 1×2 slats onto the lower shelf, making sure both ends are aligned flush with the supports. Use a 5/8″ spacer between the boards to create even gaps. Drill pilot holes, then secure the slats to the supports with 1 5/8″ screws to keep everything locked in place.
The lower shelf provides convenient storage space for gardening tools, pots, and other essentials, keeping everything you need within easy reach. It also adds extra stability to the planter stand, making it both functional and sturdy for your outdoor projects.
Finishing touches – 1 Side Planter Woodworking Plans
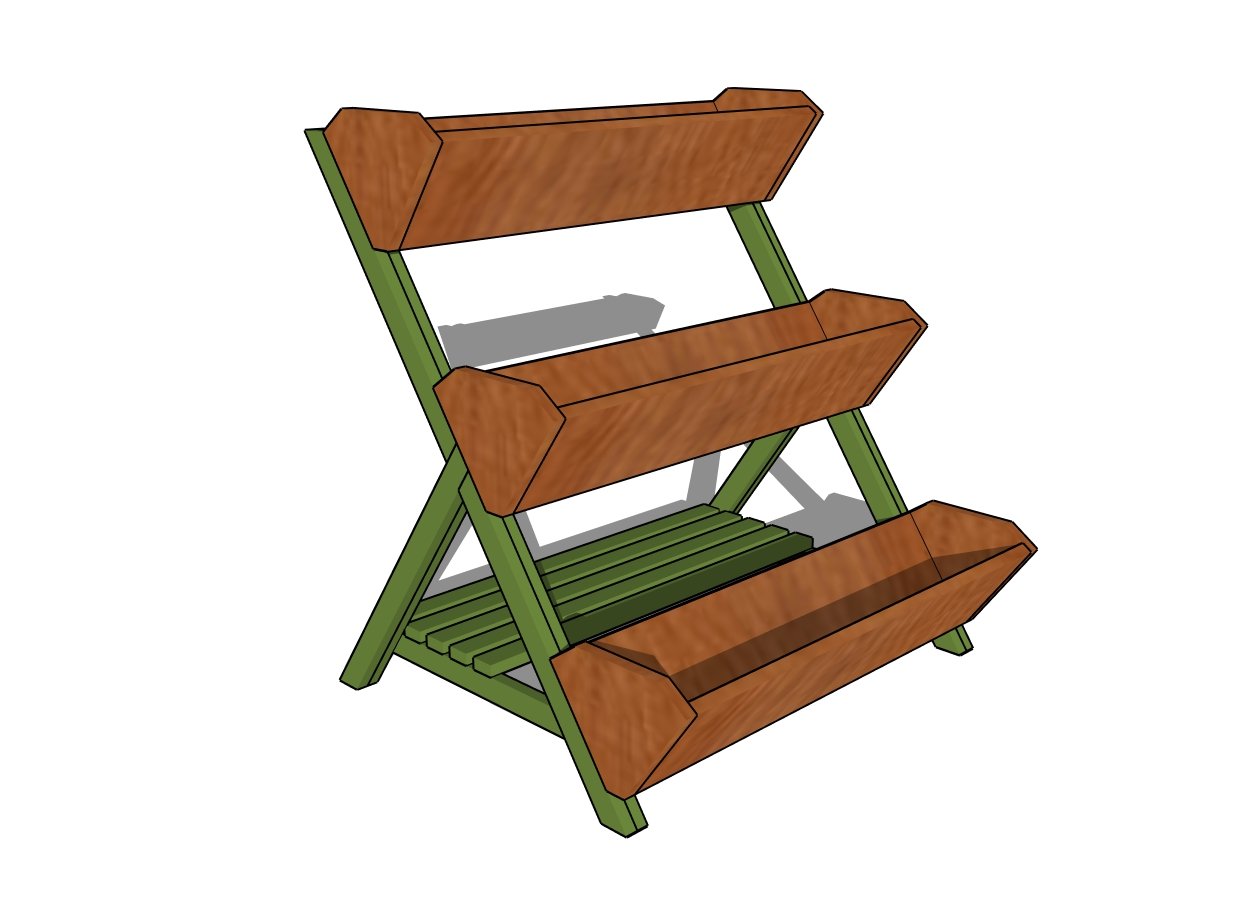
3 tier planter plans
Now that your 3-tier double-sided planter is built, let’s move on to the finishing touches. Start by giving it a good sanding to smooth out any rough edges and prep it for staining or painting. Choose a weather-resistant stain or paint that not only protects the wood but also matches your outdoor decor.
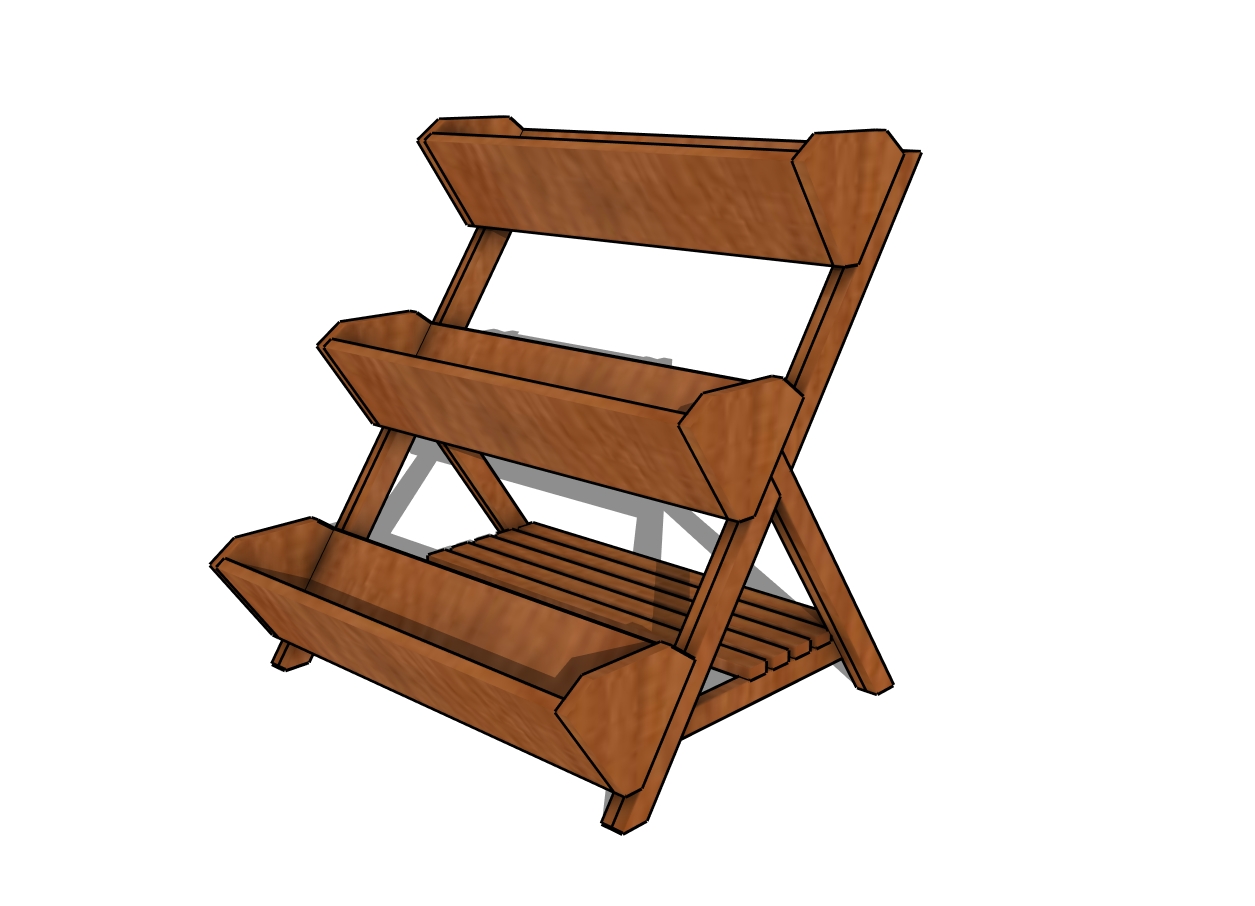
3 tier garden planter plans
Finally, consider adding some extra flair like a topcoat of sealant for durability or even some stenciled designs to give your planter a personalized touch that’ll really make it stand out!
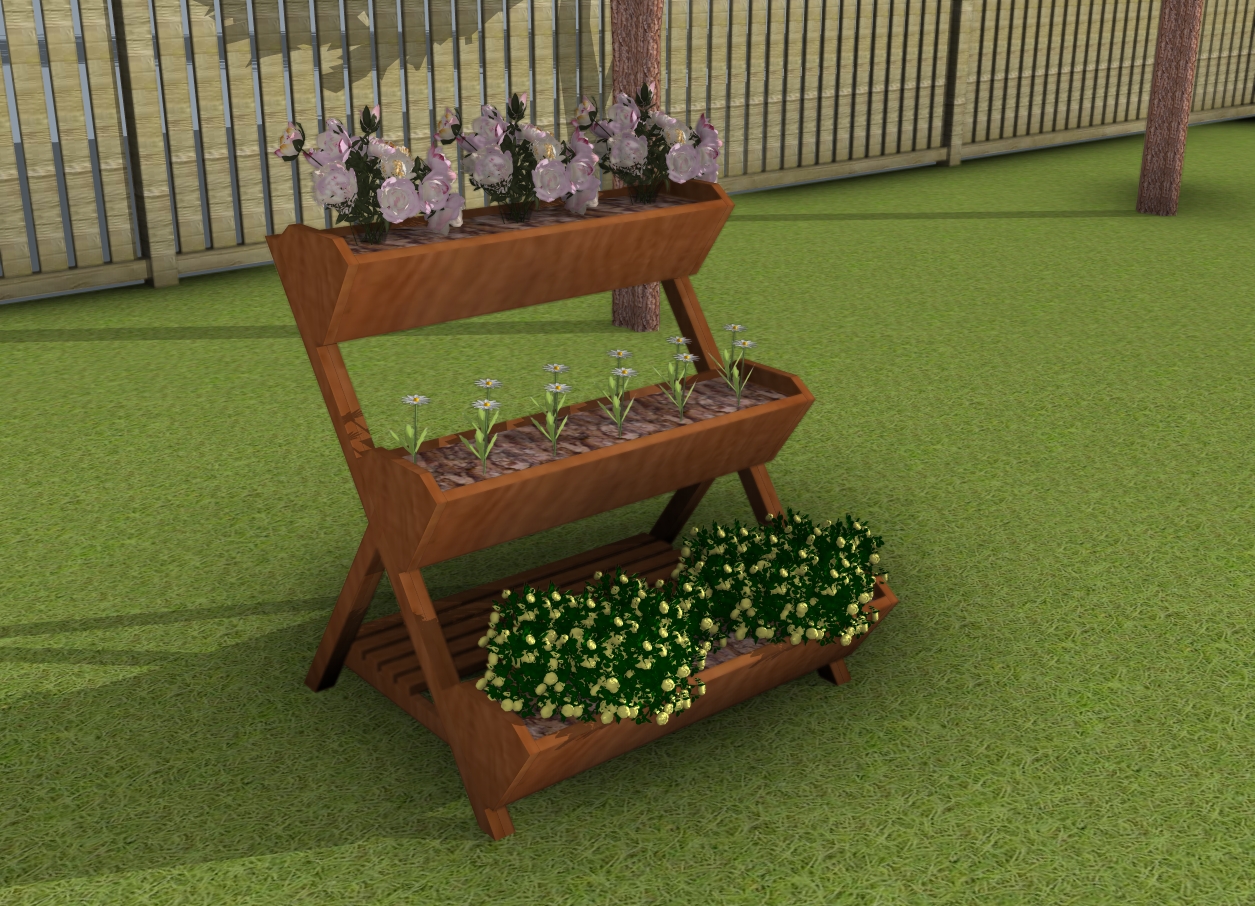
DIY garden planter plans
This 3-tier, one-sided planter is a fantastic project to tackle if you’re looking to enhance your woodworking skills while creating something truly functional. With the detailed woodworking plans, you’ll find it easy to build a sturdy and stylish planter that not only looks great but also offers plenty of space for your favorite plants.
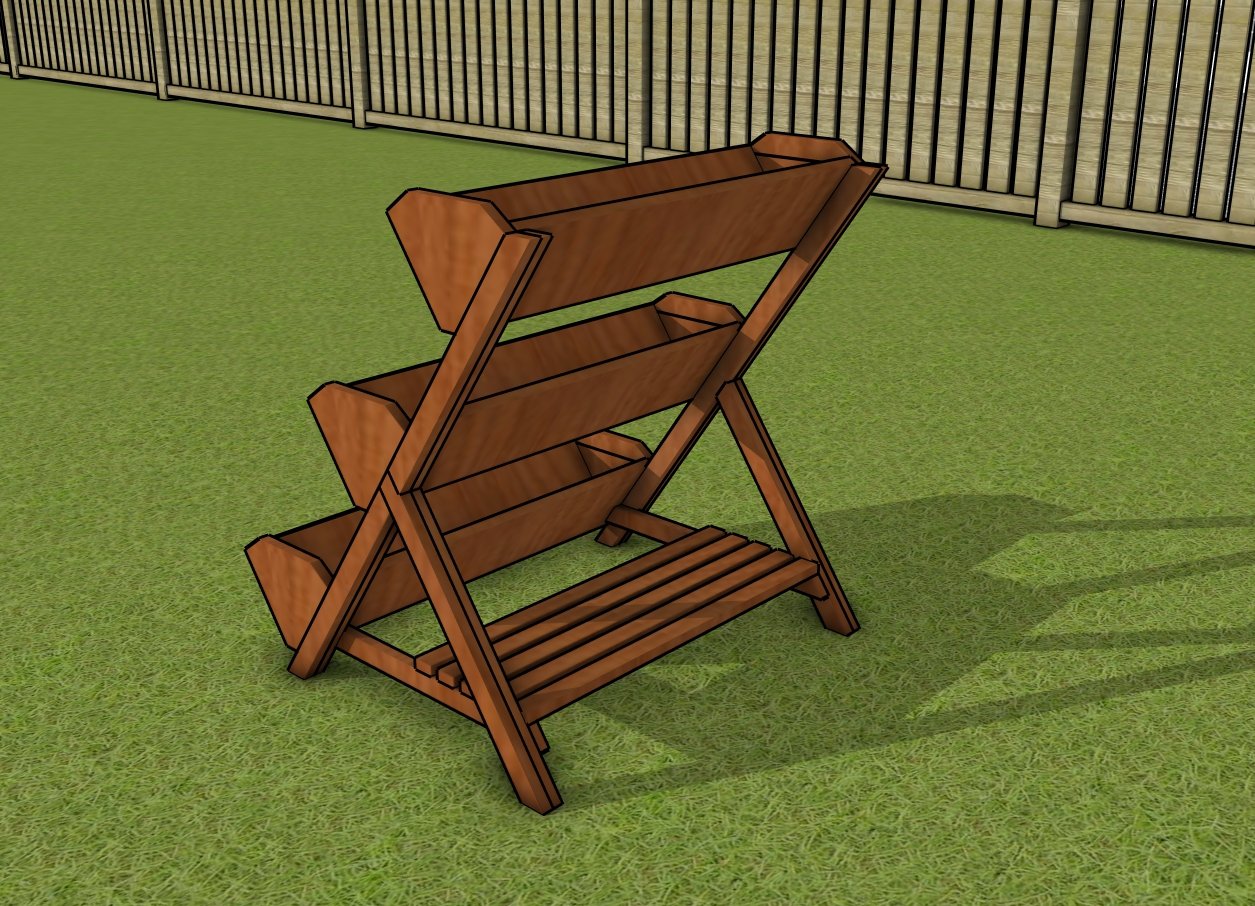
3 Garden planter – back view
With your 3-tier double-sided planter complete and looking fantastic, you’ve created a functional and beautiful addition to your garden or patio. Whether you’re growing herbs, flowers, or even small veggies, this planter will showcase your green thumb while adding a touch of handcrafted charm to your outdoor space. Now it’s time to sit back, relax, and watch your plants thrive in their new home!
If you want to get the Premium plans with all the extras, just press the GET PREMIUM PLANS button bellow. If you want to get the free plans, just read the blog FAQs.

This woodworking project was about DIY 3 planter stand plans. If you want to see more outdoor plans, check out the rest of our step by step projects and follow the instructions to obtain a professional result.