This step by step diy project is about rectangular gazebo plans. Building a rectangular gazebo is easy and it will add value to your backyard, but it is a little more complex that building a square structure. Always plan everything form the very beginning if you want to get a professional result. In addition, a proper planning could prevent many costly mistakes. Select the materials with great care, making sure the components are straight and in a good visible condition.
In most of the cases a building permit is required, so you should check out the local building codes before starting the actual constructions. There are many legal requirements you have to comply with, starting from the depth of the footings up to the height of the railings. In addition, the building codes could give you useful information regarding the materials you have to use for yoru gazebo project. See all my Premium Plans HERE.
Projects made from these plans
Cut Lists
- A – 8 pieces of 4×4 lumber – 100″ POSTS
- B – 2 piece of 2×6 lumber – 144″, 2 pieces – 189″ RIM JOISTS
- B – 4 pieces – 66 1/4″, 1 piece -182″, 2 piece – 89 1/2″ MIDDLE JOISTS
- C – 10 pieces of 2×6 – 69 3/4″ long, 8 pieces of 2×6 – 93” long JOISTS
- D – 40 pieces of 2×4 lumber – 96” long, 52 pieces of 2×4 lumber – 72′” long DECKING
- E – 9 pieces of 2×4 lumber – 89 1/4” long, 12 pieces – 65 1/4″ long CLEATS
- F – 200 pieces of 2×2” lumber – 30-34 1/2” long BALUSTERS
- 1000 pieces of 2 1/2″ screws
- 100 pieces of 1 1/4″ screws
- tar paper, asphalt shingles
- wood glue, stain/paint
- wood filler
Tools
![]() Hammer, Tape measure, Framing square
Hammer, Tape measure, Framing square
![]() Miter saw, Drill machinery, Screwdriver, Sander
Miter saw, Drill machinery, Screwdriver, Sander
Time
Related
- Part 1: Rectangular Gazebo Plans
- Part 2: How to build a gazebo roof
Building a rectangular gazebo
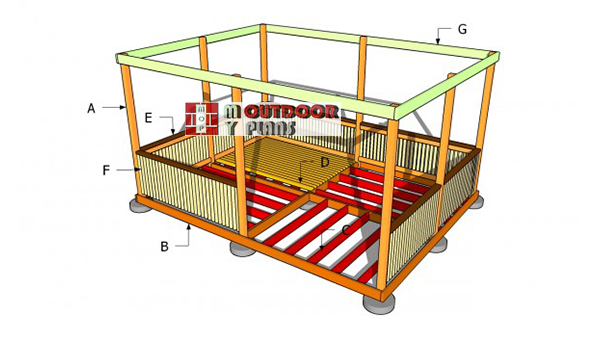
Building-a-rectangular-gazebo
Top Tip: Building a rectangular gazebo is somehow different to building a square gazebo, but any person with average woodworking skills can get the job done. Due the high amount of information, we will split the project in two parts. While in the first section we highlight the plans for the frame, in the second one we focus on the roof of the gazebo.
Rectangular Gazebo Plans
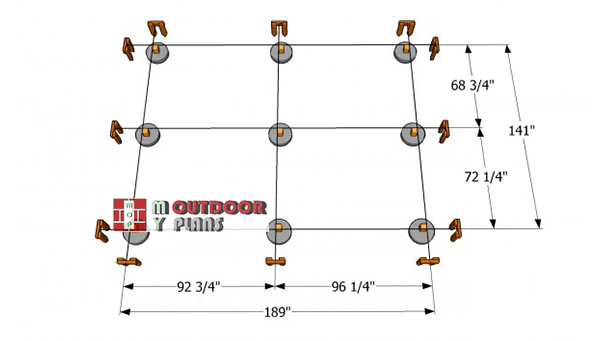
Laying-out-a-rectangular-gazebo
The first step of the project is about laying out the rectangular gazebo. These plans are about a 12×16 gazebo, so you need to adjust the dimensions and the distance between the footings, if you change the size of the construction.
Use batter boards and strings to get a professional result. Measure the diagonals and apply the 3-4-5 rule to each corner, if you want to make sure the corners are right-angled.

Anchoring the post into concrete
There are many alternatives when fitting the posts into place. On one hand you could set the posts directly into concrete, while on the other hand you could use post anchors.
Top Tip: Irrespective of your choice dig 2-3′ deep holes, about 6-8” in diameter. Fit tube forms, install the posts and pour concrete. Secure them temporarily with 2×4 braces after making sure the posts are perfectly plumb.
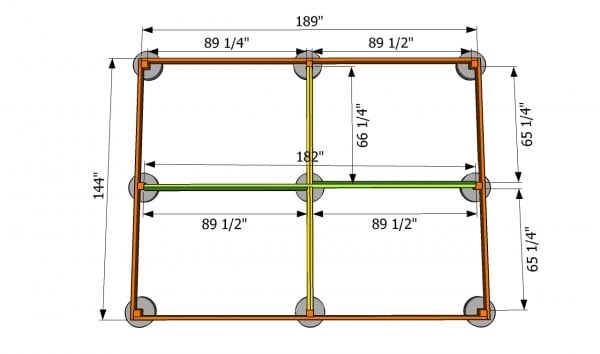
Installing the rim joists
The next step of the project is to install the rim joists. As you can see in the image, you should secure the 2×6 lumber to the posts, as well as the middle joists. After cutting the rim joists at the right size, you should lock them to the posts with 3″ galvanized screws.
Drill pilot holes to prevent the wood from splitting. Install the middle joists to the posts, as in the image. Pre-drill the lumber and lock the joists with 3″ screws.
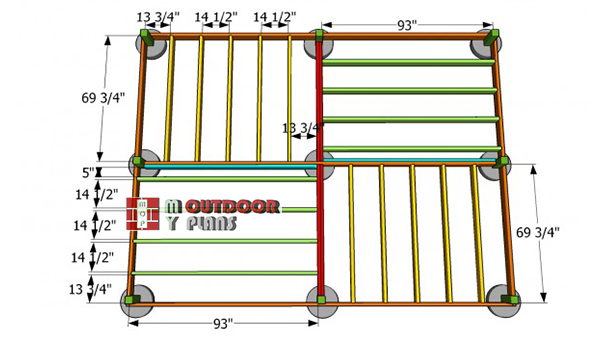
Installing-the-floor-joists
Continue the woodworking project by installing the intermediate joists. In order to support your weight efficiently, you should place the joists every 16″ on center. Use a spirit level to check if the joists are horizontal.
In addition, we recommend you to use joist hangers or to drill pilot holes trough the rim joists and insert 3 1/2″ galvanized screws. It is essential to place the joists equally spaced, if you want to distribute the weight properly.
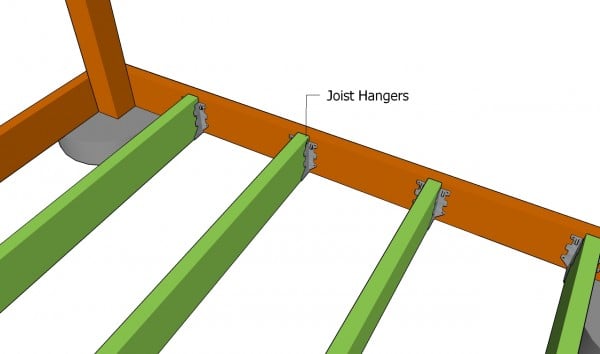
Fitting the joists
As you can see in the image, we recommend you to use metal joist hangers when securing the intermediate joists into place. Work with attention, if you want to get a professional result.
As you can see in the image, we recommend you to use metal joist hangers when securing the intermediate joists into place. Work with attention, if you want to get a professional result.
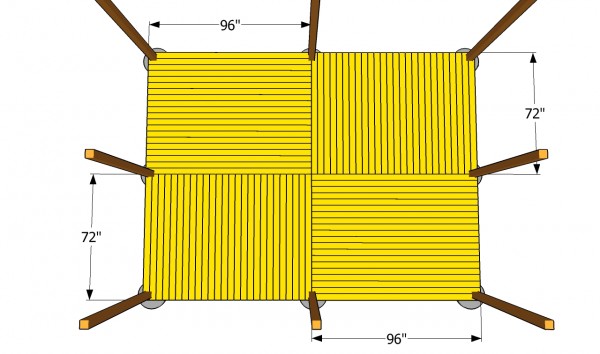
Installing the decking
Next, you should fit the 2×4 decking to the frame of the rectangular gazebo. As you can see in the image, you should follow the pattern, as to add style and character to your project. Notch the slats to fit around the posts, in order to get an accurate result.
Drill pilot holes trough the slats and lock them into place with 2 1/2″ screws/nails. Make sure you place a nail between the slats, at both ends, in order to get consistent gaps. Countersink the head of the screws, as to get a nice appearance.
Building Gazebo Railings
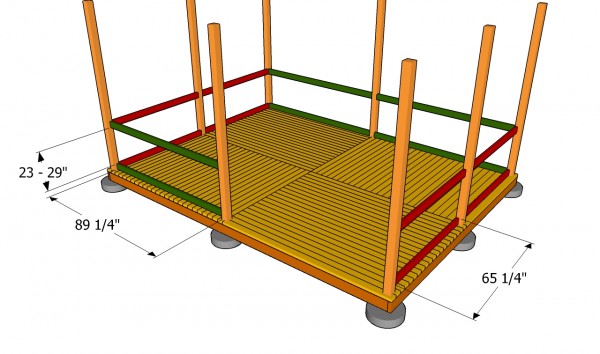
Fitting the cleats
The nest stage of this woodworking project is to build the railings for the gazebo. In order to get the job done easily, you should fit the 2×4 cleats as in the image. Cut the components at the right size and lock them to the posts with screws, after leveling them with a spirit level.
Top Tip: Usually the height of the railing is about 36″, but you can always adjust it according to your needs and tastes. Nevertheless, make sure you comply with the building codes.
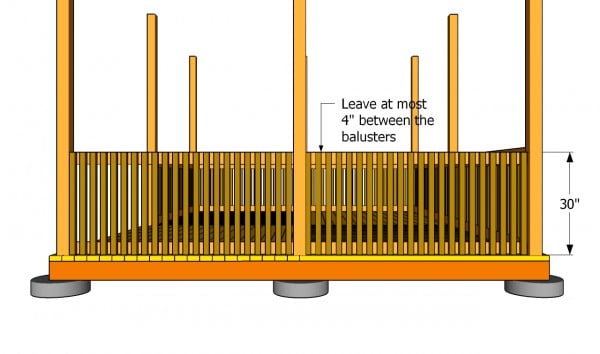
Installing the balusters
The nest step of the project is to fit the 2×2 balusters. Cut the components at the right size and attach them to the cleats with 2″ screws. Don’t forget to drill pilot holes, if you want to prevent the wood from splitting.
Place a piece of wood between the balusters, as to get consistent results. Anything between 1″ and 4″ is a good decision. If you let more than 4″ between the balusters, you child might get stuck.
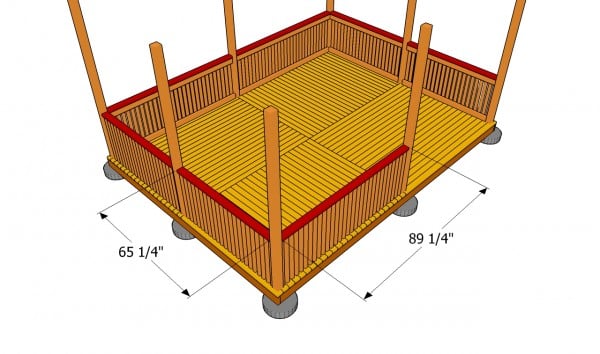
Installing the trims
Installing the 2×4 trims will most certainly add style to your project and enhance the look of the balusters. Round the exposed edges of the railings with router and a 3/4″ bit.
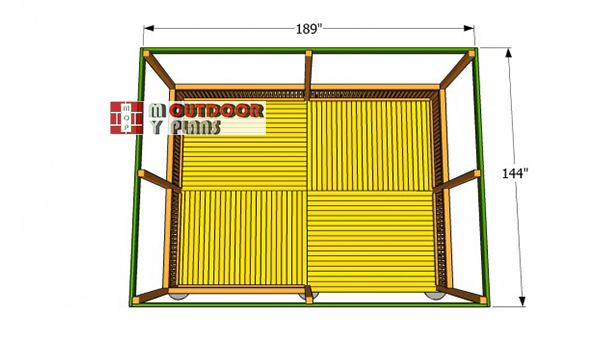
Fitting-the-top-rails
One of the last steps when building the frame of the rectangular gazebo is to fit the top rails. As you can see in the image, you need to cut the 2×4 or 2×6 lumber to the right size and secure them to the top of the posts. Drill pilot holes trough the components and lock them into place with galvanized screws.
Top Tip: Use a spirit level to check if the components are perfectly horizontal. Make sure you place the ladder on a sturdy surface.
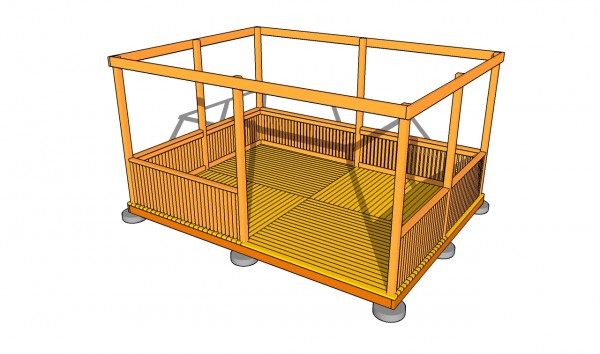
Rectangular gazebo plans
Last but not least, you should take care of the finishing touches. Therefore, check if the screws are inserted properly and if their heads are level with the wooden surface. In addition, use a spirit level to check if the components are properly aligned.
Top Tip: Don’t forget to check out the rest of the project, if you want to learn how to build the roof of the gazebo.
This diy project was about rectangular gazebo plans. If you want to see more outdoor projects, we recommend you to check out the rest of the free plans. LIKE us on Facebook to be the first that gets our latest updates and submit pictures with your DIY projects.


7 comments
Wanting plans for a gazebo for seniors 16×16 or rectangular
I don’t have plans for a 16′ wide gazebo.
Do you have plans for a 12 x 16 gazebo?
How about a 12 foot wide and 16 foot long rectangle gazebo
do you have this plan in 8 x 12..half of what it is now
No
how to connect the center?